Zoho Expense - Amazon Business Integration
Amazon Business is a marketplace exclusively designed to purchase business supplies. Business owners get access to a vast network of suppliers with quantity discounts, tax exempt purchases, and other features tailored to suit all types of business purchases.
Note: This integration is available for organizations with country as US in Zoho Expense.
How does the integration work
Zoho Expense fetches the invoice details of all the business purchases your employees make in Amazon Business and auto-creates expenses in Zoho Expense. If a user makes a purchase through the corporate card (Mastercard, Visa or Amex) which has a direct feed integration with Zoho Expense, the expense will be created in the user’s account automatically. Alternatively, if the user makes a purchase through other payment options, the admin can assign the expense to the user who made the purchase.
Key benefits
- Convert business purchases into expenses easily: All the purchases from Amazon Business will be created as expenses in Zoho Expense automatically.
- Line-item level visibility of your business purchases: Every purchase transaction will be automatically split into individual line-items within an expense.
- Get insights on your business purchases: Keep tabs on business purchases by getting an overview of the number of purchases made, the total amount spent, and the expense trends.
Set Up the Integration in Zoho Expense
- Click Admin View.
- Click the
Gear icon at the top right side.
(OR)
Go to Settings on the left sidebar. - Navigate to Other Apps under Integrations.
- Click Amazon Business.
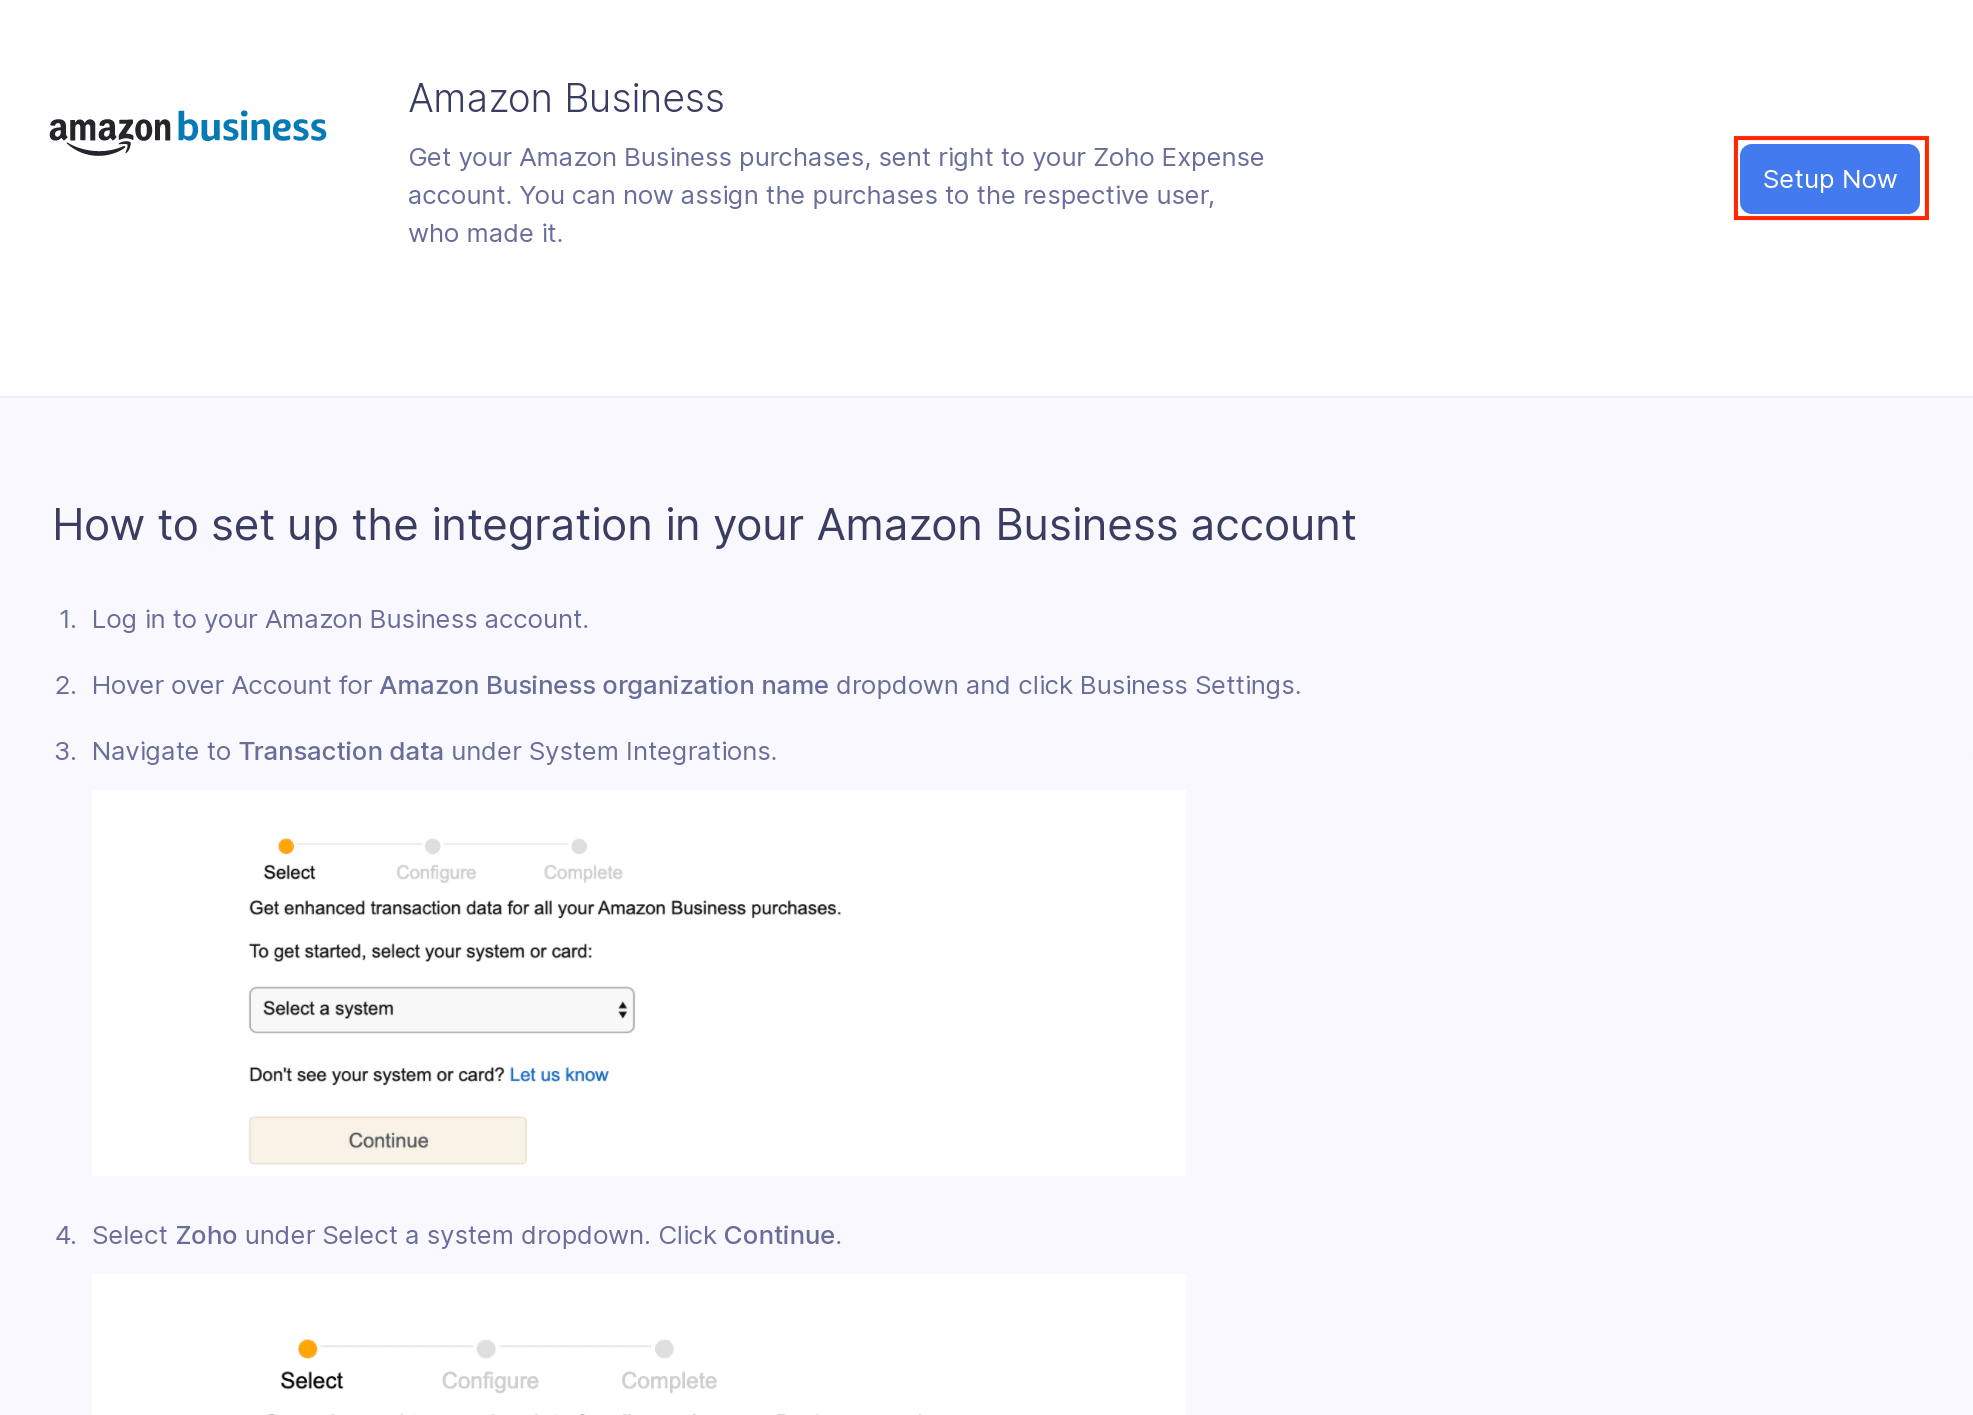
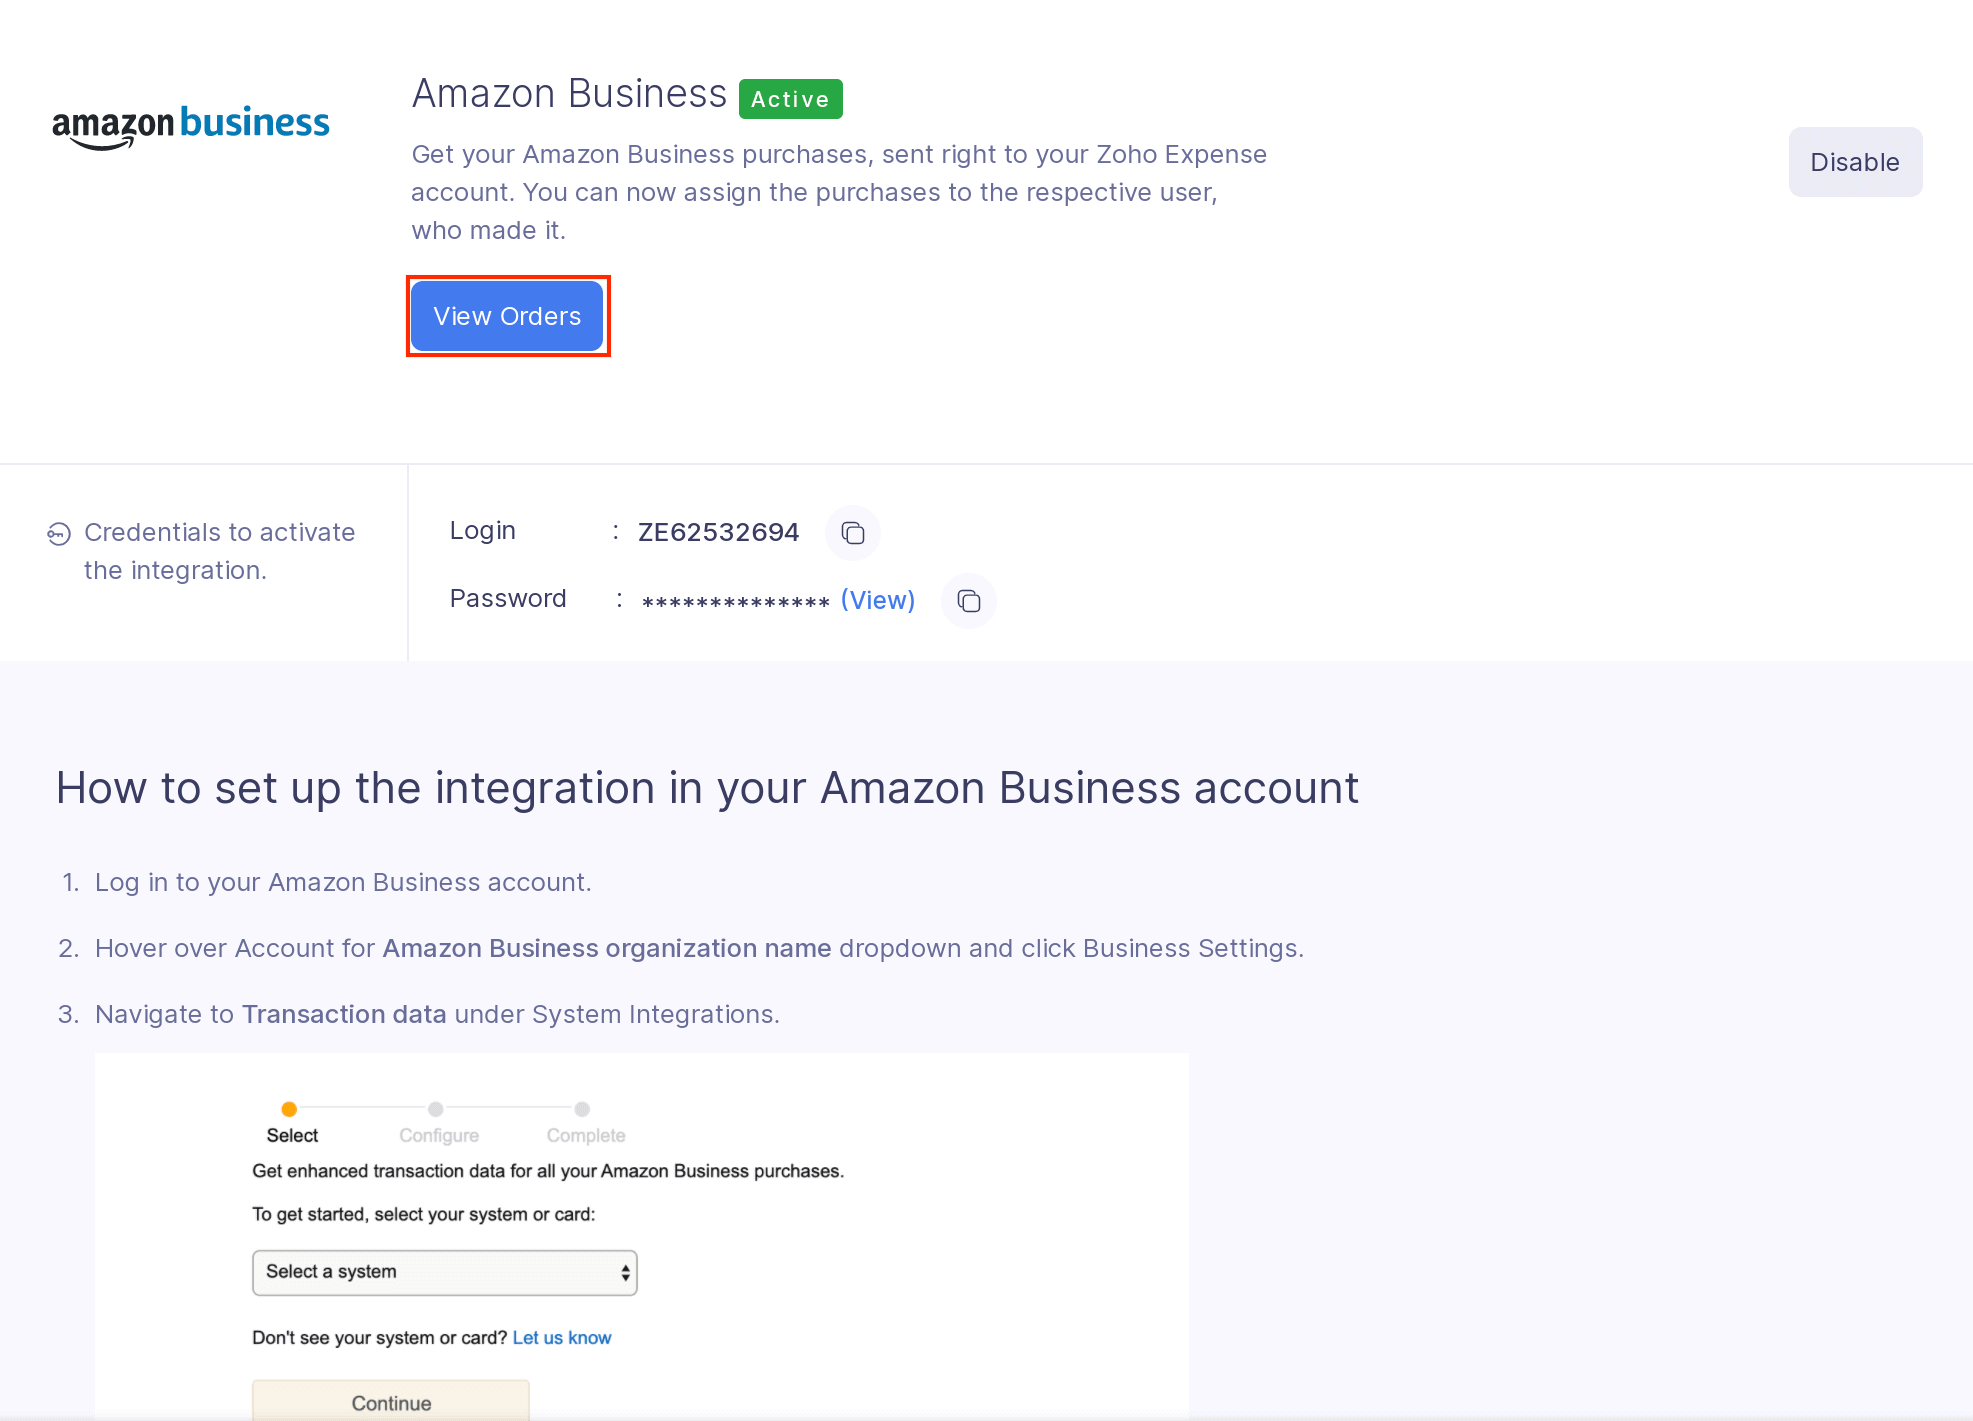
- Click Setup Now. The integration will be set up in Zoho Expense and the credentials to set up the integration in Amazon Business will be generated. But, you will have to configure the integration in Amazon Business to complete the set up and fetch the invoice details of the business purchases.
Set Up the Integration in Amazon Business
Once you set up the integration in Zoho Expense, you have to configure the integration in Amazon Business. Here’s how:
- Log in to your Amazon Business account.
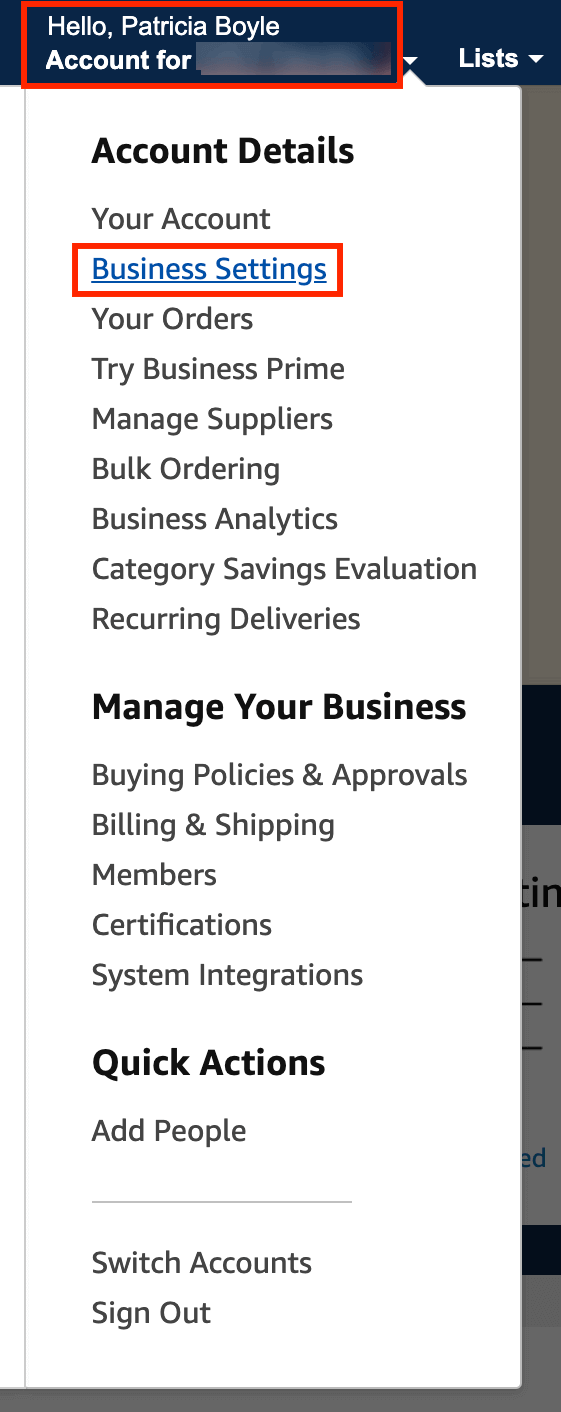
- Go to Business Settings under Account for “Amazon Business organization name” dropdown.
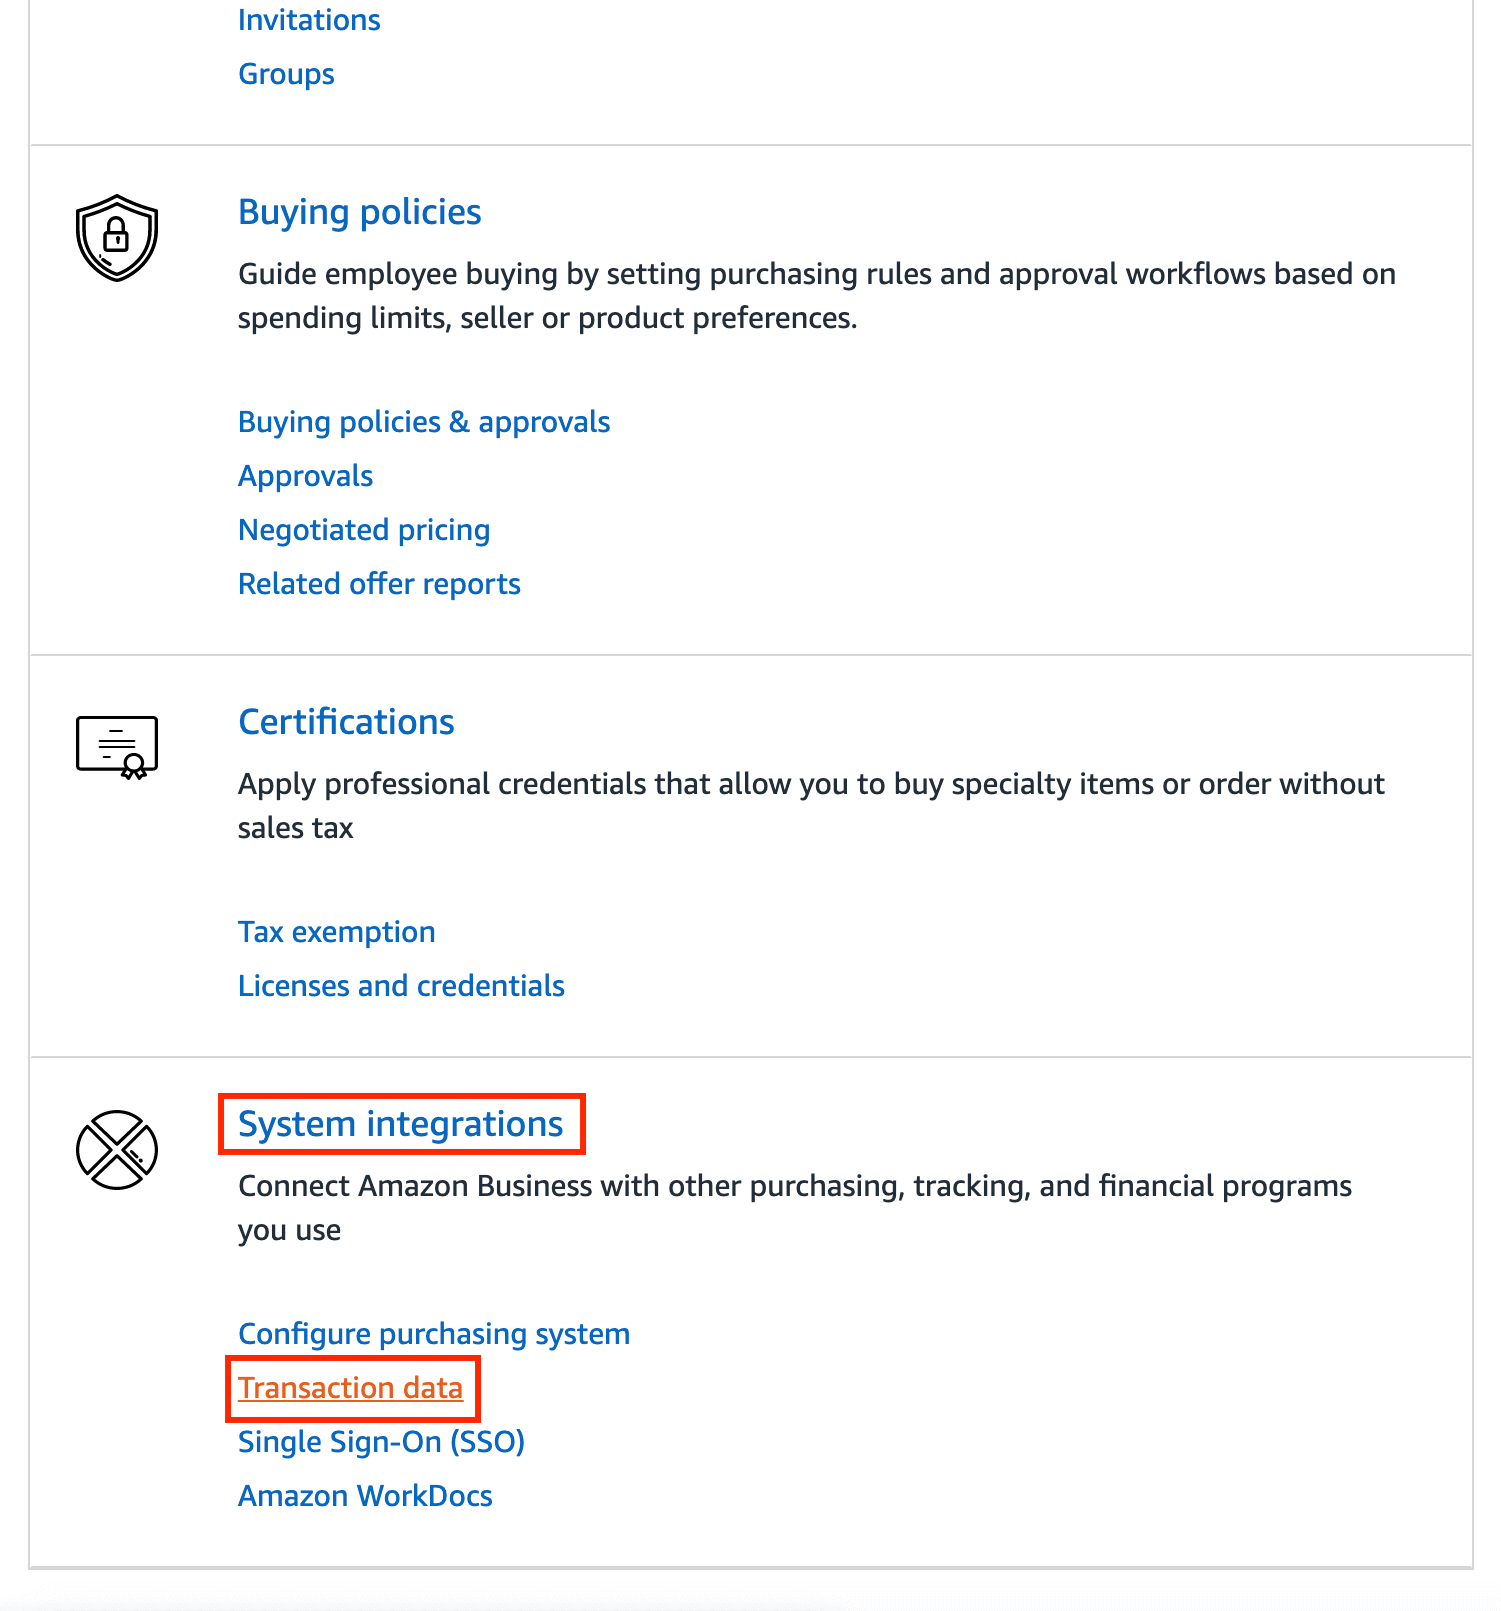
- Navigate to System Integrations and click Transaction data.
- Select Zoho as your system and click Continue.

- Copy the login credentials displayed in Zoho Expense integration page and paste it in Configure settings for Zoho page. Click Continue.
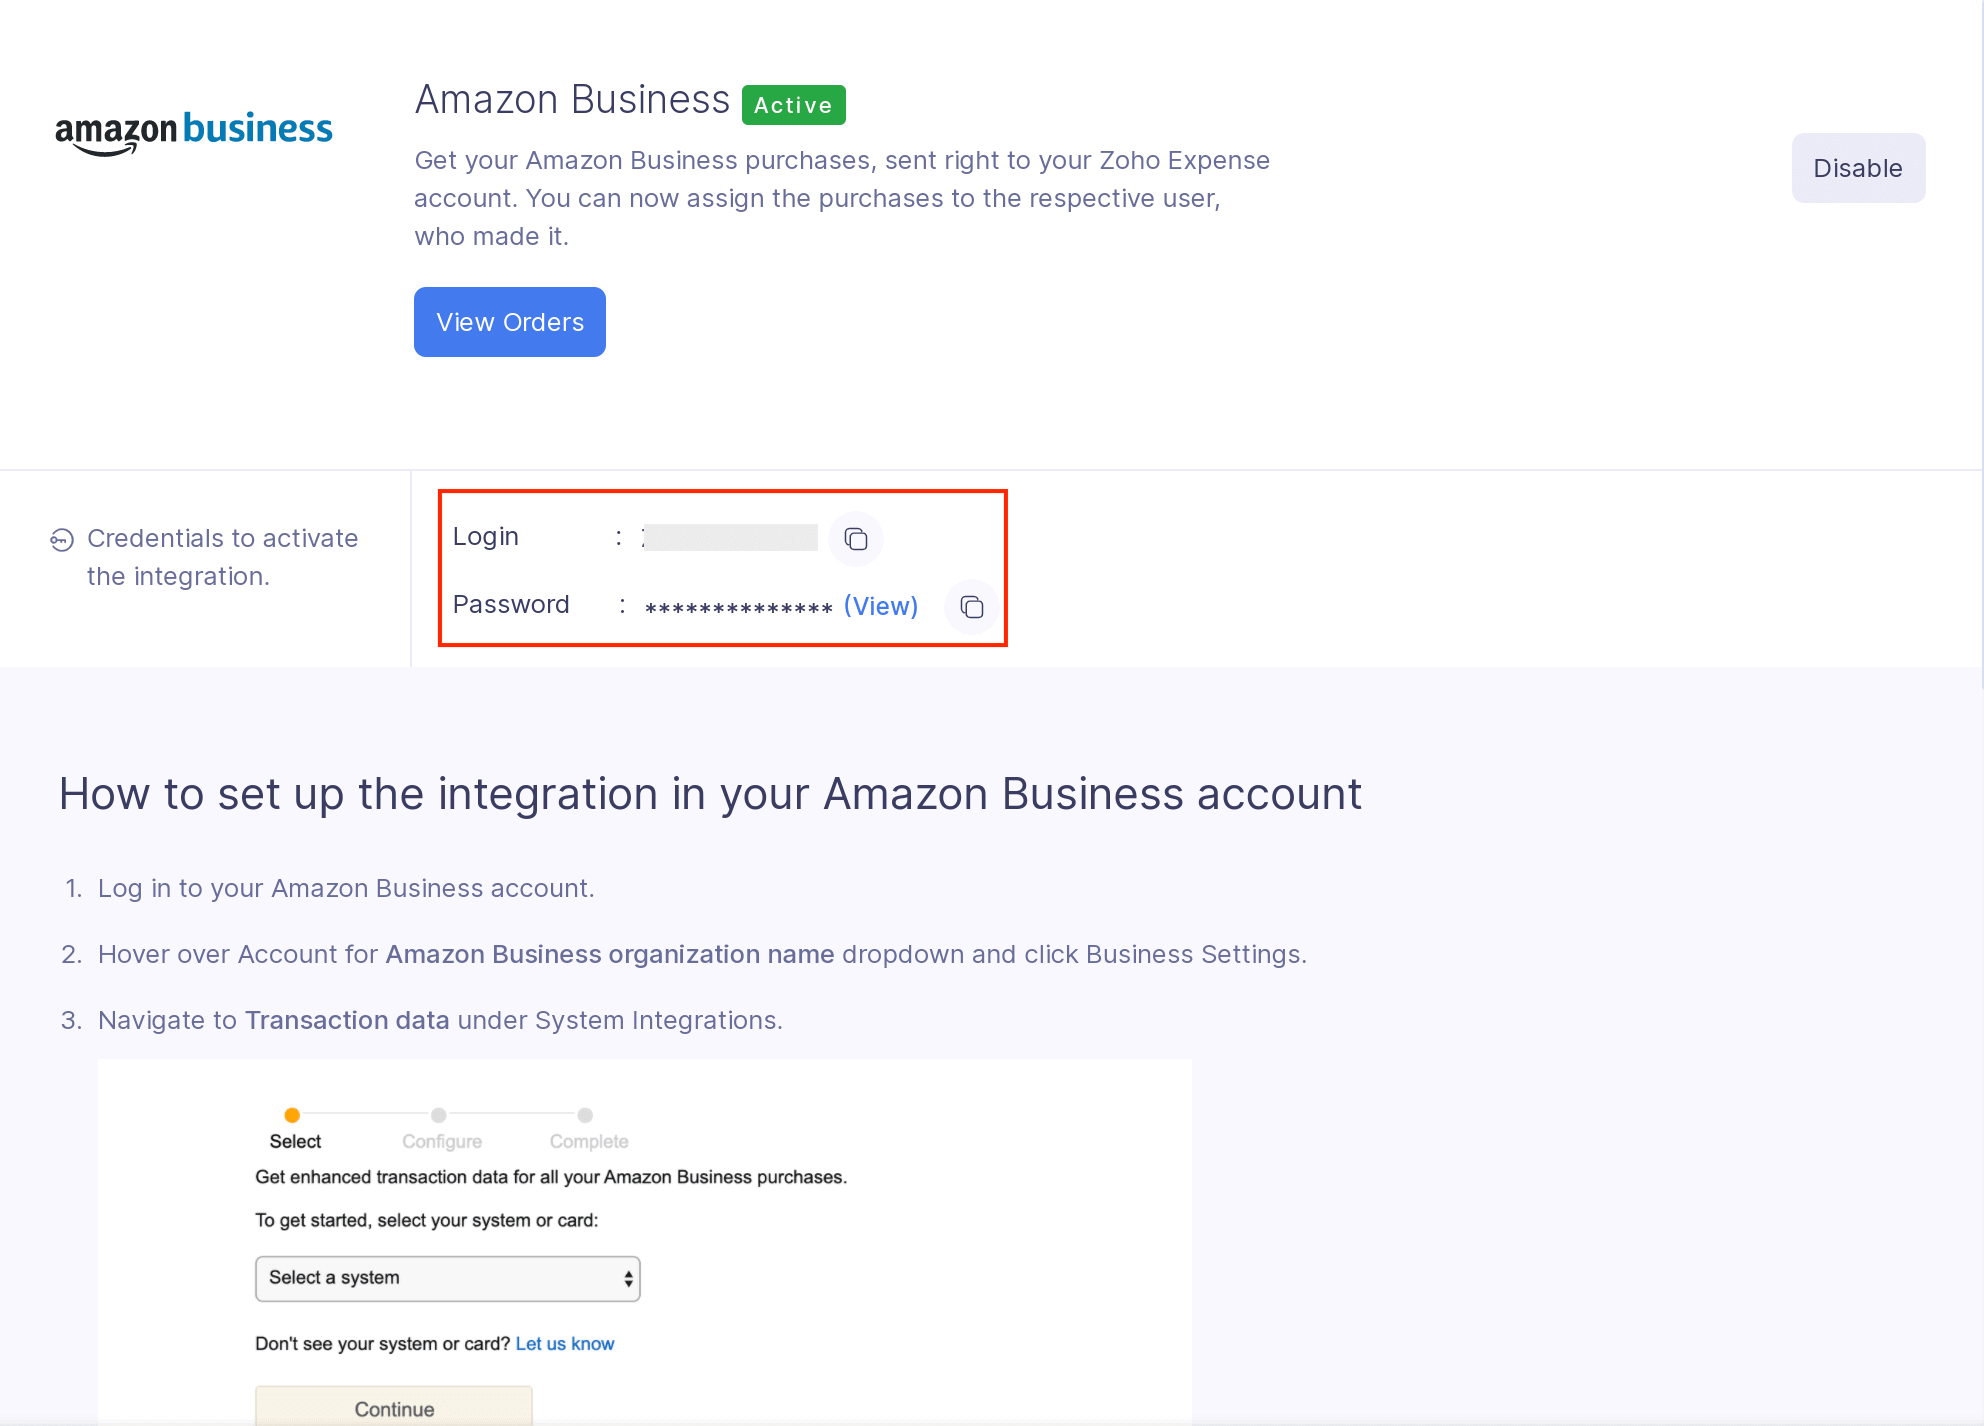

- Review the configuration details and click Configure.
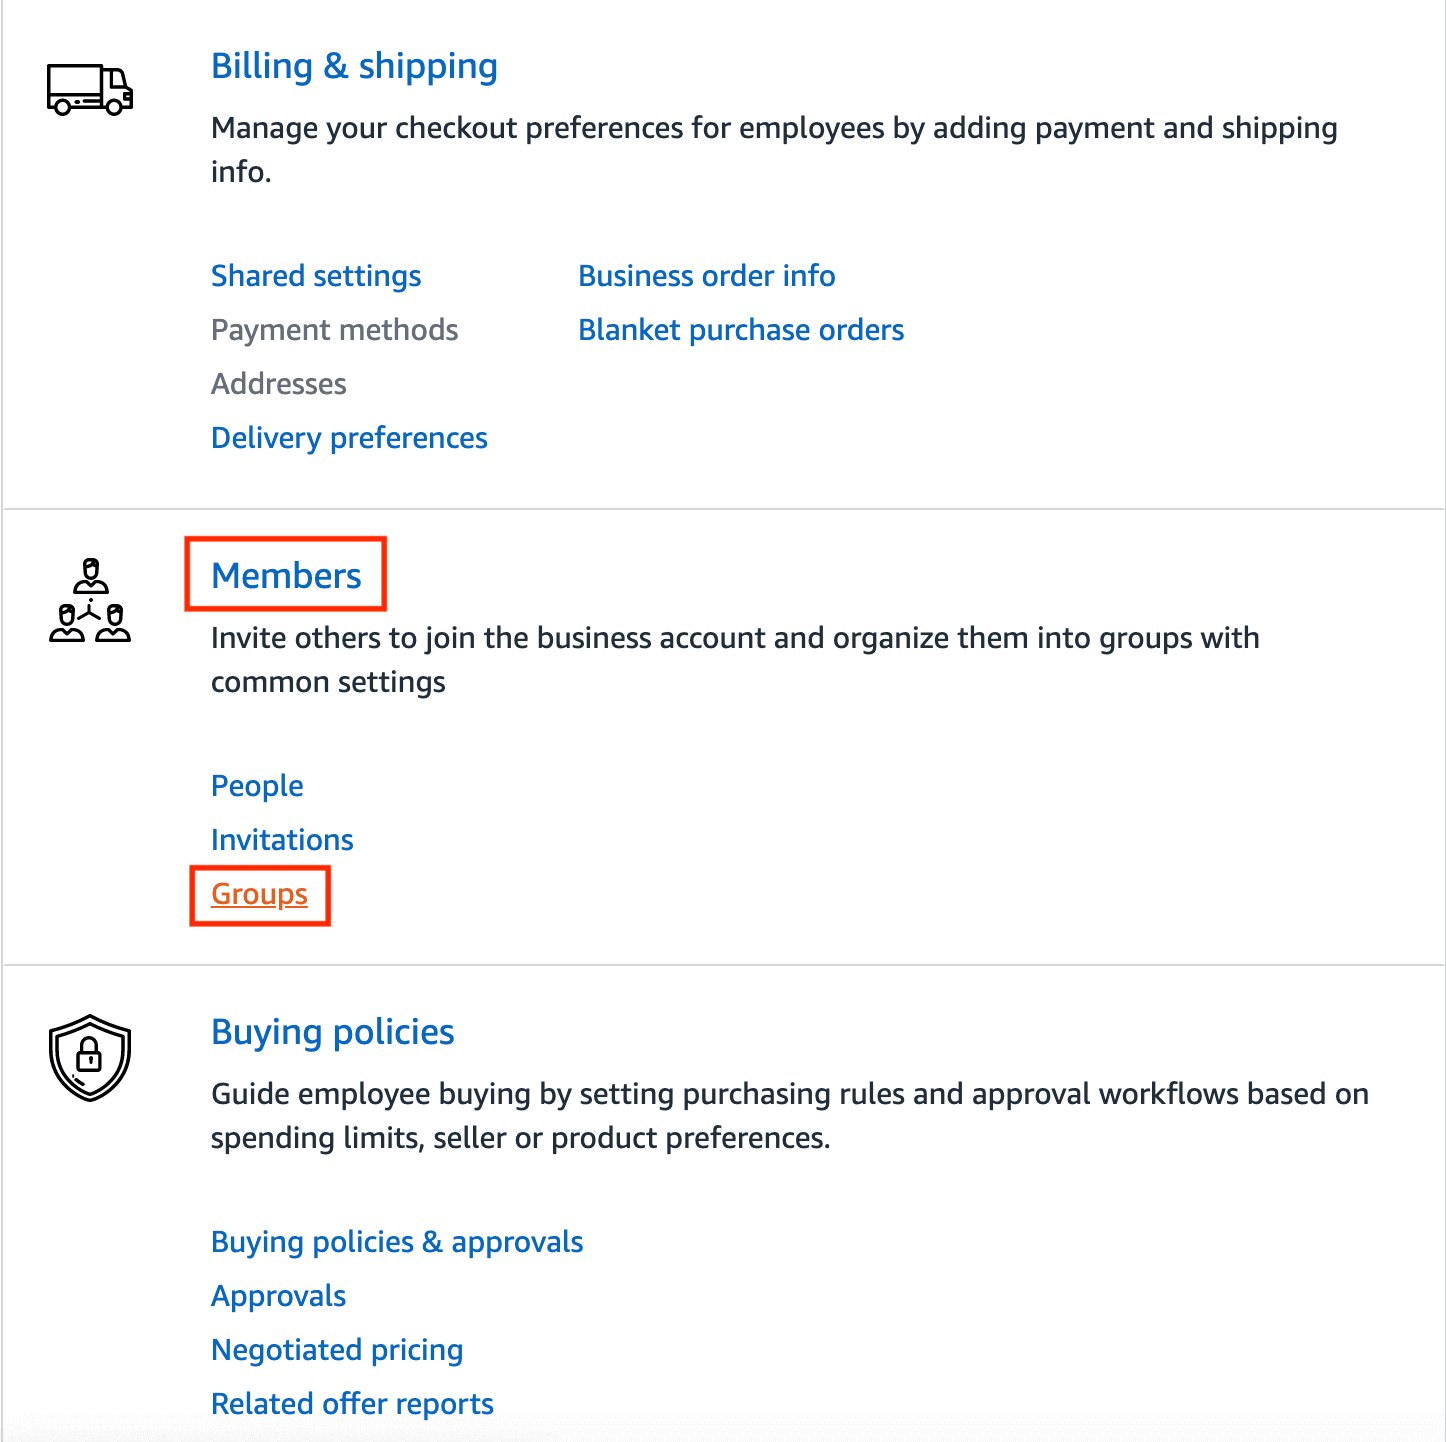
If you have multiple groups in your Amazon Business account, the integration has to be enabled for each group separately.
- Navigate to Groups under Members in the Business Settings page.
- Click the group you want to integrate with Zoho Expense.
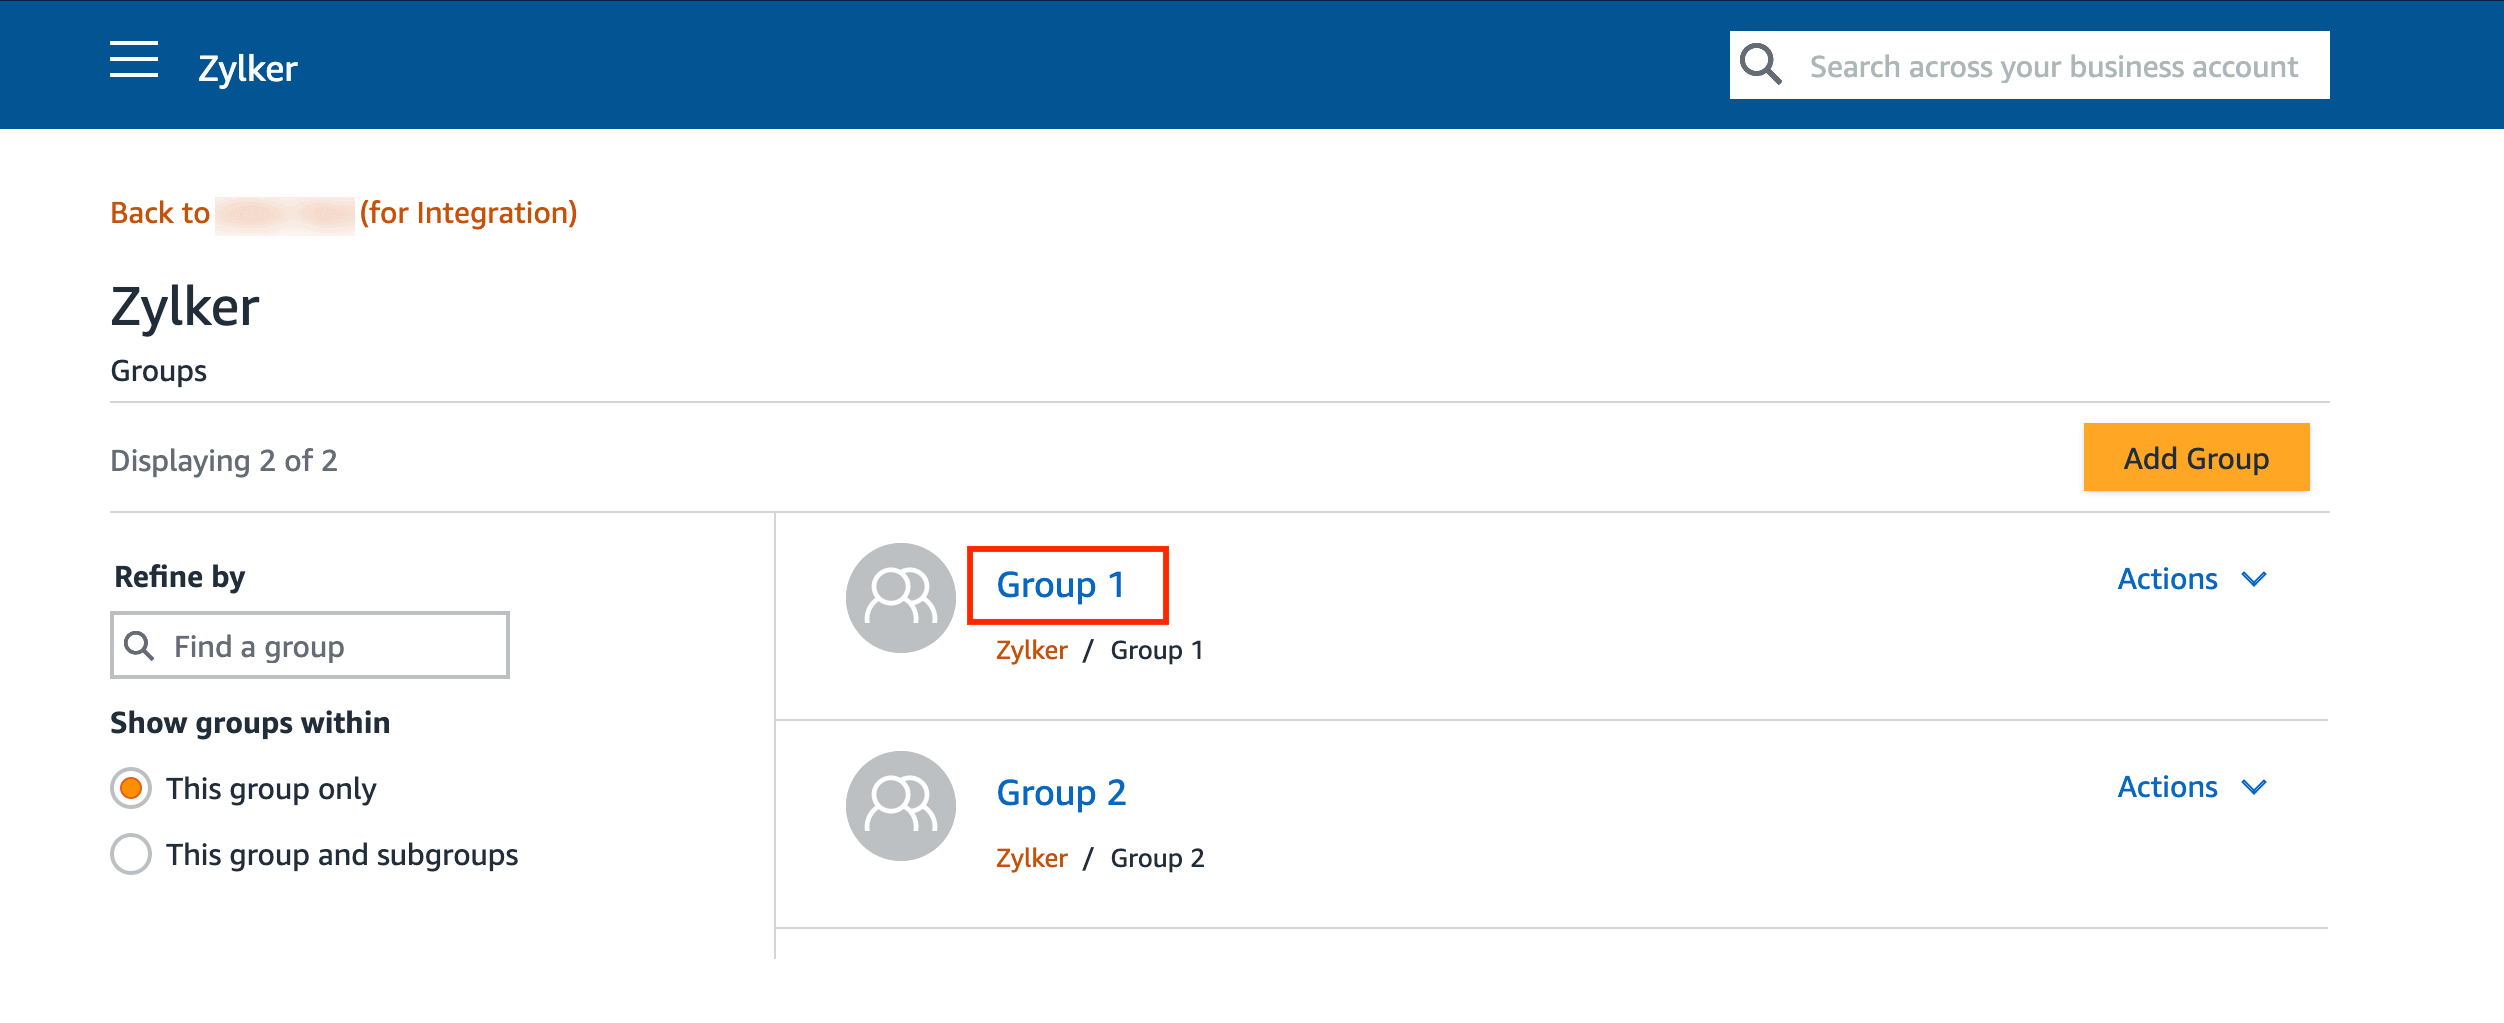
- Navigate to System Integrations and click Transaction data.
- Select Zoho as your system and click Continue.
- Copy the login credentials displayed in Zoho Expense integration page and paste it in Configure Settings for Zoho page.
- Click Continue.
- Review the configuration details and click Configure.
Your integration with Amazon Business is now enabled. Once the purchase made on your Amazon Business account is shipped, it will be fetched as an expense into your Zoho Expense organization automatically.
Amazon Business Dashboard
Get an overview of all your Amazon Business purchases from the dashboard. It gives you a graphical representation of the monthly spend summary of your Amazon Business account. Also, it gives you an aggregate of the expense amount that is yet to be assigned to the respective users and a total of expenses that are yet to be submitted for approval.
In the latter part of the page, all the expenses incurred in Amazon Business will be listed in the All tab along with the status of the expenses. In the Unassigned tab, you can find the expenses that are yet to be assigned to a user. The Unsubmitted tab will list all the assigned expenses that are yet to be submitted for approval.
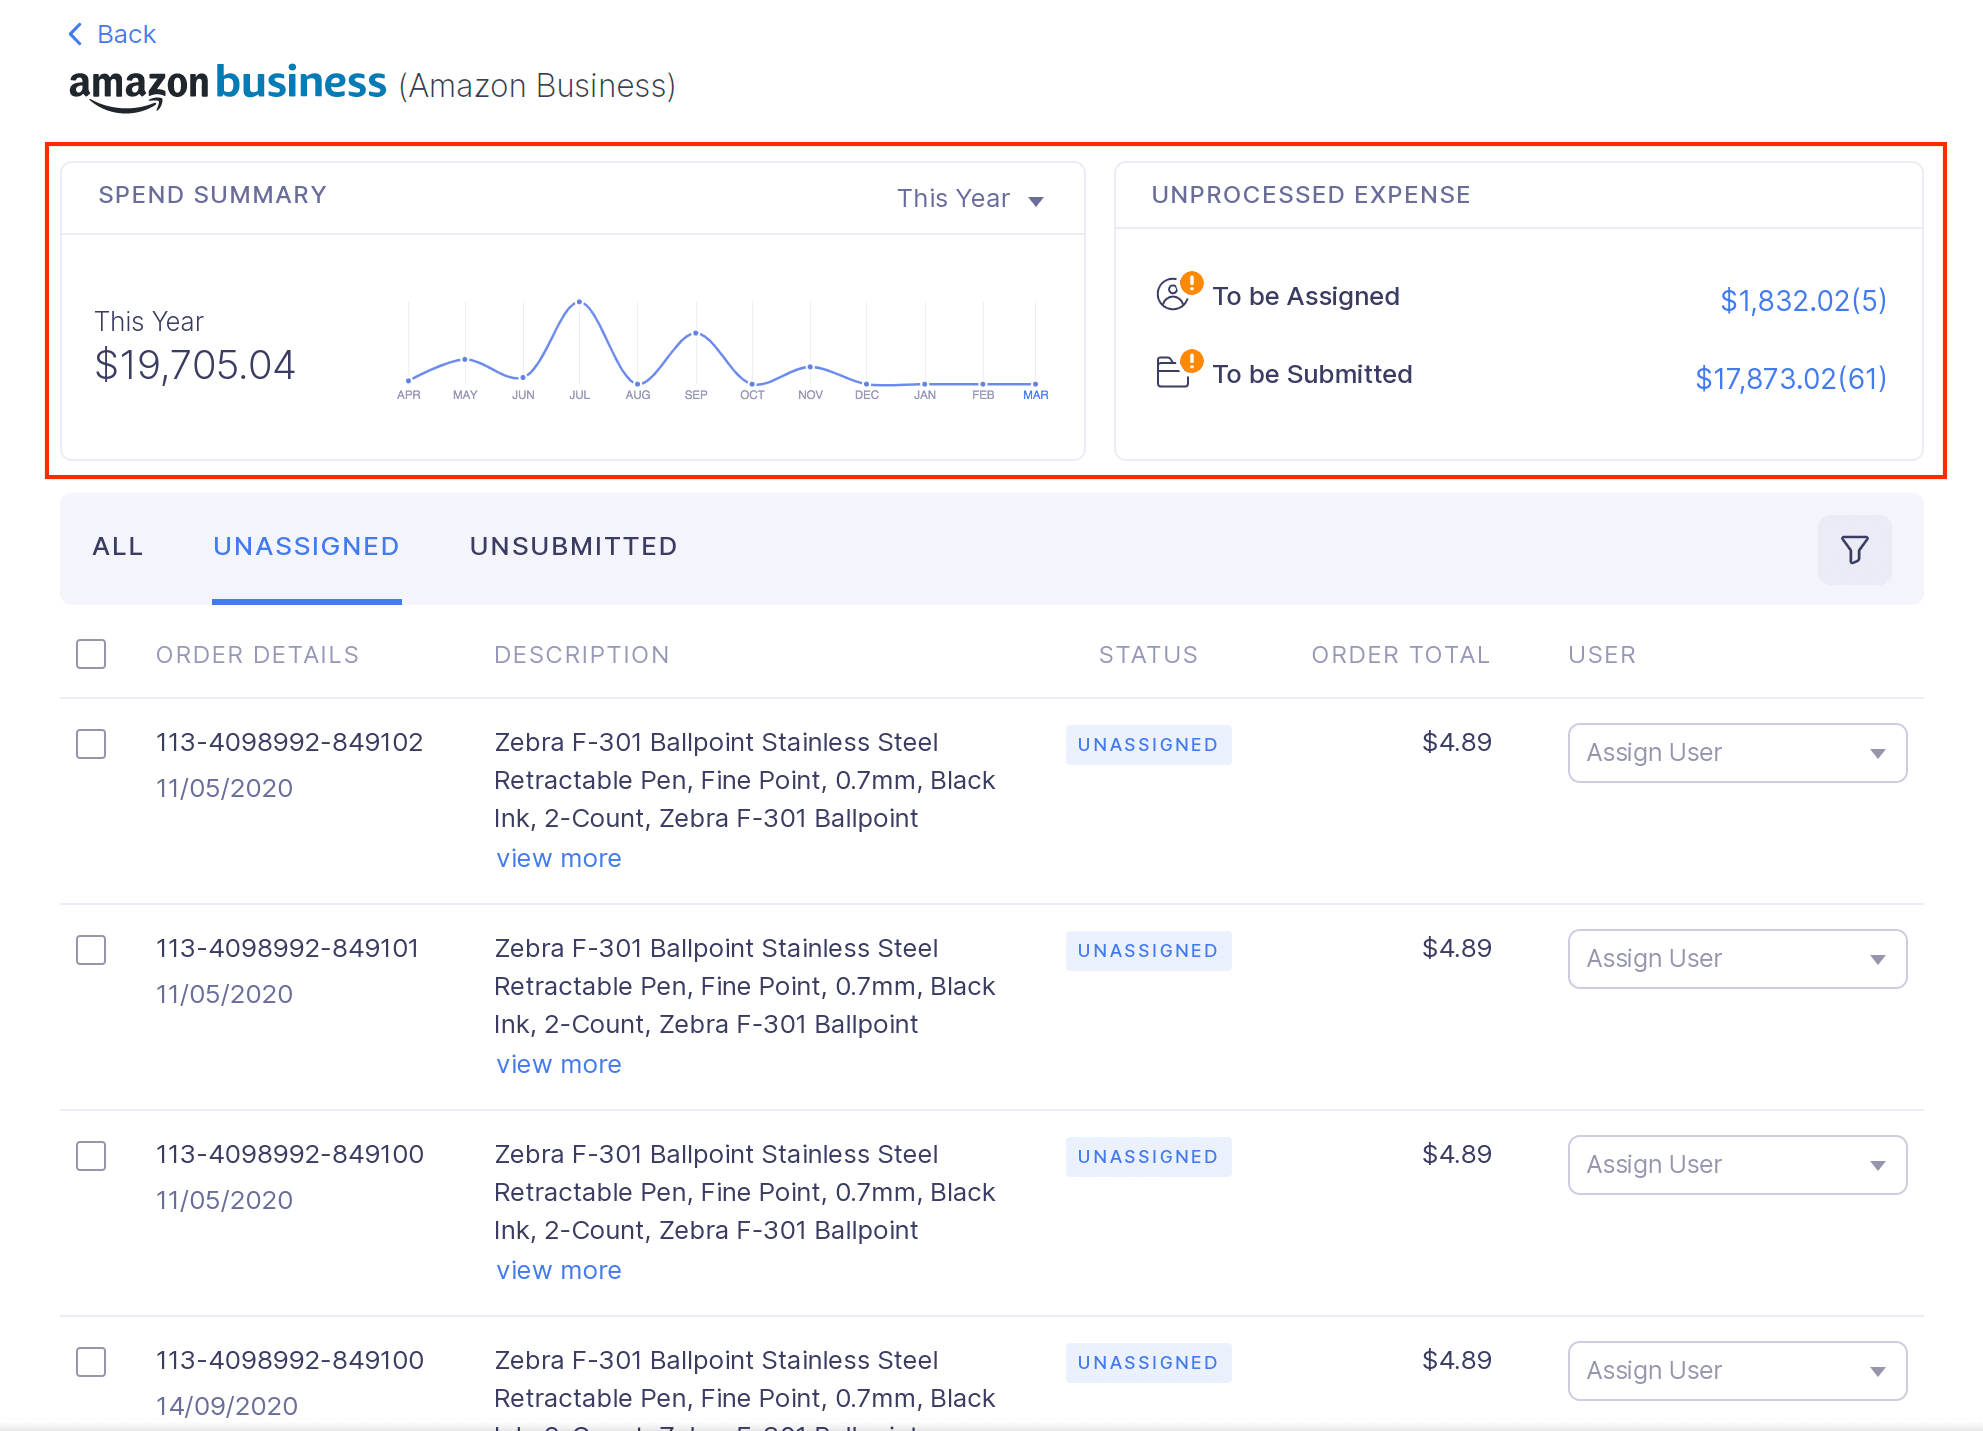
To view the dashboard:
- Click Admin View.
- Click the
Gear icon at the top right side.
(OR)
Go to Settings on the left sidebar. - Navigate to Other Apps under Integrations.
- Click Amazon Business.
- Click View Orders and your dashboard will be displayed.
Assign Purchases to Users
Once the integration is set up, Zoho Expense will fetch the purchase details and auto-create expenses in Zoho Expense. These expenses can then be assigned to the employees who have made the purchases so that the expenses will be created in the respective user’s account.
Prerequisite: Only admins can assign the expenses to the users who have made the purchases.
To assign purchases:
- Click Admin View.
- Click the
Gear icon at the top right side.
(OR)
Go to Settings on the left sidebar. - Navigate to Other Apps under Integrations.
- Click Amazon Business.
- Click View Orders.
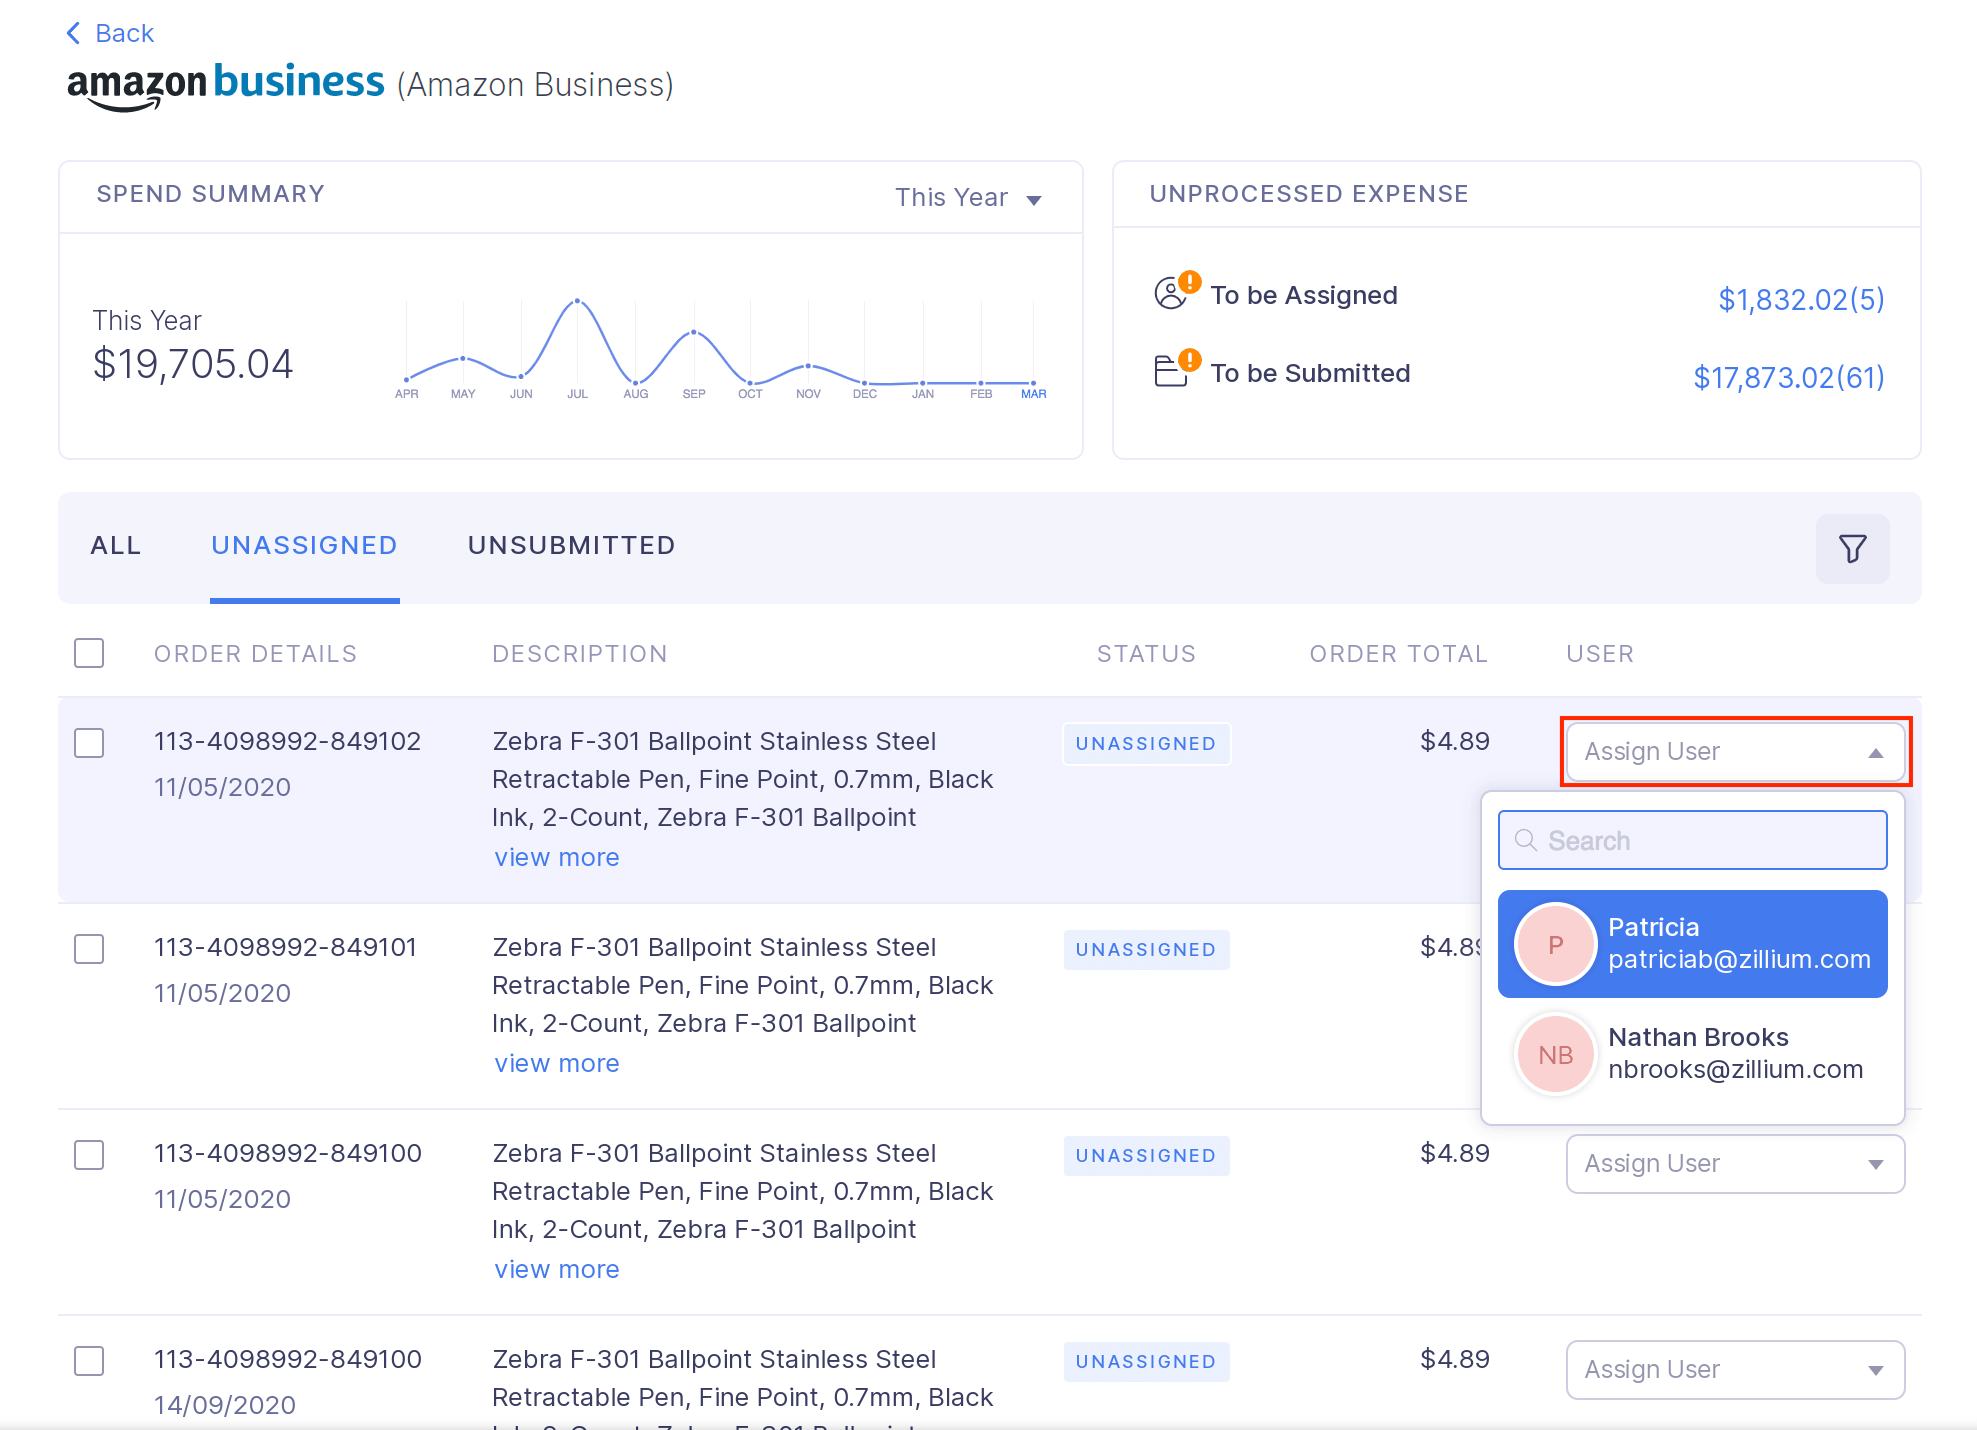
- Navigate to the Unassigned tab. All the expenses that are yet to be assigned will be listed.
- Click the Assign User dropdown in the expense you want to assign.
- Select the user you want to assign and the expense will be assigned to them. The unassigned expense will now be listed under the All tab and an expense will be created for the selected user in their Zoho Expense account.
Pro Tips:
- If you want to create business purchases as expenses in the respective user’s account without manual intervention, configure direct feed integration for the corporate cards added to Zoho Expense. Once this is configured, every time a user makes a purchase using the corporate card, expenses will be created under that user’s account automatically. This expense will also be auto-matched with the respective card transaction in the user’s Zoho Expense account. To configure direct feed integration, please contact support@zohoexpense.com.
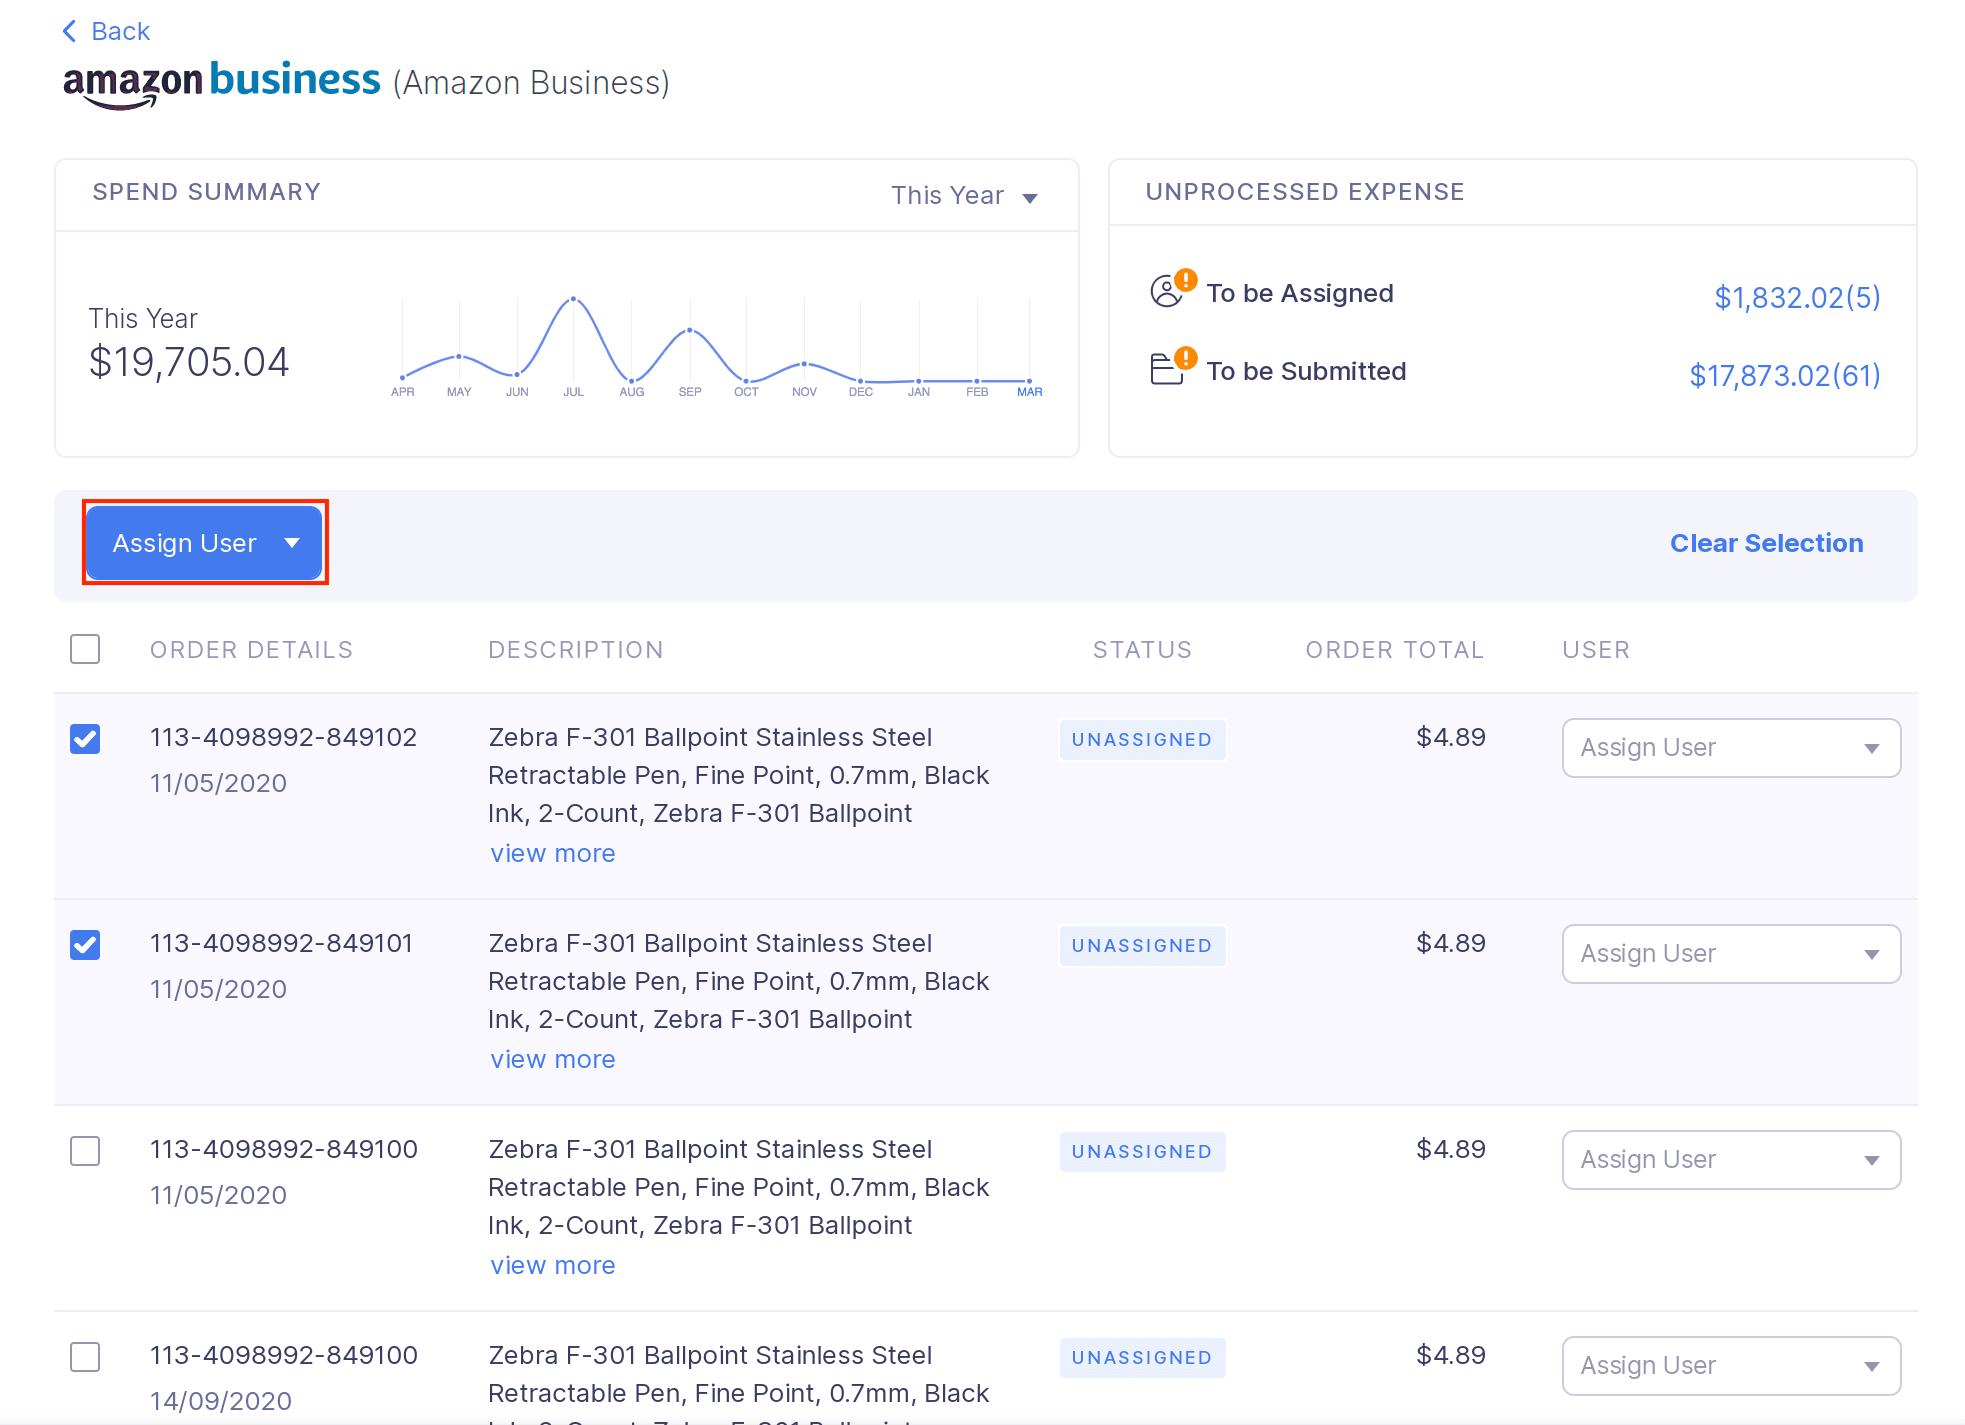
- To bulk assign the expenses, select the required expenses and click the Assign User dropdown. Select the user to whom you want to assign the selected expenses. The expenses will be assigned and created under the selected user’s account.
Disable Integration
If you no longer want to fetch the business purchases made in Amazon Business into Zoho Expense, you can disable the integration. To do this:
- Click Admin View.
- Click the
Gear icon at the top right side.
(OR)
Go to Settings on the left sidebar. - Navigate to Other Apps under Integrations.
- Click Amazon Business.
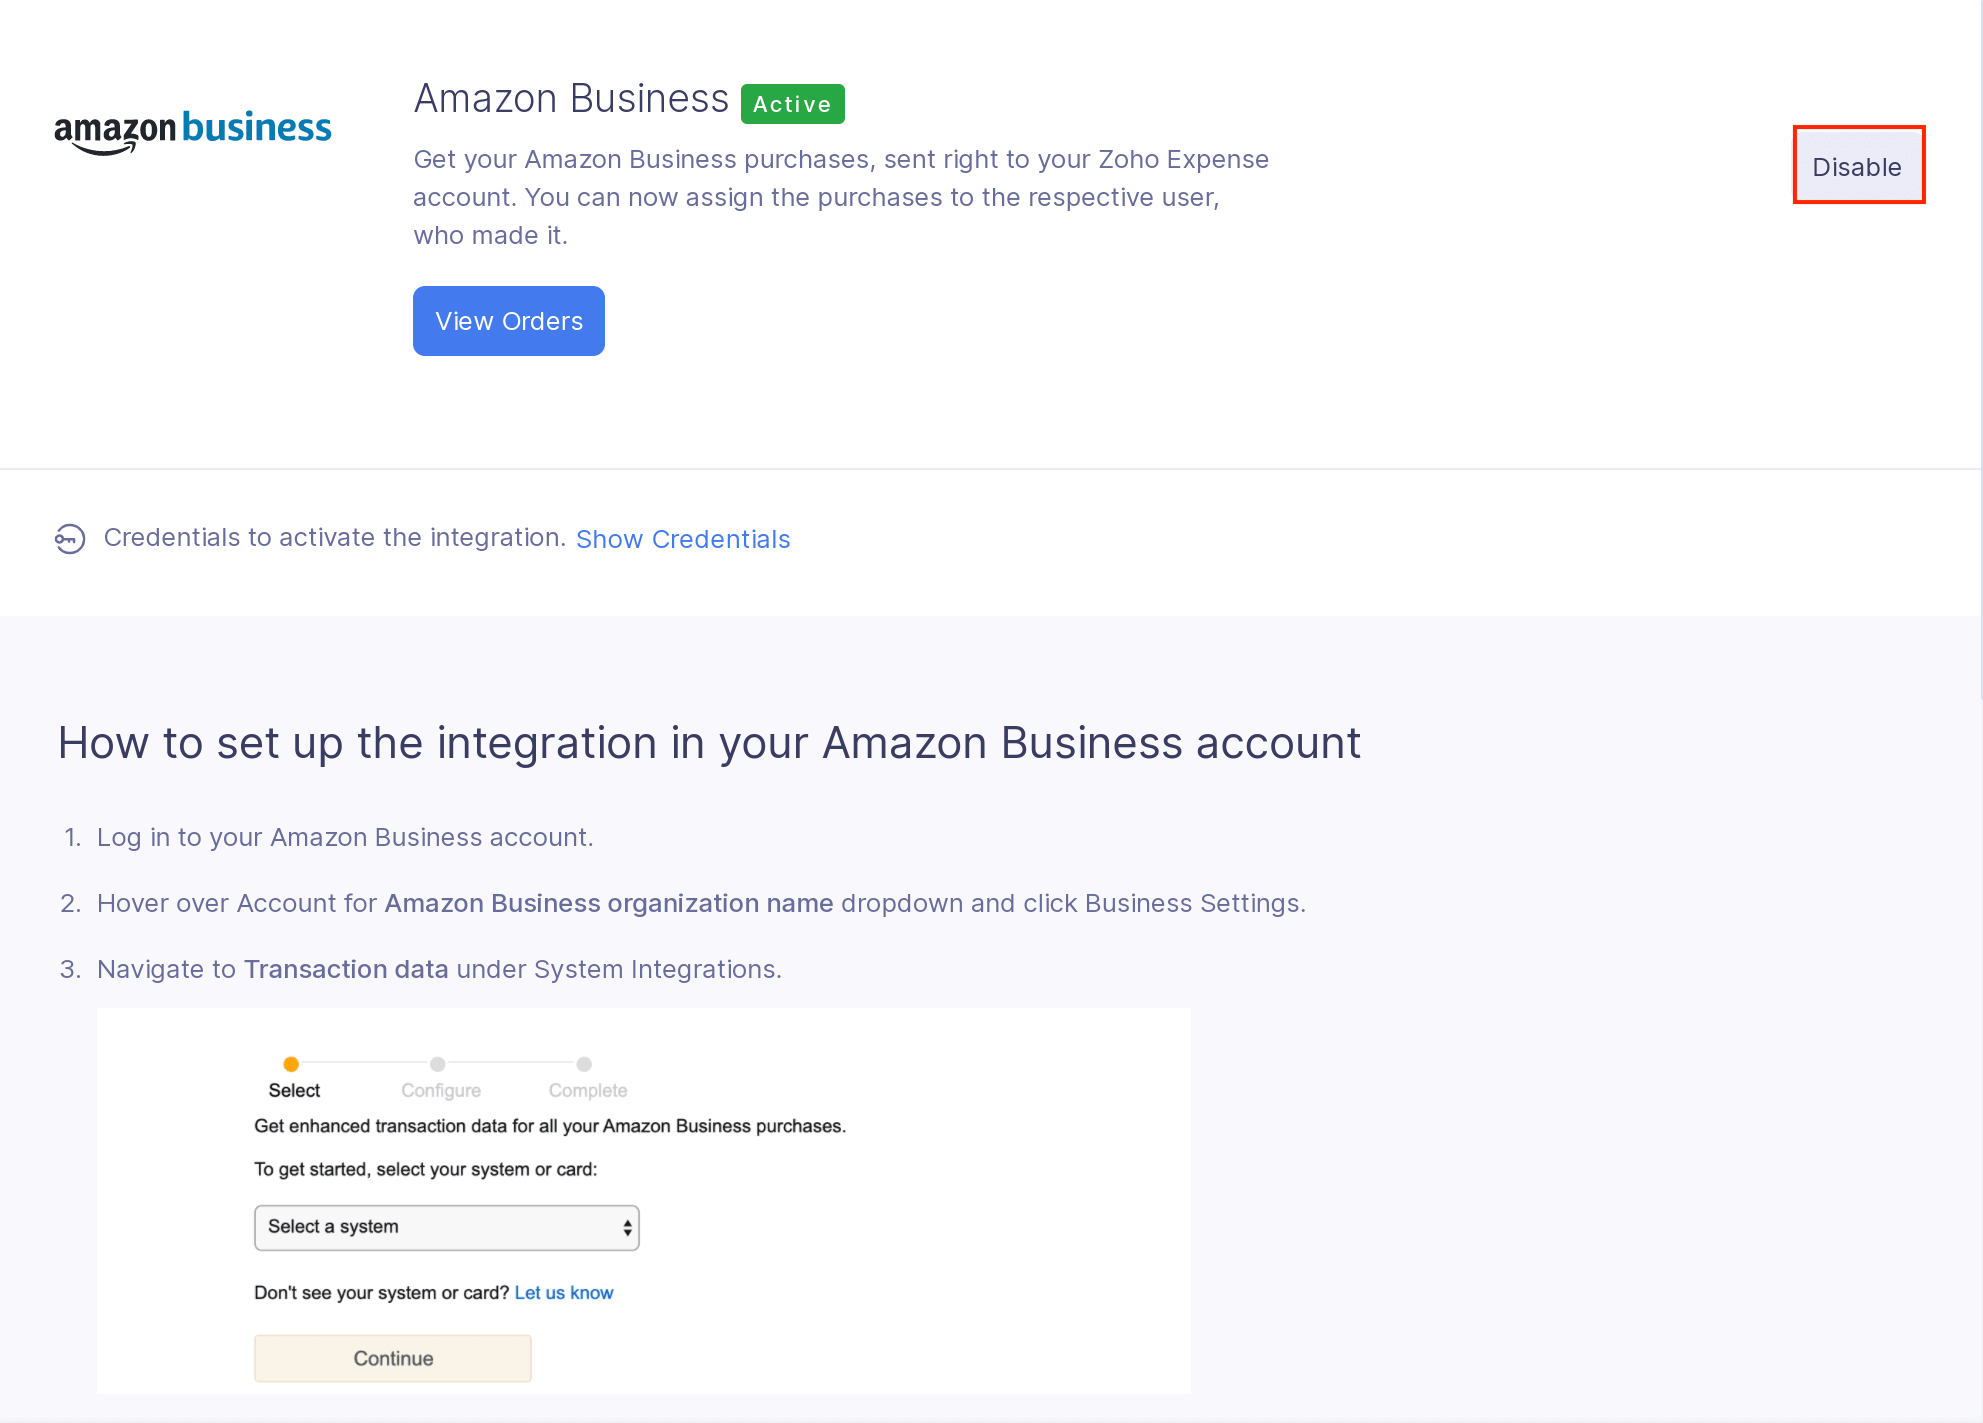
- Click the Disable button at the top right side of the page.
- In the pop-up that opens, click Disable. Your integration with Amazon Business will be disabled and the business purchases will not be fetched into Zoho Expense.
