Embedding Views in Web Pages, Web Applications and Blogs
Zoho Analytics, being a versatile reporting software, allows you to easily embed any view such as a table, report or dashboards in a website, web application, blog or an intranet page. You can embed views with a secured login (with login) or a private permalink (without login) or with public access. Users visiting the webpage will be able to see the latest live version of the view and any changes that you make to the view will automatically get reflected in the embedded version as well.
- What are the views that I can embed in my website/blog?
- What are the access modes available when embedding a report/dashboard?
- What is the difference between the three embedding modes?
- How to embed a view with Secured login?
- How to embed a view with Private URL/Permalink?
- Can I protect my Private URL (without Login) with a password?
- Can I set an expiry date for my Private URL (without Login)?
- Can I embed only a few selected columns from my data table/query table?
- How to embed a view with Public access?
- Can the embedded reports and dashboards be shared across social handles?
- How to share embedded reports and dashboards across social handles?
- What are the interaction options that are supported in an embedded report/dashboard?
- I regenerated the random key, I cannot access my previously embedded views. What should I do?
- How do I edit the permission of the embedded view?
- How do I remove the access of the embed view?
- Can I pass a dynamic filter while embedding the view?
1. What are the views that I can embed in my website/blog?
You can embed all the views such as tables, charts, pivots, tabular view, summary view, query tables and dashboards that you create using Zoho Analytics. To embed a view created in Zoho Analytics, you need to get the corresponding HTML code snippet generated for the view by Zoho Analytics and paste them within the <body>...</body> HTML tags of the destination page. Refer to this question to learn about generating a HTML snippet.
2. What are the access modes available when embedding a report/dashboard?
The following are the three access modes that you can choose while embedding a report/dashboard.
- Embedding with Secured Login (with login): This is the most secure mode of embedding a view. Only the users with whom you have shared the report will be able to view it upon logging into Zoho Analytics.
- Embedding with Private permalink (without login): When this setting is selected Zoho Analytics will generate an embed URL (within an iframe code) which will contain a big randomly generated private key (private link), making them secure and very hard (if not impossible) to guess. Users can view the embedded report without logging in to Zoho Analytics. Please do note that this option is available only in the premium and enterprise plans of Zoho Analytics.
- Embedding with Public Access: In case you want your embedded report to be accessible to the users within your organization or to the users who visit your web page and do not require any random key based link generation or logging into Zoho Analytics, you can use the public access mode.
3. What is the difference between the three embedding modes?
Embedding with secured login allows the highest level of security to the embedded view. When you embed the view with "Private Access with Login", then it would prompt for the users to login to Zoho Analytics to access the embedded view. Also, only users to whom you have shared the view would be able to access the embedded view, on a successful login.
When you embed a report with "Private Access without Login", Zoho Analytics will generate a private permalink making it secure and very hard to guess. Users need not login to Zoho Analytics to view the embedded report. Although this is secure, the randomly generated key is not impossible to guess.
In case you want your embedded report to be accessible to the users within your organization or to the users who visit your web page and do not require any random key based link generation or logging into Zoho Analytics, you can use the public access mode.
4. How to embed a view with Secured login?
Click to learn about editing permissions for the embedded report/dashboard.
5. How to embed a view with Private URL/Permalink?
Click to learn about editing permissions for the embedded report/dashboard.
6. Can I protect my Private URL (without Login) with a password?
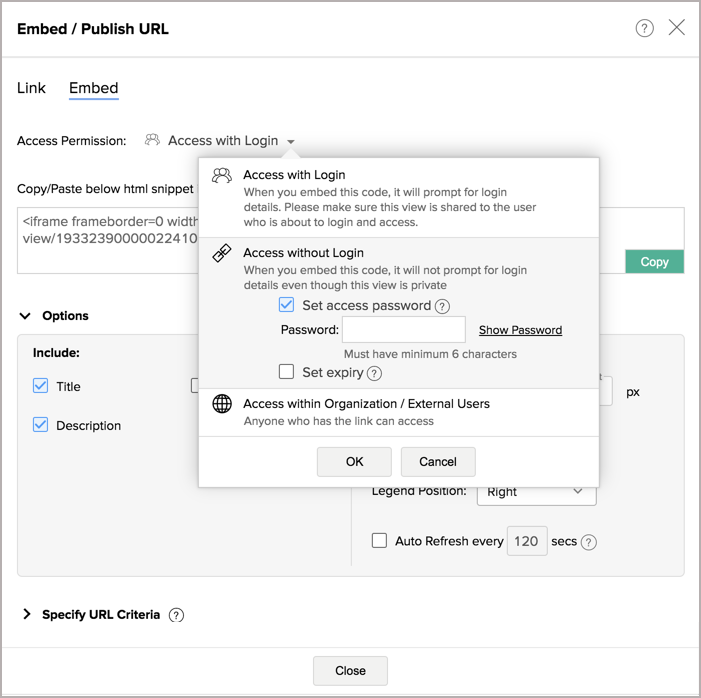
Yes, you can protect your private URLs (without Login) with password. When you generate a permalink with Private Access (Without Login), Zoho Analytics will generate a private permalink making it secure and very hard to guess. You can also protect it with a password by selecting Set access password checkbox in Embed/Publish URL dialog.
7. Can I set an expiry date for my Private URL (without Login)?
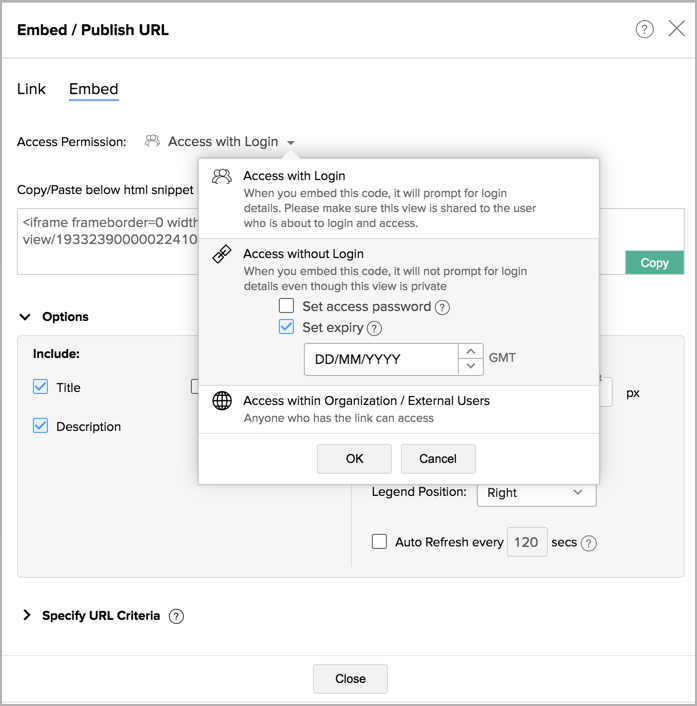
Yes, you can set an expiry date for your URL by checking the Set expiry checkbox in the Access without Login section. The shared URL will be valid only for the specified time frame. After the mentioned date, the URL will expire. After the set time, you can extend the expiry date, if you want to extend the validity.
8. Can I embed only a few selected columns from my data table/query table?
Yes, you can embed selected columns from your table while you embed them without login. This enables you to control what data your users get to see and will particularly be helpful in case you have sensitive data in your table.
You can share selected columns from your table by following the below steps:
- Open the view that you wish to embed.
- Click Share > Embed.
- Once you have set your Access Permission as Access Without Login, you will notice an Edit Permissions link inline with the option.
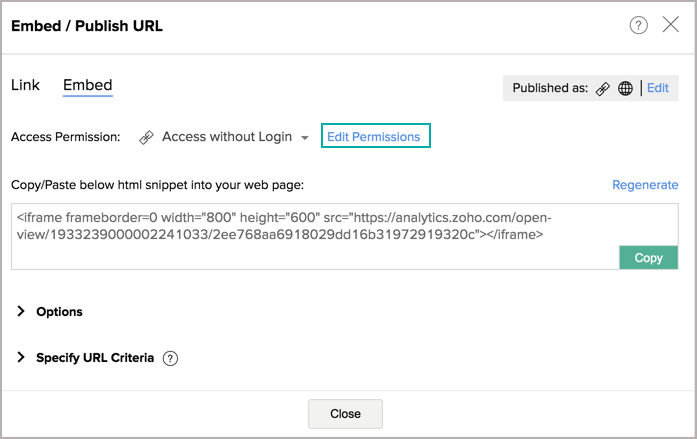
- Click the Edit Permissions link. The Apply Permissions & Filters dialog will open.
- Click the All Columns link under Read Access and then select the columns to be shared.
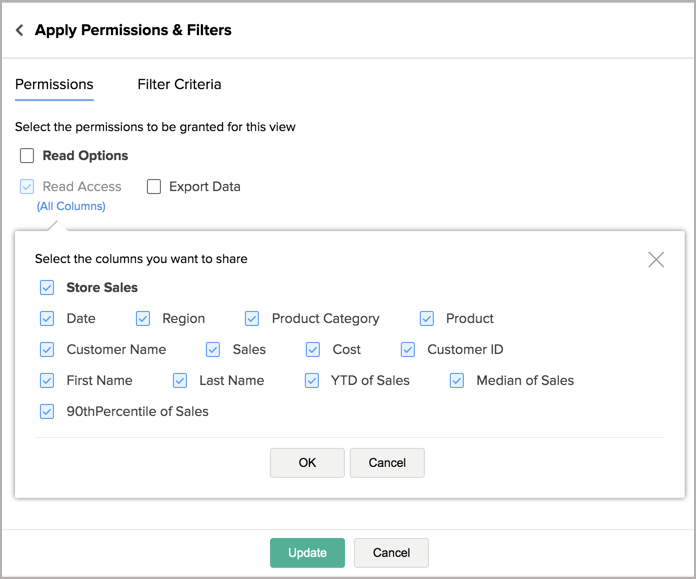
- Click OK to confirm the selected columns. The users accessing the URL will be able to access only selected columns for viewing and report creation.
9. How to embed a view with Public access?
Click to learn about editing permissions for the embedded report/dashboard.
10. Can the embedded reports and dashboards be shared across social handles?
Yes, you can share the embedded reports and dashboards to your social handles using the Social Widget option. Learn more.
11. How to share the embedded reports and dashboards across social handles?
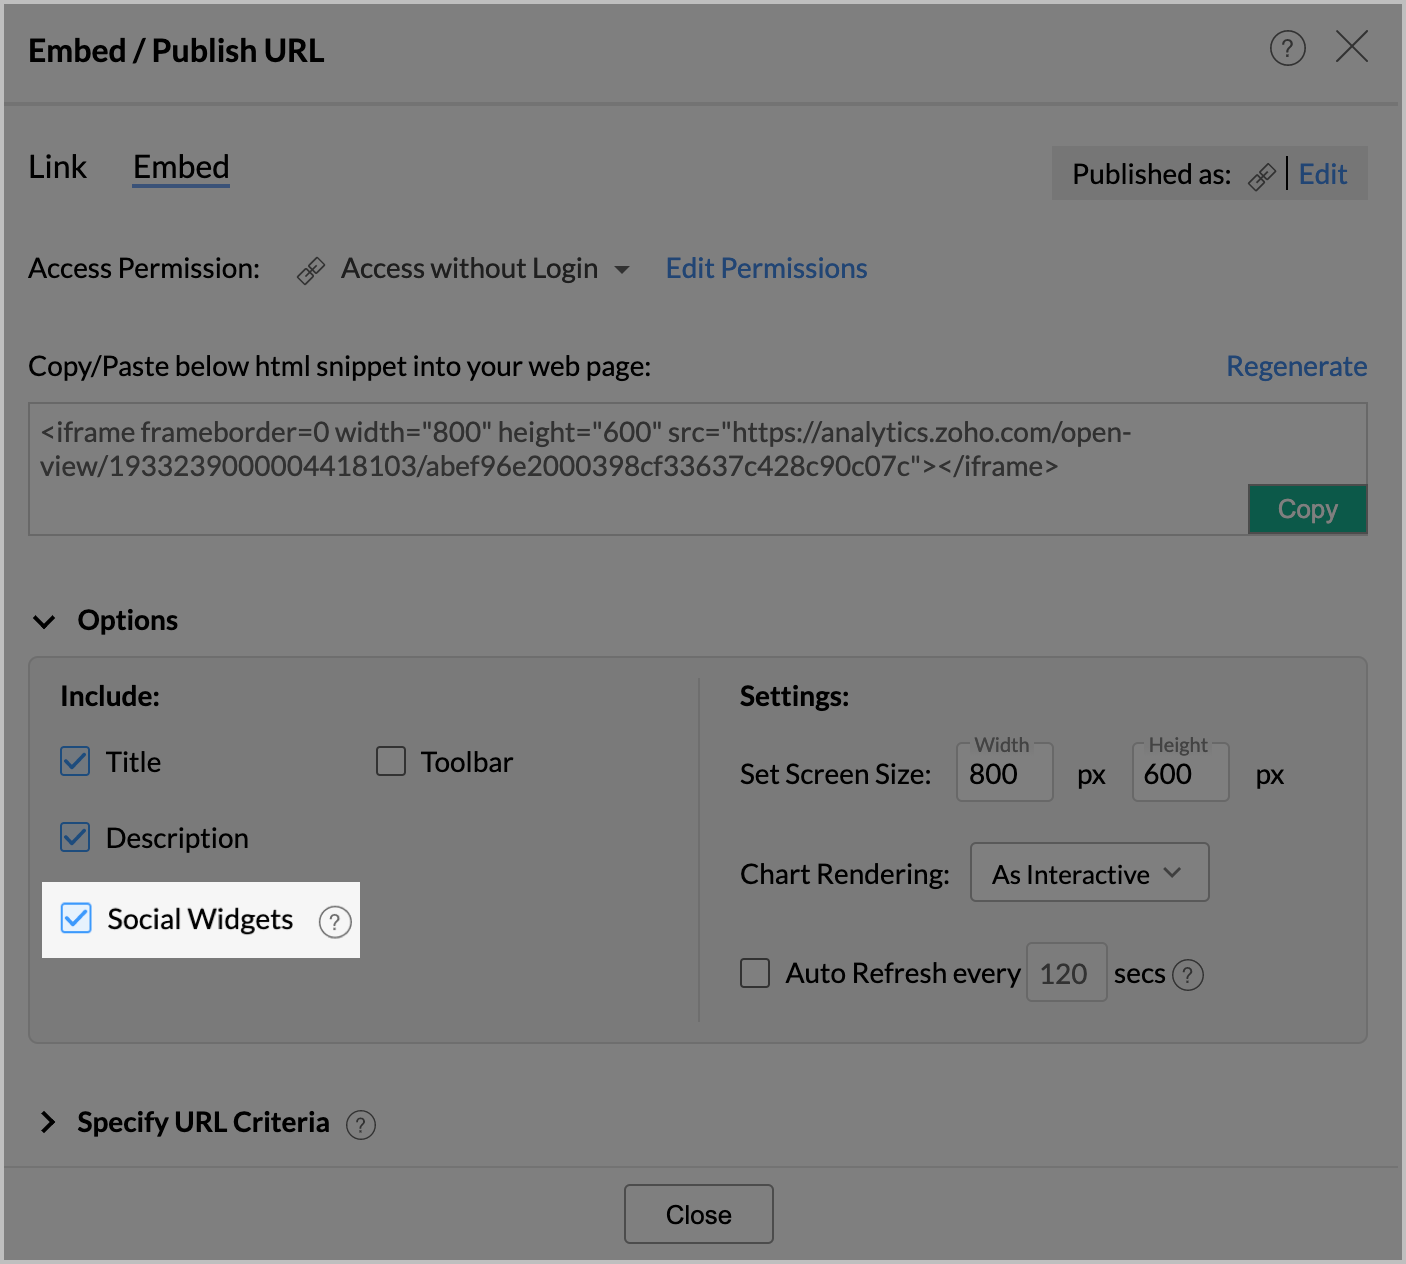
Follow the below steps to share the embedded reports and dashboards to your social handles:
- Click the Share button from the top-right corner.
- Select the Embed option from the drop-down menu.
- Select the Access Permission as Access without Login or Access within the Organization/External Users.
- Choose the Social Widgets checkbox available in the Options section.
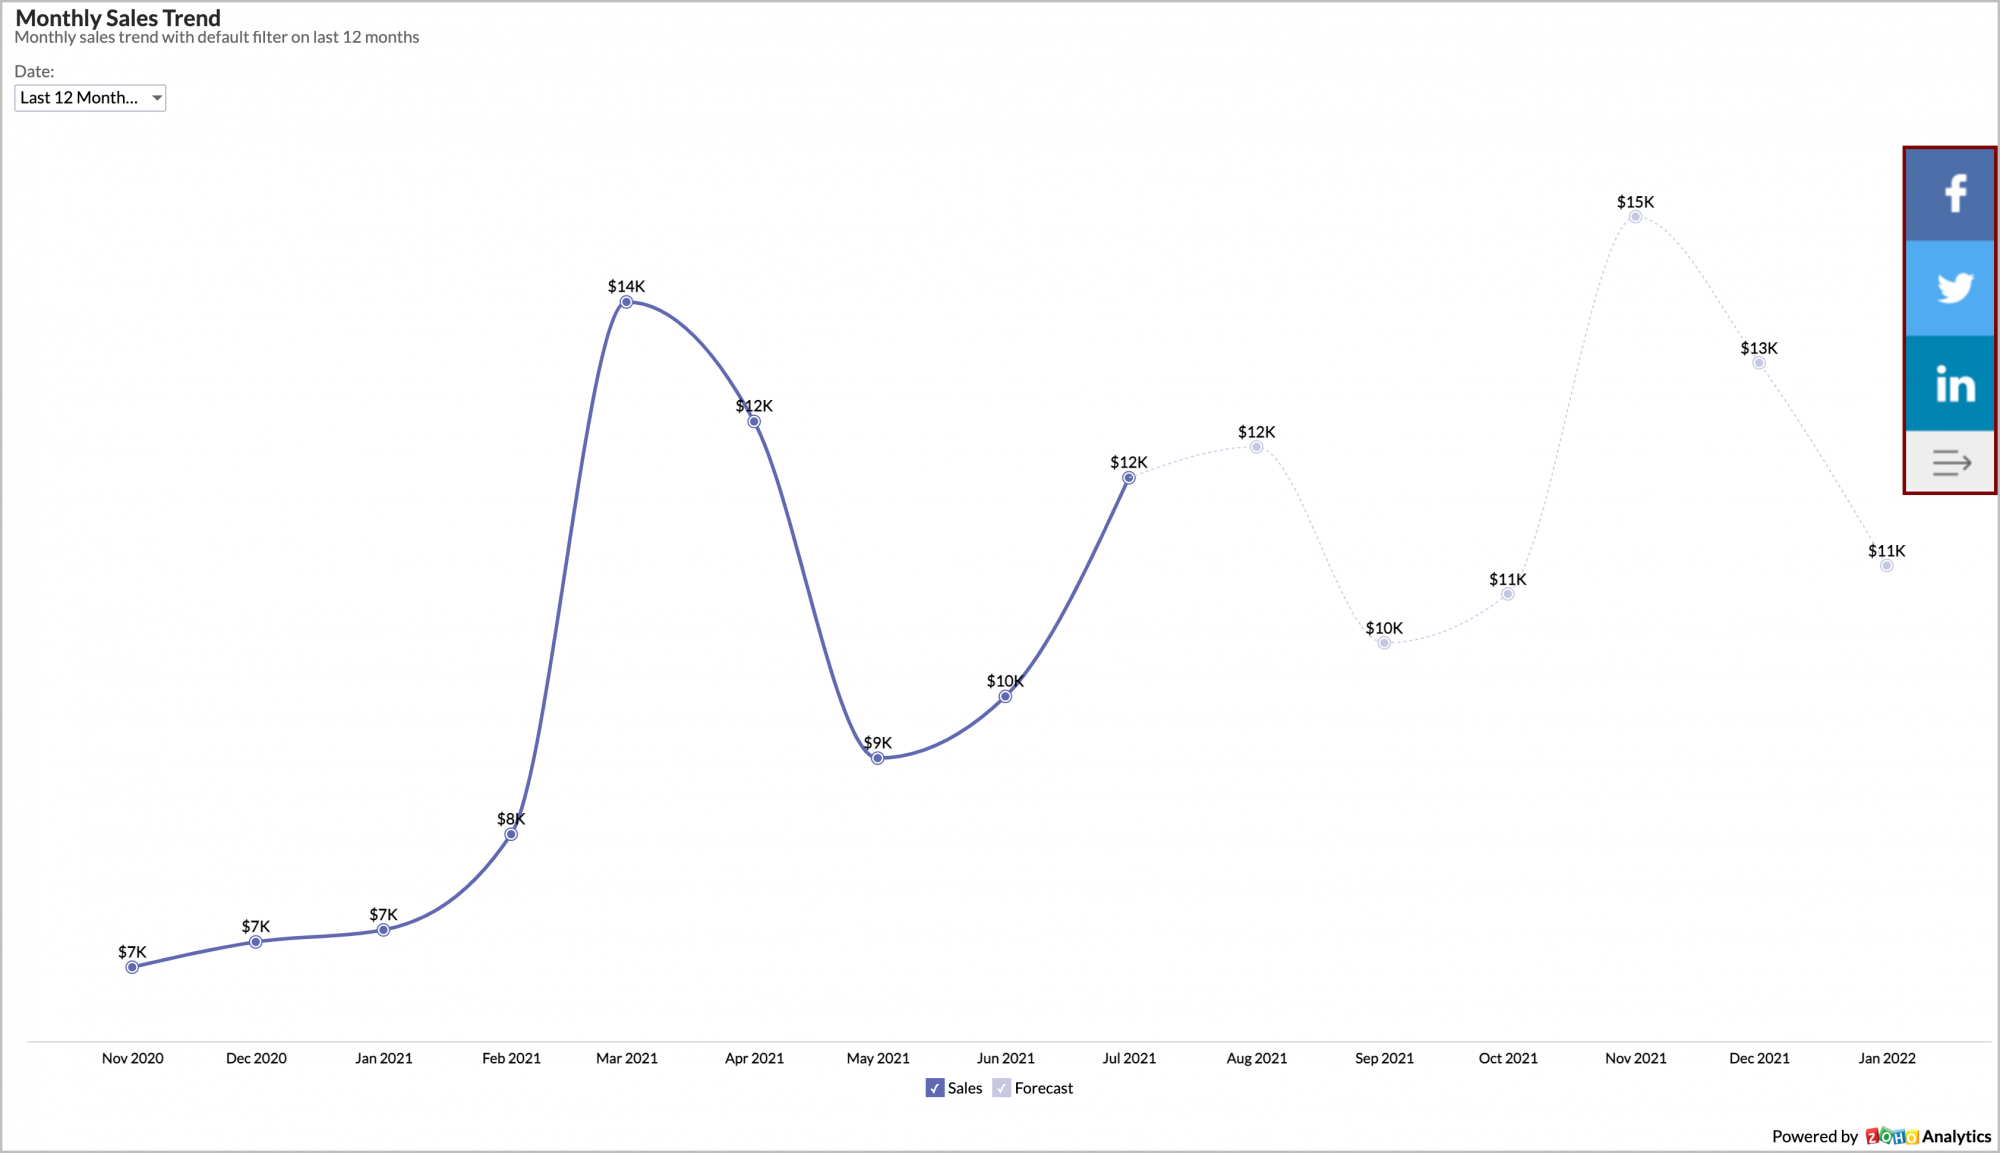
- When you access the embedded report/dashboard, you will notice the Facebook, Twitter, and LinkedIn icons. Using these icons, you can share/tweet them.
12. What are the interaction options available while embedding a report/dashboard?
Zoho Analytics allows you to embed reports/dashboards in an interactive mode. When you embed a report in interactive mode in a web page, then users visiting the web page can view and interact with the chart as you could do when you view the report within the Zoho Analytics user interface. The following interactions are possible when a chart is embedded in an interactive mode:
1. Tooltips & highlights.
2. View the underlying data
3. Drill down
4. Change chart type
5. Apply User Filters, if the chart contains user filters
6. Interact with legend
You can also embed the reports as a image. This feature is only available for charts. As a result of this, the chart will be generated as a static image and hence will load faster.
13. I regenerated the random key, now I cannot access my previously embedded views or URL's of that report/dashboard. What should I do?
When you reset/regenerate the random key, the previously shared URL's/Embeds will become invalid. You will have to regenerate the new embed snippet and update the page.
14. How do I edit the embed permissions?
You can edit the previously granted permissions by following the below steps:
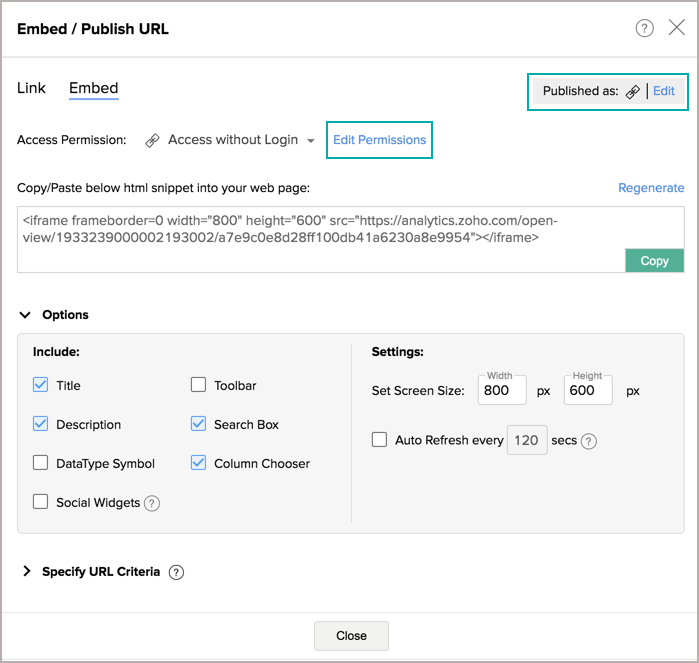
- Open the corresponding view that has been embedded and invoke the Share > Embed in Website/Blog.
- From the Embed / Publish URL page that opens, click the Edit link at the top right corner or the Edit Permissions link in line with Access without Login menu.
 \
\
15. How do I remove the access of the embed view?
You can easily remove the permissions by following the below steps:
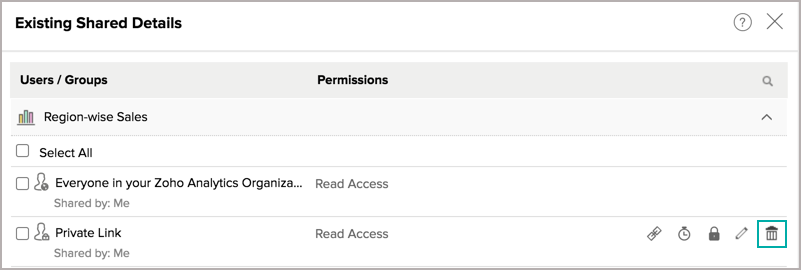
- Open the corresponding report that has been embedded and invoke the Share > Embed.
- From the Embed / Publish URL page that opens, click the Edit link at the top right corner.
- Click the Remove icon in line with the respective access to remove the permission.
16. Can I pass a dynamic filter while embedding the view?
Zoho Analytics offers a powerful feature of applying dynamic filters when you embed any view into your Web page. Using this feature, you can embed the same view in web pages applying different set of filter criteria, to suit the allowed permission, context and profile of the user who is viewing the page.
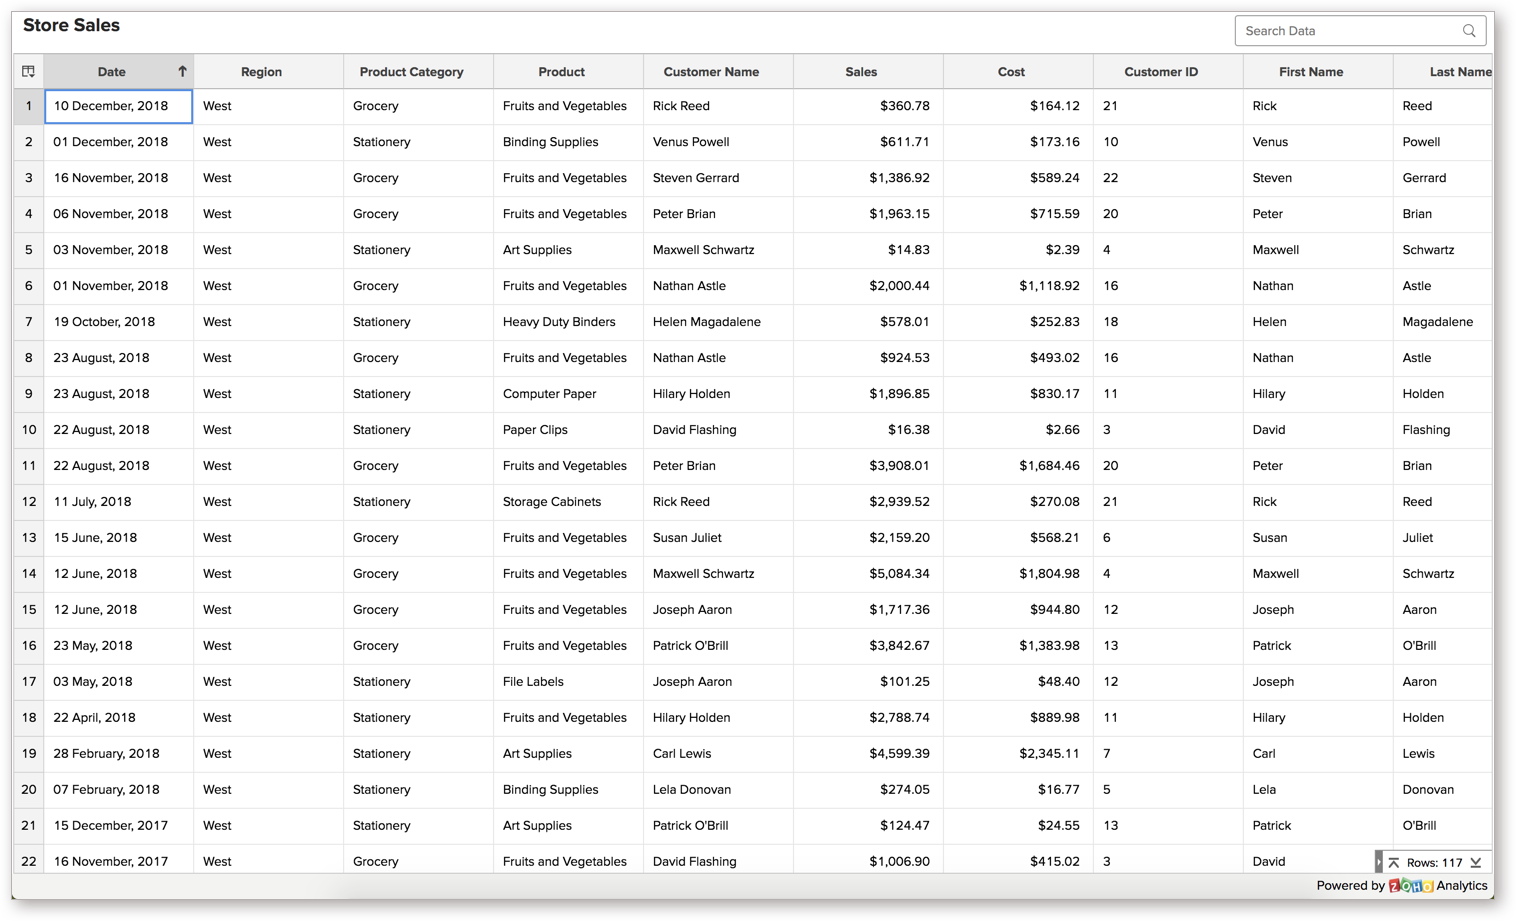
For example, an embedded sales report can have a 'Region' based criteria in each page that it's embedded, creating a scenario such that, when a sales person from say Region West views his/her accessible page, will only see the Sales from that region in the report embedded. A similar setup can be applied for sales person from other regions.
Filters can be applied by passing the required filter criteria to the parameter named ZOHO_CRITERIA and appending it as part of the Embed URL present in the HTML <iframe> code snippet. The embedded view's data is filtered and displayed based on the criteria specified, whenever the web page is loaded in the browser.
Example:
The generated HTML code snippet for embedding your view with the <iframe> tag would look like something given below (the following code snippet is for a Table):
<iframe frameborder=0 width="800" height="600" src="https://analytics.zoho.com/open-view/1156972000001226026?ZOHO_CRITERIA=("Store Sales"."Region"='West')"></iframe>
The above snippet displays a "Sales" table when embedded. To limit the view to just show the Sales in the West Region, the parameter ?ZOHO_CRITERIA=("Store Sales"."Region"='West') is added to the <iframe> code snippet. In this parameter "Region" is the column name in the view, which is filtered to display values matching the region West. The parameter should also be encoded. You can use this tool or any other tool that is available on the internet to encode.
The complete code snippet with this parameter is given below:
<iframe frameborder=0 width="800" height="600" src="https://analytics.zoho.com/open-view/1156972000001226026"?ZOHO_CRITERIA=(%22Store%20Sales%22.%22Region%22%20%3D%20'West')'></iframe>
When you embed the above code snippet into a web page, the table view displayed will contain only the values matching the Region West.
Filter Criteria Format
The filter criteria that is passed follows the same format as that of the SQL SELECT Query's WHERE clause. You can also use SQL in-built functions as part of the criteria. These built-in functions should be the functions supported by any of Oracle, MS SQL Server, MySQL, DB2, Sybase, ANSI SQL, Informix and PostgreSQL databases.
The generalized format of simple criteria is given below.
| ZOHO_CRITERIA="(<[tablename].[columnname]/SQL expression/SQL function calls> <relational operator> <value/[tablename].[columnname]/SQL expression/SQL function calls>)" |
Description:
| Column name | Refers to the name of the column on which you are applying the criteria |
| SQL Expression | Any valid SQL Expression. Eg: "Store Sales"."Sales"-"Store Sales"."Cost">1000 Supported Arithmetic Operators are: +, -, *, / |
| SQL Function call | In-built standard functions from Oracle, MS SQL Server, MySQL, DB2, Sybase, ANSI SQL, Informix and PostgreSQL databases Eg.: year([table_name].[date_column]) = 2016 |
| Relational operator | Any relational operator to compare values supported in an SQL SELECT Query WHERE clause. The following operators can be used:
|
| Value | Refers to the exact value to match Eg.: "Accounts"."Department" = 'Finance" here 'Finance' is a literal value to match. |
You can also define filters containing multiple columns as the example given below
(("Store Sales"."Region"='South' AND "Store Sales"."Sales" < 10000) OR ("Store Sales"."Region"='West' AND "Store Sales"."Sales" < 10000))
Notes for Criteria formation:
- You can combine any number of criteria defined in the above-specified format using Logical Operators like AND and OR to form complex criteria, the same way as in SQL SELECT WHERE clause. Also, use Braces '()' to group the criteria for ordering.
- Enclose string literals (i.e. values) in single quotes.
- Enclose table name and column names in double quotes.
- Eg.: ("Store Sales"."Date Of Birth" = '2016-01-31 00:00:00')
- Currency symbols (or) percent symbol can't be used in criteria
- Eg.: [table_name].[currency_column] = 75.66 is valid
- Eg.: [table_name].[percent_column] = 100 is valid
- [table_name].[currency_column] = 75.66$ (or) [table_name].[percent_column] = 100% is not valid
Refer to the SQL SELECT WHERE clause documentation to know more on how to construct the filter criteria.


