## Documentation Index
Access the complete documentation index at:
https://www.zoho.com/books/developer/llms.txt
Use this file to discover all available documentation pages before proceeding.
# Salesperson Extension Using Vue
In this help document, we’ll explain the steps to install and configure Vue and build the settings widget required for the Salesperson extension using Vue. You’ll have to add the code for the UI components required for the extension in the settings widget.
You can follow the steps in this help document or refer to our Git project on the [Salesperson extension using Vue](https://github.com/zoho/zohofinance-SalespersonWidget-Vue/tree/main).
**Prerequisite:** You need to download and install Node.js and Node Package Manager (npm) in your device. You can install Node.js from the [Node.js website](https://nodejs.org/).
### Folders for Vue and Settings Widget
You have to create separate folders for [Vue](/books/developer/extensions/salesperson-extension-using-vue.html#vue) and the [settings widget](/books/developer/extensions/salesperson-extension-using-vue.html#settings-widget).
#### Vue
To create a folder for Vue:
1\. Install Vue Command Line Interface (CLI) globally on your device. Enter the following command in your terminal or command prompt.
```js
npm install -g @vue/cli
```
2\. Enter the following command in your terminal or command prompt to create the project. Here, salesperson-vue-app is the folder name. You can enter a folder name of your choice.
```js
vue create salesperson-vue-app
```
3\. Pick a preset for the project. A preset is the pre-configured set of options, settings, and plugins that can be used to set up your Vue project quickly. You can choose either the _Default_ _preset_ or _Manually select features_. In this project, we’ve used **Manually select features**. The presets required for the project are explained in the subsequent steps.
4\. Select all the project configurations such as Babel, Router, and Linter/Formatter. You can choose the options that best suit your project’s requirements.
5\. Choose either the Vue 2 or Vue 3 framework. In this project, we’ve used the Vue 2 framework.
6\. Select the required configurations.
#### Settings Widget
To create the settings widget:
1\. Install the [Zoho Extension Toolkit (ZET)](/books/developer/widgets/framework-and-hosting.html) globally by entering the following command in your terminal or command prompt.
```js
npx install -g zoho-extension-toolkit
```
2\. Enter the command:
```js
zet init
```
3\. Select **Zoho Books** from the options listed.
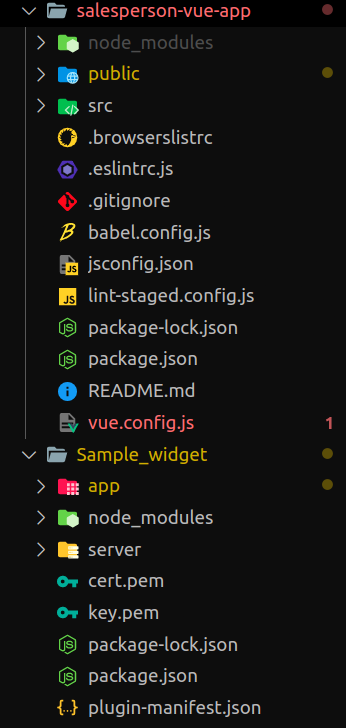
After creating the Vue project and the settings widget, your project’s structure should look similar to the project structure shown in the image below.
### Configure Vue
Now that you’ve installed Vue and created a Vue project, and the settings widget, you have to configure Vue so that the SDK methods for the widget can function properly. Here’s how:
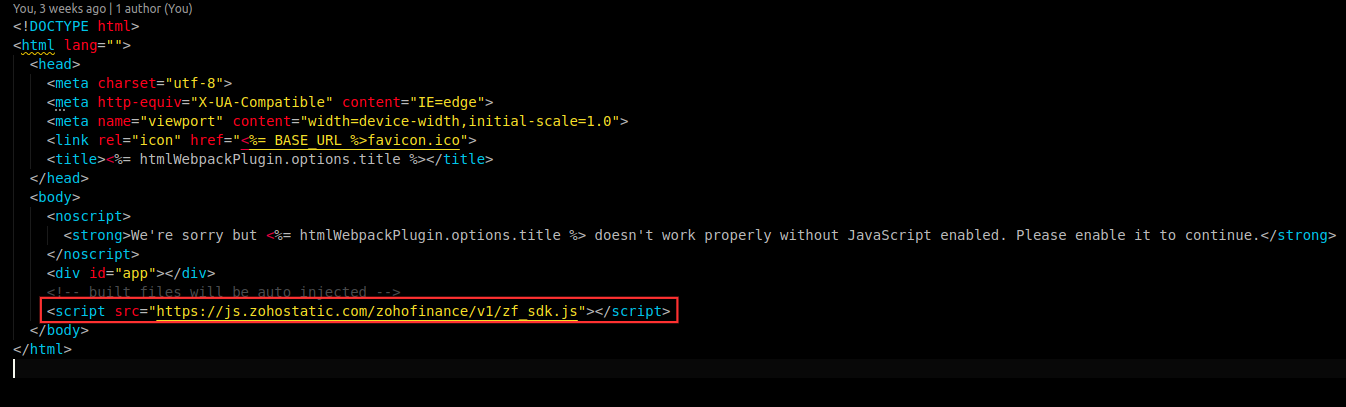
1\. Go to your Vue project folder > public > index.html.
2\. Paste the following command in the body tag of the index.html file. You can find this code by navigating to your _widget folder_ > _app_ > _widget’s html file._
```js
```
Refer to the image below to know where to paste the code.
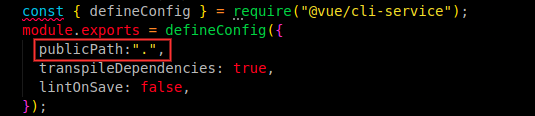
3\. Go to your _Vue project folder > src > vue.config.js_.
4.Add the line **publicPath:"."** to the file. The _publicPath_ field is a configuration that helps Vue applications work correctly when deployed to sub-directories or specific hosting environments.
Refer to the image below to know where to paste the code.
### Build UI
To build the UI required for the Salesperson extension, you have to install Bootstrap on your device.
To do this, enter the following command in your terminal or command prompt.
```js
npm i bootstrap
```
Next, create the following folders and files in the **src** folder as shown in the image below.
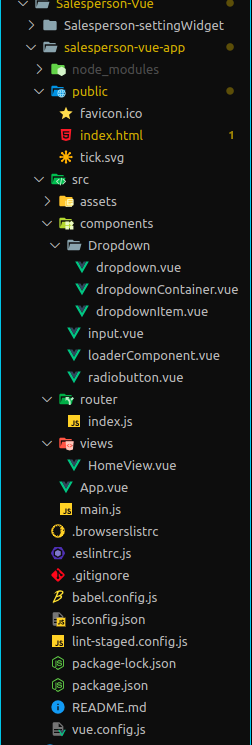
In the subsequent sections, we’ll explain the need for each file or folder and what code you have to paste into each file.
#### main.js
The main.js serves as the entry point for your application. It’s the file where you create the root Vue instance, setup the required global configurations, and initialize ZFAPPS.
**Insight:** ZFAPPS is the name of the [Zoho Extension Toolkit (ZET)](/books/developer/widgets/framework-and-hosting.html) framework used by the Zoho Finance apps.
Paste the following code in the main.js file:
```js
import Vue from "vue";
import App from "./App.vue";
import router from "./router";
import "bootstrap/dist/css/bootstrap.css";
Vue.config.productionTip = false;
async function initializeApp() {
if (window.ZFAPPS) {
window.ZFAPPS.extension.init().then(async (zapp) => {
window.ZFAPPS.invoke("RESIZE", { width: "550px", height: "600px" });
const organizationMap = await window.ZFAPPS.get("organization");
const { organization: { api_root_endpoint } } = organizationMap;
window.zapp = zapp;
// Store the data globally
Vue.prototype.$appMeta = {
organizationMap:JSON.stringify(organizationMap),
domainURL: api_root_endpoint,
connection_link_name:"salesperson_commission_books",// created in the sigma developer portal
orgVariablePlaceholder:"vl__u76nt_data_store", // paste the placeholder created in the sigma developer portal
};
new Vue({
zapp: zapp,
router,
ZFAPPS: window.ZFAPPS,
render: h => h(App),
}).$mount("#app");
});
}
}
initializeApp();
```
#### App.vue
The App.vue file is used to route the view of the **HomeView.vue file**. The App.vue file:
1. Handles the routing of the application.
2. Specifies which content or component should be displayed based on the current route or user interaction.
When a certain route is matched, the App.vue file is responsible for rendering the content of the HomeView.vue file.
Paste the following code in the App.Vue file:
```js
```
#### index.js
The index.js will be present in the router folder. This file defines the routes for your application. It specifies the mapping between URLs and Vue components that should be displayed when you navigate to these URLs.
Paste the following code in the index.js file:
```js
import Vue from "vue";
import VueRouter from "vue-router";
import HomeView from "../views/HomeView.vue";
Vue.use(VueRouter);
const routes = [
{
path: "/",
name: "home",
component: HomeView
},
];
const router = new VueRouter({
mode: "hash",
base: process.env.BASE_URL,
routes
});
console.log("base"+router);
export default router;
```
#### Components Folder
The components folder is the centralized location for all reusable and shareable UI elements.
For the Salesperson extension, the following components are required:
* Dropdown components:
* [dropdown.vue](/books/developer/extensions/salesperson-extension-using-vue.html#dropdown.vue)
* [dropdownContainer.vue](/books/developer/extensions/salesperson-extension-using-vue.html#dropdown-container.vue)
* [dropdownItem.vue](/books/developer/extensions/salesperson-extension-using-vue.html#dropdown-item.vue)
* [Input component (input.vue)](/books/developer/extensions/salesperson-extension-using-vue.html#input.vue)
* [Loader component (loaderComponent.vue](/books/developer/extensions/salesperson-extension-using-vue.html#loader-component.vue)
* [Radio button component (radioButton.vue)](/books/developer/extensions/salesperson-extension-using-vue.html#radio-button.vue)
#### dropdown.vue
Paste the following code in the dropdown.vue file:
```js
```
#### dropdownContainer.vue
Paste the following code in the dropdownContainer.vue file:
```js
```
#### dropdownItem.vue
Paste the following code in the dropdownItem.vue file:
```js
{{ label }}
```
#### input.vue
Paste the following code in the input.vue file:
```js
```
#### loaderComponent.vue
Paste the following code in the loaderComponent.vue file:
```js
```
#### radioButton.vue
Paste the following code in the radioButton.vue file:
```js
```
#### HomeView.vue
The HomeView.vue file contains the overall UI for the Salesperson extension. The code to store data in the global field will be available in this file.
Paste the following code in the HomeView.Vue file:
```js
When do you wish to create the expenses Sales Person Commissions ?
Commission Type
Commission Rate
Select the paid through account for expense created
Select the expense account
Commission Specification
```
### Build Project
Now that you’ve made the necessary configurations for the Vue project, you’ll have to build it. To build the project, run the **npm run build** command in your terminal or command prompt. This will create an optimized build for the project in the build folder.
### Paste the Build Folder Into the Widget Folder
After building the Vue project, you have to copy the **build** folder and paste it into the widget folder. To automate this process, you can create a file (say **updateWidget.js**) in the Vue folder, where you can implement the logic for copying and pasting.
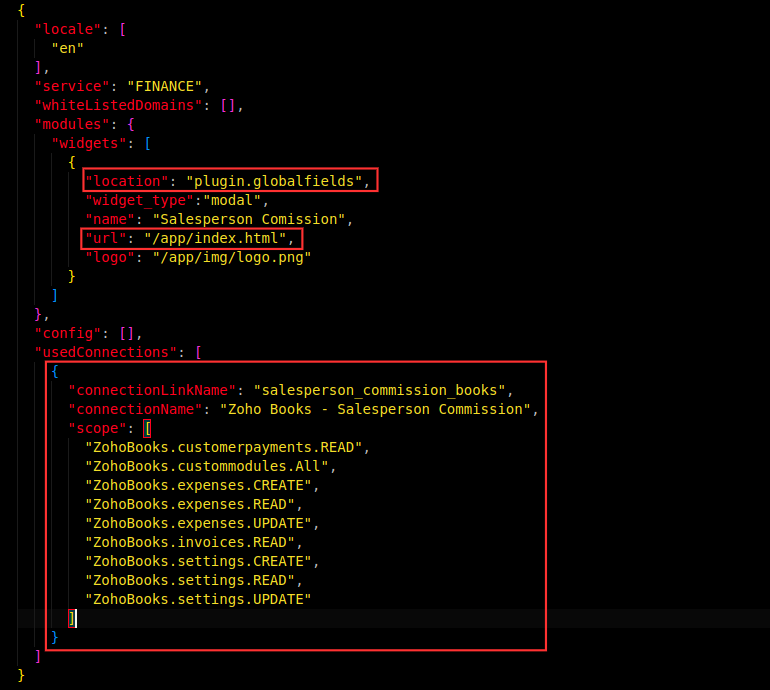
### Update the plugin-manifest.json File
The widget creation process happens during the extension’s installation. By default, the widget’s location will be the widgets pane in the right sidebar of the invoice creation page. To change its location, set the location attribute to **plugin.globalfield** and change the url to **/app/index.html**.
Additionally, you have to include the widget’s scope in the **usedConnection** array. To find the widget’s scope, go to the connection created for the extension in the Zoho Books Developer Portal and copy the JSON code. You have to paste this code inside the usedConnection array.
Refer to the image below to know where to paste the code.
### Validate Widget
The next step is to validate the widget to ensure if it adheres to the guidelines specified in the plugin-manifest.json file. To do this, enter the command **zet validate** in the terminal or command prompt.
### Pack Widget
To upload the widget in Zoho Books Developer Portal, you’ll have to pack it. Not all the files of your project directory are required while packing. Enter the command **zet pack** in your terminal or command prompt to pack the essential files and folders. After the command is executed, a ZIP file will be created.
### Upload Widget
To upload your widget into Zoho Books Developer Portal:
* Go to **Configure** at the top.
* Click **Global Fields** in the left sidebar.
* Click **Upload Widget** on the top right corner of the page.
* In the pop-up that appears:
* Enter the **Name** and **Description** for the widget.
* Click **Attach From Desktop** next to _Upload ZIP_ and upload the ZIP file generated by entering the **zet pack** command.
With this, you’ve built the settings widget for the extension using Vue.
