
Manual Journals
In accounting, journals are used to record debit and credit entries for transactions in chronological order. These entries are then posted to the general ledger. The main types of journals include the Sales Journal, Purchase Journal, Cash Disbursement Journal, and Cash Receipt Journal.
In Zoho Books, manual journals are used to record financial transactions that cannot be recorded through standard modules such as invoices or bills. Certain accounting adjustments, such as depreciation, accruals, and error corrections require manual intervention. A manual journal allows you to directly record debit and credit entries for multiple accounts, ensuring accurate financial reporting. These entries typically impact reports such as the Balance Sheet and Profit and Loss, and can be further reviewed in reports like the General Ledger, Trial Balance, and Journal Report. For example, you can use a manual journal to record monthly depreciation.
Approval Statuses
Manual journals can have different statuses based on whether approvals are enabled.
| Journal Status | Description | Applicable When |
|---|---|---|
| Draft | The manual journal is created and saved as a draft. | Approvals is enabled or disabled |
| Pending Approval | The manual journal is waiting for approval. | Approvals is enabled. |
| Approved | The manual journal is approved and ready to be published. | Approvals is enabled. |
| Rejected | The manual journal is rejected. | Approvals is enabled. |
| Published | The manual journal is finalized and recorded in the accounts. | Approvals is enabled or disabled |
Record Manual Journals
You can record manual journals in Zoho Books either by creating new journals or importing them.
Create Manual Journals
To create a manual journal:
- Go to Accountant on the left sidebar and select Manual Journals.
- Click + New Journal.
- In the New Journal page, enter the required details:
- Select the Date on which you want to record the manual journal.
- The journal number will be auto-populated in the Journal# field. To configure it manually, click the Gear icon next to the field.
- In the Configure Journal Number Preferences pop-up, select if you want to auto-generate journal numbers or enter them manually.
- Click Save.
- Enter the Notes for the journal entry.
- In the Reporting Method field, select how you want the journal entry to appear in your reports.
- Select Accrual only to make the journal entry appear only in the reports that are generated on accrual basis.
- Select Cash only to make the journal entry appear only in the reports that are generated on cash basis.
- Select Accrual and Cash to make the journal entry to appear in the reports generated on both accrual and cash basis. This option is selected by default when creating a new journal.
- Select the Currency you want to associate with the journal.
- In the line item table of the journal:
- Select the Account you want to track credit and debit entries.
- Select the Contact you want to associate with the journal entry.
- Select Sales or Purchases as the required Transaction Type.
- In the Tax column, select the tax rate you want to apply to the journal entry. If you’ve provided a tax rate for a journal entry and did not select a Taxable Type, then the journal entry will be considered taxable as a Sales transaction.
- Enter the required credit or debit entries.
Note: Ensure that the amount debited is always equal to the amount credited.
- Click Save as Draft or Save and Publish.
Once the journal is created, you can view its details on the Journal details page in both Details and PDF view. The Details view shows complete journal information, including journal number, date, accounts, debit and credit amounts, and other fields like reporting tags. The PDF View displays the same information in a clean, formatted layout with totals.
Note: When a manual journal is created in the Draft status, the amounts will not get reflected in the respective accounts. On the journal’s details page, click Publish to reflect the amount in their respective accounts. You can also publish multiple manual journals by selecting the required journals and clicking Publish.
Import Manual Journals
To import manual journals:
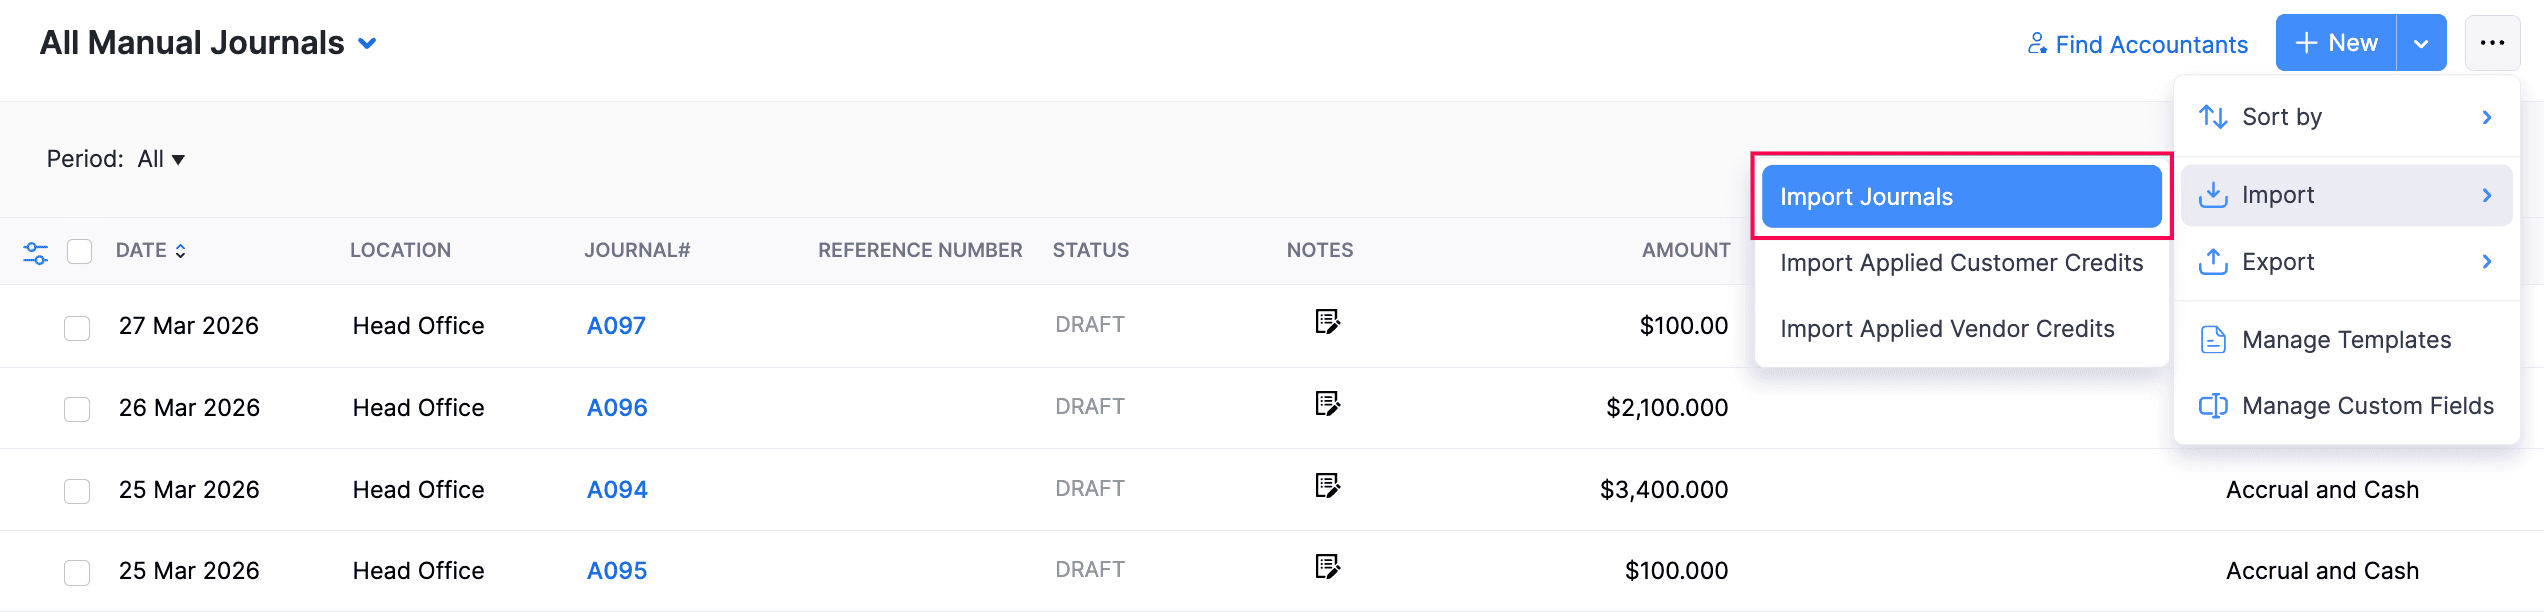
- Go to Accountant on the left sidebar and select Manual Journals.
- Click the More icon in the top right corner of the page, then select Import and choose Import Journals from the dropdown.
- In the new page that appears, click Choose File to select and import the required file. You can also download a sample file for reference.
- Select the Character Encoding and File Delimiter for your uploaded file.
- Check the Auto-generate Journal Numbers option to automatically generate journal numbers. Any journal numbers in your import file will be ignored.
- Click Next.
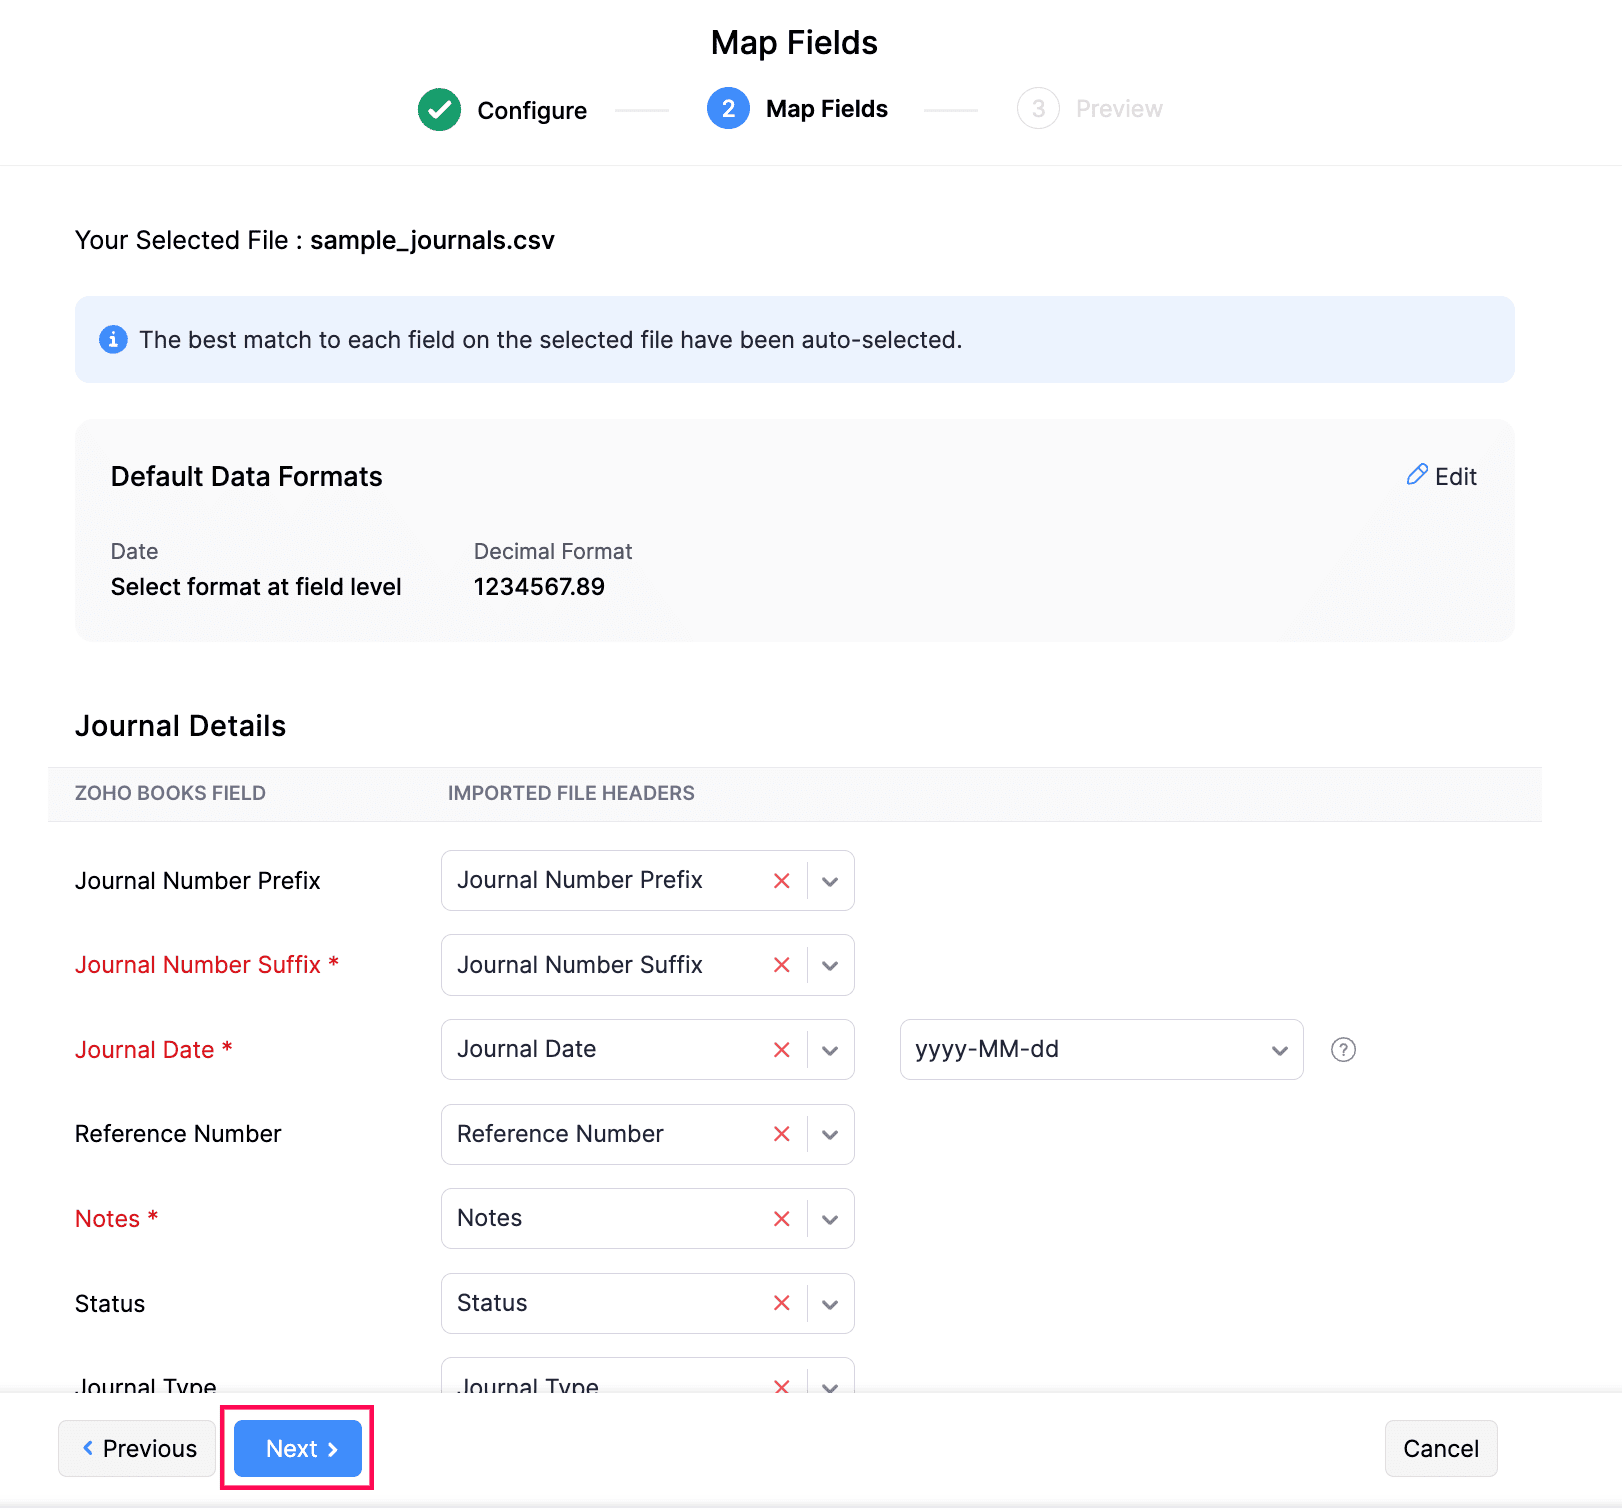
- In the Map Fields page, check if the fields are correctly mapped with the headers of the import file.
- Click Next.
- In the Preview page, click Import.
Insight: The status of journals, i.e., Draft or Published, will also be included in the import file.
View Associated Reporting Tags
To view the associated reporting tags of a manual journal:
- Go to Accountant on the left sidebar and select Manual Journals.
- Select the manual journal for which you want to view the associated reporting tags.
- In the journal’s details page, click the Details view.
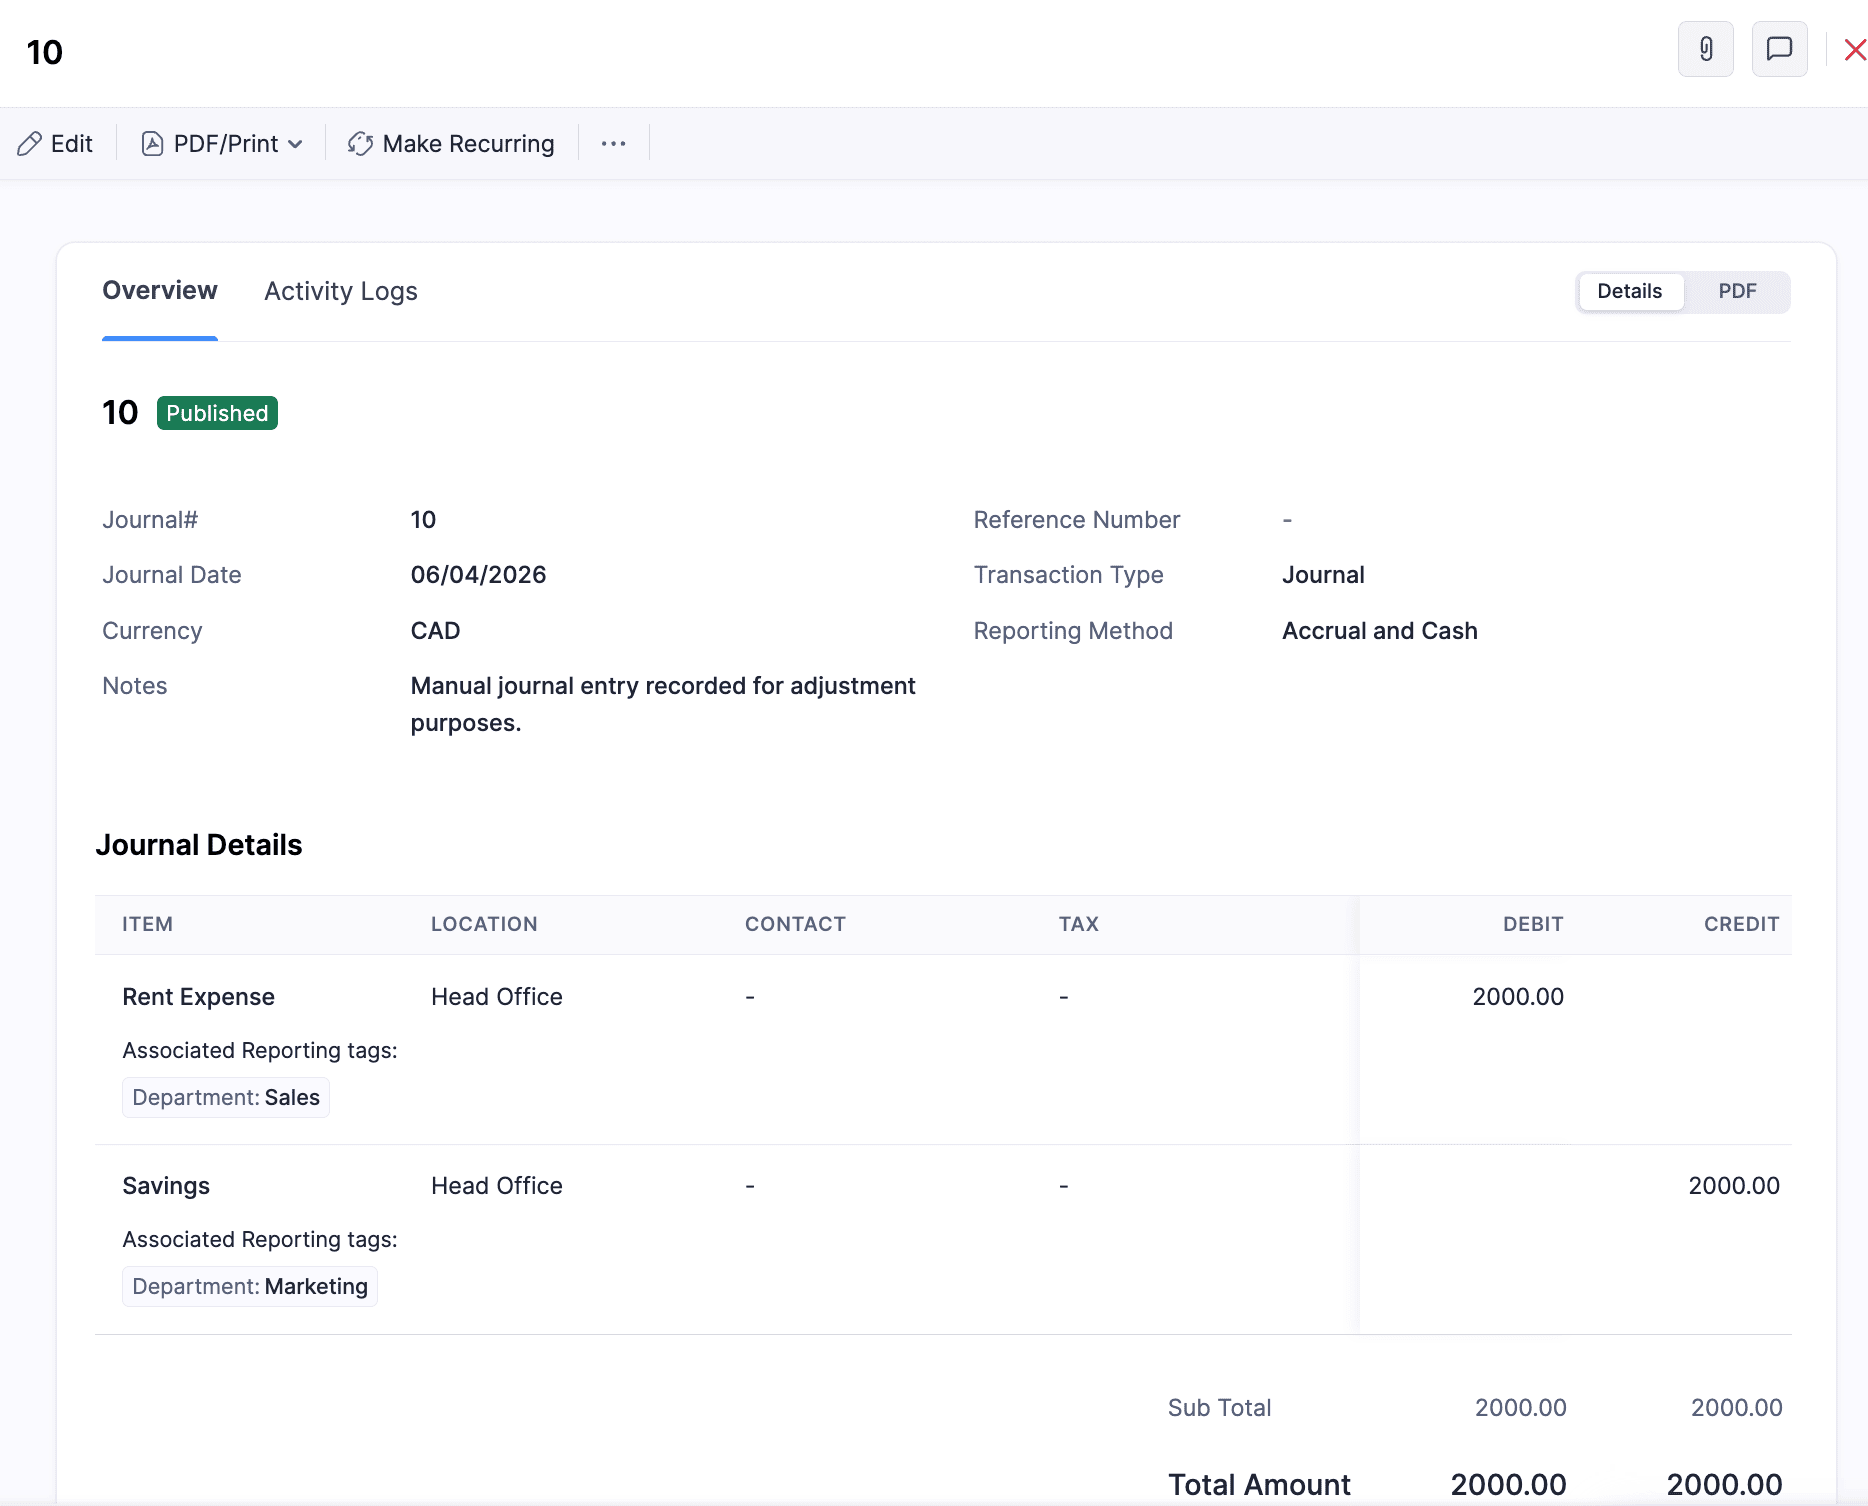
You can view the reporting tags associated with the manual journal in the Journal Details table.
View Activity Logs
To view the activity logs of a manual journal:
- Go to Accountant on the left sidebar and select Manual Journals.
- Select the manual journal for which you want to view the activity logs.
- In the journal’s details page, navigate to the Activity Logs tab.
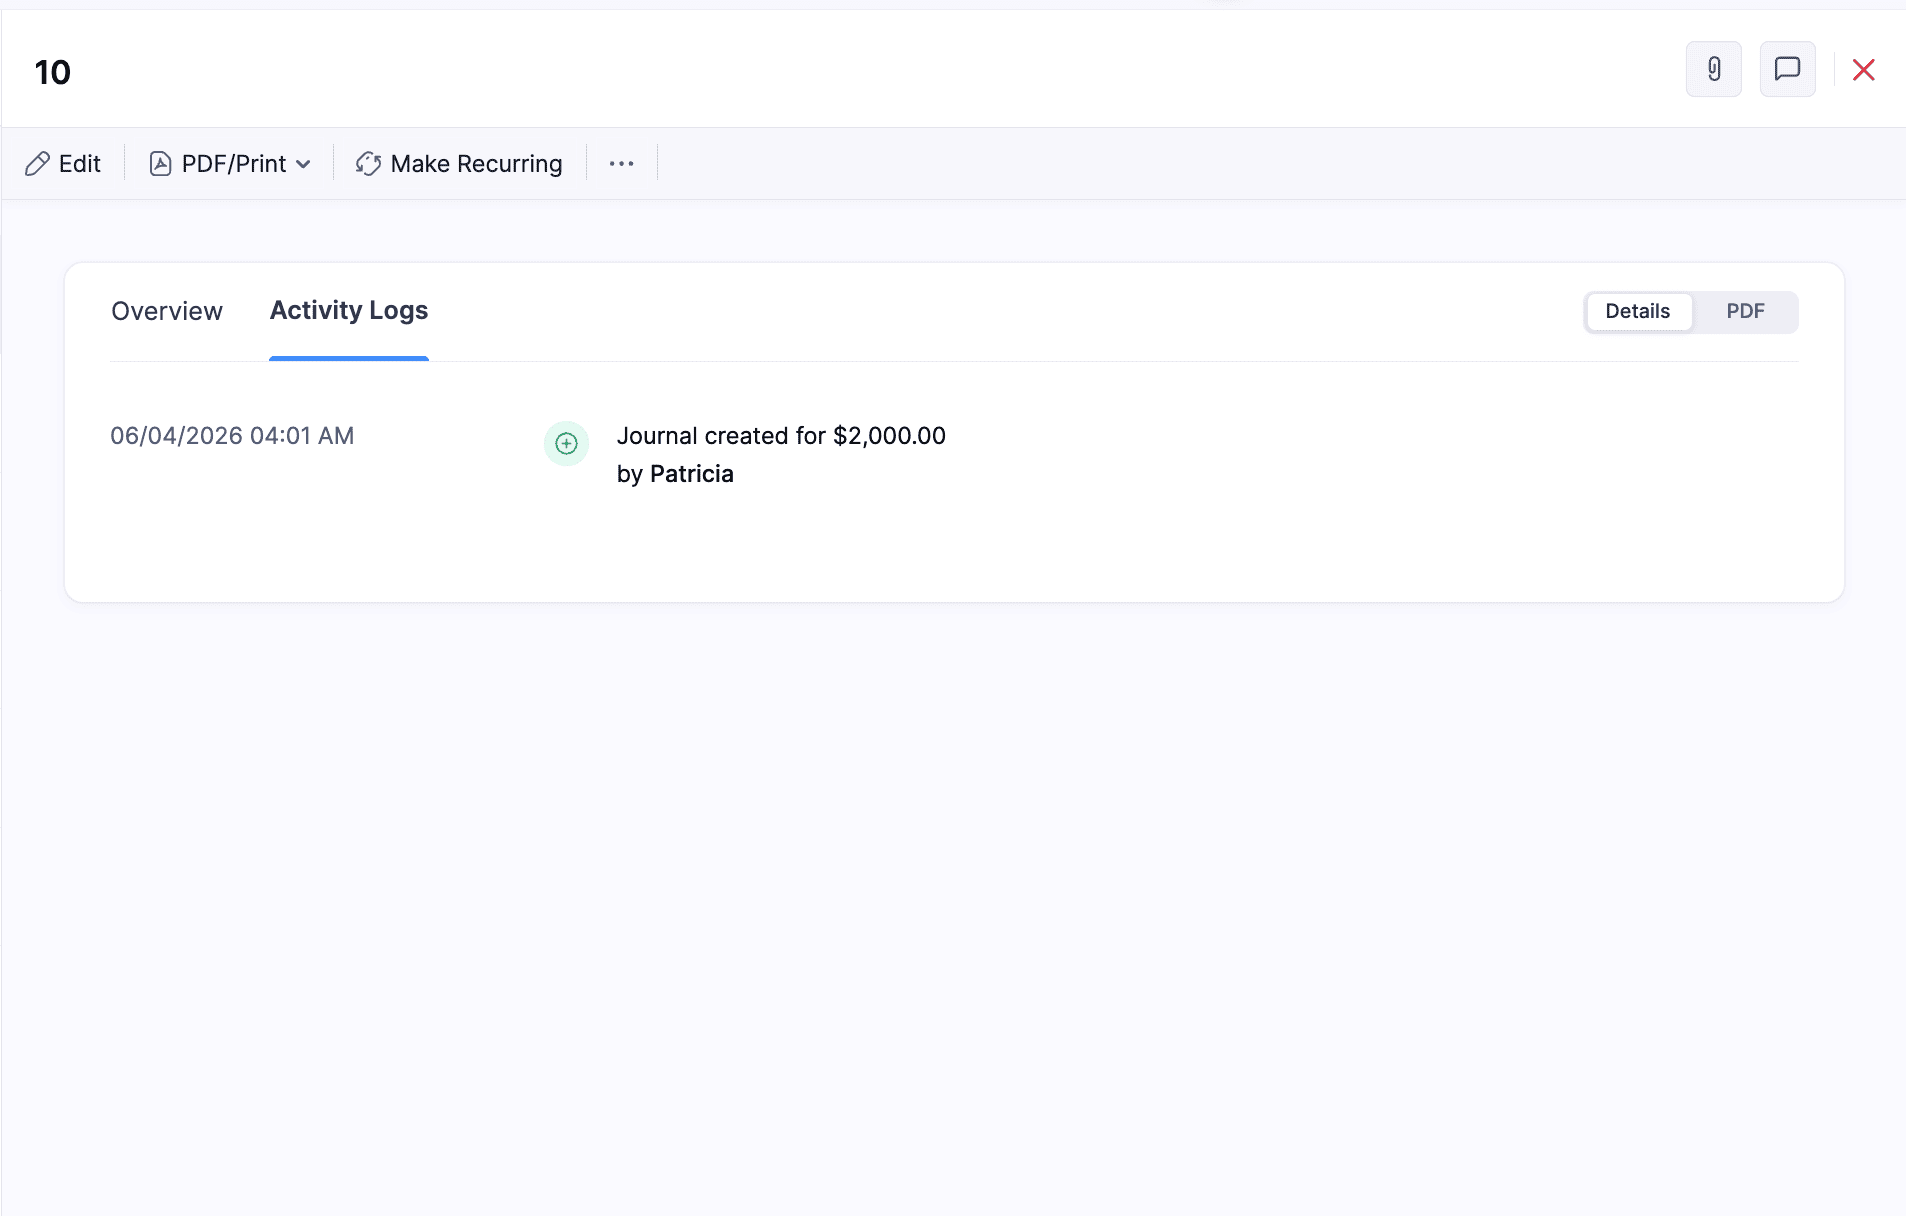
You can view all the activities related to the manual journal, such as creation, edition, approvals, and status changes.
Create Manual Journals for Bank Accounts
You can also create manual journals using the bank accounts you’ve added in Zoho Books. After creating a manual journal, the transaction will appear under the respective bank account as a Manually Added transaction, listed as either a withdrawal or a deposit. You can then match this manually added transaction with an uncategorized transaction. Here’s how:
- Go to Banking on the left sidebar.
- Select the bank account where you want to match transactions.
- Select an uncategorized transaction to match.
- The best possible matches will be displayed in the right pane, including the manually added transaction if the date and amount are the same.
- Click Match next to the required transaction.
Learn more about matching and categorizing transactions.
Export Manual Journals
To export manual journal:
- Go to Accountant on the left sidebar and select Manual Journals.
- Click the More icon in the top right corner of the page, then select Export and choose Export Journals from the dropdown.
- In the Export Manual Journals pop-up that appears, fill in the following fields:
- The Module will be auto-selected as Manual Journals.
- Select whether you want to import All Manual Journals or only journals from a Specific Period
- Select the Decimal Format.
- Select the Export Template with which you want to export data.
- Select the required Export File Format of your export file. The available options include CSV, XLS, and XLSX formats.
- Enter a password in the File Protection Password field to encrypt your export file from unauthorized access.
- Click Export.
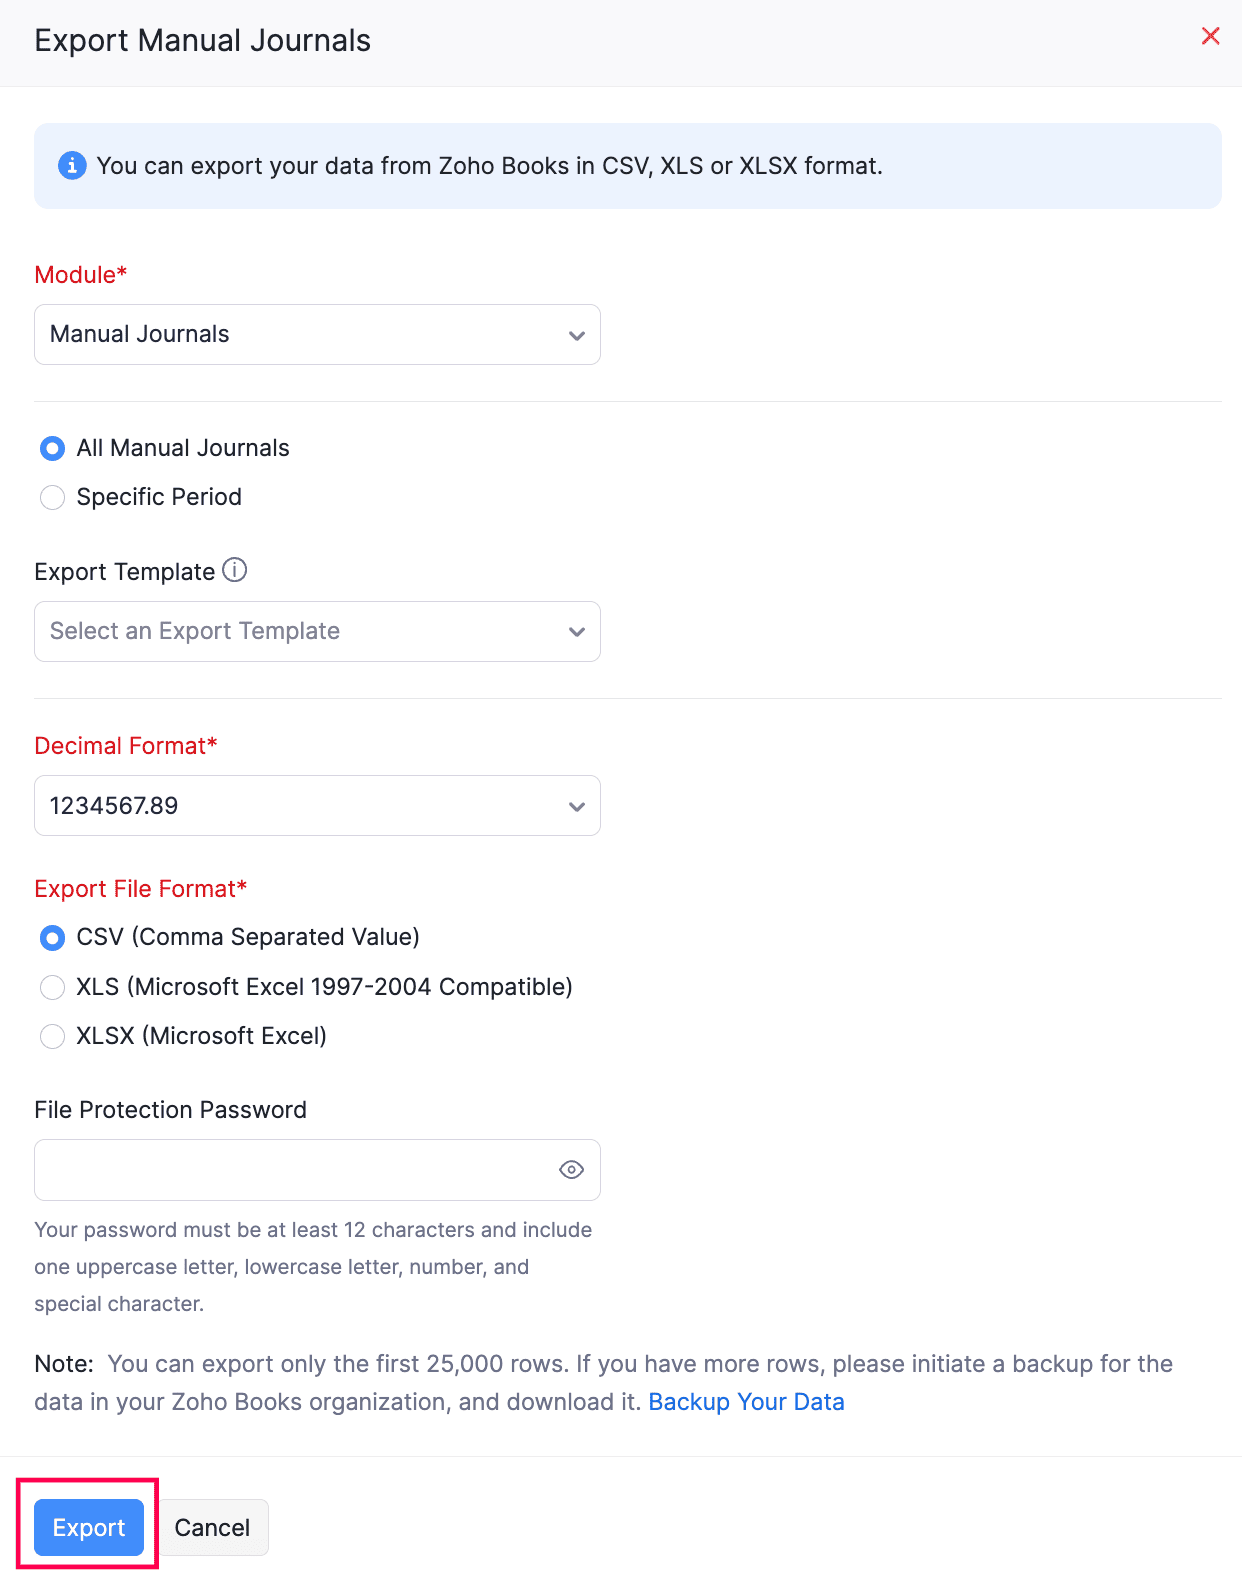
Note: The status of journals, i.e., Draft or Published, will also be included in the export file.
Other Actions
You can perform the following actions in the Manual Journals module of Zoho Books.
Edit Manual Journals
To edit a manual journal in Zoho Books:
- Go to Accountant on the left sidebar and select Manual Journals.
- Select the manual journal you want to edit.
- Click the Edit icon in the journal’s details page.

- Make the necessary changes and click Save.
The manual journal will be updated.
Download as PDF
To download a manual journal in Zoho Books:
- Go to Accountant on the left sidebar and select Manual Journals.
- Select the manual journal you want to download as a PDF.
- Click PDF/Print at the top of the journal’s details page and select PDF from the dropdown.
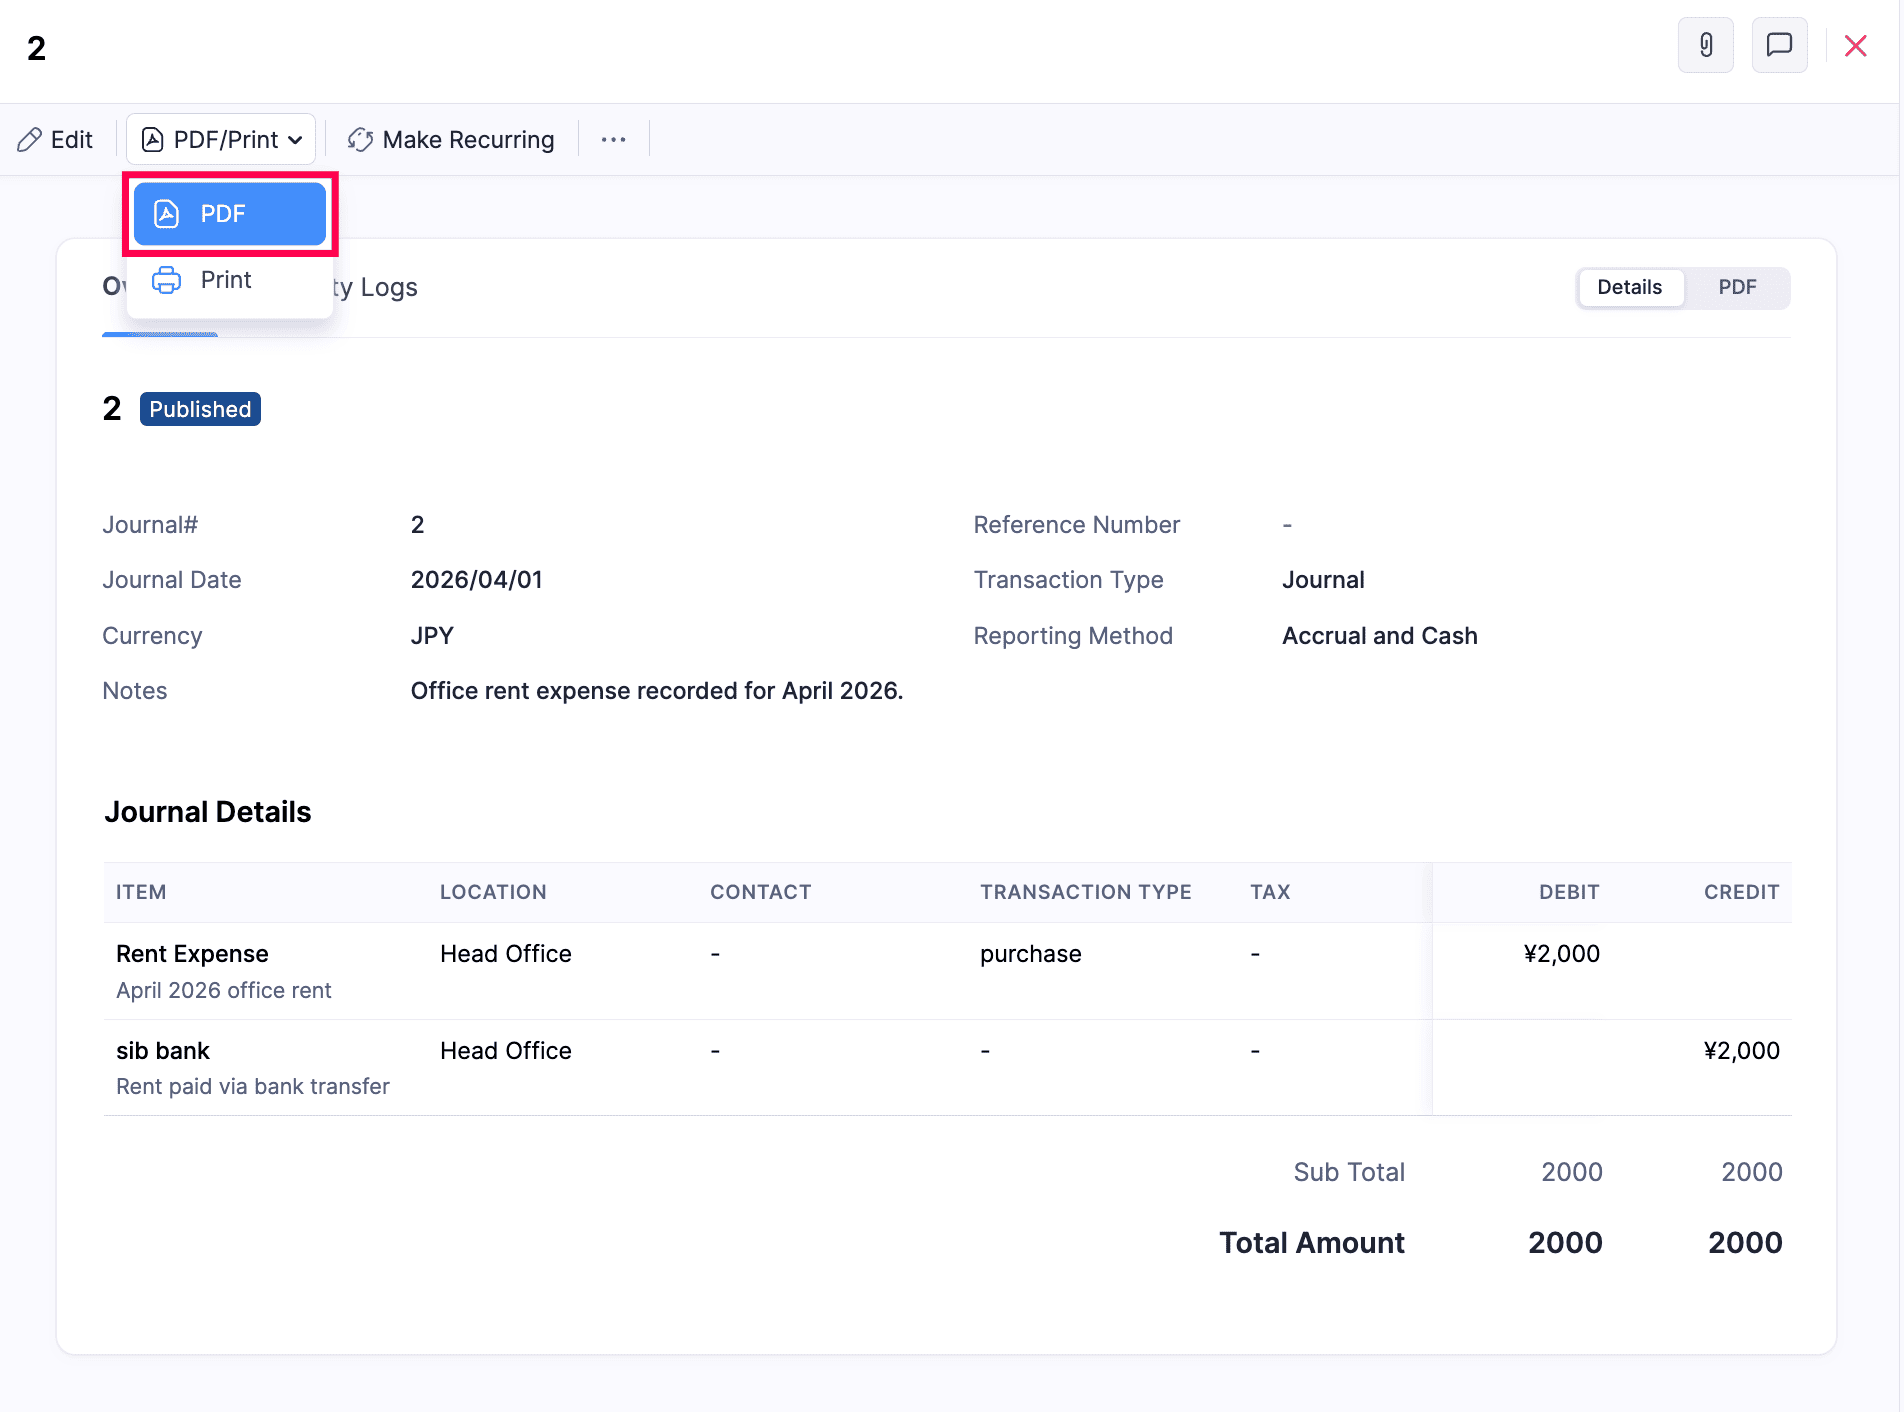
The manual journal will be downloaded as a PDF file.
Print Manual Journals
To print a manual journal in Zoho Books:
- Go to Accountant on the left sidebar and select Manual Journals.
- Select the manual journal you want to print.
- Click PDF/Print at the top of the journal’s details page and select Print from the dropdown.
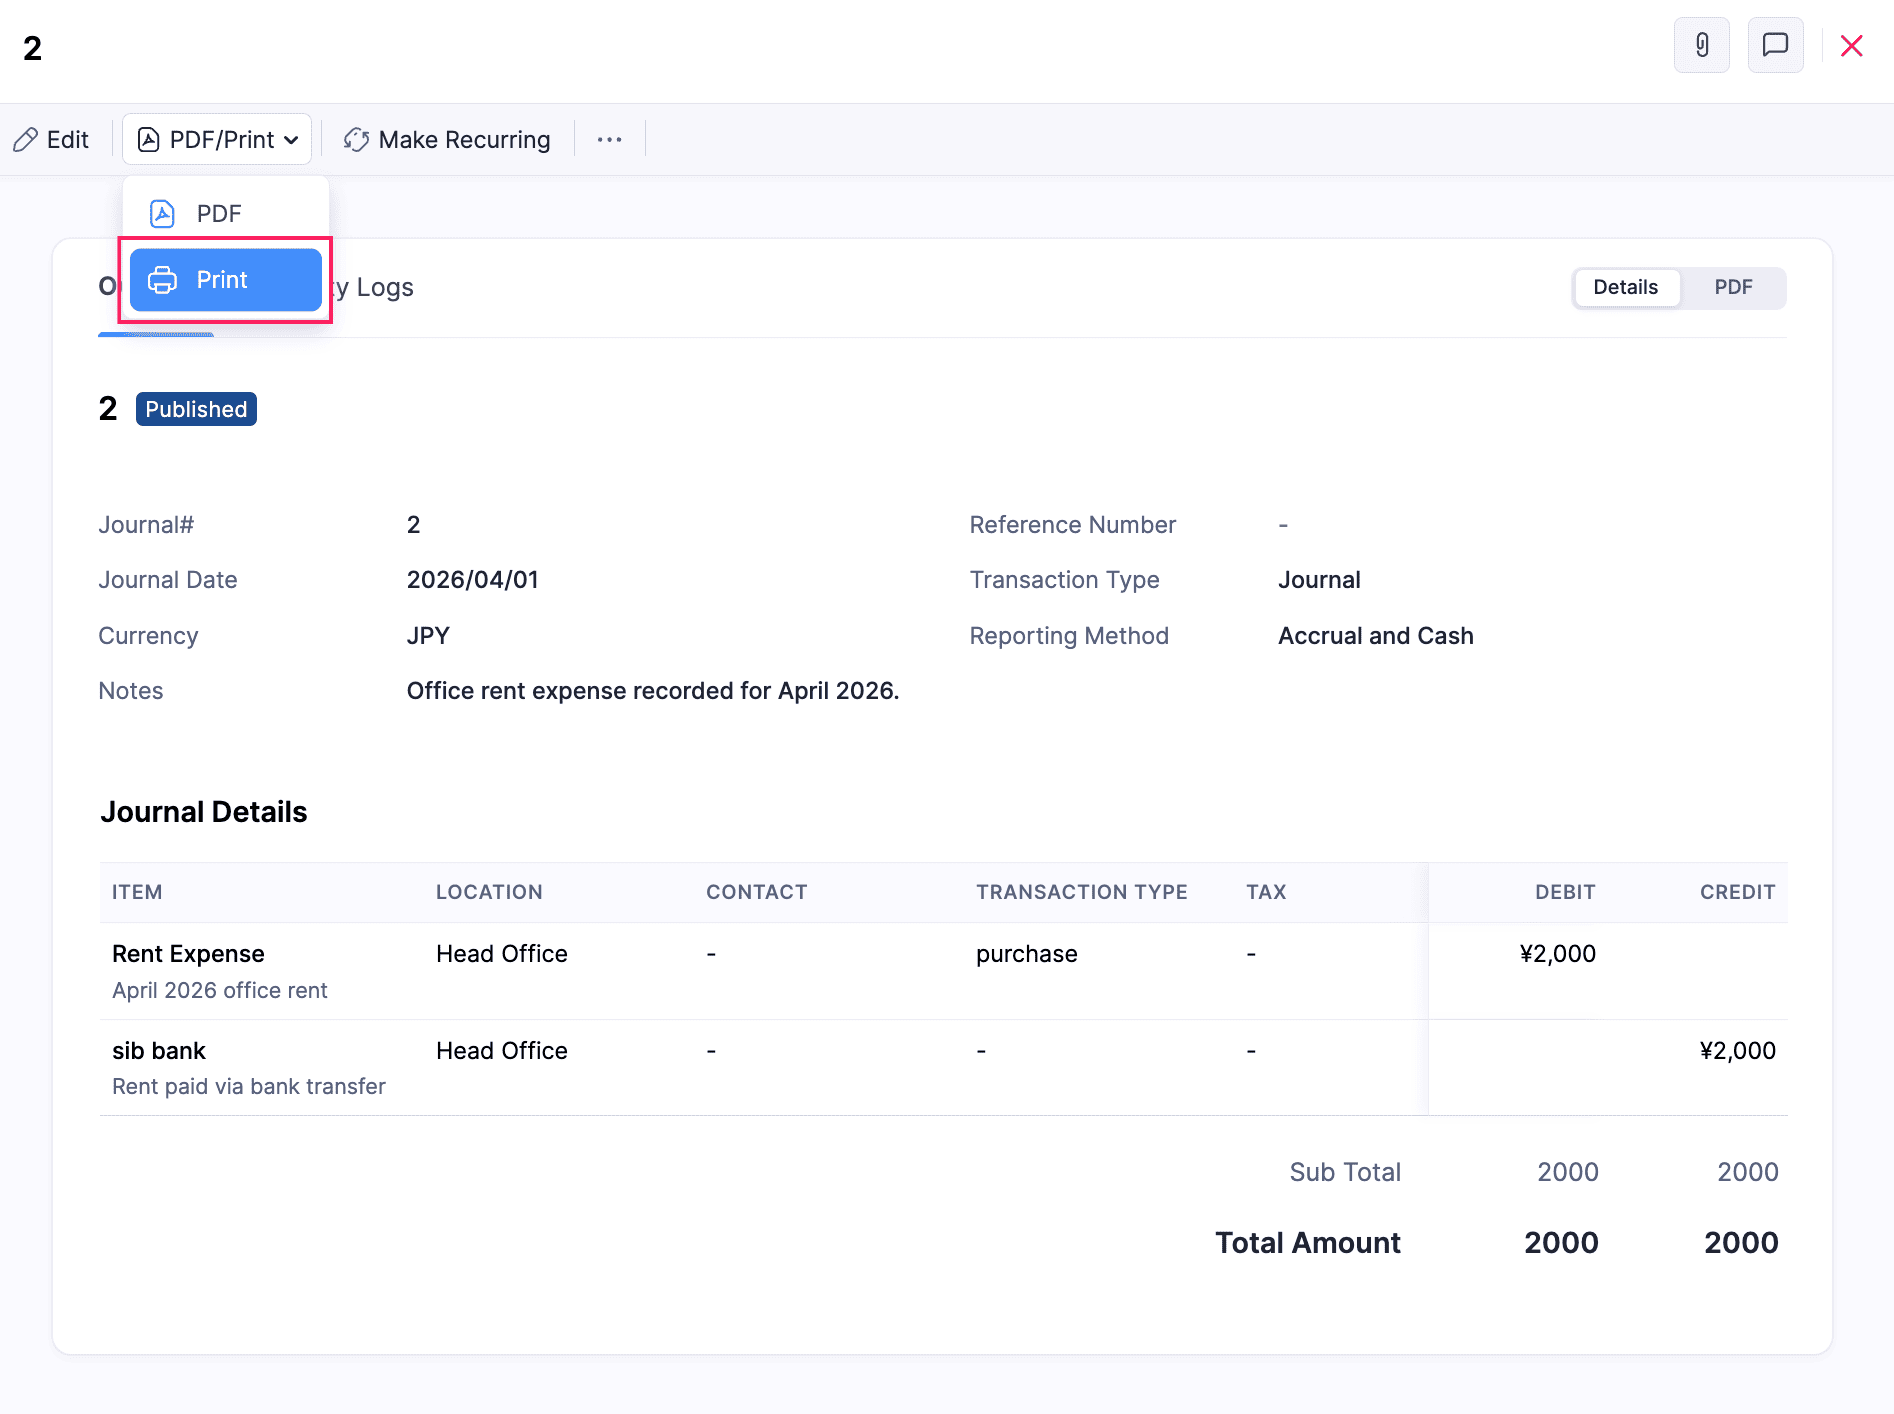
- In the pop-up that appears, review the preview and click Print.
The manual journal will be printed.
Attach Files to a Manual Journal
You can attach necessary files to a manual journal. Here’s how:
- Go to Accountant on the left sidebar and select Manual Journals.
- Select the manual journal for which you want to attach files.
- Click Attach Files in the journal’s details page. Then, select Upload your Files and choose the files you want to attach.
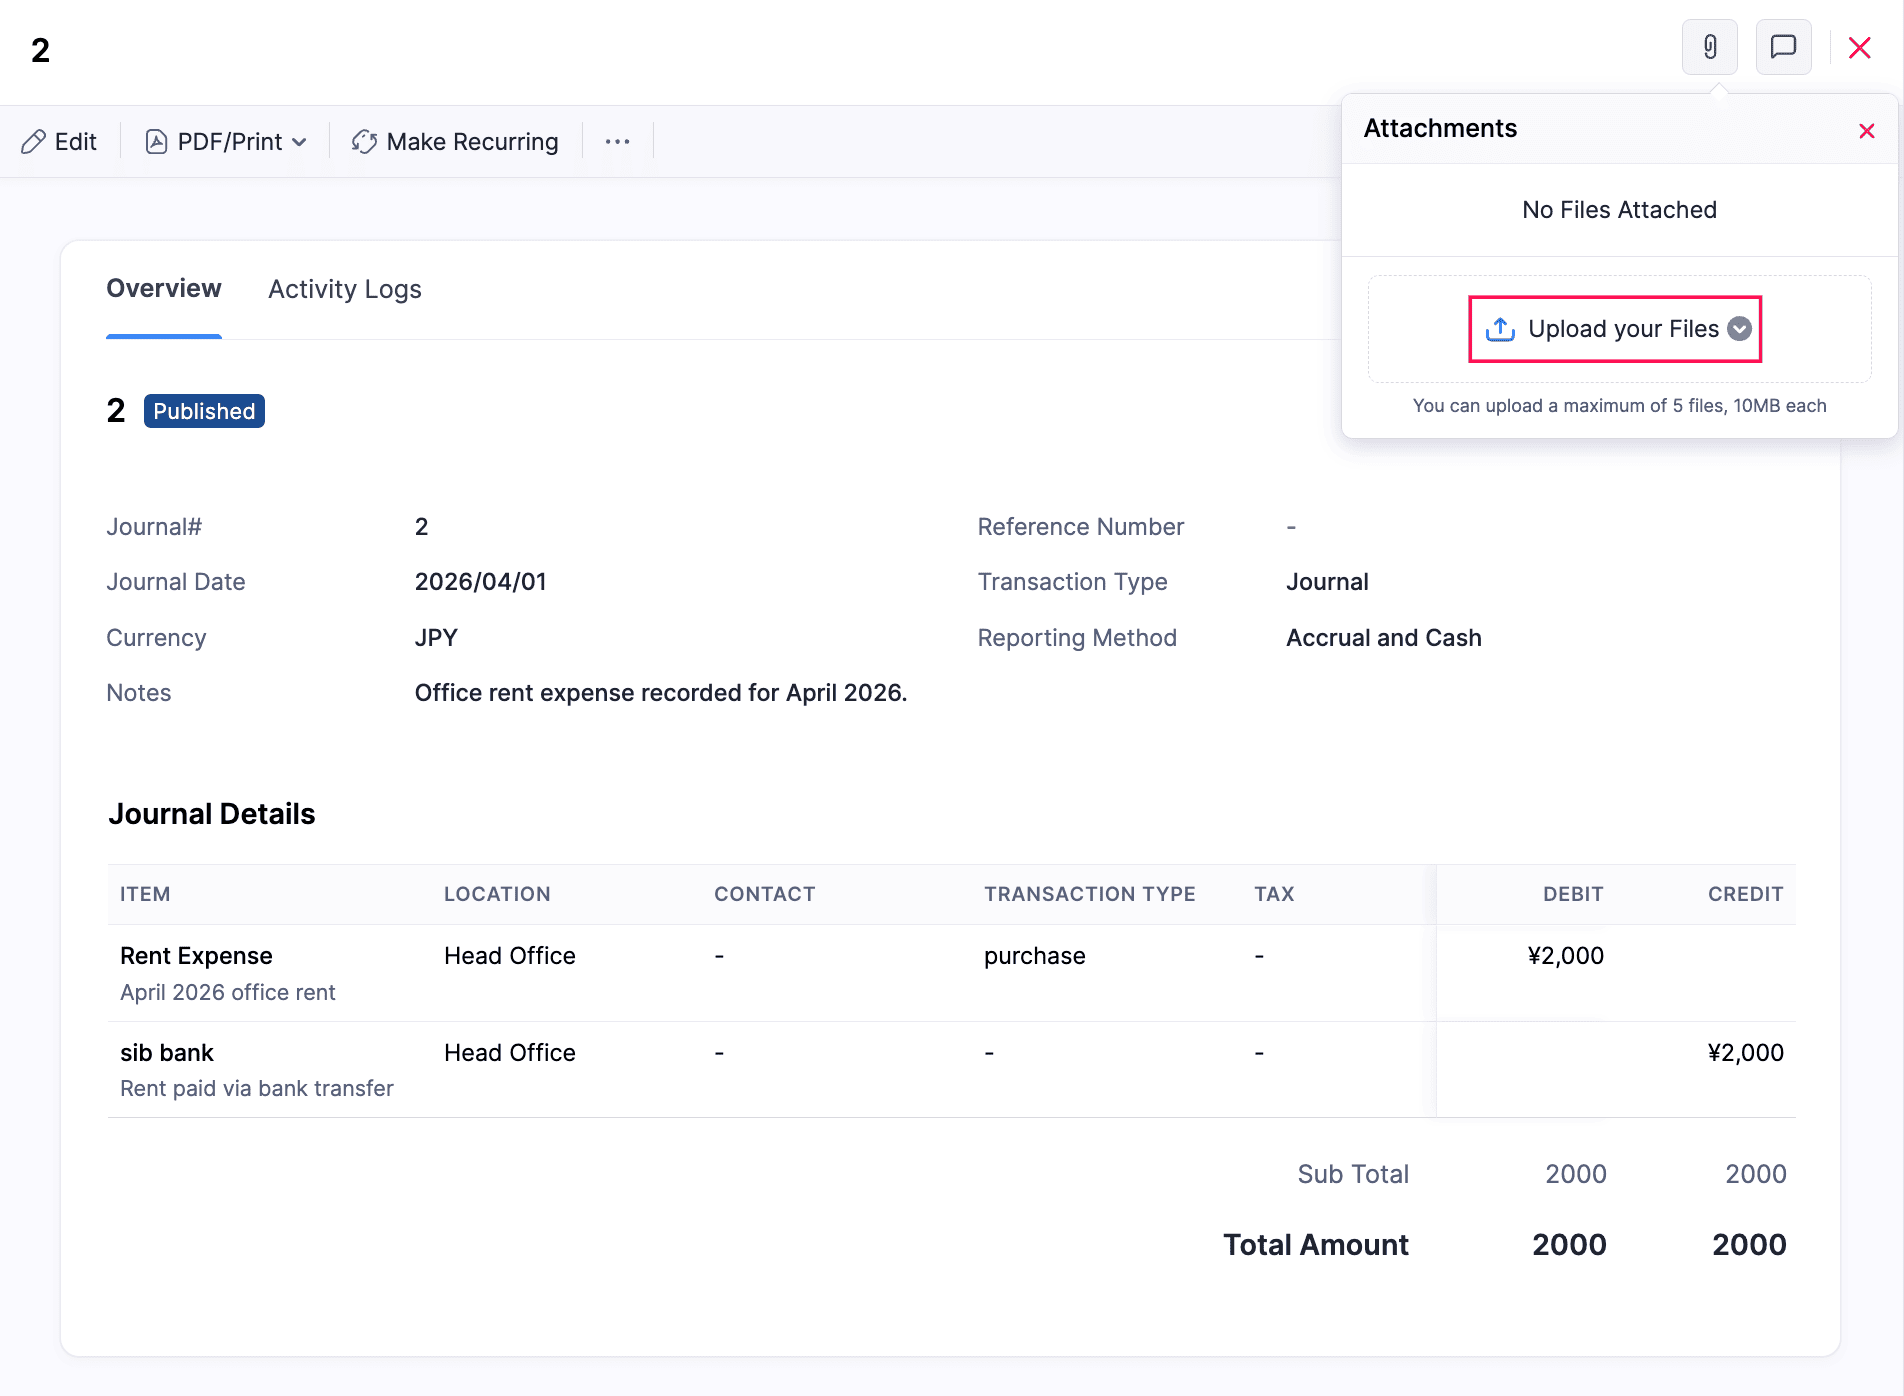
The selected files will be attached to the manual journal.
Clone Manual Journals
If you want to create a journal with details similar to an existing one, you can clone it. Here’s how:
- Go to Accountant on the left sidebar and select Manual Journals.
- Select the journal you want to clone.
- Click the More icon at the top right corner of the journal’s details page and select Clone from the dropdown.
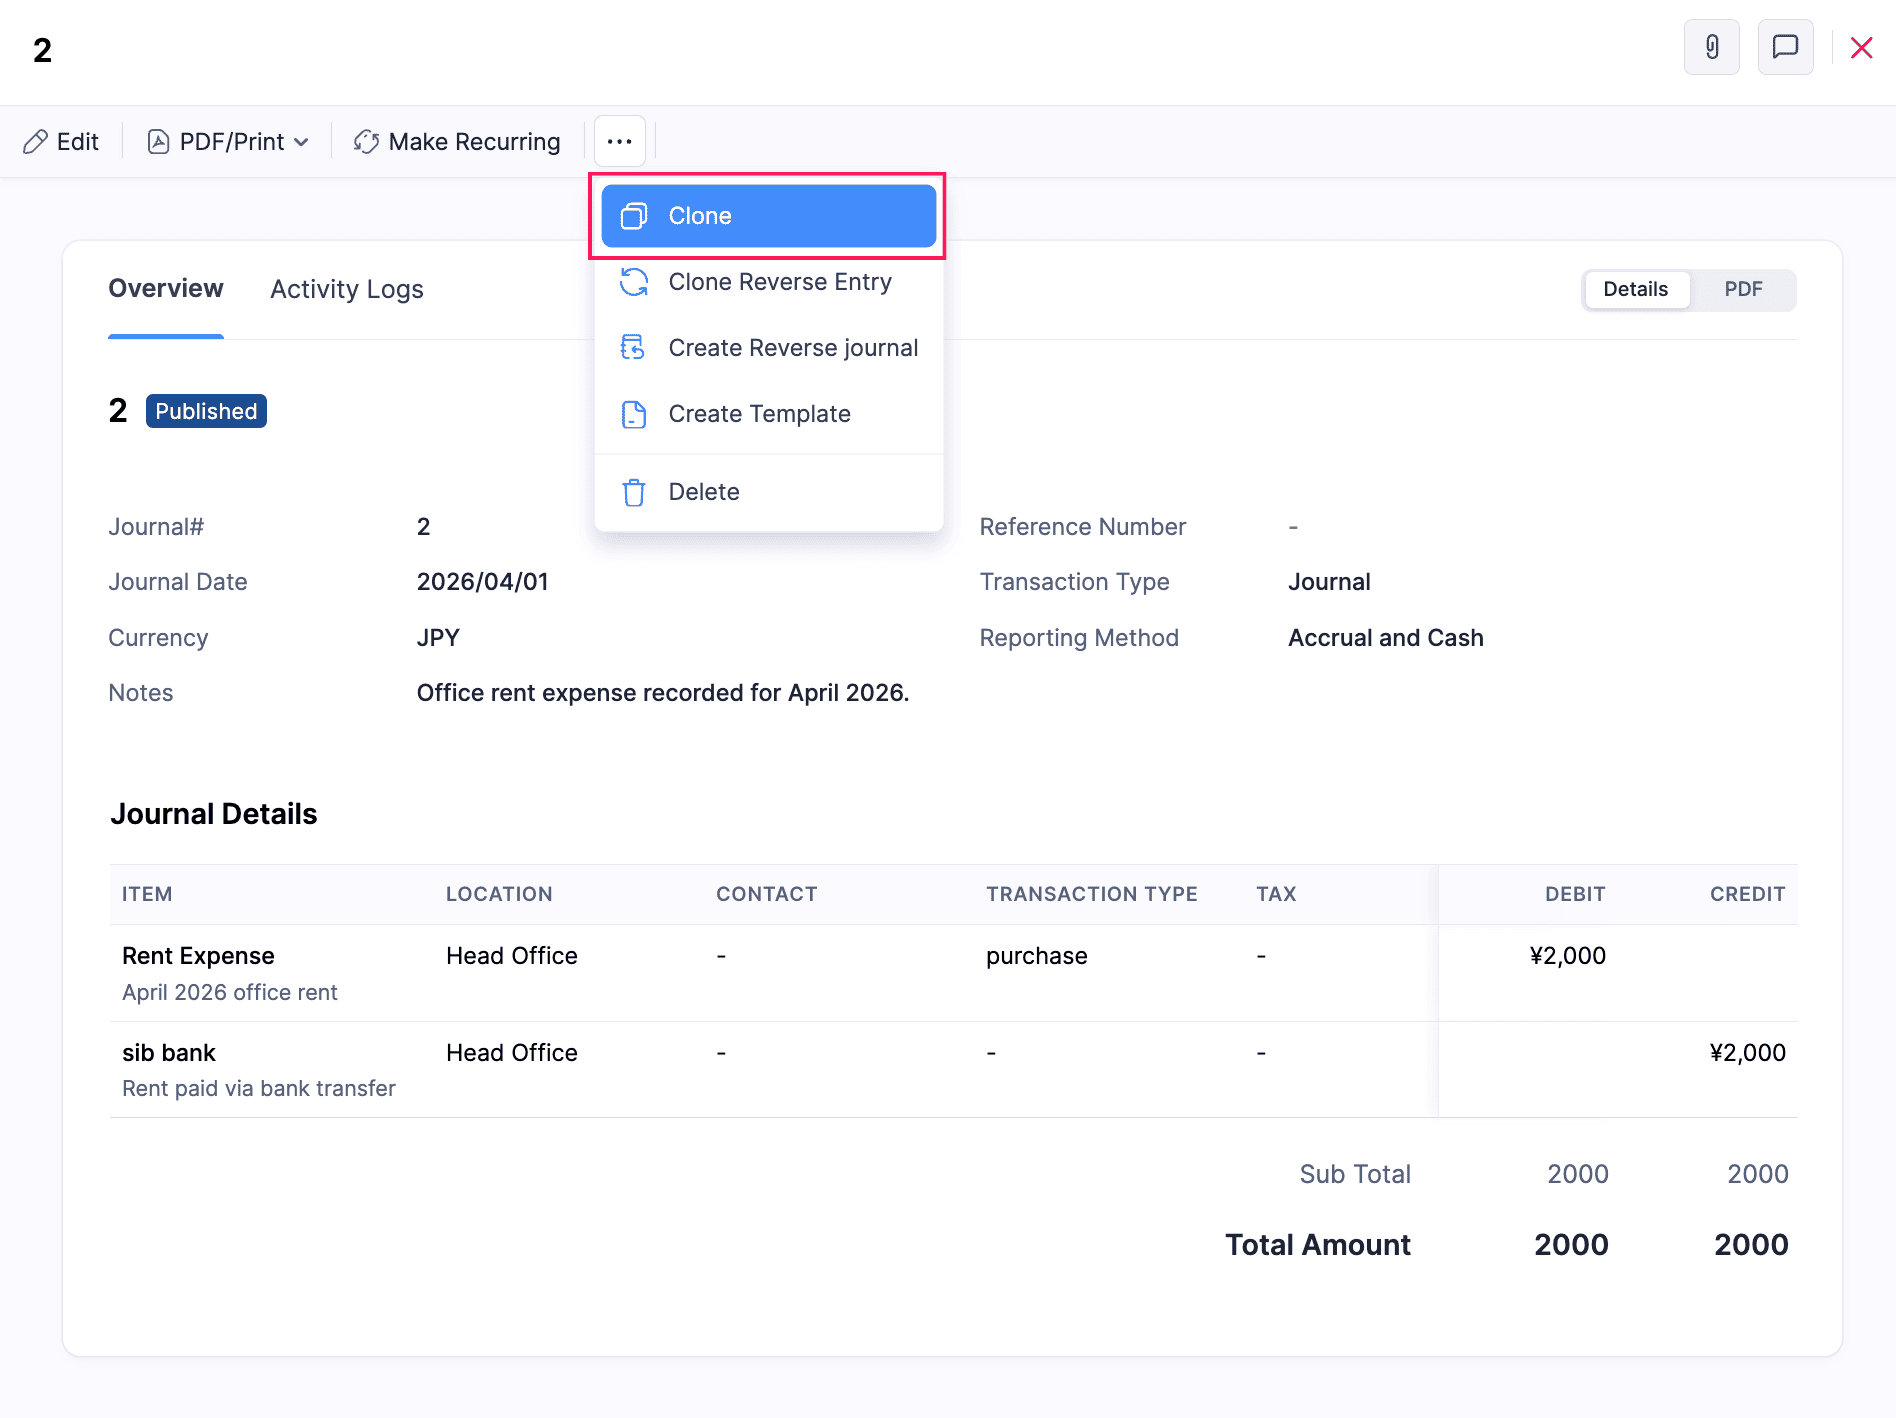
- Make the necessary changes and click Save as Draft or Save and Publish.
The journal will be cloned.
Delete Manual Journals
To delete a manual journal in Zoho Books:
- Go to Accountant on the left sidebar and select Manual Journals.
- Select the journal you want to delete.
- Click the More icon at the top right corner of the journal’s details page and select Delete from the dropdown.
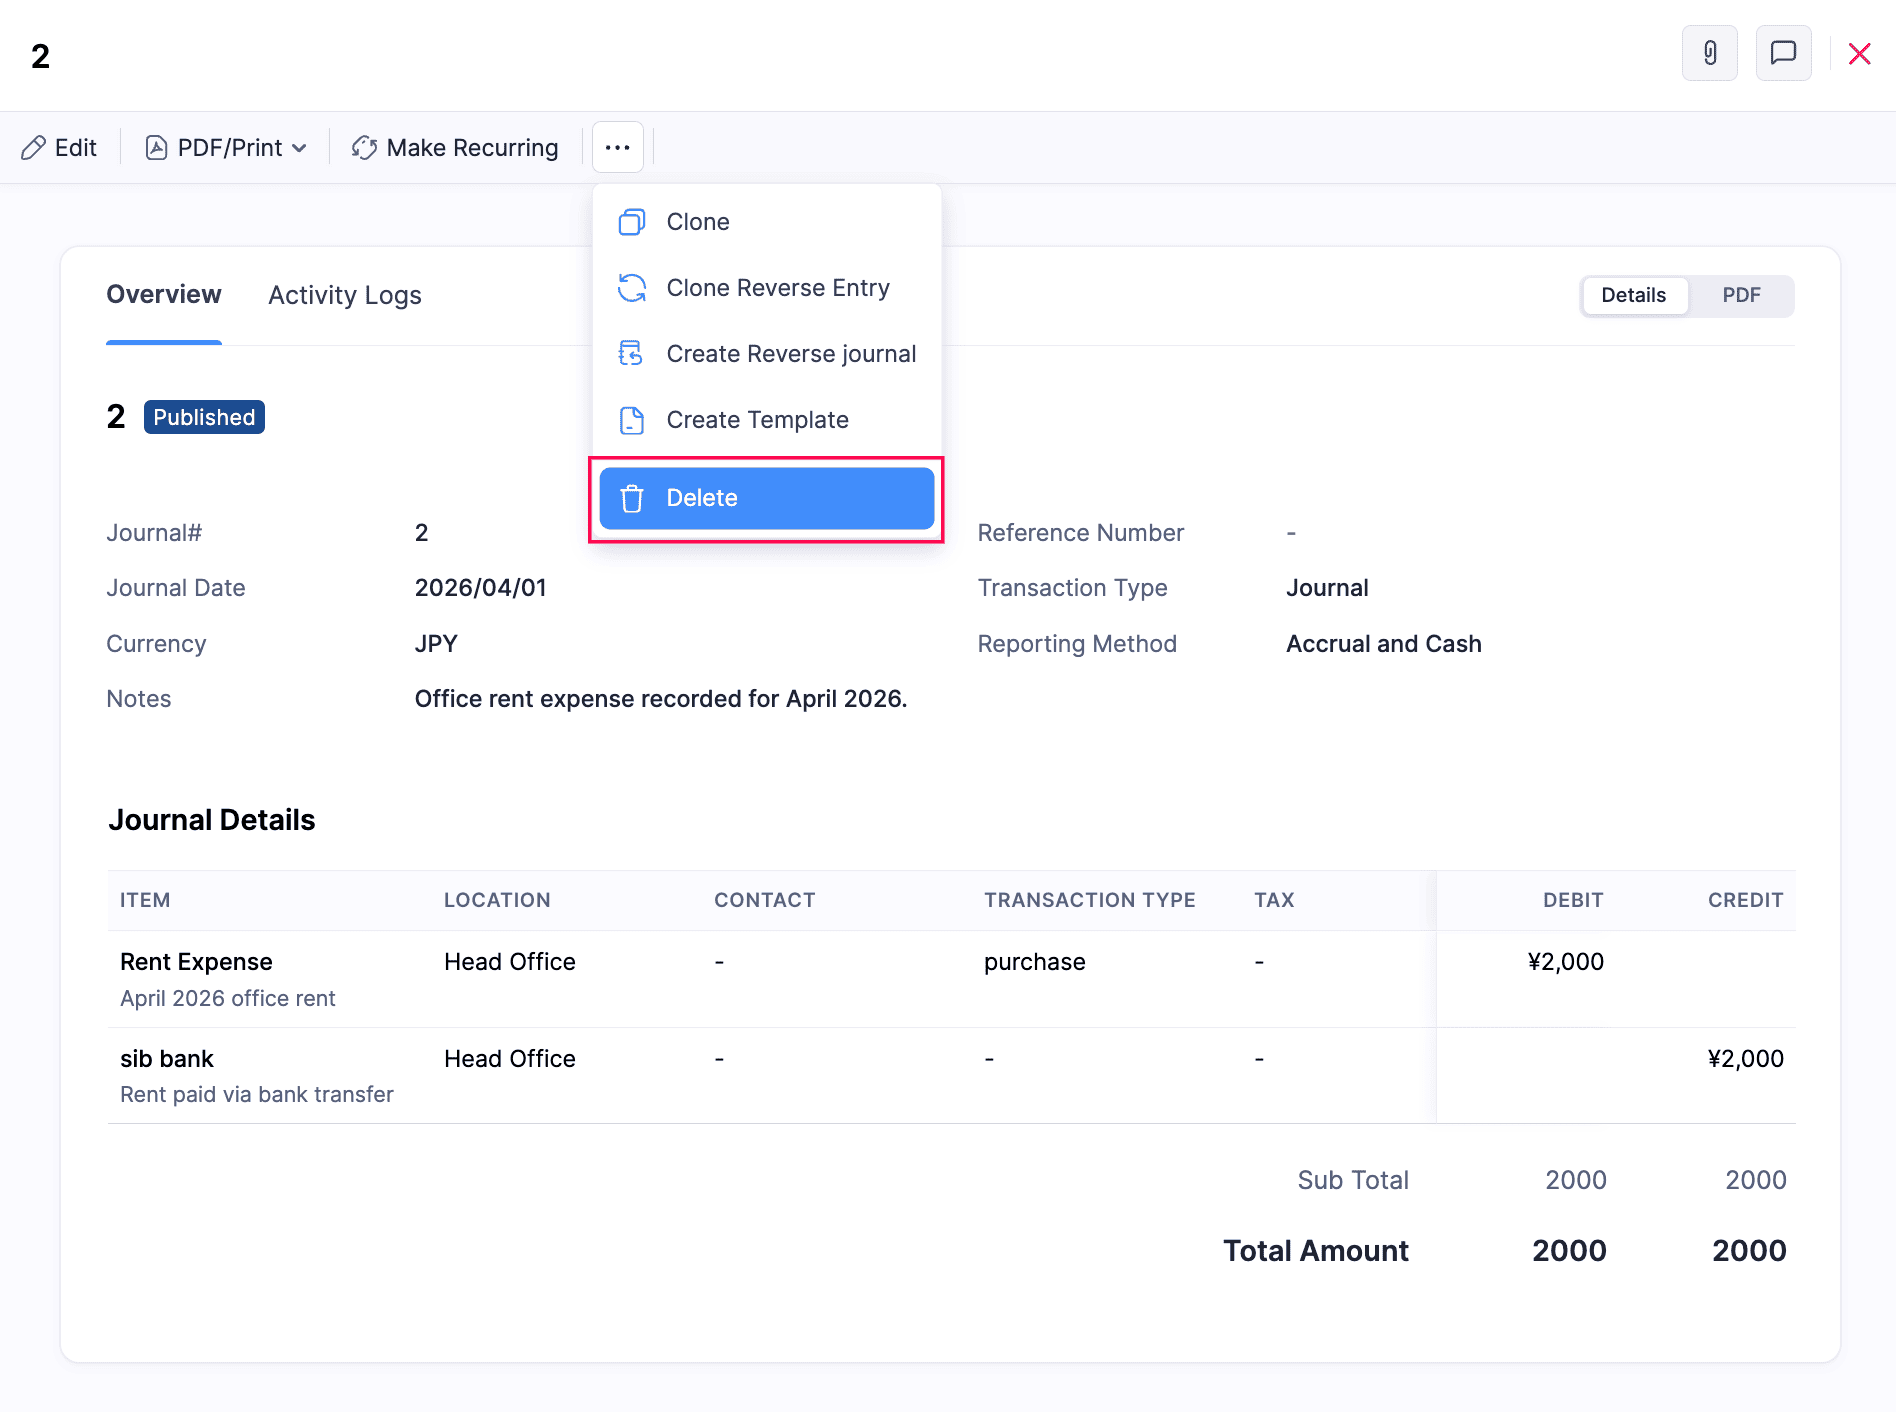
- In the confirmation pop-up that appears, click Yes, Delete to confirm.
Note: You can also delete multiple journals at once by selecting them in bulk and clicking the Delete icon.
Bulk Print Manual Journals
To bulk print manual journals in Zoho Books. Here’s how:
- Go to Accountant on the left sidebar and select Manual Journals.
- Select the journals you want to print in bulk.
- Click the Print icon at the top of the page.
- In the pop-up that appears, review the preview and click Print.
The selected journals will be printed in bulk.
Create Custom Fields for Journals
To create custom fields for manual journals:
- Go to Settings.
- Navigte to Module Settings and select Accountant under General.
- Navigate to the Journal Fields tab.
- Click + New Field in the top right corner.
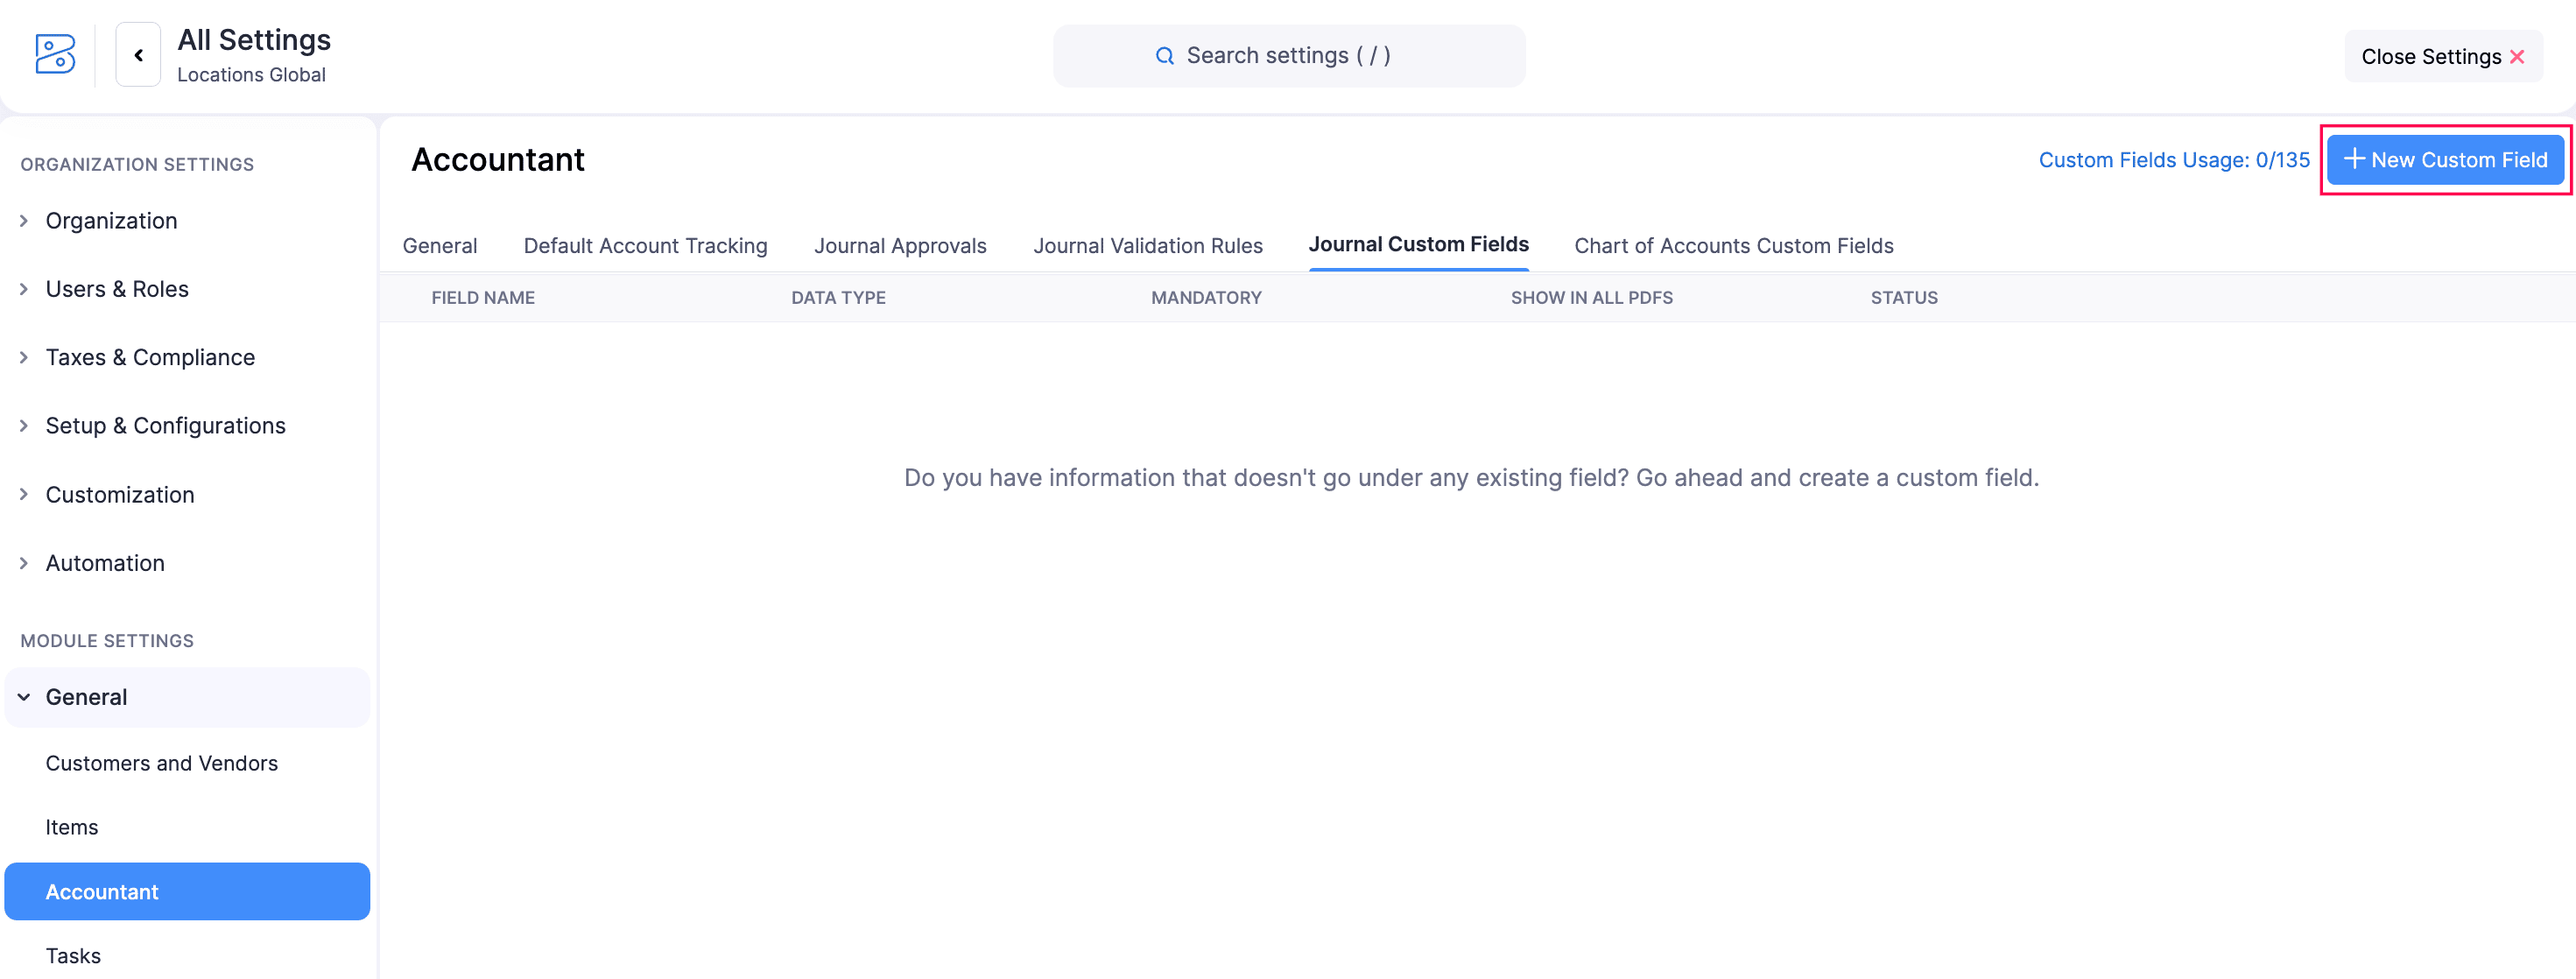
- In the New Field page, enter the required details and click Save.
 Yes
No
Yes
No
Thank you for your feedback!