Voice channel
Zoho CPaaS Voice is an automated transactional calling solution designed to help businesses reach customers reliably without manual intervention. Whether you need to send a one-time password, notify a customer about a shipped order, remind them of an appointment, or alert them to a suspicious transaction, Voice delivers these messages as real phone calls automatically.
Calls are placed using phone numbers you purchase and verify directly within Zoho CPaaS via Zoho Voice infrastructure. This ensures your calls originate from a legitimate, registered business number rather than a generic or masked line, which helps improve answer rates and builds customer trust.
Voice in Zoho CPaaS is designed for transactional use cases, such as:
- OTP and verification calls
- Order and delivery status notifications
- Appointment and payment reminders
- Fraud alerts and security notifications
- Any other time-sensitive customer communication
Voice call is currently supported for customers hosting their accounts in the US, IN, EU and AU DCs.
Pricing
Voice in Zoho CPaaS is credit-based. Both number rental and per-call charges are deducted from your credit balance. Per-minute rates vary by country and carrier. Contact Zoho CPaaS support or refer to the Zoho Voice pricing page for the rate card applicable to your region.
Getting Started with Voice
Before you can make your first automated voice call, complete the following setup steps in order. Each step is covered in detail in the sections that follow.
Upload address proof documents
Many countries require valid address proof before a number can be purchased. Upload your documents first so they are ready to attach during the number purchase flow.
- Go to Configuration > Voice > Documents.
- Click Upload Doc and provide a display name, country, and the document file.
- Save the document. It will appear in the dropdown when you buy a number.
Buy a phone number
Every outbound voice call originates from a verified phone number tied to your account.
- Go to Configuration > Voice > Buy number.
- Filter by country and number type (Local or Toll-Free).
- Select a number, attach your uploaded document, and confirm the purchase. Credits are deducted automatically.
Create a voice template
A voice template defines the full call experience including the spoken message, keypad response options, branching logic, and call termination timing.
- Go to Configuration > Voice > Templates.
- Choose a sample template or start with a blank canvas.
- In the template editor, set the Associate Agent field to your target agent.
- Drag nodes onto the canvas, configure each node, connect them, and save.
Trigger calls via API
With a number, template, and agent in place, use the Zoho CPaaS Voice API to initiate outbound calls programmatically. Refer to the API Reference for request format and authentication details.
Voice configuration
The Voice tab is the default tab under the Configuration section in Zoho CPaaS. It is the central hub for managing everything related to your outbound voice calls.
Numbers: Every outbound voice call needs a verified phone number. You can browse available phone numbers, purchase them, and manage the numbers already active on your account. Before you can send any automated voice call, you need a verified number assigned to an agent.
Templates: A template defines the entire call experience, including the message played, keypad response options, call branching logic based on input, and call termination timing. You can select from available sample templates or create and manage custom call flow templates for your automated calls.
Voice numbers
Every outbound voice call is placed from a phone number you purchase and verify through Zoho CPaaS. It uses Zoho Voice numbers, which you can browse, purchase, and manage from the Voice tab.
Number types
Zoho CPaaS currently supports local voice numbers (mobile and landline numbers). These are standard phone numbers tied to a specific geographic region. A number can be mapped to a single Agent and support multiple simultaneous outbound calls.
Uploading documents
Before purchasing a number, ensure you have the following documents ready:
- Business Registration certificate — a copy of your valid business registration.
- Local address proof — an internet, water, or electricity bill for the region where you are purchasing the number.
- Valid business website — the website details must match your submitted documents.
Note
Some countries require additional documents (such as a government-issued ID or passport) depending on local regulations.
To upload a document in Zoho CPaaS:
- Log in to your Zoho CPaaS account.
- Go to Configuration > Voice > Documents from the left navigation menu.
- Click Upload Doc.
- Enter a display name and select the document's country.
- Upload the file and click Save.
The document will now appear in the dropdown during the number purchase flow. To delete one or more documents, select them using the checkboxes and click Delete Doc.
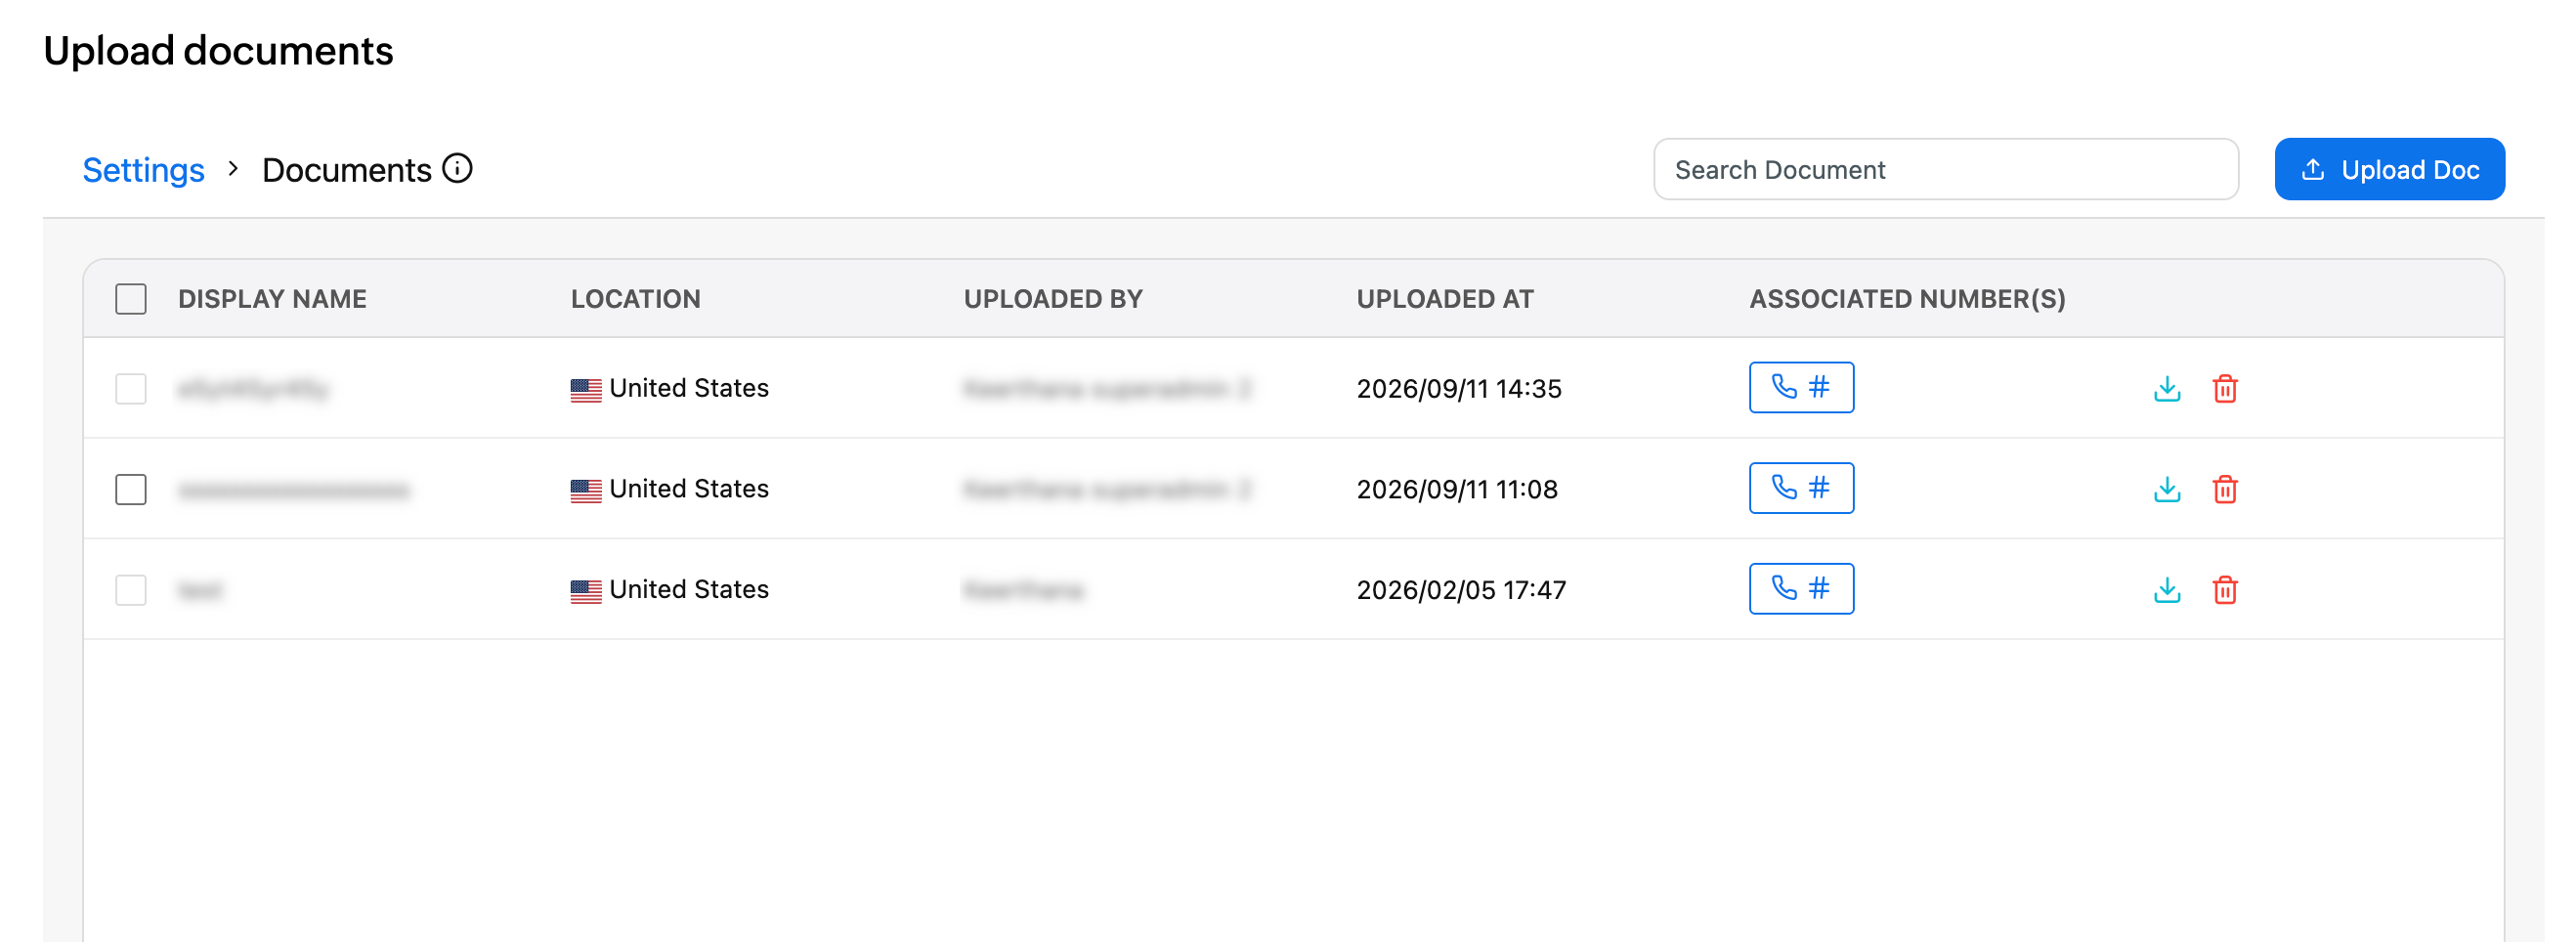
Each uploaded document shows the following details:
- Display name — the name given to the document when it was uploaded.
- Location — the country the document is associated with.
- Uploaded by — the admin who uploaded the document.
- Uploaded at — the date and time the document was uploaded.
- Associated number(s) — the phone numbers linked to this document. Click the icon to view the list of associated numbers and copy their details.
Buying a number
To buy a number in Zoho CPaaS:
- Log in to your Zoho CPaaS account.
- Go to Configuration > Voice from the left navigation menu.
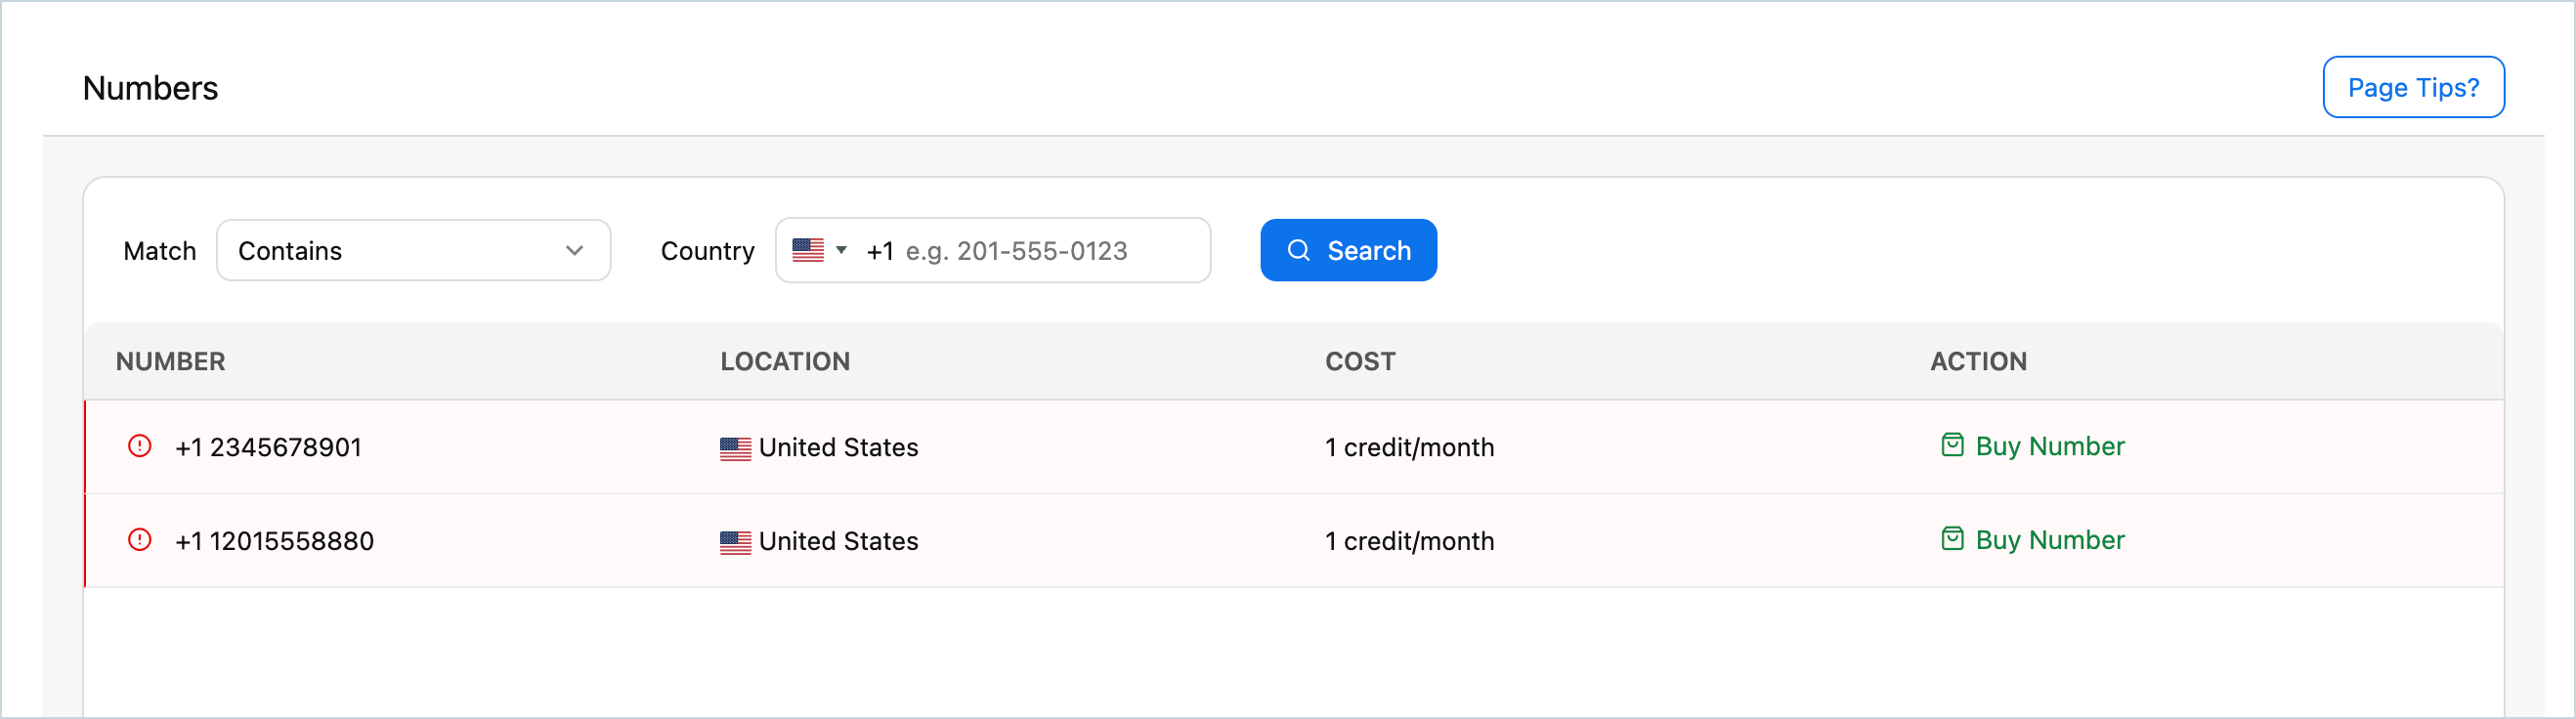
- Click the Buy number tab.
- Use the filters to narrow your search:
- Match — choose whether the number should Contain, Start with, or End with the digits you enter.
- Country — select your country from the dropdown.
- Click Search to view available numbers. The list shows the number, its location, type, and monthly cost.
- Click Buy Number next to the number you want. The Purchase Number Using Credits panel opens on the right, showing the number's details such as location, type, and monthly cost in credits.
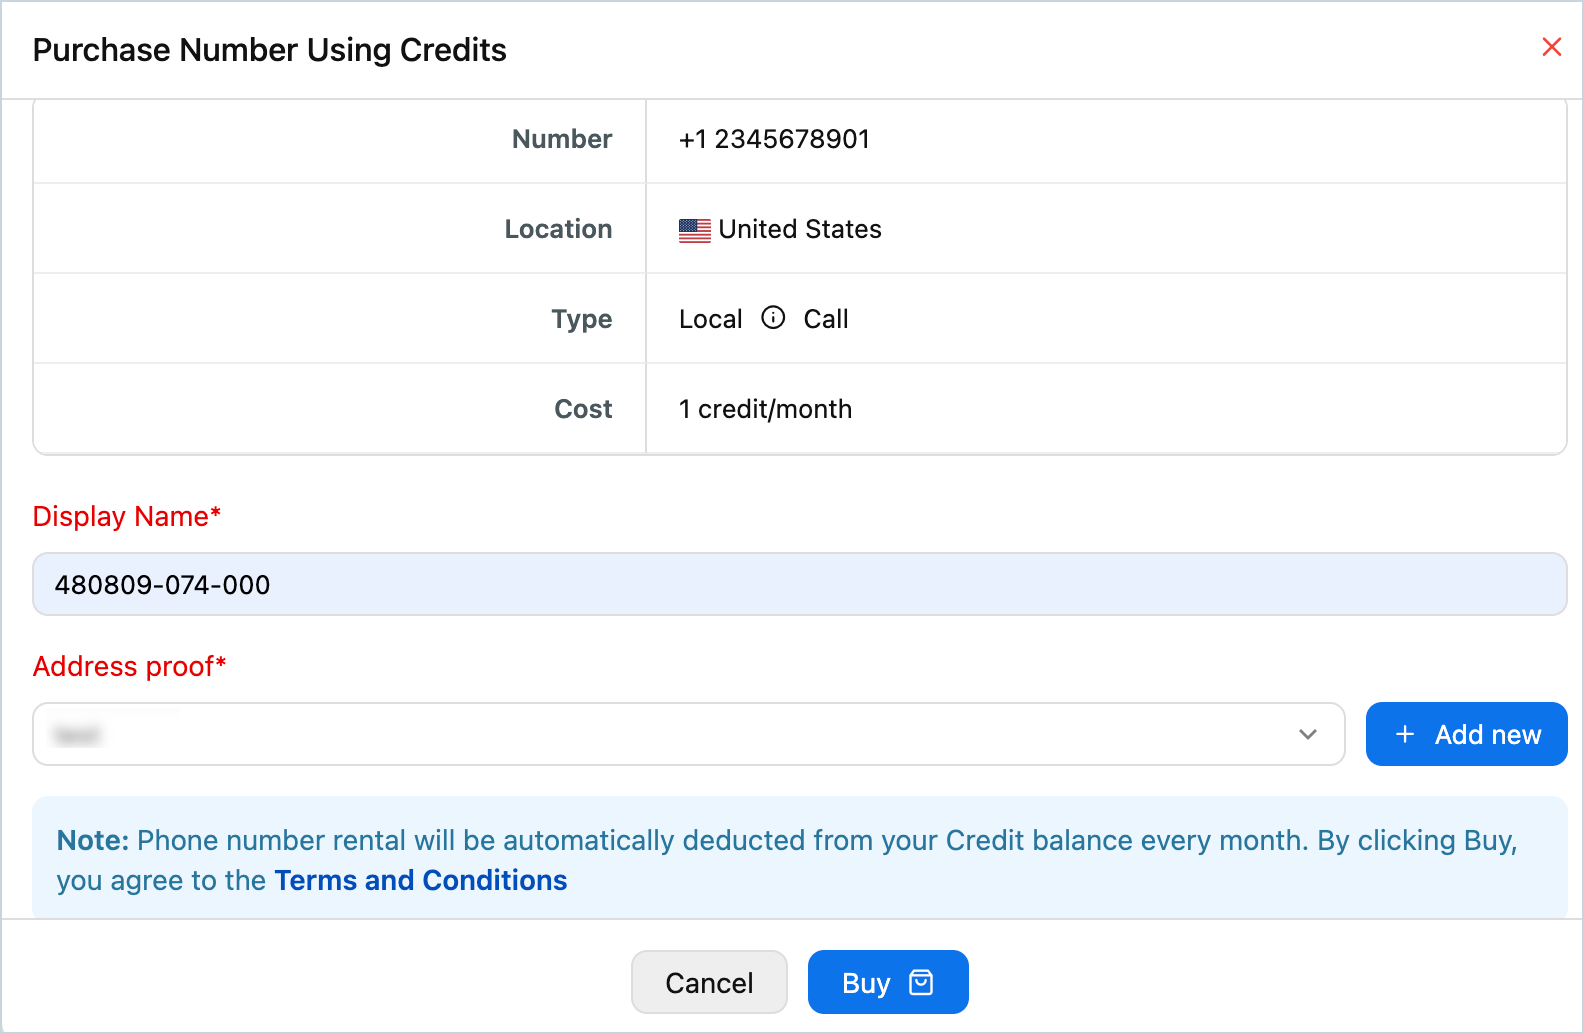
- Enter a Display Name for the number. This is the name the number will appear under in your Zoho CPaaS account.
- Under Address proof, select a previously uploaded document from the dropdown. If you have not uploaded one yet, click + Add new to upload your address proof directly from this step.
- Click Buy to confirm the purchase. The cost will be deducted from your credit balance.
Our support team will verify your submission and activate the number once approved.
- Number rental is automatically deducted from your credit balance every month.
- Numbers cannot be purchased during a trial period using free credits.
- Only a Postmaster role can purchase numbers.
Before you get started it is important to know that Zoho CPaaS supports transactional communications only. We do not support sending of bulk emails or promotional emails like newsletters or marketing campaign emails. If you are looking for a bulk email provider, you can visit Zoho Campaigns.