Understand File Upload Field | Zoho Creator Help
Understanding the file upload field
Uploaded file's name
When your users upload a file to this field, the file's name is set in the following format:
- The file's name is prepended by an underscore (_) and a system-generated number that uniquely identifies that file in your account
- The file's name will automatically be trimmed when it exceeds 150 characters
- Whitespaces and other special characters, excepting hyphens (-), will be replaced by an underscore (_).
On accessing from a web browser
The following is an example of a file upload field when a user accesses from a web browser. Subject to the browse options you enable for your field, your users can upload a file:

To upload a file from local storage
- Click the upload icon. This will launch the device's file manager.
- Select the required file.
Alternatively, you can drag and drop the required file in to the field.
To upload a file from Zoho WorkDrive
- Click the cloud picker icon. The Cloud Picker pop-up window will appear, displaying all the files and folders present in your Zoho WorkDrive.
- Select the required field, then click Attach.
To upload a file from Google Drive
- Click the cloud picker icon. The Cloud Picker pop-up window will appear.
- Select Google Drive on the left. If you previously connected with your Google account, the files and folders from your Google Drive will be displayed, and you will be taken to step six.
- Click Authenticate Google .
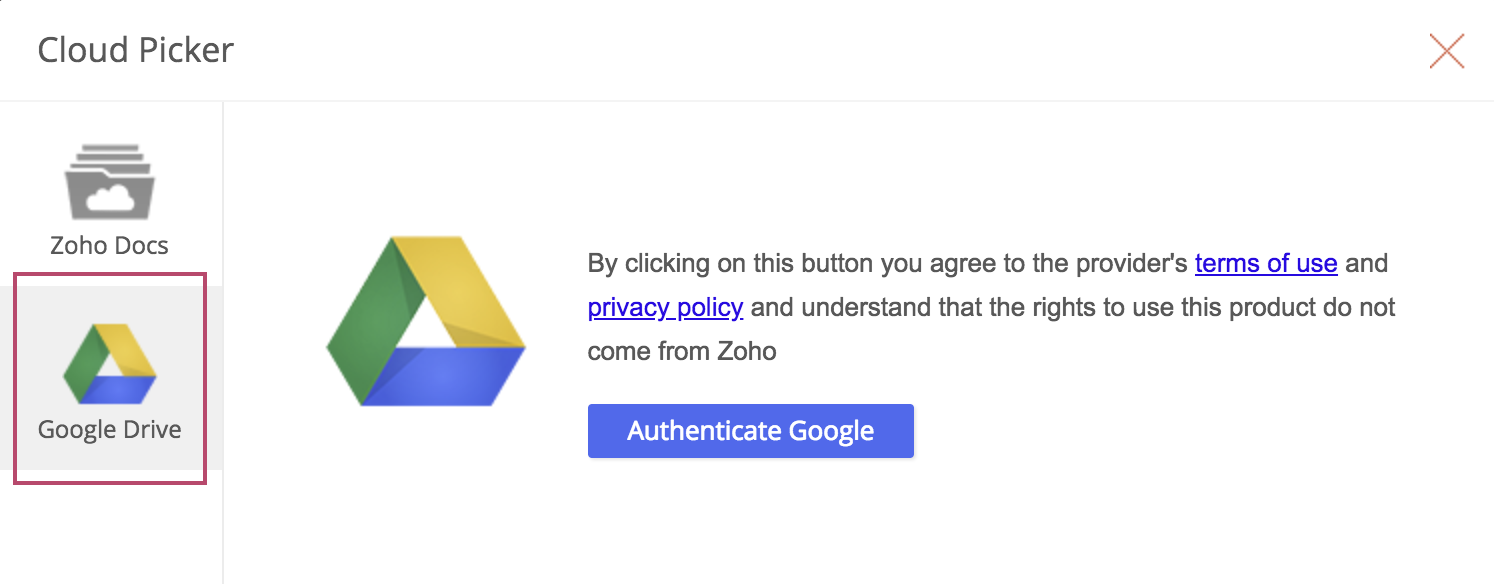
- Enter your Google account's credentials.
- Grant Zoho Corp the permission to view and manage the files in your Google Drive. Upon a successful connection, all the files and folders from your Google Drive will appear.
- Select the required field, then click Attach .

- The end users can connect with multiple Google accounts via the Sign in as a different user button near the top-right corner of the Cloud Picker pop-up window.
- The end users will be able to upload files from their Google Drive, if Zoho has access to their Google accounts. Refer to this page to learn more, including removing this access.
On accessing from a phone or tablet
The following is an example of how a file upload field looks when a user accesses from a phone or tablet. Your users will be able to:
- Upload a file
- Upload a photo from their device's gallery
- When using iOS 13.0 and later, scan photos and upload them as a PDF file

To upload a file
- Tap the file upload field, then tap Browse . This will open the recently accessed files in your user's device.
- Select the required file.
To upload a photo
- Tap the file upload field, then tap Choose Photo . This will open the device's photo gallery.
- Select the required photo. This will close the photo gallery and let the end user preview the selected photo.
Scan photos and upload as a PDF
Users of iOS 13.0 and later will be allowed to scan multiple photos and upload them as a PDF to the file upload field.
- Tap the file upload field, then tap Scan Document .
- Capture the required images and click Save .
Field properties
You can perform the following customizations for the user experience of the file upload field on a form:
- Set the browse options : This defines the sources from which your users will be able to select the file when they access the file upload field.
- Local Computer enables your users to upload a file that's stored in their device—computer, phone, or tablet
- Zoho WorkDrive enables your users to upload a file from their Zoho WorkDrive
- Google Drive enables your users to upload a file from their Google Drive
- Customize the field name and field link name of this field
- Make it mandatory for your users to upload a file in this field
- Show the field only to the app’s admin (and hide it from other users)
- Set the field size
- Describe this field using a tooltip or a help text
URL format for downloading a file
A file stored in the file upload field can be downloaded using the following URL:
where,
- domain will be DC-specific. For example, you'll need to use creatorexport.zoho.com if your account is in Zoho's US data center, and creatorexport.zoho.eu if in the EU data center. Click here to find your domain specific to your DC.
- account_owner_name contains the user name of the Creator application's account owner and the link name of the application.
- reportLinkName is the link name of the report where the corresponding file upload field is displayed.
- fieldLinkName is the link name of the corresponding file upload field.
- fileName is the corresponding file's name. Learn more
For example, imagine that you've built a Candidate Recruitment app. In this application, you have created a form named Candidate Details , where your users will enter the required details and upload their resume. When you access the Candidate Details report, you may want to view their resumes. To do this, you can configure a custom action in your report such that when you click the button Download resume , the resume is downloaded as a file. This custom action has the above URL format constructed as follows:
where,
- BaseURL is a variable that refers to the URL you have constructed
- zoho.appuri returns the application details in the format:
/<account_owner_name>/<application_link_name>/ - input.<fieldLinkName> returns the filename of each file stored in the corresponding file upload field
- The openUrl Deluge task is used to redirect the user to the specified URL. This URL can be opened in the same window, new window, parent window, popup window, or iframe
Now, when you access the Candidate Details report, you can see the Download resume button:
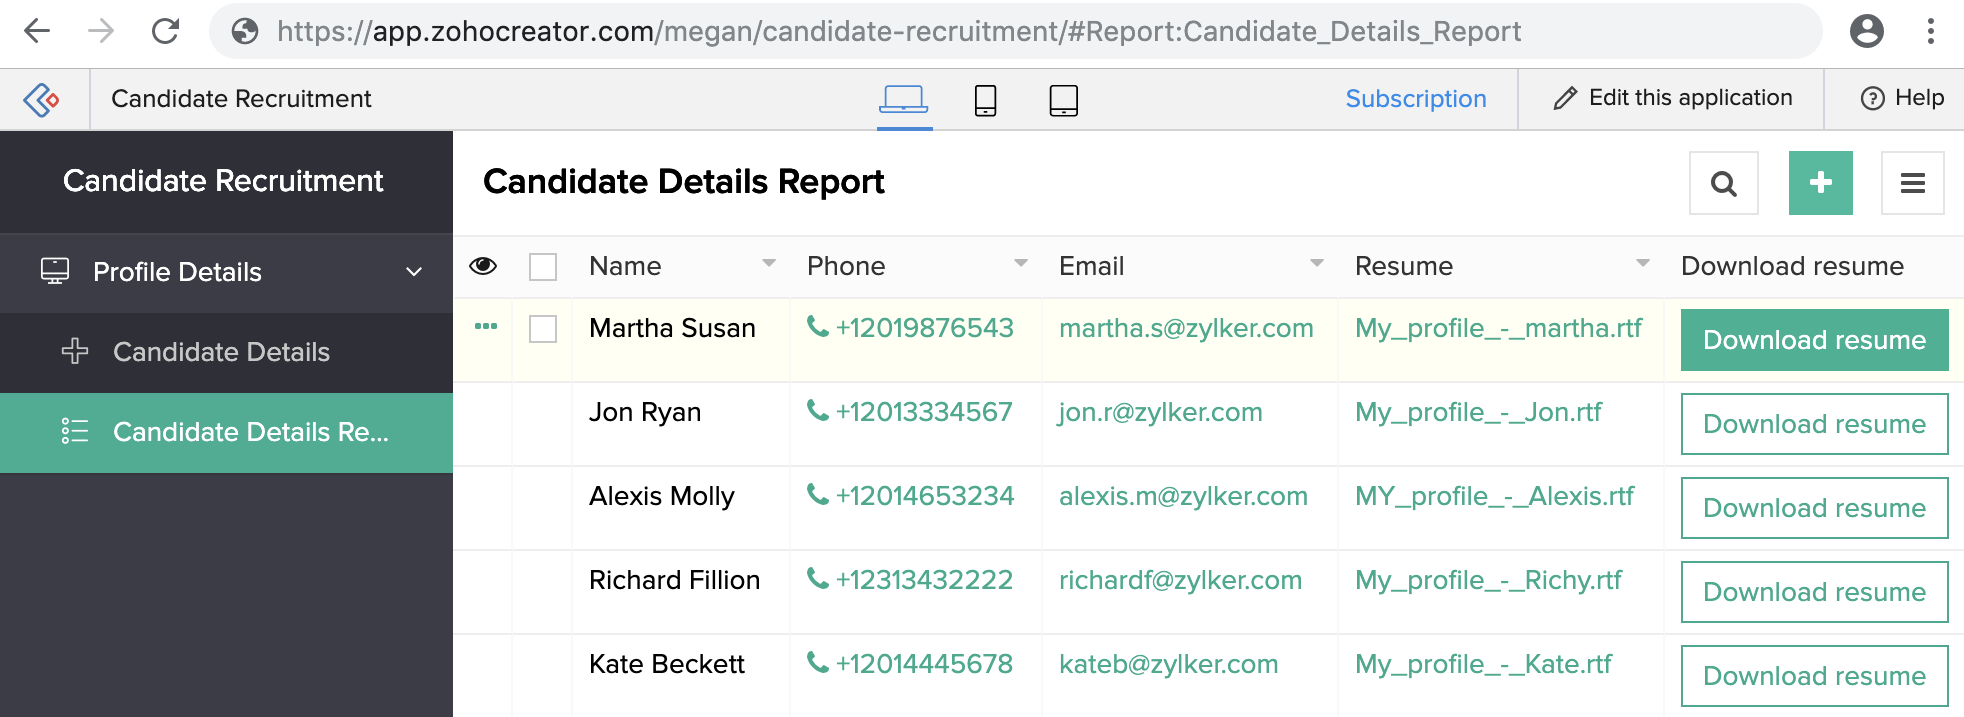
In the above image, Megan is the <account_owner_name> and candidate-recruitment is the <application_link_name>
Points to Note
- A maximum of 10 files can be uploaded per file upload when the Multiple files option is chosen.
- Files up to 50 MB can be uploaded.
- If an uploaded file is empty (i.e. it contains no valid data), it will not be accepted. Please ensure the file has valid content before uploading.
- All uploaded files will be automatically renamed to a system-generated format to ensure each file name remains unique.
- If a file name exceeds 150 characters, it will be shortened automatically to meet the character limit.
- All whitespaces and special characters (excluding hyphens) in file names will be replaced with underscores for consistency and compatibility.
- If the file upload field has the Multiple files property enabled, then they can't be referenced in formula expressions.
- Assignment statements can't be used for multi-file upload fields in Before Form Submission workflows.
- Aggregate functions, like sum and average (excluding count), can't be used for multi-file upload fields.
- In subforms, adding or updating files through a workflow is not supported for multi-file upload fields.
- Admins can set an upload limit for each multi-file upload field to restrict the number of files users can upload.
Related Topics:

Access your files securely from anywhere
Zoho CRM Training Programs
Learn how to use the best tools for sales force automation and better customer engagement from Zoho's implementation specialists.
Zoho DataPrep Personalized Demo
If you'd like a personalized walk-through of our data preparation tool, please request a demo and we'll be happy to show you how to get the best out of Zoho DataPrep.
- Zoho Workerly Home
- Forums
- Connect With Us:


- Zoho Recruit Home
- Forums
- Connect With Us:
![]()
Create. Review. Publish.
You are currently viewing the help pages of Qntrl’s earlier version. Click here to view our latest version—Qntrl 3.0's help articles.


Zoho Sheet Resources
Zoho Forms Resources
Zoho Sign Resources
Sign, Paperless!
Zoho TeamInbox Resources
Design. Discuss. Deliver.
Related Articles
Understanding DS file
1. In a nutshell A Deluge Script (DS) file is a text-based file that stores the complete schema of a Zoho Creator application in the Deluge script format. It includes all components, such as forms, fields, reports, pages, schedules, custom functions, ...Setting browse options for the file upload field
Upload Mode Configuration The file upload field provides flexible upload options through two configurable modes when the field is added: Single Upload – Users can upload one file per submission. Multiple Upload – Users can upload up to 10 files per ...Periodically upload files in Zoho Creator to Zoho Workdrive
Requirement Perform integration between Zoho Creator and Zoho Workdrive, and use Schedules to upload files from Creator to Workdrive on a monthly basis. Use Case A project tracker app maintains report files of finished projects in a form - ...Check for the type of the file uploaded
Requirement Only allow the file upload field to accept file types PDF, XLS, or XLXS. Display an alert message when any other file type is detected. Use case A restaurant app contains a form to store supplier receipts as files. When an admin uploads a ...Understanding the image field
When accessed via your iOS devices' browsers, you can upload images and attach image URLs but you cannot capture them via the image field. This is because media objects are not supported by iOS. When accessed via Safari browser, you can upload images ...