

Fields

Fields are additional data entries you can create in a module’s records in Zoho Books to store information beyond the default fields of a record. Zoho Books supports a wide range of field types, including Standard Fields for structured data and AI Fields that extract and analyze information.
Standard Fields
Standard Fields are custom fields used to capture structured, user-defined data using predefined data types. They are best used for capturing values that are explicitly provided and consistently used across records. Learn more about the Standard Field data types available in Zoho Books.
Scenario: Zylker Furniture sells to customers across different industries. To segment follow-ups and reporting, Patricia, the sales head, creates a standard field called Industry in the Customers module and records values such as Retail, Hospitality, and Healthcare for each customer.
AI Fields
AI Fields are custom fields that automatically derive values from another custom field’s input data using built-in intelligence. They are suited for extracting information and generating insights from unstructured data with minimal manual input. Learn more about the AI Field data types available in Zoho Books.
Scenario: Zylker displays a text field called Customer Feedback in the customer portal so customers can share feedback on invoices. To prioritize follow-ups, Patricia creates a Sentiment Analysis AI field by selecting Customer Feedback as the Input Custom Field. When users create or update a record, Zoho Books automatically marks the sentiment as Positive, Negative, or Neutral on the record’s Details page, so the Zylker team can quickly focus on records with negative feedback.
Create a Field
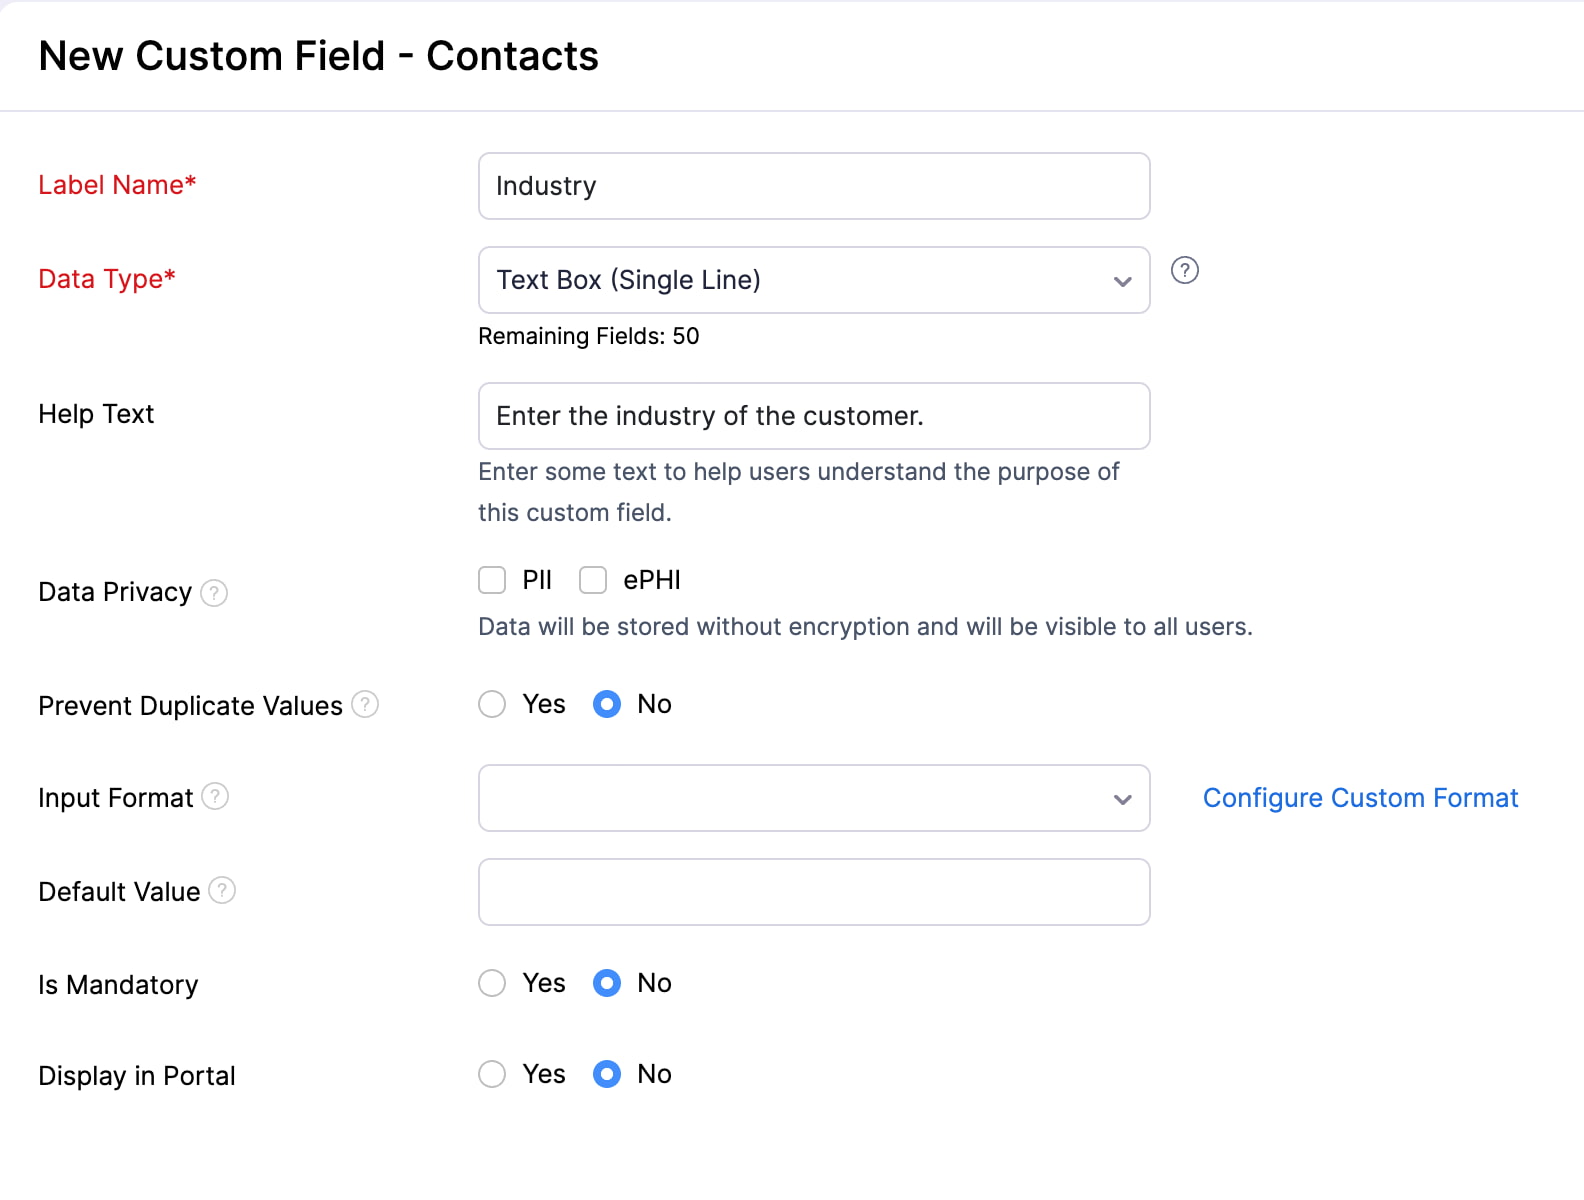
To create a new field:
- Go to Settings in the top right corner.
- Select the module for which you want to add the field.
- Go to the Fields tab.
- Click + New Field in the top right corner.
- Fill in the following fields:
Label Name
Select an appropriate name for your field. This field will be displayed when entering data in records of the respective module.
Data Type
Choose the data type for the data that you will enter or store in the field. Learn more about the data types available in Zoho Books.
Help Text
Provide some text to help users understand the purpose of this field.
Data Privacy
If the field will be used to store sensitive information that can be used to identify individuals, you can protect the information stored in the field using PII (Personally Identifiable Information) or ePHI (Electronic Protected Health Information), depending on the information you enter in this field.
- Select PII if the information you enter is confidential and can be used to identify a person. You can mark fields such as Text, Email, URL, Phone, Number, and Date as PII. You can encrypt and store it if the data is sensitive or store it without encryption if the data is non-sensitive. Choose if the information you enter will be sensitive or not sensitive:
- Sensitive data. Encrypt and store it. This data can be viewed only by users with permission to access PII.
- Not sensitive data. Store it without encryption. Only users with access to protected data can view the details. However, users can use this field to perform advanced searches.
- Select ePHI if the information that you enter can be used to identify a patient. For example, an electronic copy of a medical report will be ePHI. You can mark only fields such as Text, Email, URL, Phone, and Date as ePHI. The data will be treated as sensitive; therefore, it will undergo encryption before being securely stored. Only users with access to protected data can access the fields. Users cannot use this field to perform advanced searches.
Prevent Duplicate Values
Choose whether the value entered in the field should be unique. This field will not be available if you’ve enabled Data Privacy for the field.
Input Format
Add data in a field and validate them using the Input Format field. You can specify the type of characters that can be entered and the length as well.
For example, many countries use the National Insurance Number (NIN) to track citizens. The NIN is 9 characters long, consisting of two letters, six digits, and one letter. If you want to store the NIN for users in your organization, you can set it up using a field. The Input Format ensures that any data entered in this field matches the correct NIN format. In this case, you need to enter the value ^[A-Z]{2}[0-9]{6}[A-Z]{1}$.
If you choose the Text Box (Single Line) or Text Box (Multi-line) data type, you can either enter the input format directly by clicking Configure Custom Format or choose from the available input formats by clicking Use Standard Formats.
If you select Use Standard Formats, you can choose from the following options:
Format Description Numbers The field accepts only a combination of the numbers 0-9. For example, 123. Alphanumeric Characters Without Spaces The field accepts only a combination of lowercase letters (a-z), uppercase letters (A-Z), and numbers (0-9), without any spaces. For example, customField123. Alphanumeric Characters With Spaces The field accepts only a combination of lowercase letters (a-z), uppercase letters (A-Z), numbers (0-9), and spaces. For example, custom Field 123. Alphanumeric Characters With Hyphens and Underscores The field accepts only a combination of lowercase letters (a-z), uppercase letters (A-Z), numbers (0-9), hyphens (-), and underscores (_). For example, custom-Field_123. Alphabets Without Spaces The field accepts only a combination of lowercase (a-z) and uppercase (A-Z) letters, without any spaces. For example, customField. Alphabets With Spaces The field accepts only a combination of lowercase (a-z) and uppercase (A-Z) letters and spaces. For example, custom Field. 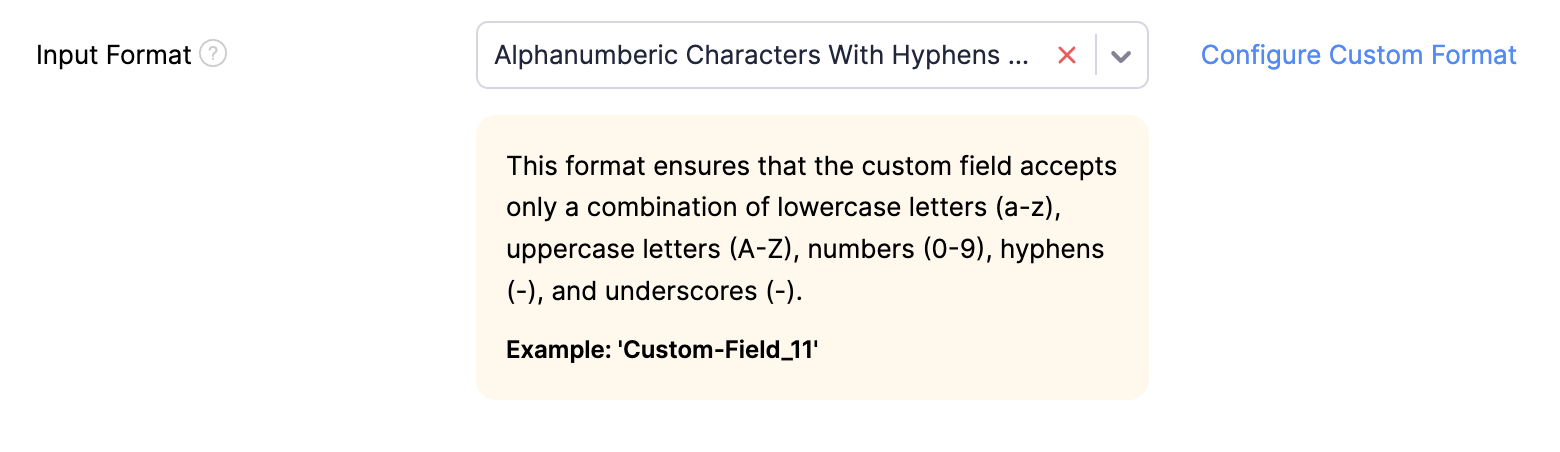
If you select Configure Custom Format, you can directly enter the input format in the field. For example, ^[A-Z]{2}[0-9]{6}[A-Z]{1}$.

Default Value
The value you enter will be the default value of the field. For example, if you create a field for the Invoices module and set the Default Value as 1, it will automatically fill the field with 1 when you create an invoice without providing any value for the field. A preview of the field and the data will be shown on the same page.
Note:
- This field will not be available if you’ve enabled Data Privacy for the field.
- If you enable Prevent Duplicate Values for a field and set a Default Value, ensure you provide a unique value for the field while creating records.
You can also choose to inherit values from fields in other modules. To do this:
- Select Inherit value next to Default Value.

- Click the first dropdown next to the Inherit Value From field and select the module from which you want to inherit the value. You can inherit data from modules related to the module for which you’re creating the field. For example, if you’re creating the field for the Invoices module, you can inherit the fields in the Customers module.
- Now, click the second dropdown next to the Inherit Value From field and select the field of the module from which you want to inherit the value. This will be the default value for this field when you create transactions.

Is Mandatory
Choose whether this field should be a mandatory field. If you select Yes, users can save or update records only after entering a value in this field. If you select No, they can save or update records even without entering a value.
Show in All PDFs
Choose whether the field should be included in transaction PDFs. Select Yes to display it, or No to hide it.
- Click Save after you’ve provided the required details.
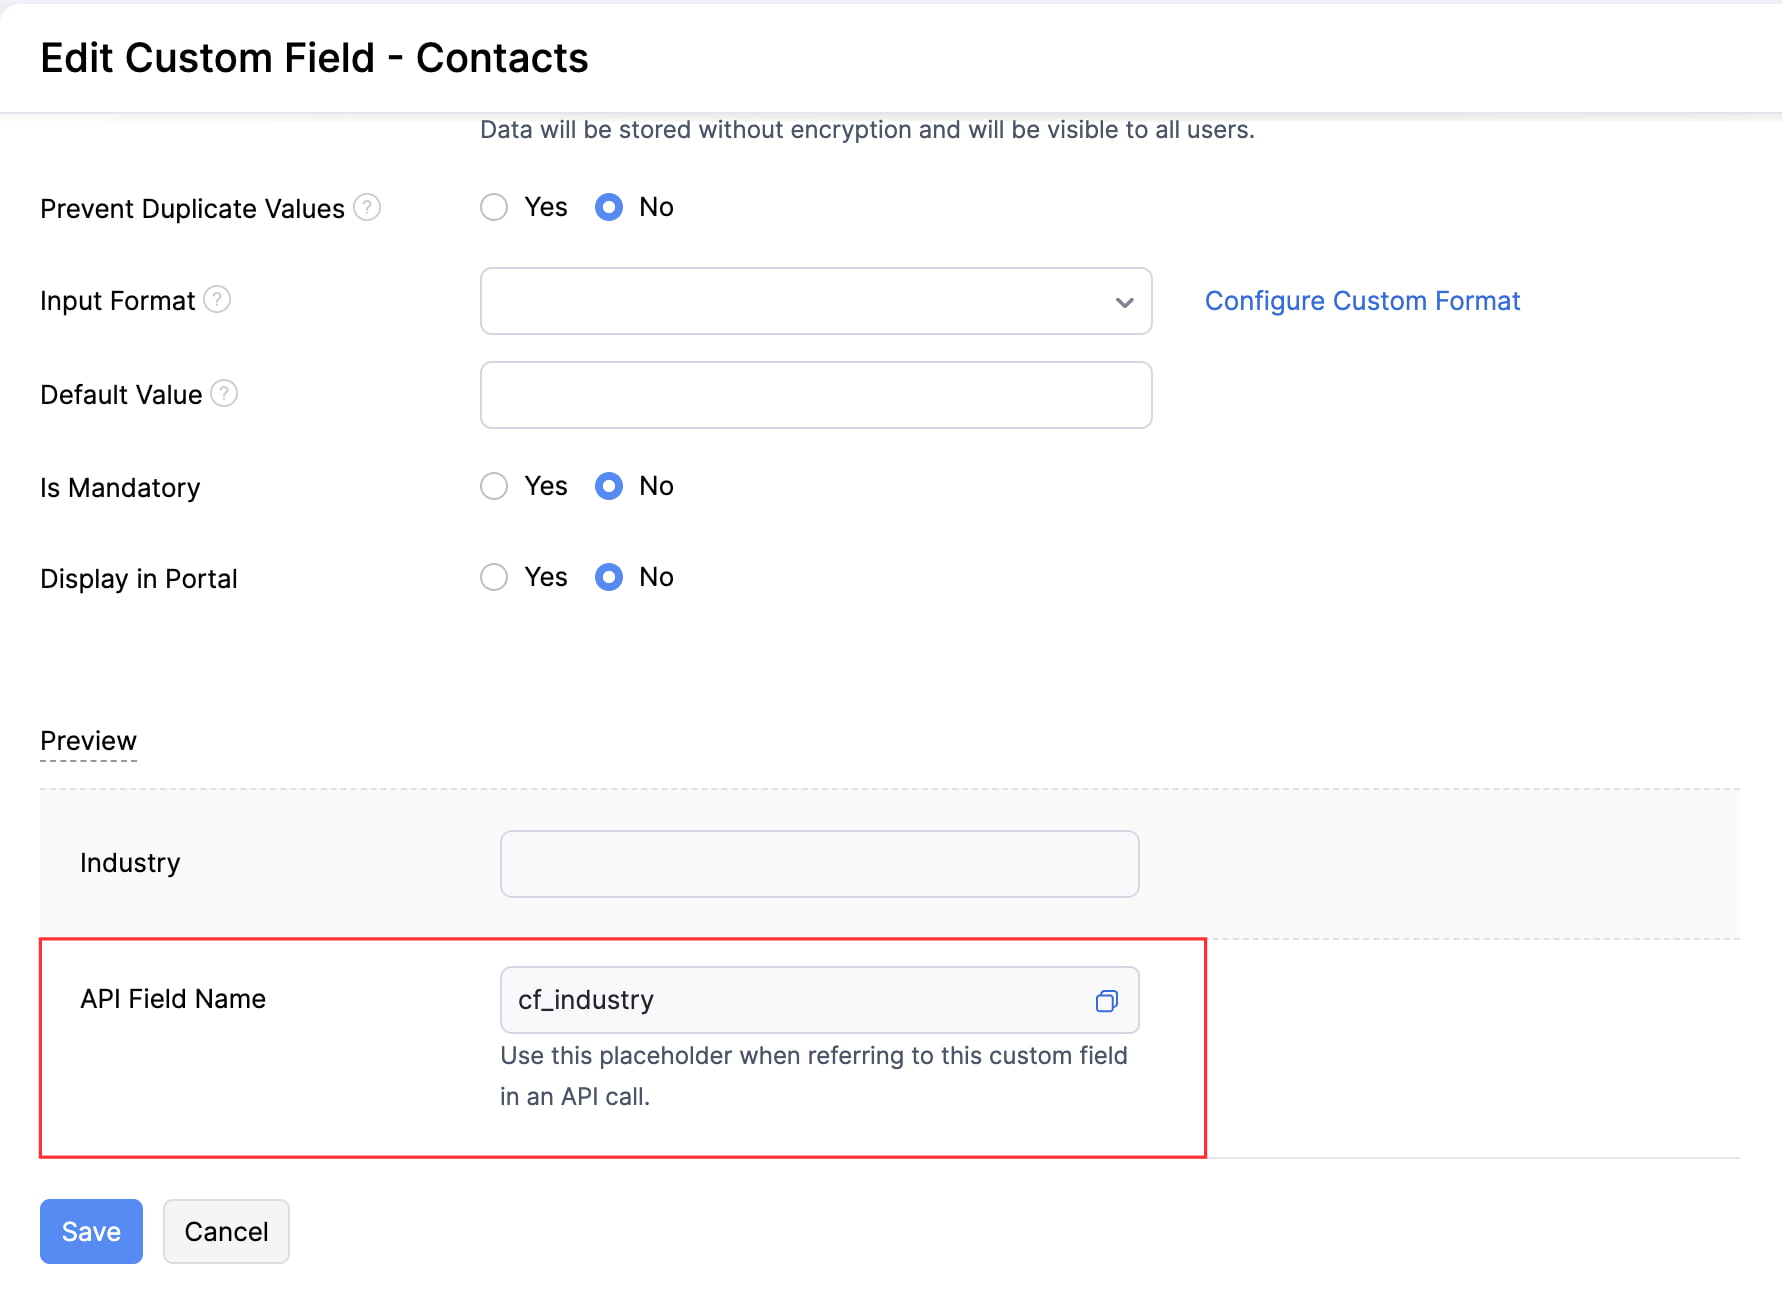
API Field Name
Once you save a field, you can edit it to find the API Field Name. This name will be used when referring to this field for an API call.
Custom Field Limitations
There are certain limitations to the number of fields that can be created for each data type. Based on the limitations, fields are split into the following sections: Numerical, Decimal, String, Boolean, Long Text, Multi-select, and Formula.
Note: The limitations on fields will vary from one subscription plan to another. Visit our pricing page to know the number of fields available for your subscription plan.
- Go to Settings in the top right corner.
- Select the module for which you want to view the number of fields.
- Go to the Fields tab.
- Click Custom Fields Usage in the top right corner.
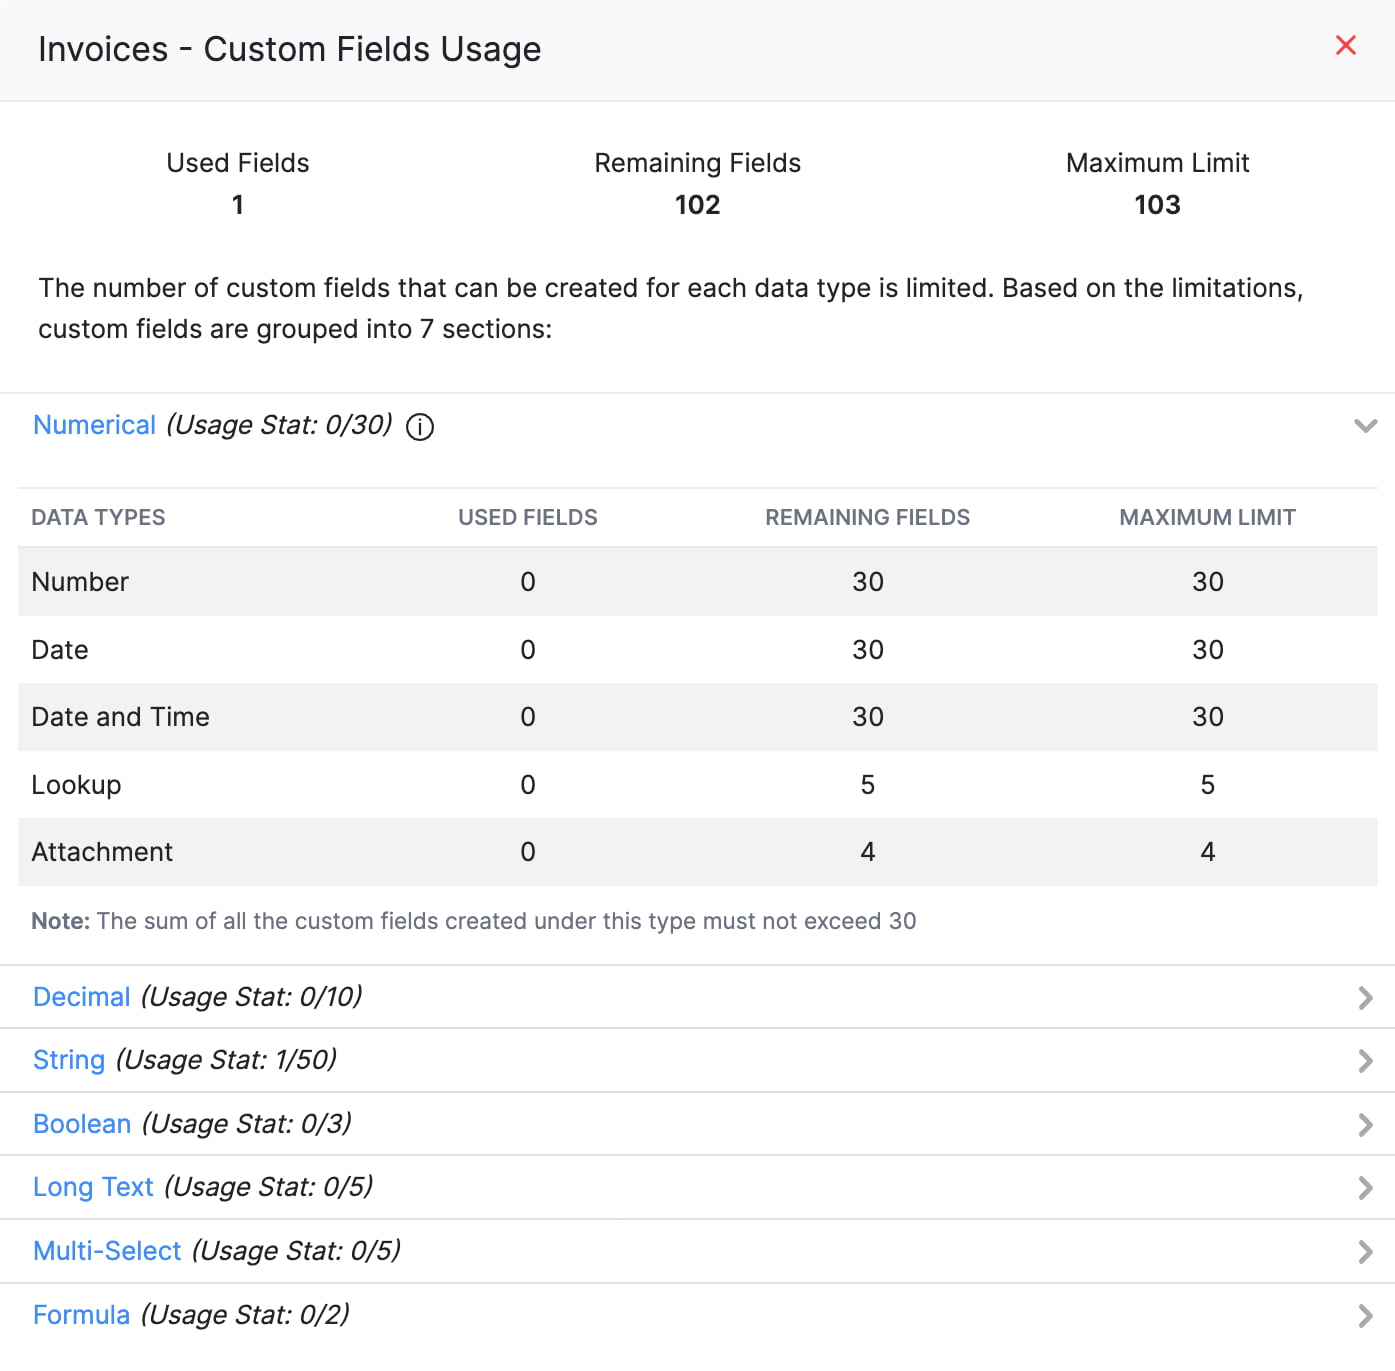
Now, you will be able to view the field usage for different modules.
Edit a Field
You can change the details of a field created in Zoho Books. Here’s how:
- Go to Settings in the top right corner.
- Select the module containing the field.
- Go to the Fields tab.
- Hover over the field that you want to edit.
- Click the Dropdown icon next to the field and select Edit.
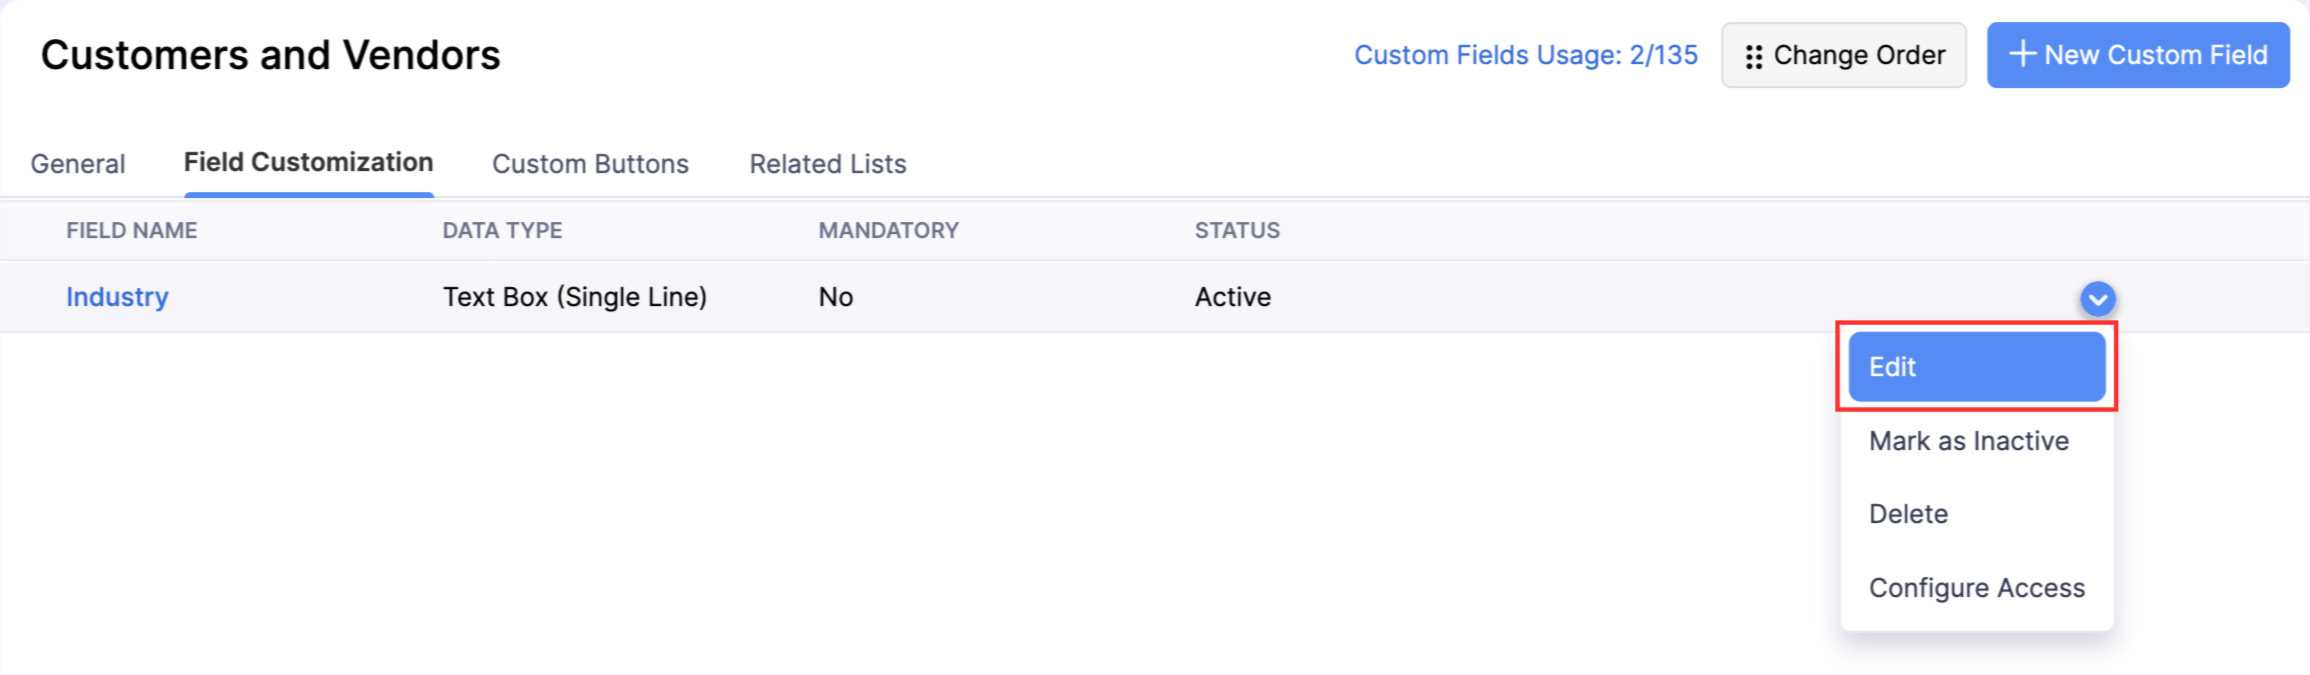
- Make the required changes and click Save.
Note: If you enable Prevent Duplicate Values for an existing field and if there are more than 10,000 records in that module, it will take some time to update the field’s details in all the records. You’ll receive an in-app notification once the process is completed.
Mark a Field as Inactive
If you don’t want to enter data in any field temporarily, you can choose to mark it as inactive. Here’s how:
- Go to Settings in the top right corner.
- Select the module containing the field.
- Go to the Fields tab.
- Hover over the field you want to mark inactive.
- Click the Dropdown icon next to the field and select Mark as Inactive.
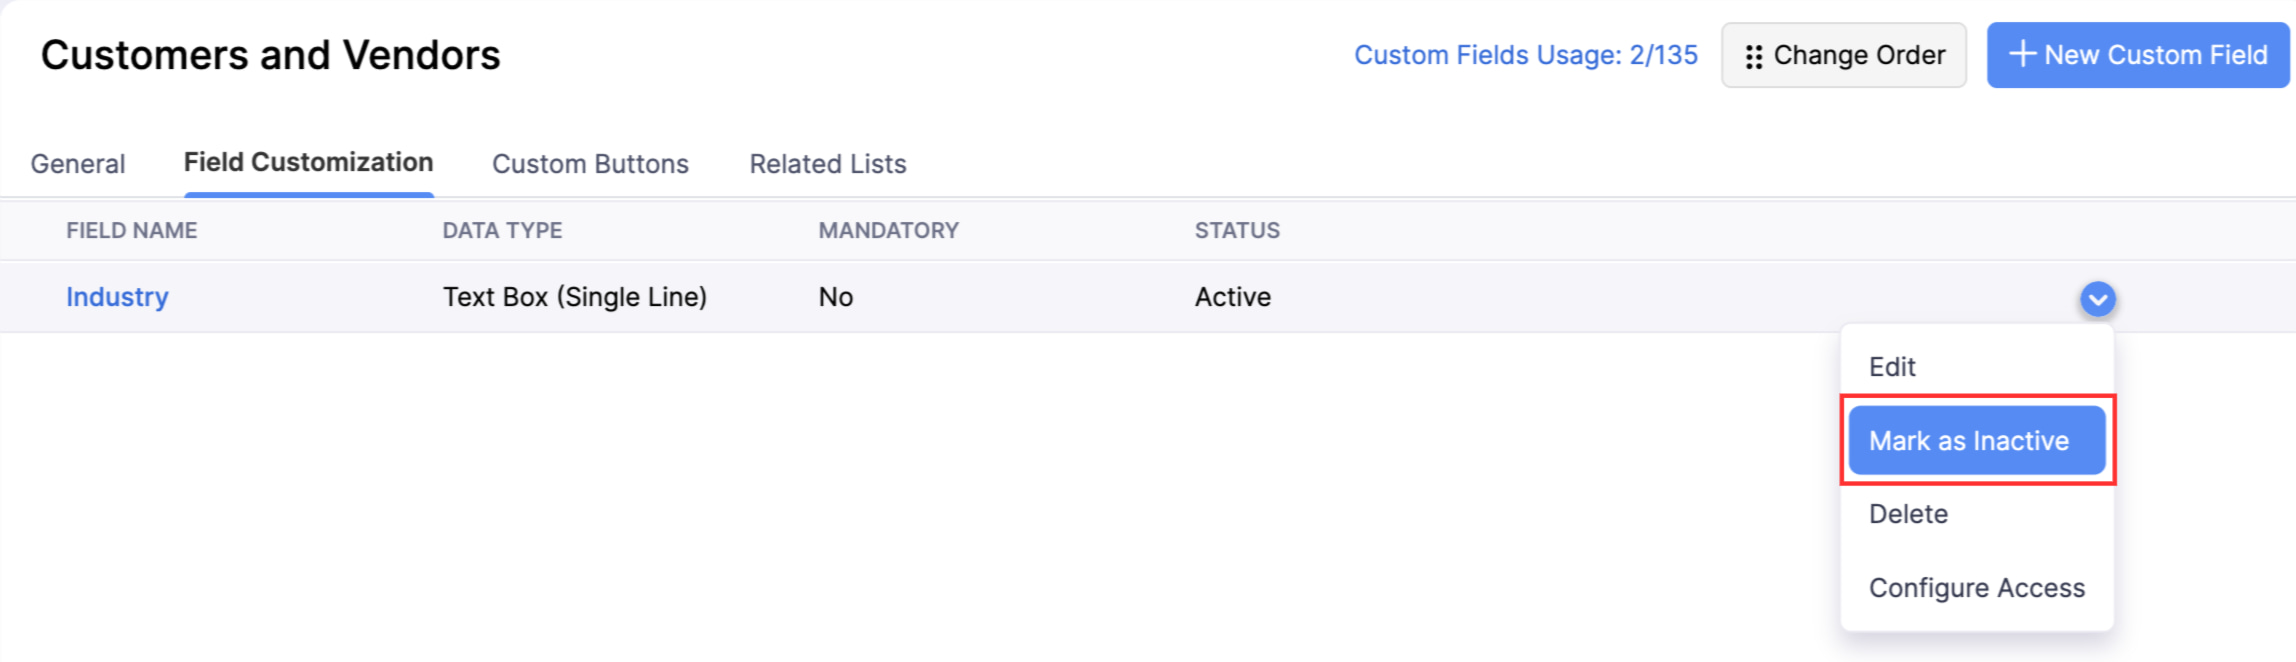
Mark a Field as Active
If you have marked a field as inactive, you can make it active again. Here’s how:
- Go to Settings in the top right corner.
- Select the module containing the field.
- Go to the Fields tab.
- Hover over the inactive field you want to mark active.
- Click the Dropdown icon next to the field and select Mark as Active.
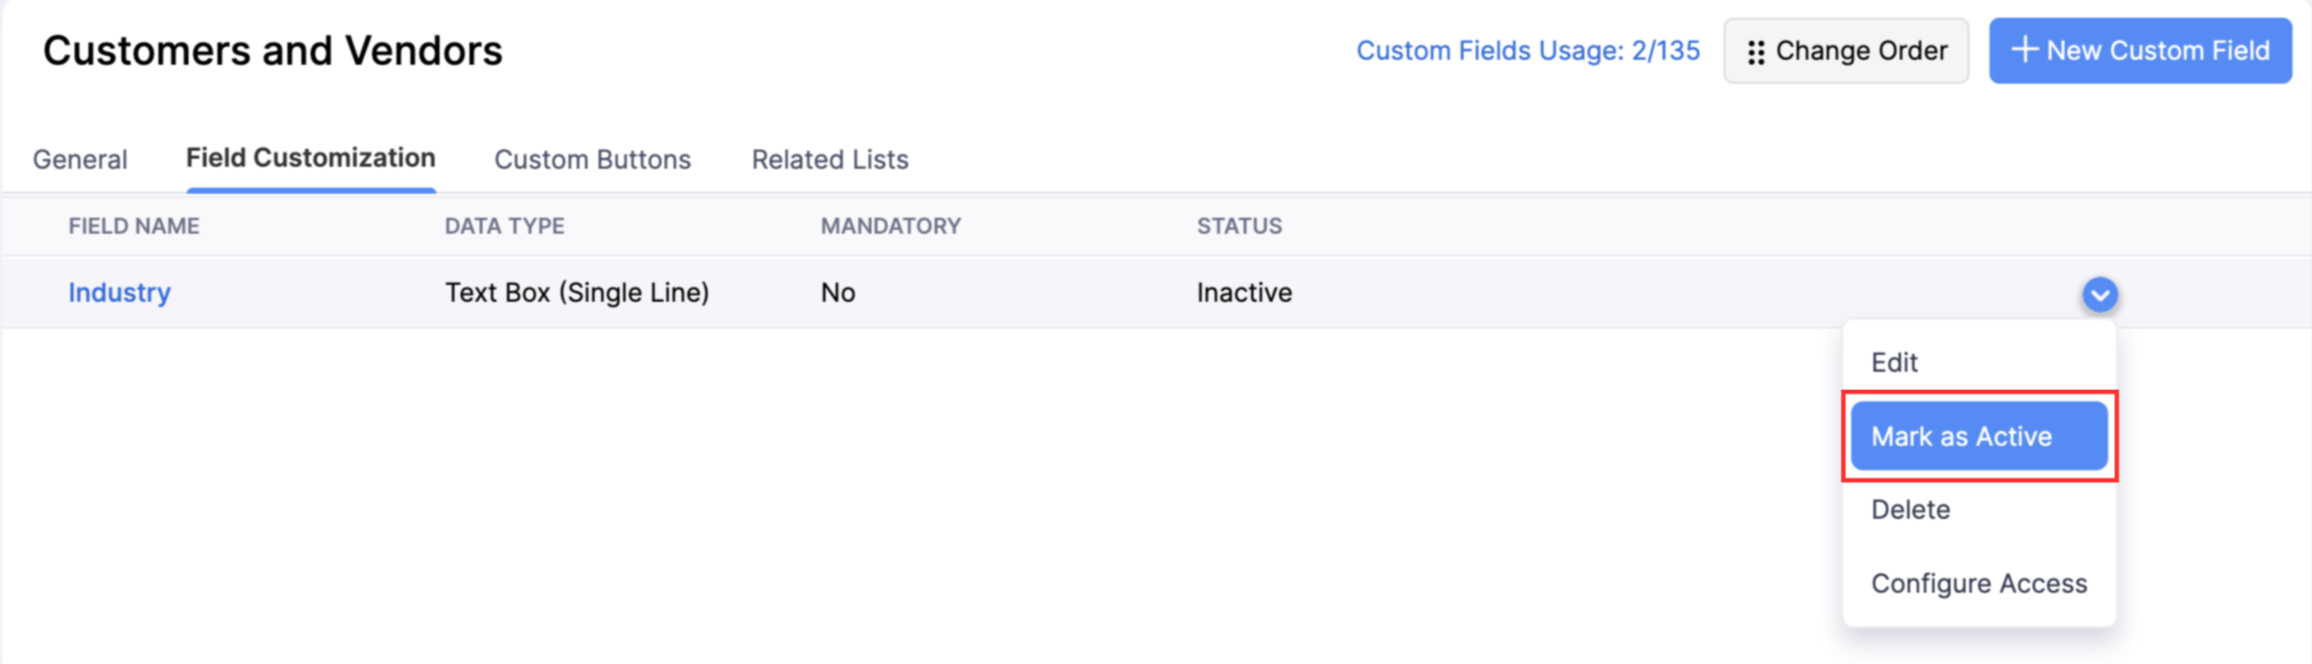
Configure Access
By default, a field is accessible to all roles in your organization. Zoho Books lets you choose the access type of a field for each role. Here’s how:
- Go to Settings in the top right corner.
- Select the module containing the field.
- Go to the Fields tab.
- Hover over the field for which you want to configure access.
- Click the Dropdown icon next to the field and select Configure Access.
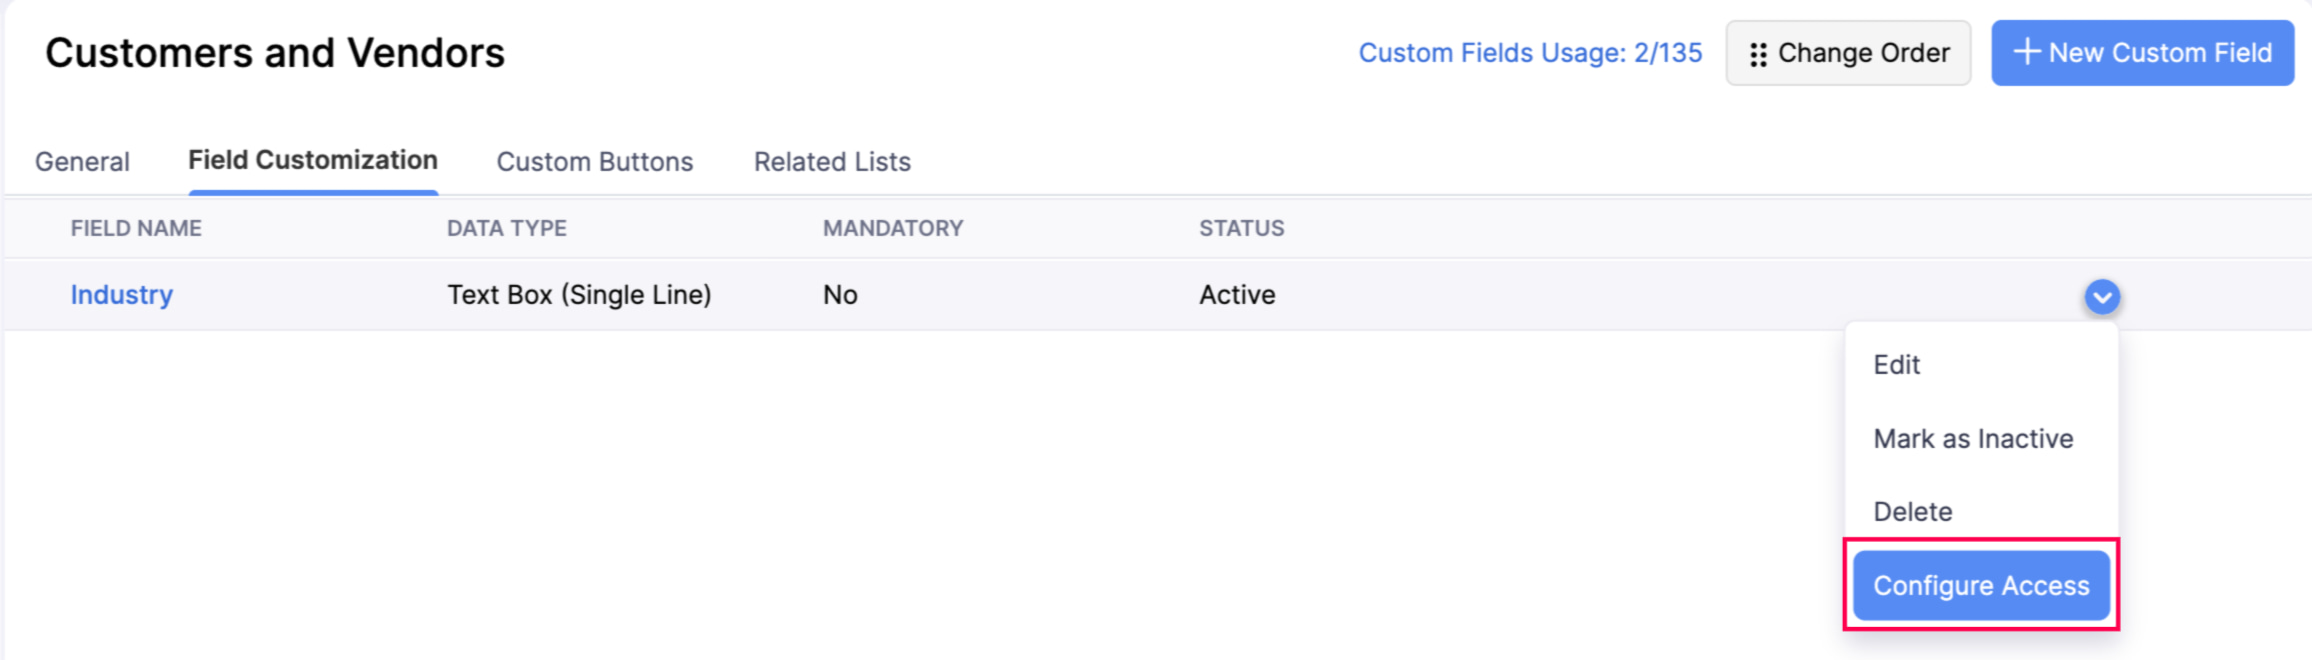
- Choose the level of access you want to provide for each role. By default, the Admin role has unrestricted access to the field, and you cannot change its access type.
- Read and Write: Users in the role can view and update the data stored in the field.
- Read Only: Users in the role can view the data in the field but cannot update it.
- Hide Field: Users in the role cannot view the field.
- Click Save after you’ve configured the access type for all roles.
Delete a Field
You can delete a field created in Zoho Books. Here’s how:
- Go to Settings in the top right corner.
- Select the module containing the field.
- Go to the Fields tab.
- Hover over the inactive field you want to delete.
- Click the Dropdown icon and select Delete.
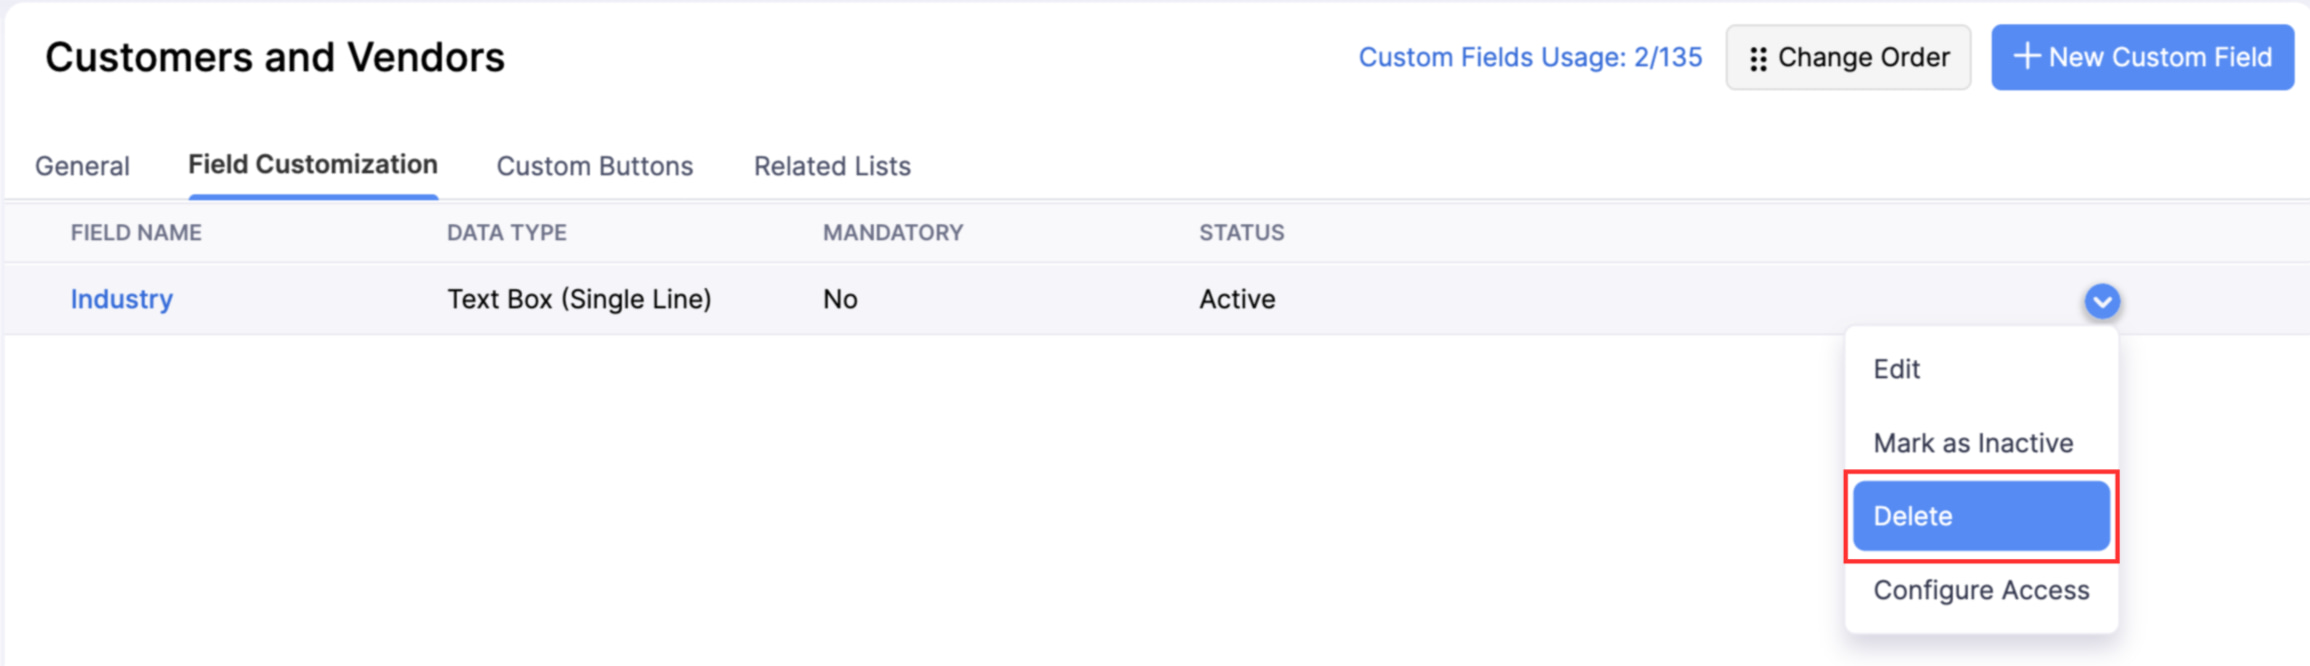
- Click Yes in the pop-up to confirm your action.
- If this field has data associated with existing records, the Force Delete pop-up will appear. You must either delete the associated transactions and then delete the field, or force delete the field. Click Force Delete in the pop-up to proceed. This will permanently remove the field and all data stored in it.
 Yes
Yes