



Items Preferences

You can configure various preferences for the Items module in Zoho Commerce to streamline your inventory, ensuring that your online store runs efficiently and complies with tax regulations. Here’s how:
Preferences
In Preferences, you can configure:
- Set Item Measurements
- HSN code or SAC
- Price Lists
- Composite Items
- Digital Downloads
- Advanced Inventory Tracking
- Reorder Point
Set Item Measurements
You can select measurement units to record the weight and dimensions of your items. Here’s how:
- Log in to your Zoho Commerce organization.
- Click Settings in the top right corner.
- Navigate to Items under Sales.
- Select the Preferences tab.
- Click the dropdown towards the right to select the measurement units for item dimensions and weight.
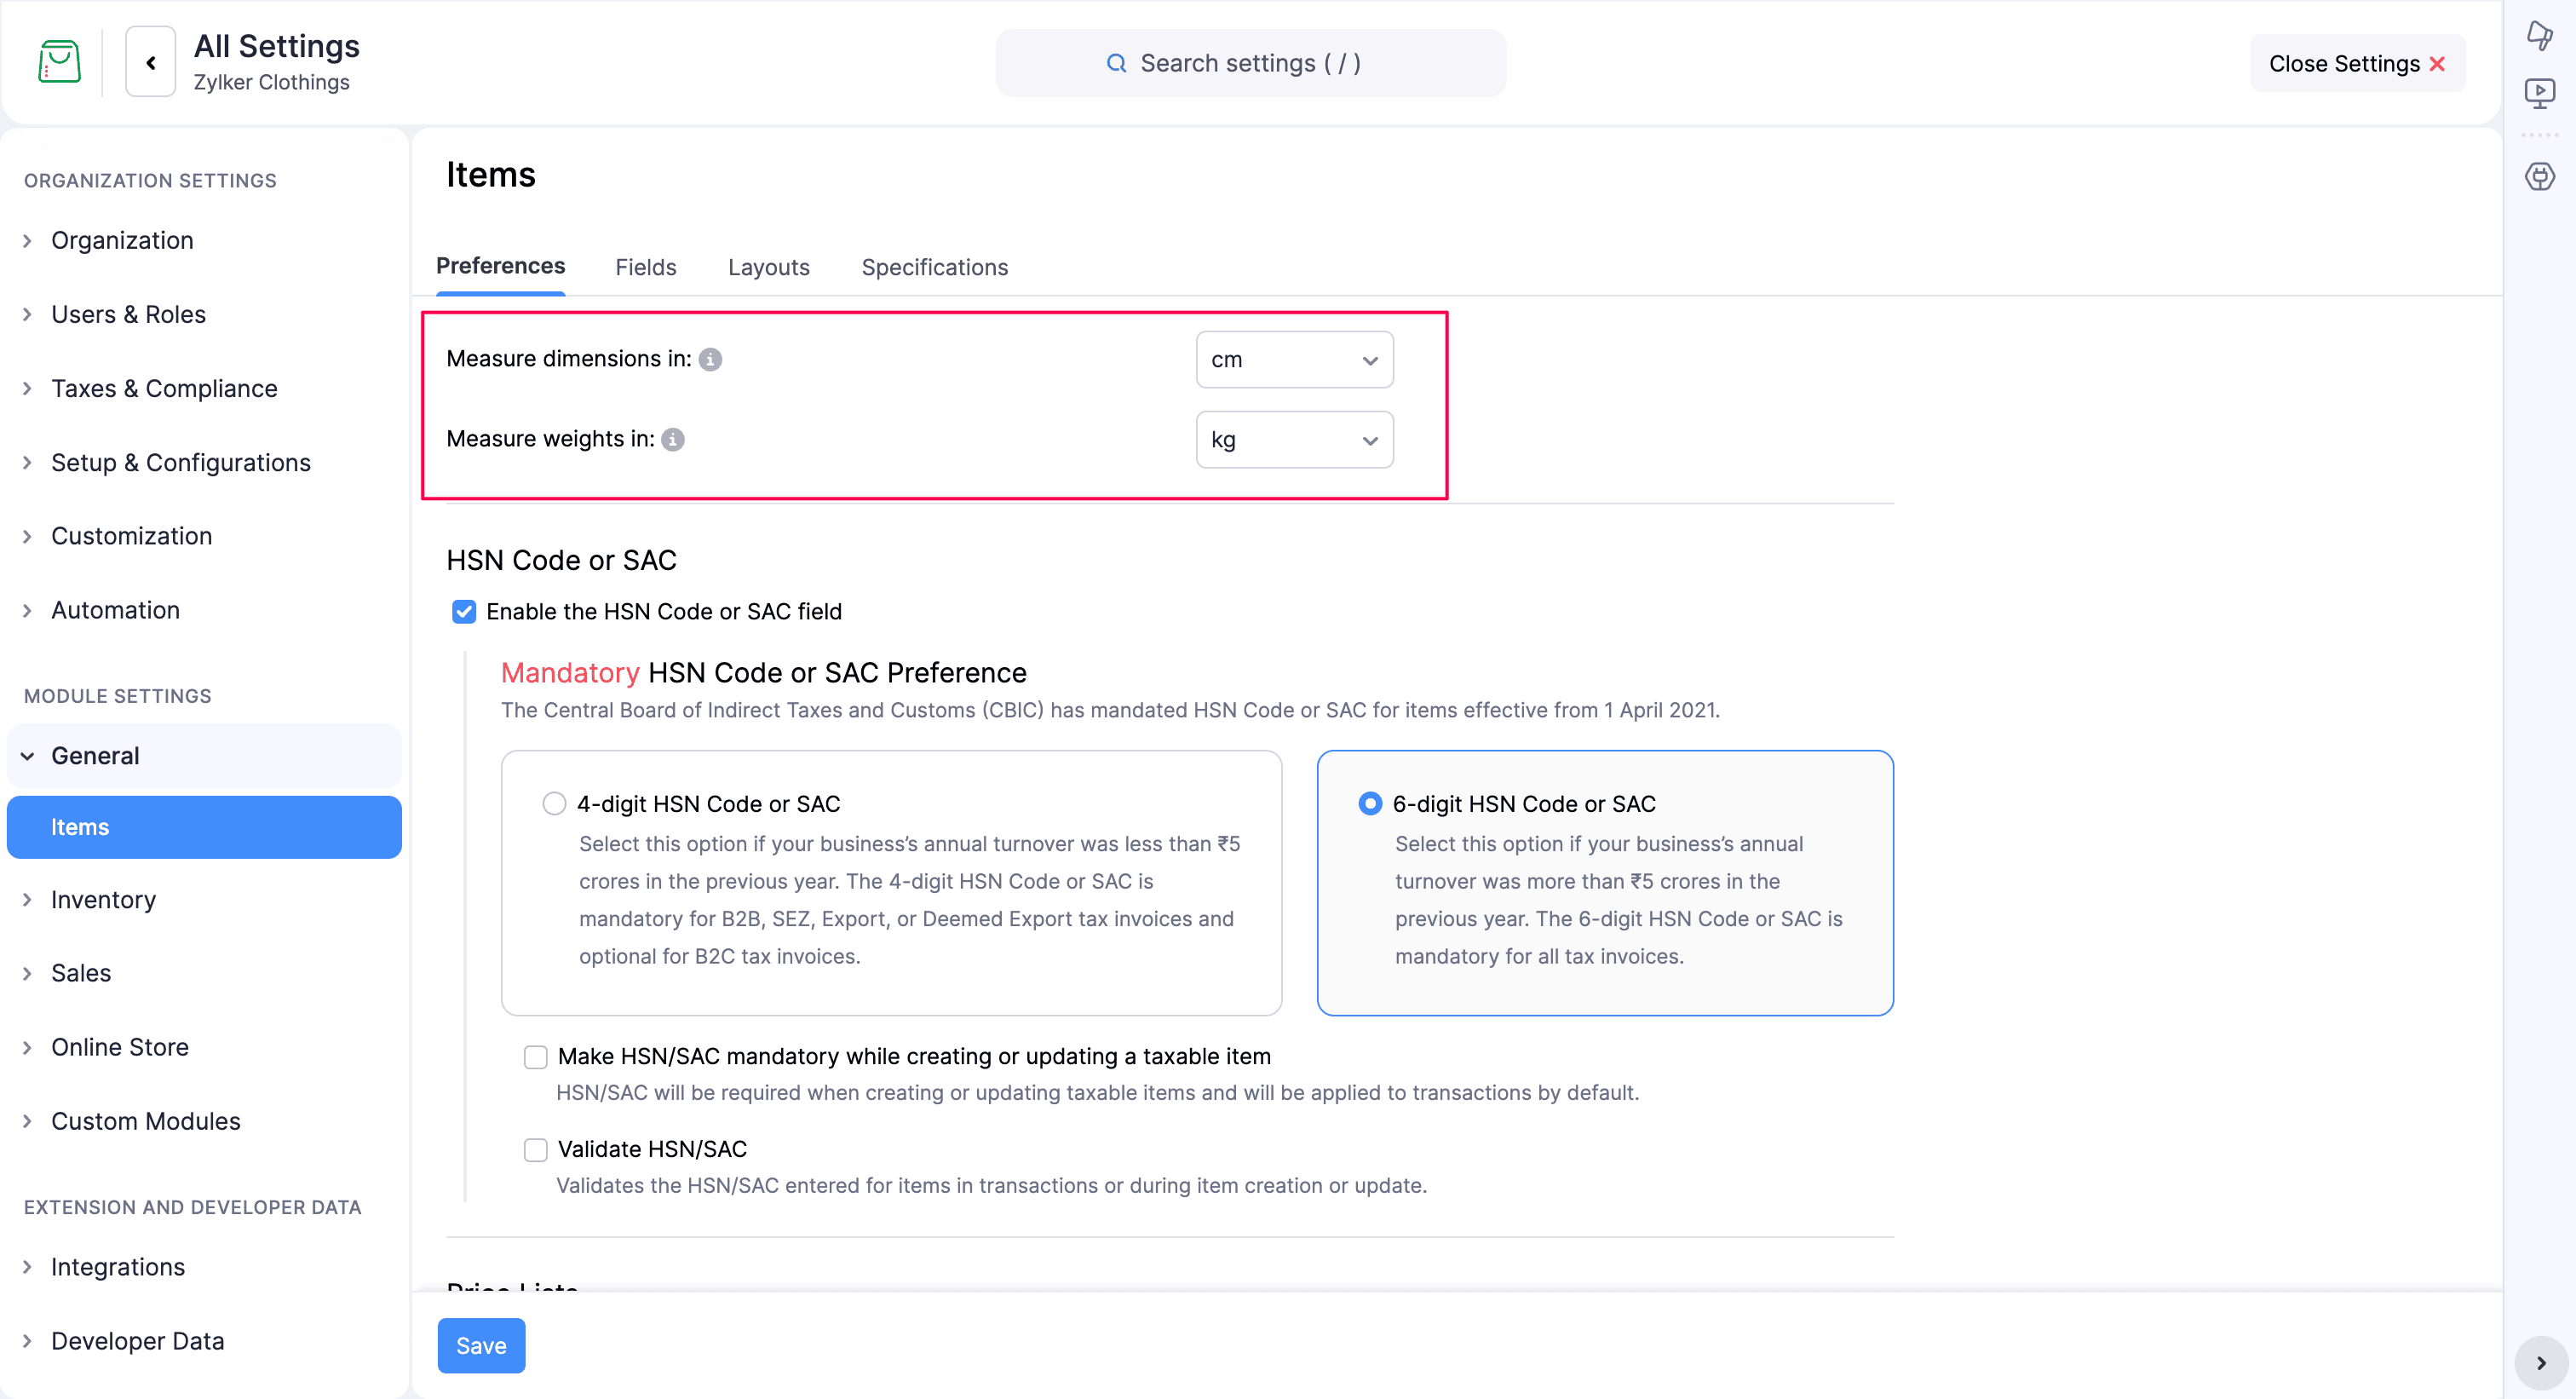
- Click Save to apply the selected measurement units.
HSN code or SAC
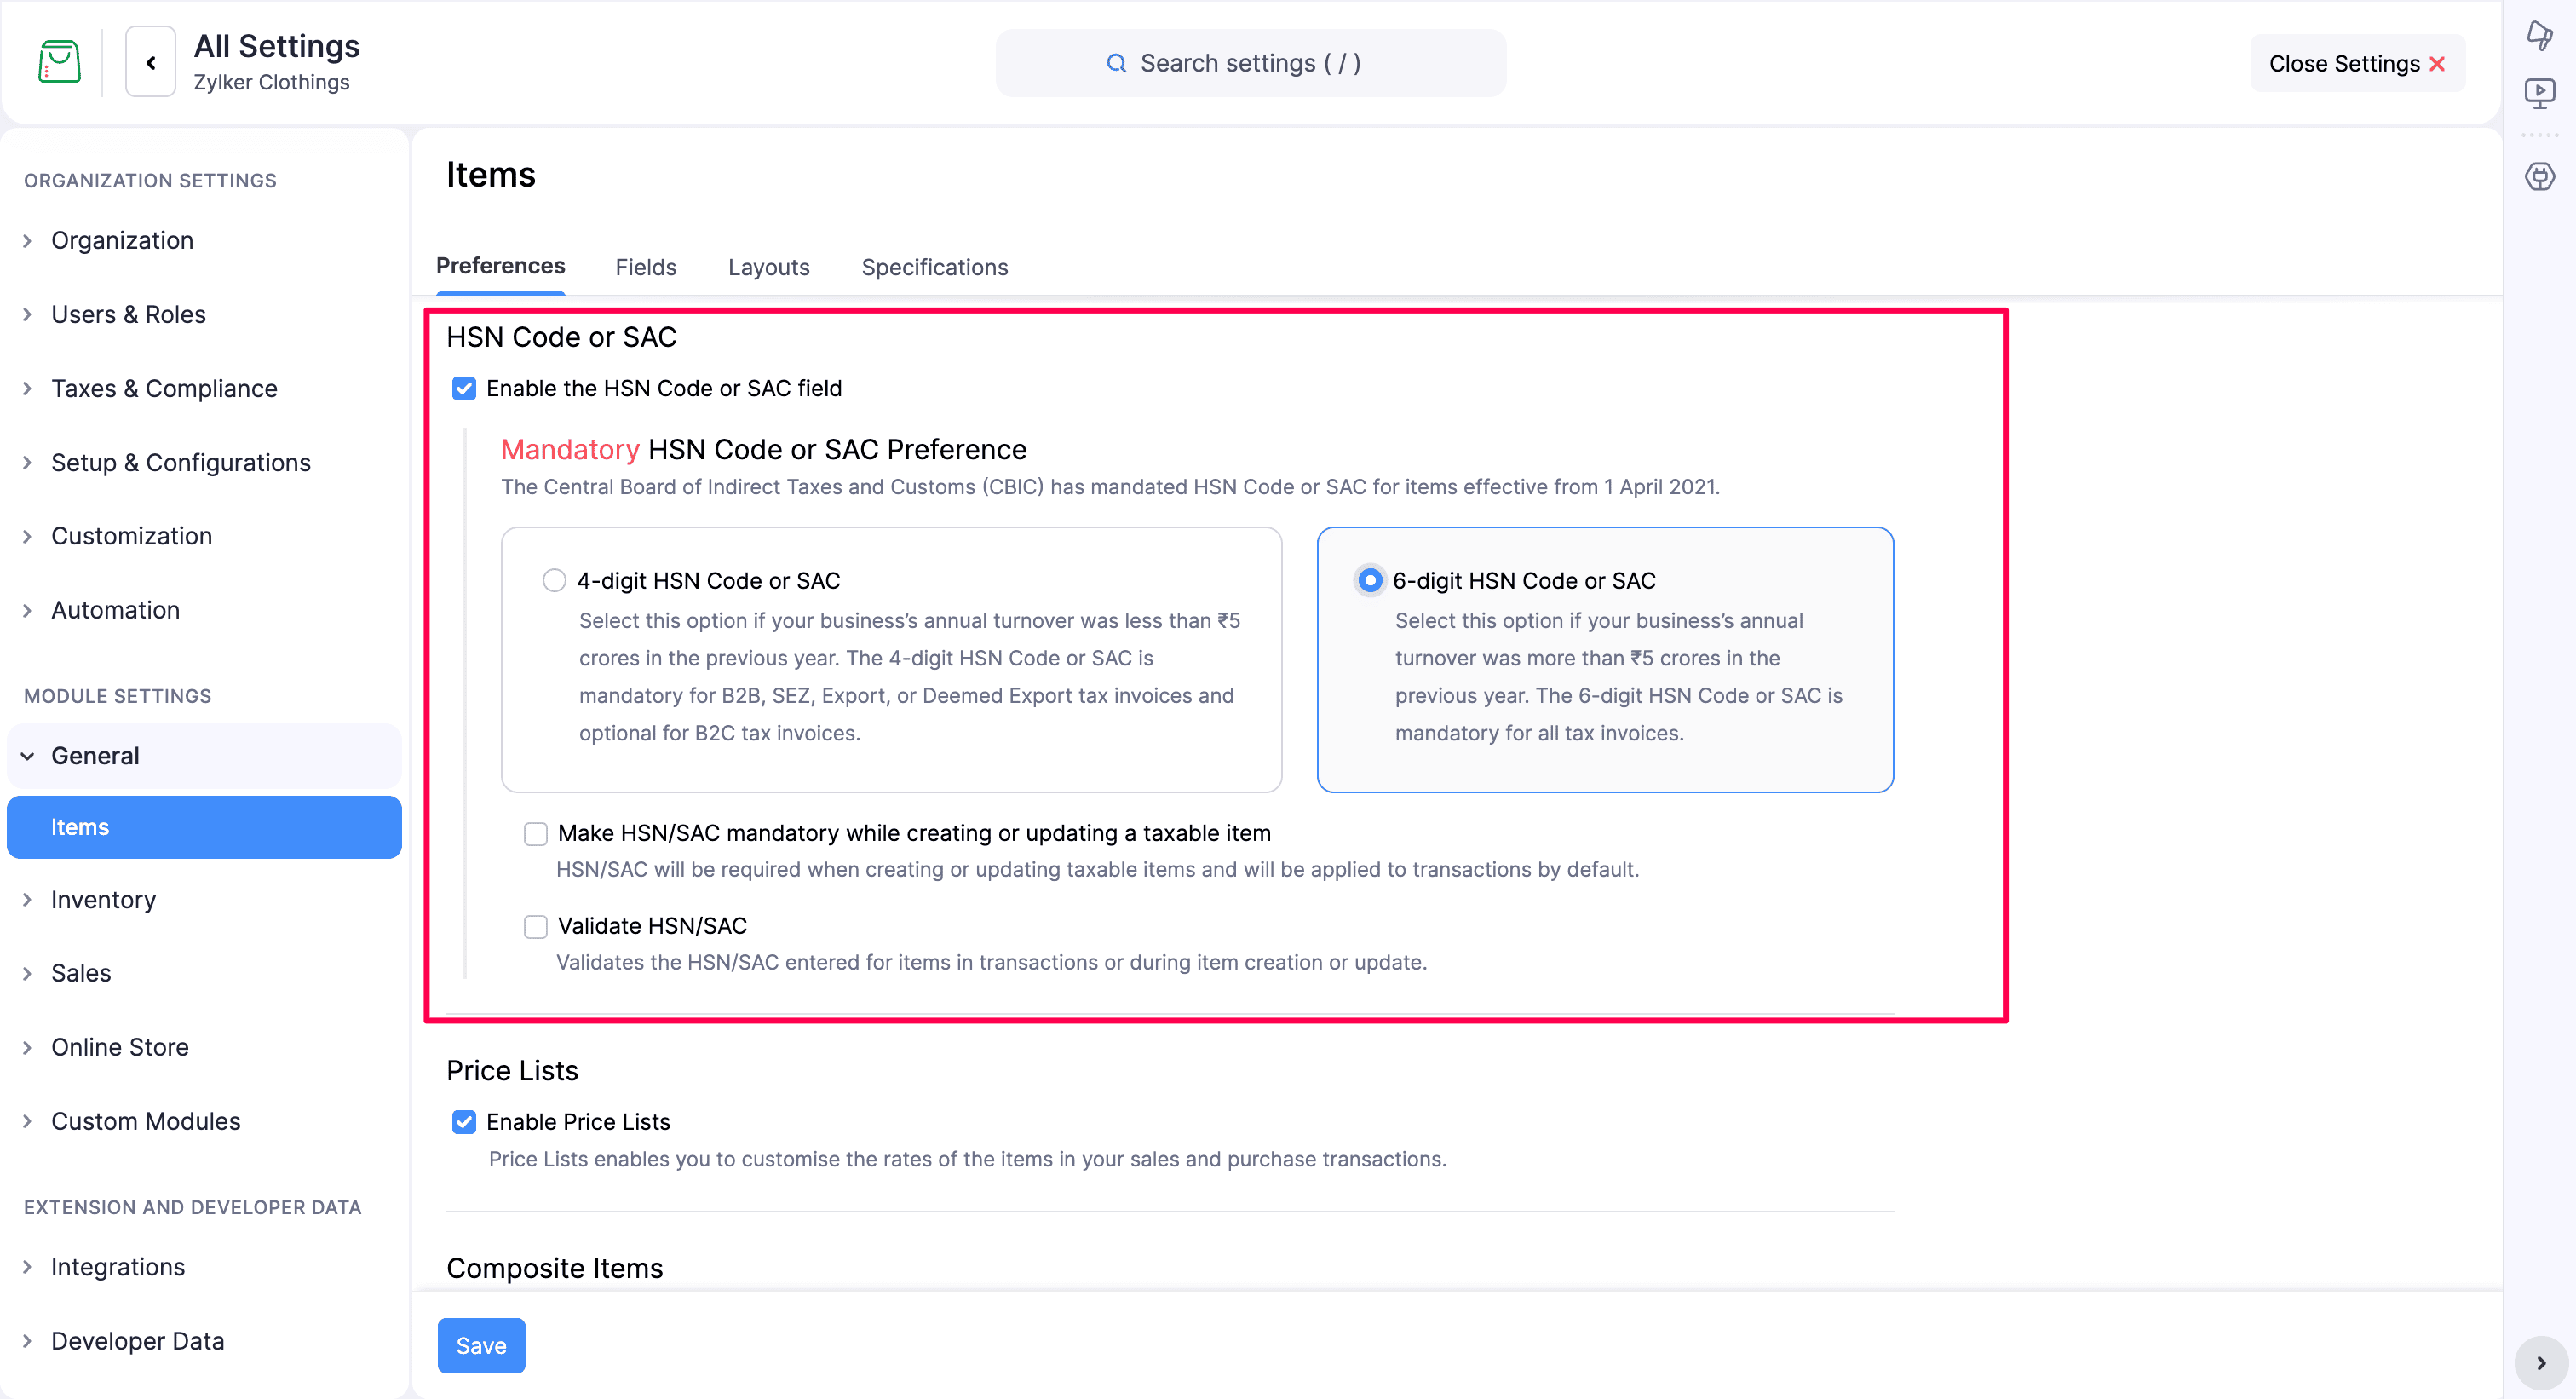
You can enable and configure HSN code or SAC for your items to comply with tax regulations. Here’s how:
- Log in to your Zoho Commerce organization.
- Click Settings in the top right corner.
- Navigate to Items under General.
- Select the Preferences tab.
- Scroll to the HSN Code or SAC section.
- Select Enable the HSN Code or SAC field.
- Under Mandatory HSN Code or SAC Preference, choose the option that applies to your business:
- 4-digit HSN Code or SAC: Select this option if your business’s annual turnover was less than ₹5 crores in the previous year. The 4-digit HSN Code or SAC is mandatory for B2B, SEZ, Export, and Deemed Export tax invoices, and optional for B2C tax invoices.
- 6-digit HSN Code or SAC: Select this option if your business’s annual turnover was more than ₹5 crores in the previous year. The 6-digit HSN Code or SAC is mandatory for all tax invoices.
- To make HSN/SAC mandatory while creating or updating a taxable item, select Make HSN/SAC mandatory while creating or updating a taxable item.
- To validate the HSN/SAC against the item tax details, select Validate HSN/SAC.
- Click Save to apply the changes.
Price Lists
You can enable Price Lists to customize item rates for your sales transactions based on your business needs. Here’s how:
- Log in to your Zoho Commerce organization.
- Click Settings in the top right corner.
- Navigate to Items under General.
- Select the Preferences tab.
- Check the Enable Price Lists option.
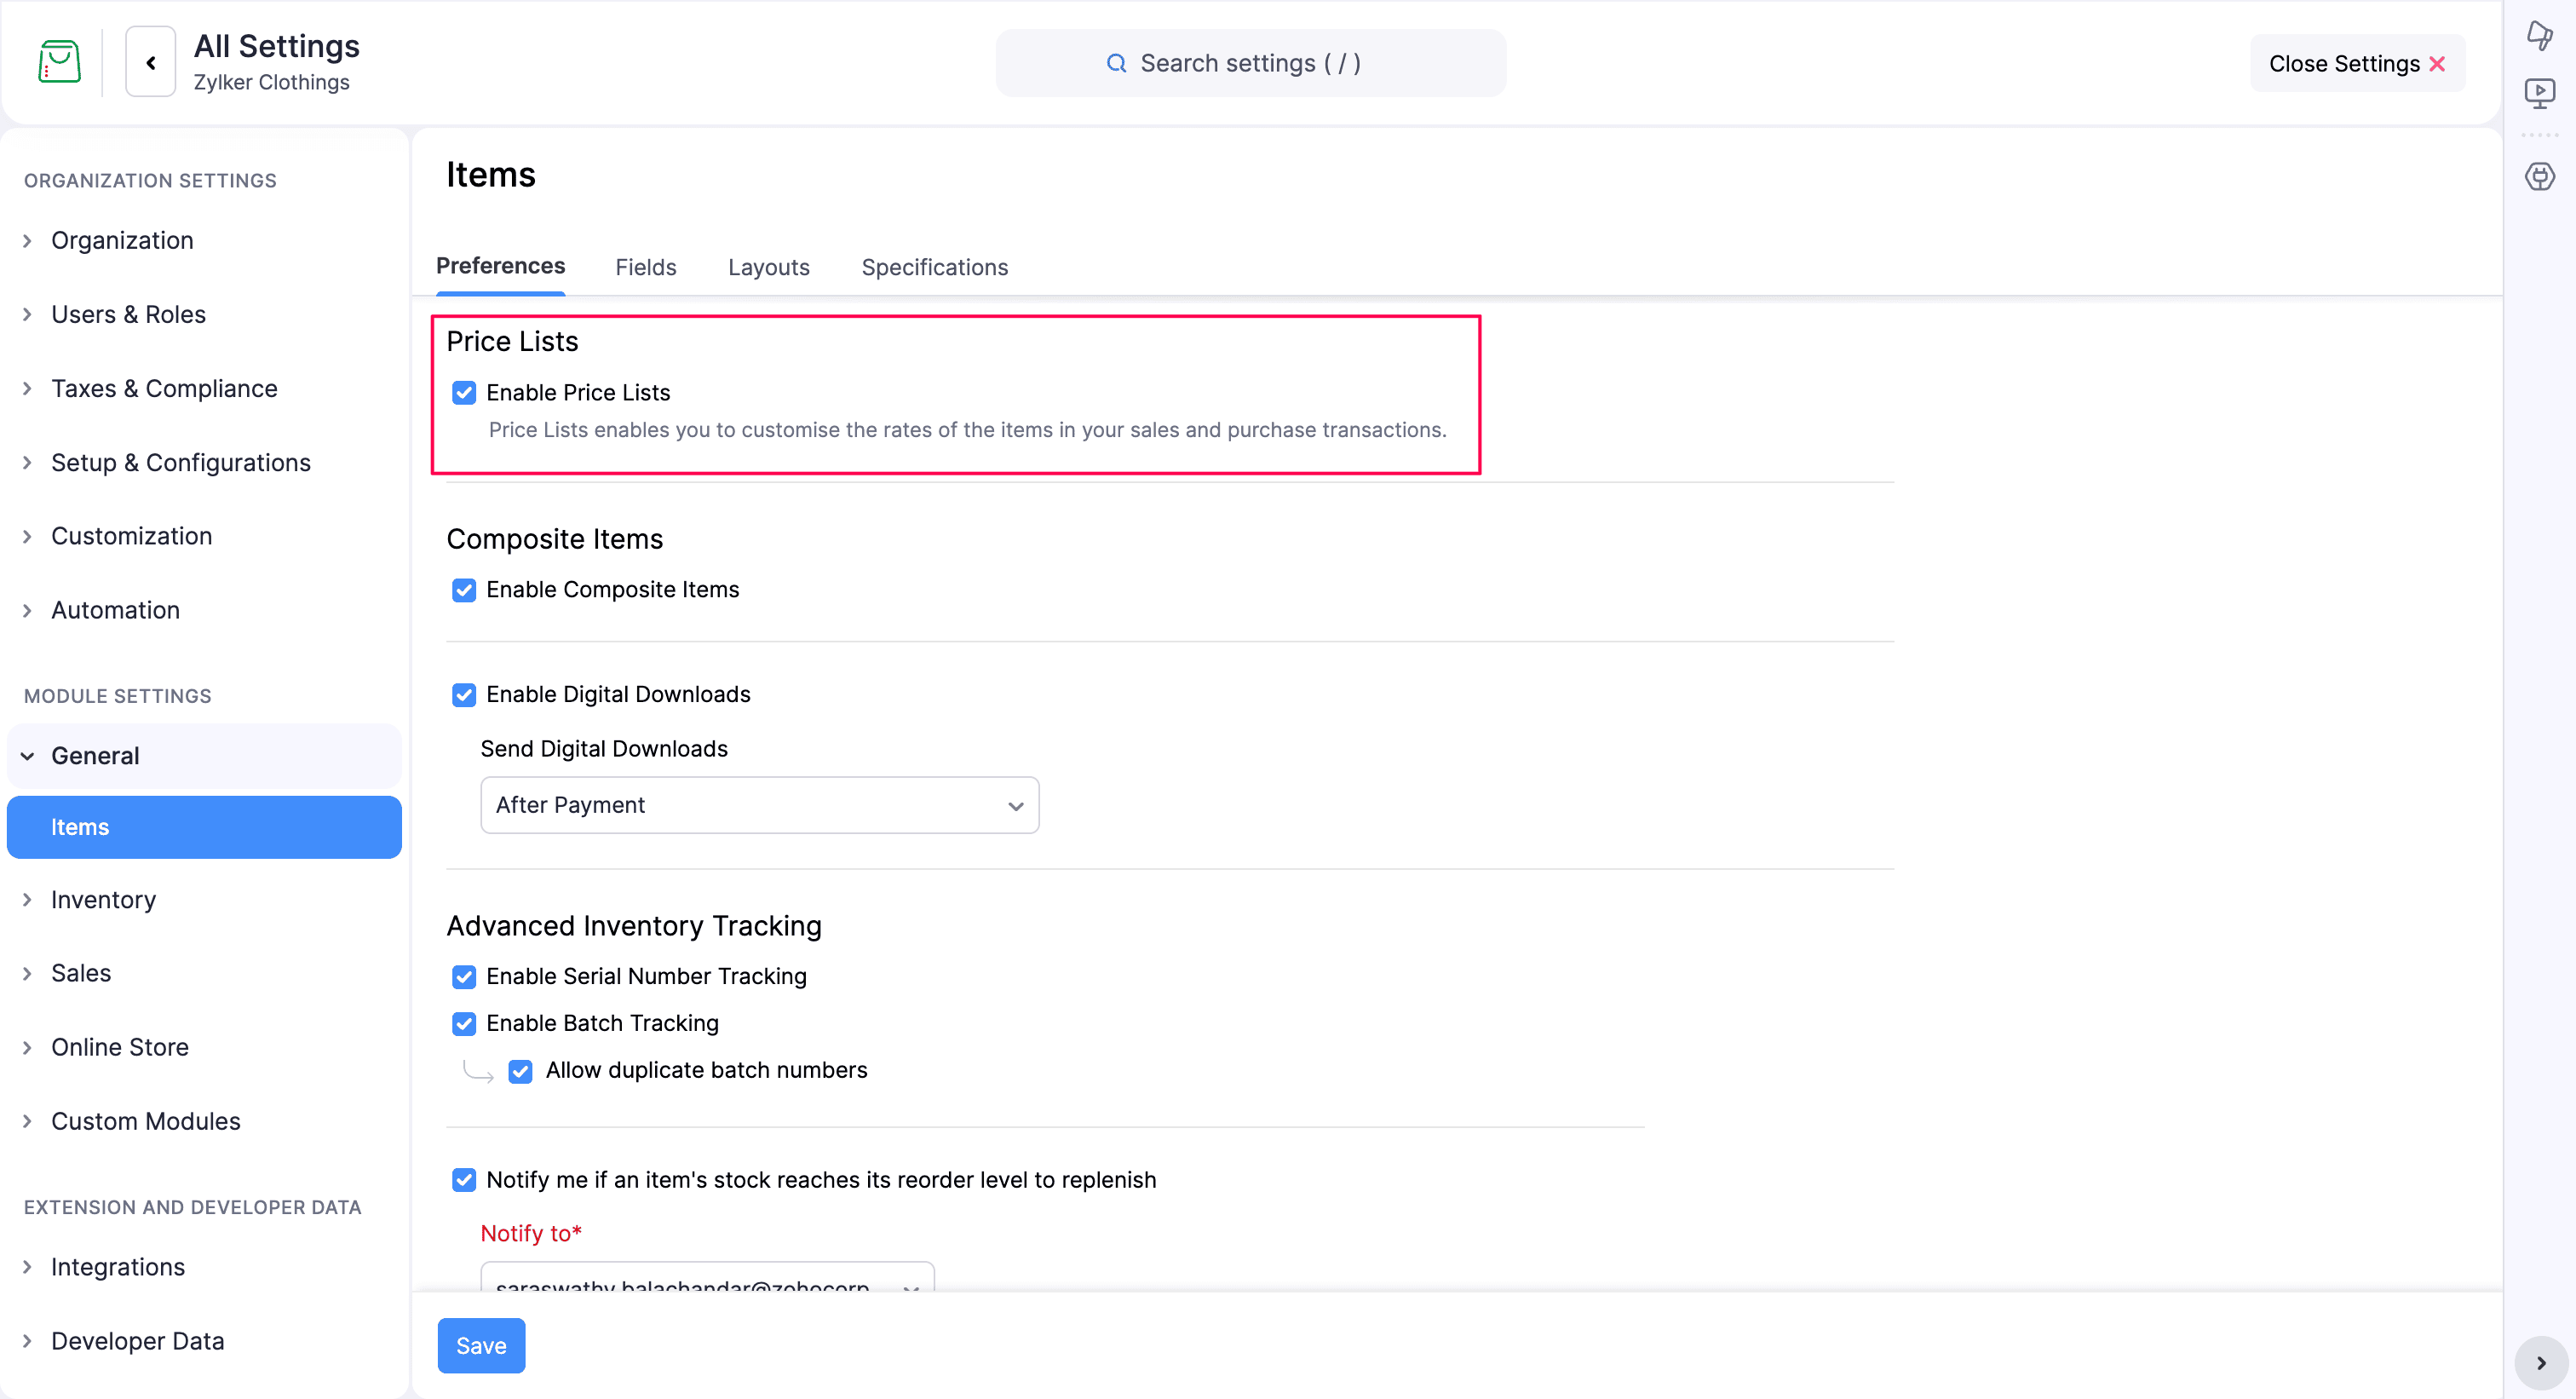
- Click Save to enable Price Lists in Items.
Learn more about setting up the Price Lists by clicking here.
Composite Items
You can enable Composite Items to create a single product by combining two or more individual items and/or services. Here’s how:
- Log in to your Zoho Commerce organization.
- Click Settings in the top right corner.
- Navigate to Items under General.
- Select the Preferences tab.
- Check the Enable Composite Items option.
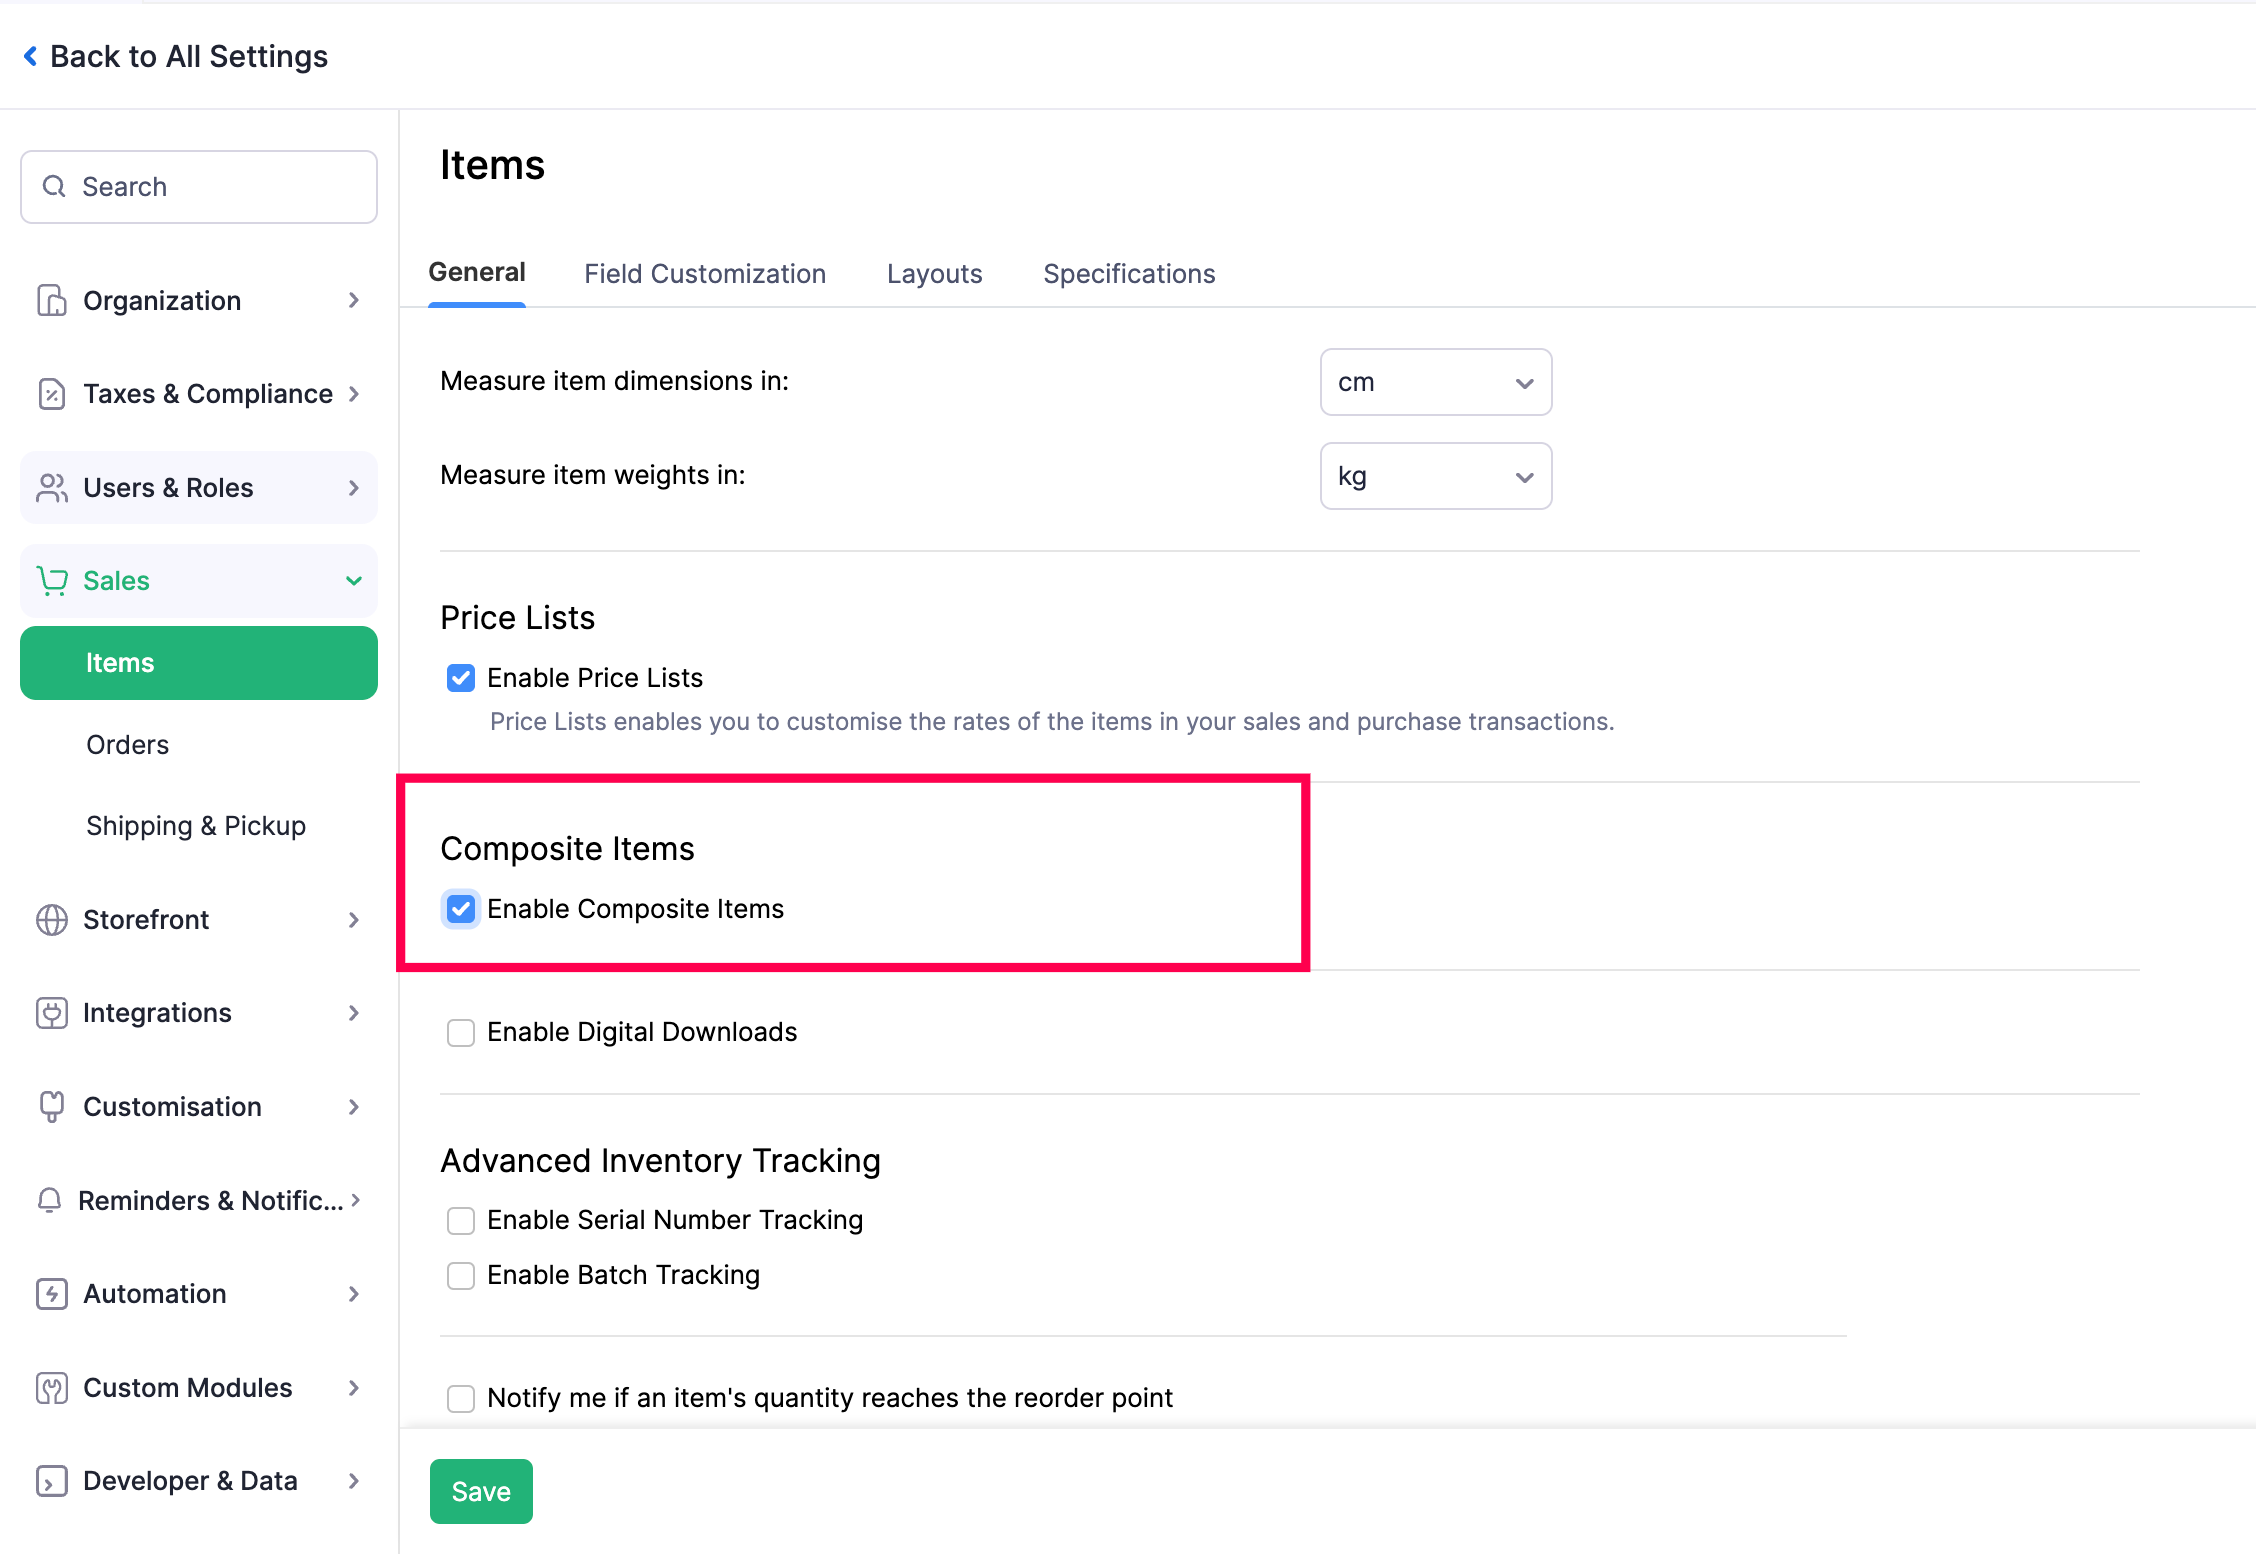
- Click Save to enable Composite Items.
Digital Downloads
You can configure the Digital Downloads feature in Zoho Commerce to send digital files to your customers upon purchase. You can choose to deliver files either automatically after payment or manually at your convenience.
Scenario: Patricia sells eBooks through her Zoho Commerce store. To simplify delivery, she enables the Digital Downloads feature and sets it to auto-deliver after payment. Now, customers instantly receive their eBooks as soon as their purchase is complete.
To enable Digital Downloads:
- Log in to your Zoho Commerce organization.
- Click Settings in the top right corner.
- Navigate to Items under General.
- Select the Preferences tab.
- Scroll to the Digital Downloads section.
- Check the Enable Digital Downloads option.
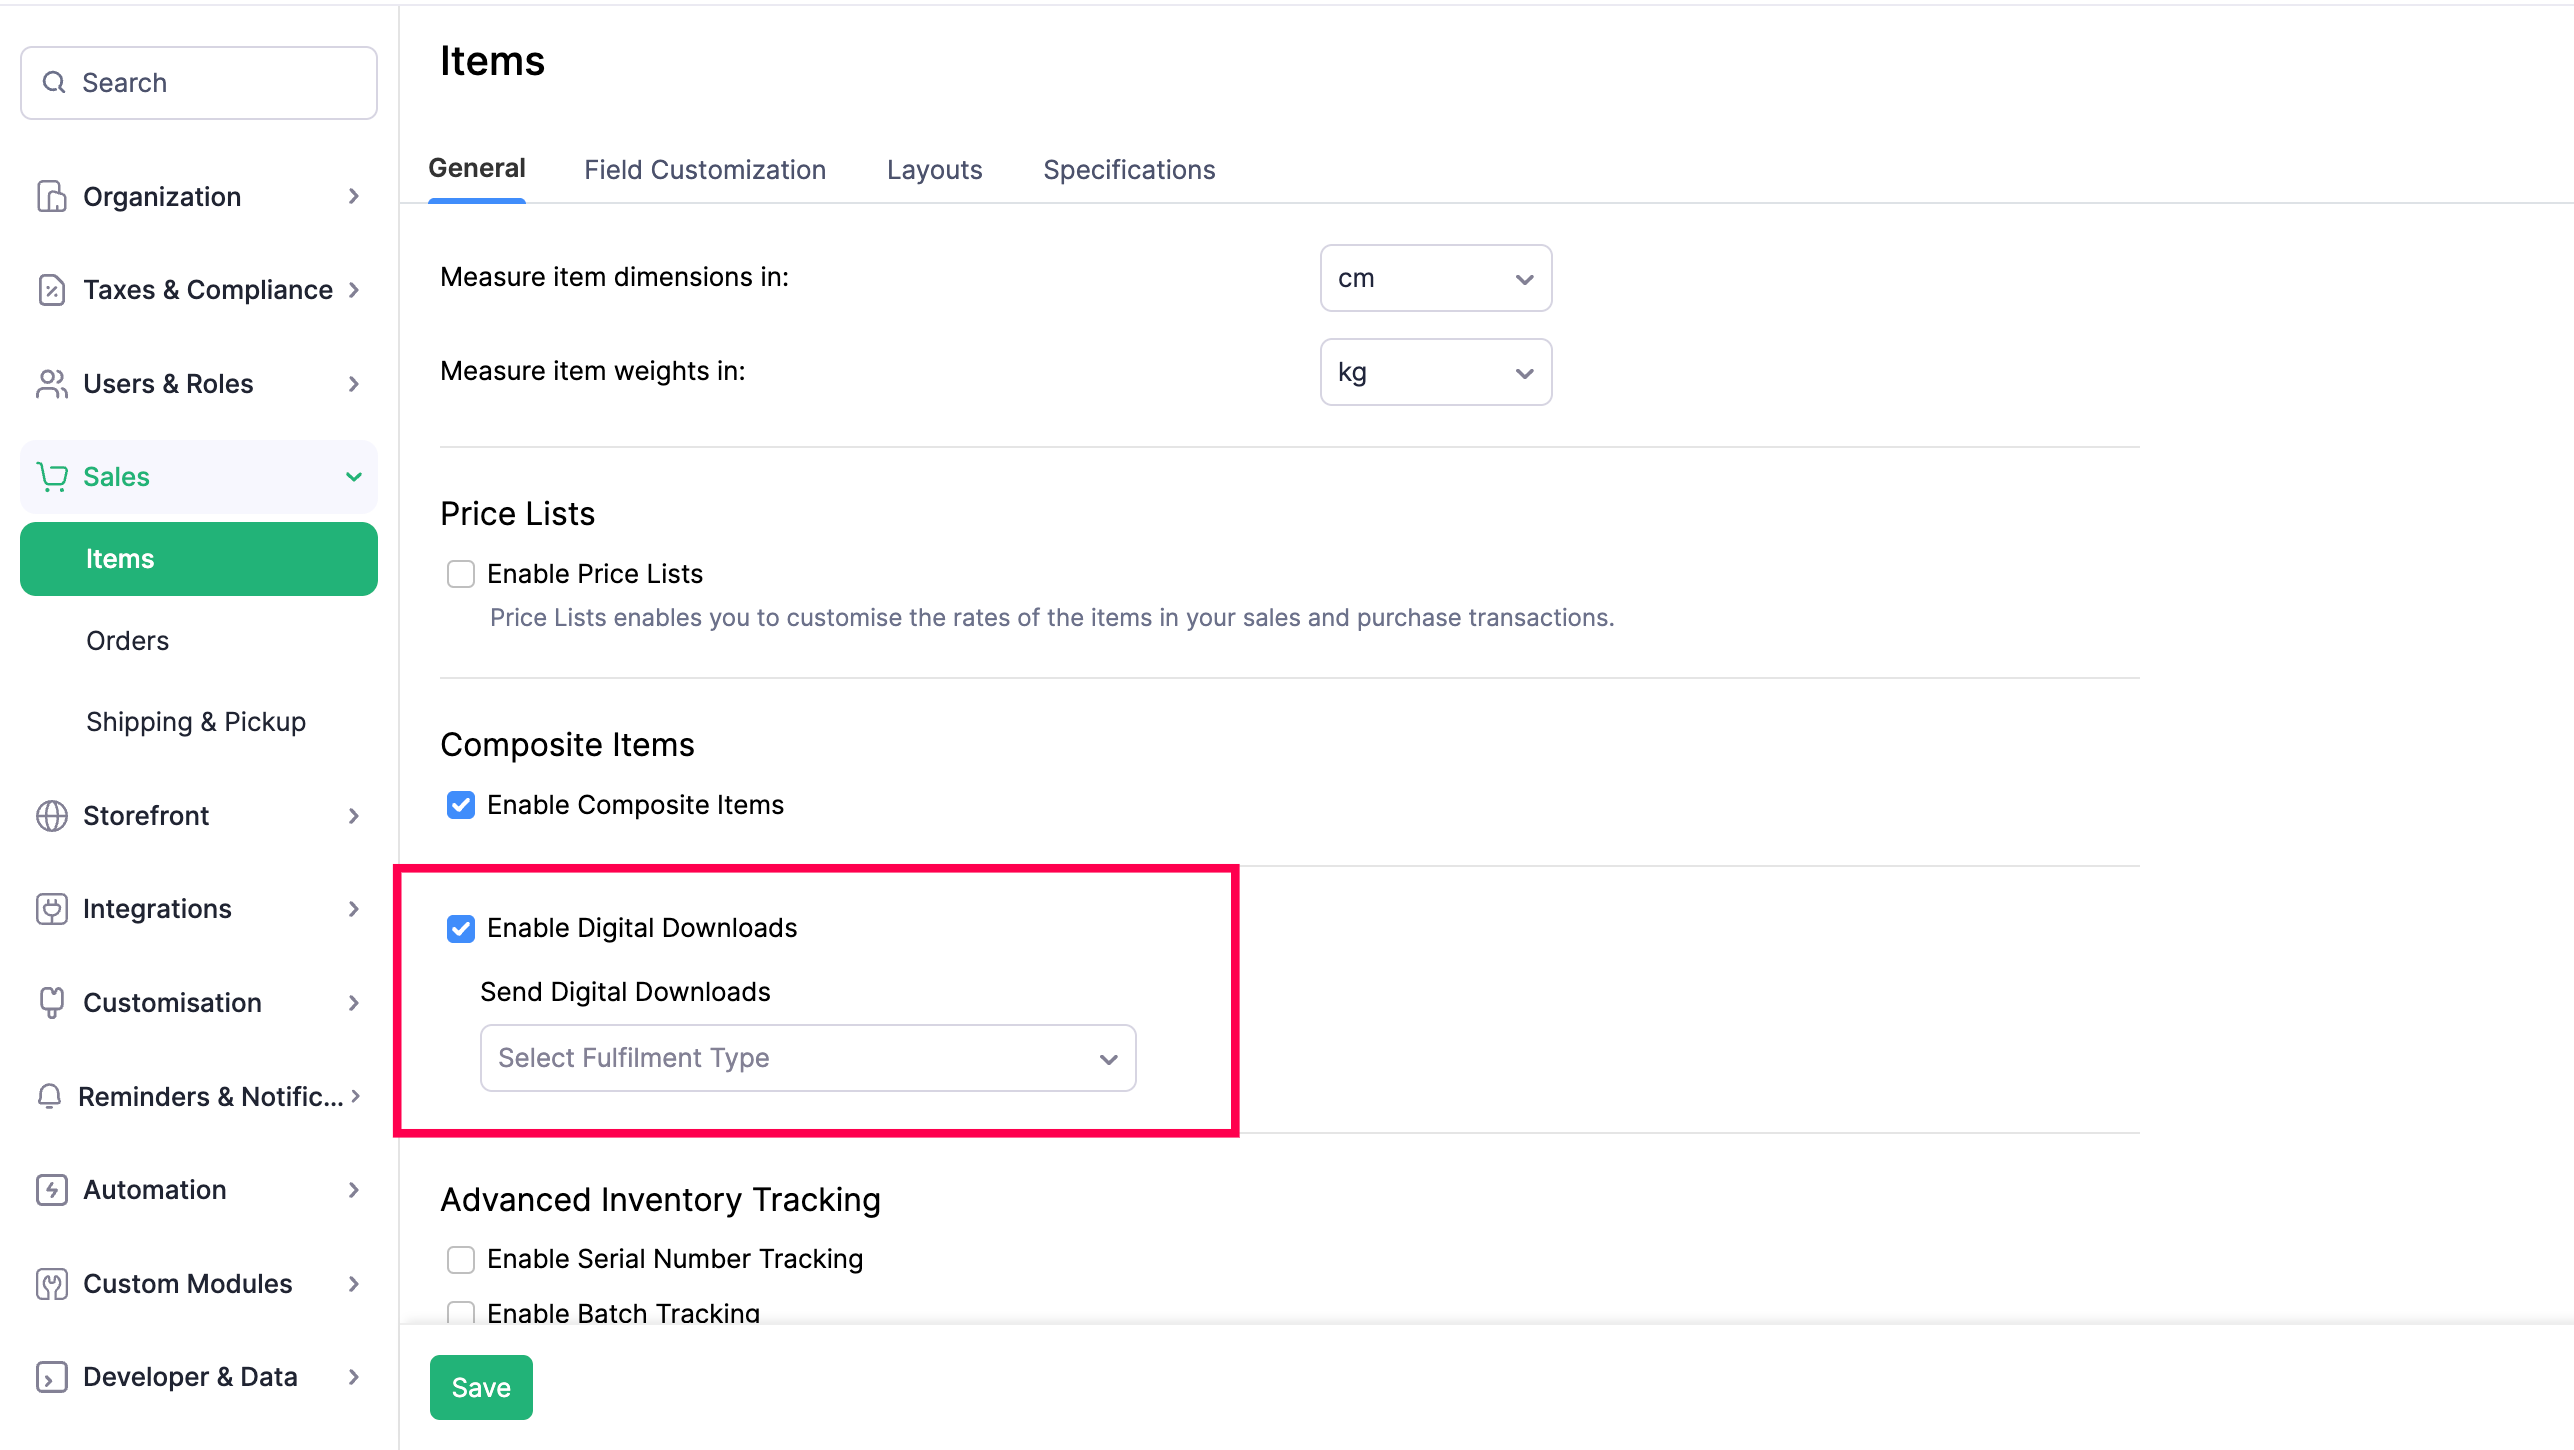
- In the Fulfilment type, choose your preferred option. You can choose from After Payment, Manual, and After Fulfilment.
- Click Save to apply your preferences.
Advanced Inventory Tracking
You can enable this feature to use advanced inventory tracking methods such as serial number tracking and batch tracking for your items. Here’s how:
- Log in to your Zoho Commerce organization.
- Click Settings in the top right corner.
- Navigate to Items under General.
- Select the Preferences tab.
- Scroll to the Advanced Inventory Tracking section and enable the following as required:
- Serial Number Tracking: Enable this option to track each unit of an item individually using unique serial numbers.
- Batch Tracking: Enable this to group items into batches.
- Allow Duplicate Batch Numbers: Enable this to use the same batch number across different items.
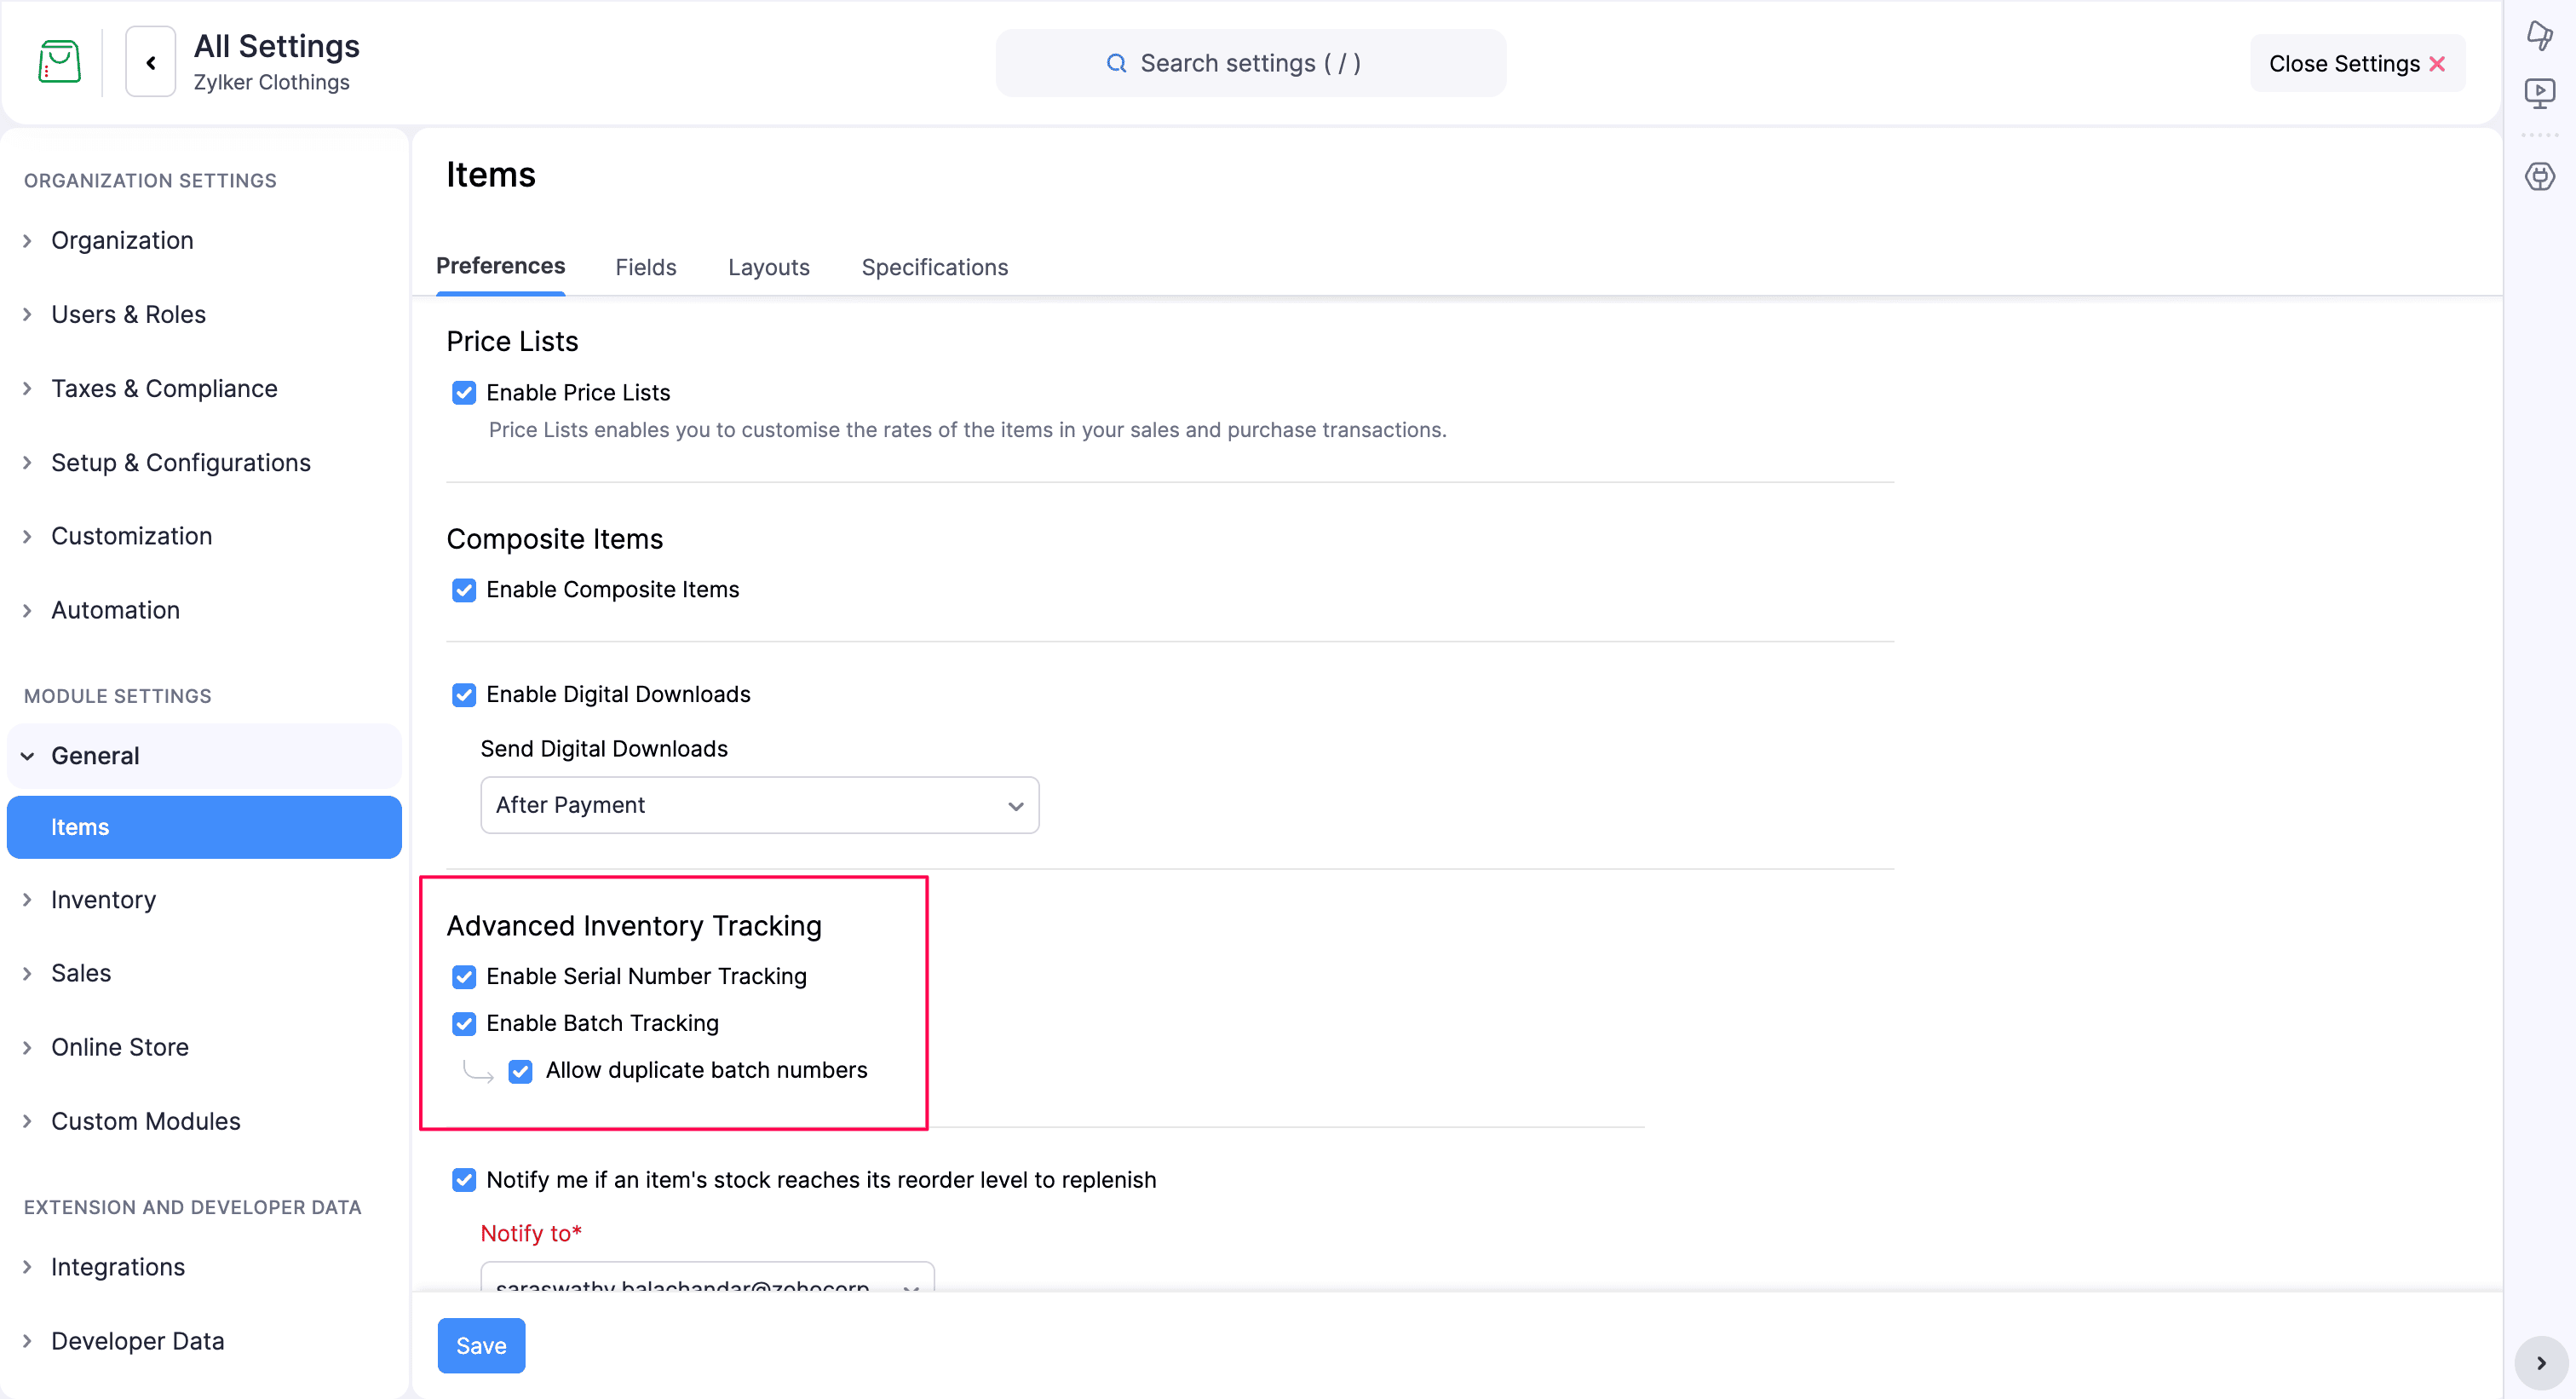
- Click Save to apply the changes.
Reorder Point
You can enable notifications to alert you when an item’s quantity reaches its reorder point to ensure timely restocking. Here’s how:
- Log in to your Zoho Commerce organization.
- Click Settings in the top right corner.
- Navigate to Items under General.
- Select the Preferences tab.
- Check the Notify me if an item’s quantity reaches its reorder level to replenish option.
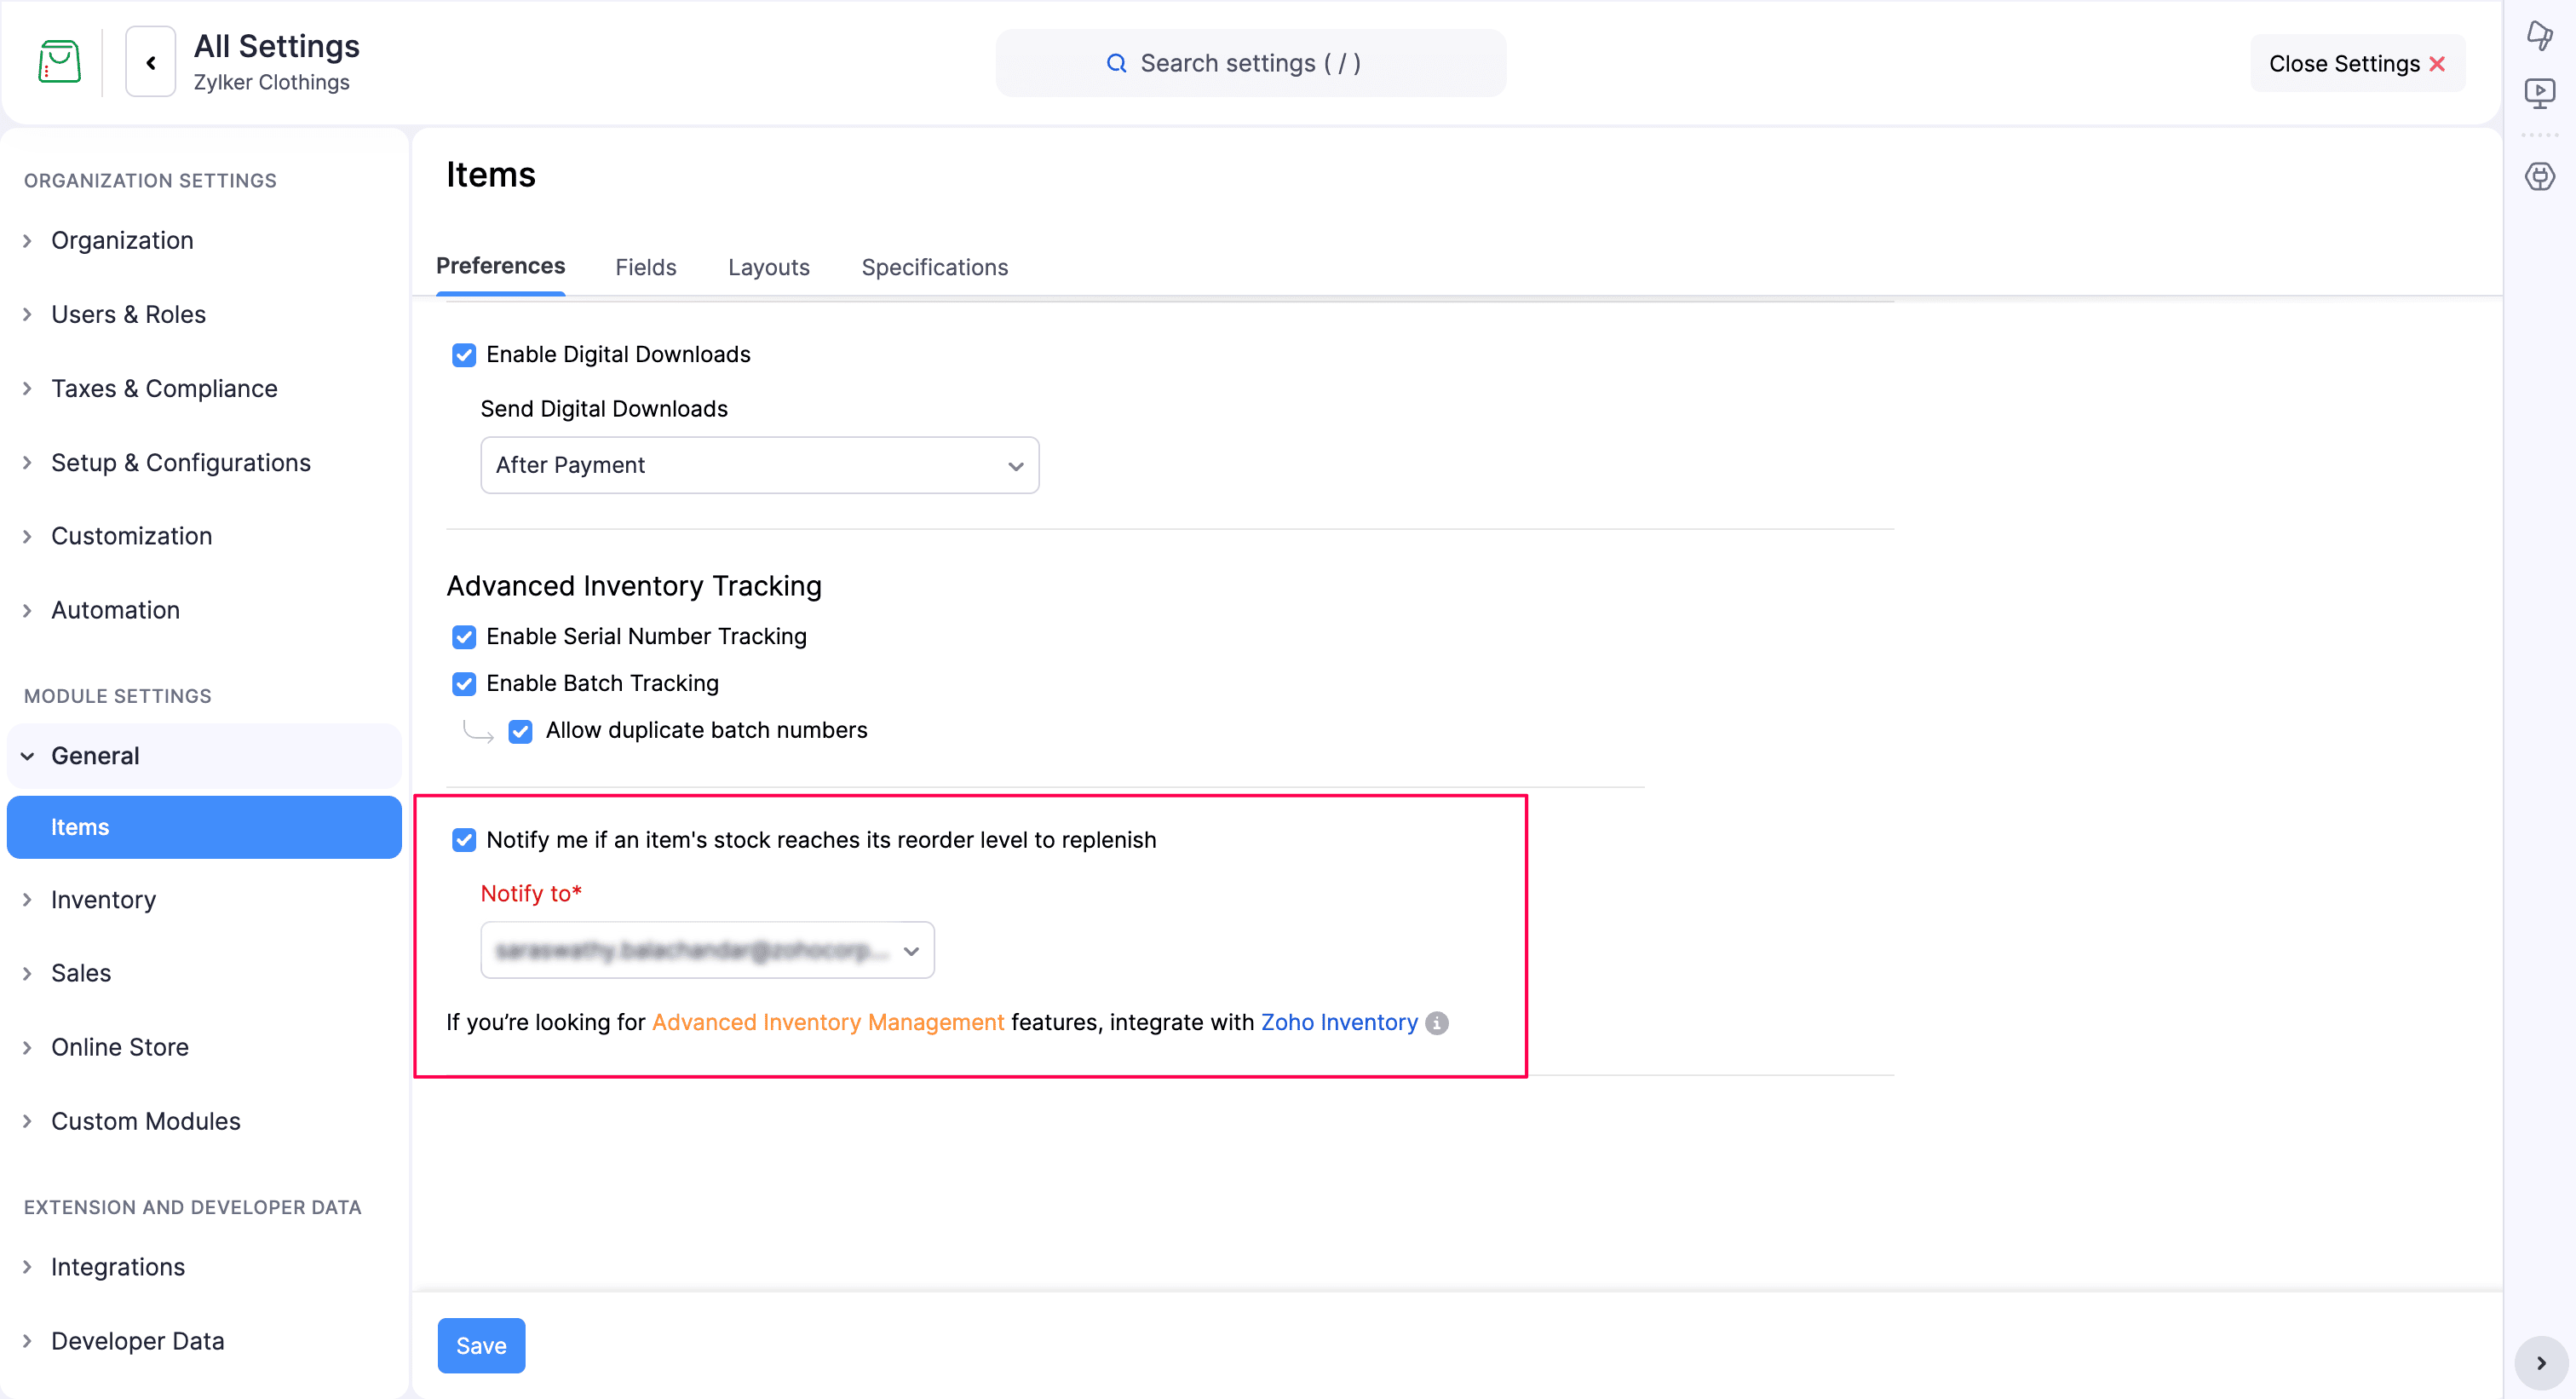
- Click Save to enable notification for reorder points.
Field Customization
You can create custom fields to let customers choose product options such as material, style, and design. This helps you collect additional information for customized products without creating separate variants.
Scenario: Zylker, a clothing brand, wants to offer different customization options for each product. In addition to product variants, they want customers to choose the material type, style, and design. This can be done by creating custom fields with customization options.
To customize a field:
- Go to Items under Settings.
- Select the Field Customization tab.
- Click New Field.
- On the New Field page, select the relevant options:
- Create Custom Field For: Choose whether to create the custom field for Item or Batch.
- Label Name: Enter the name of the custom field.
- Data Type: Select the type of data the field will store, such as Text Box (Single Line).
- Help Text: Add helper text to explain the purpose of the field.
- Data Privacy: Choose PII or ePHI as required.
- Prevent Duplicates Values: Set to Yes or No.
- Input Format: Choose the required format and use Configure Custom Format if needed.
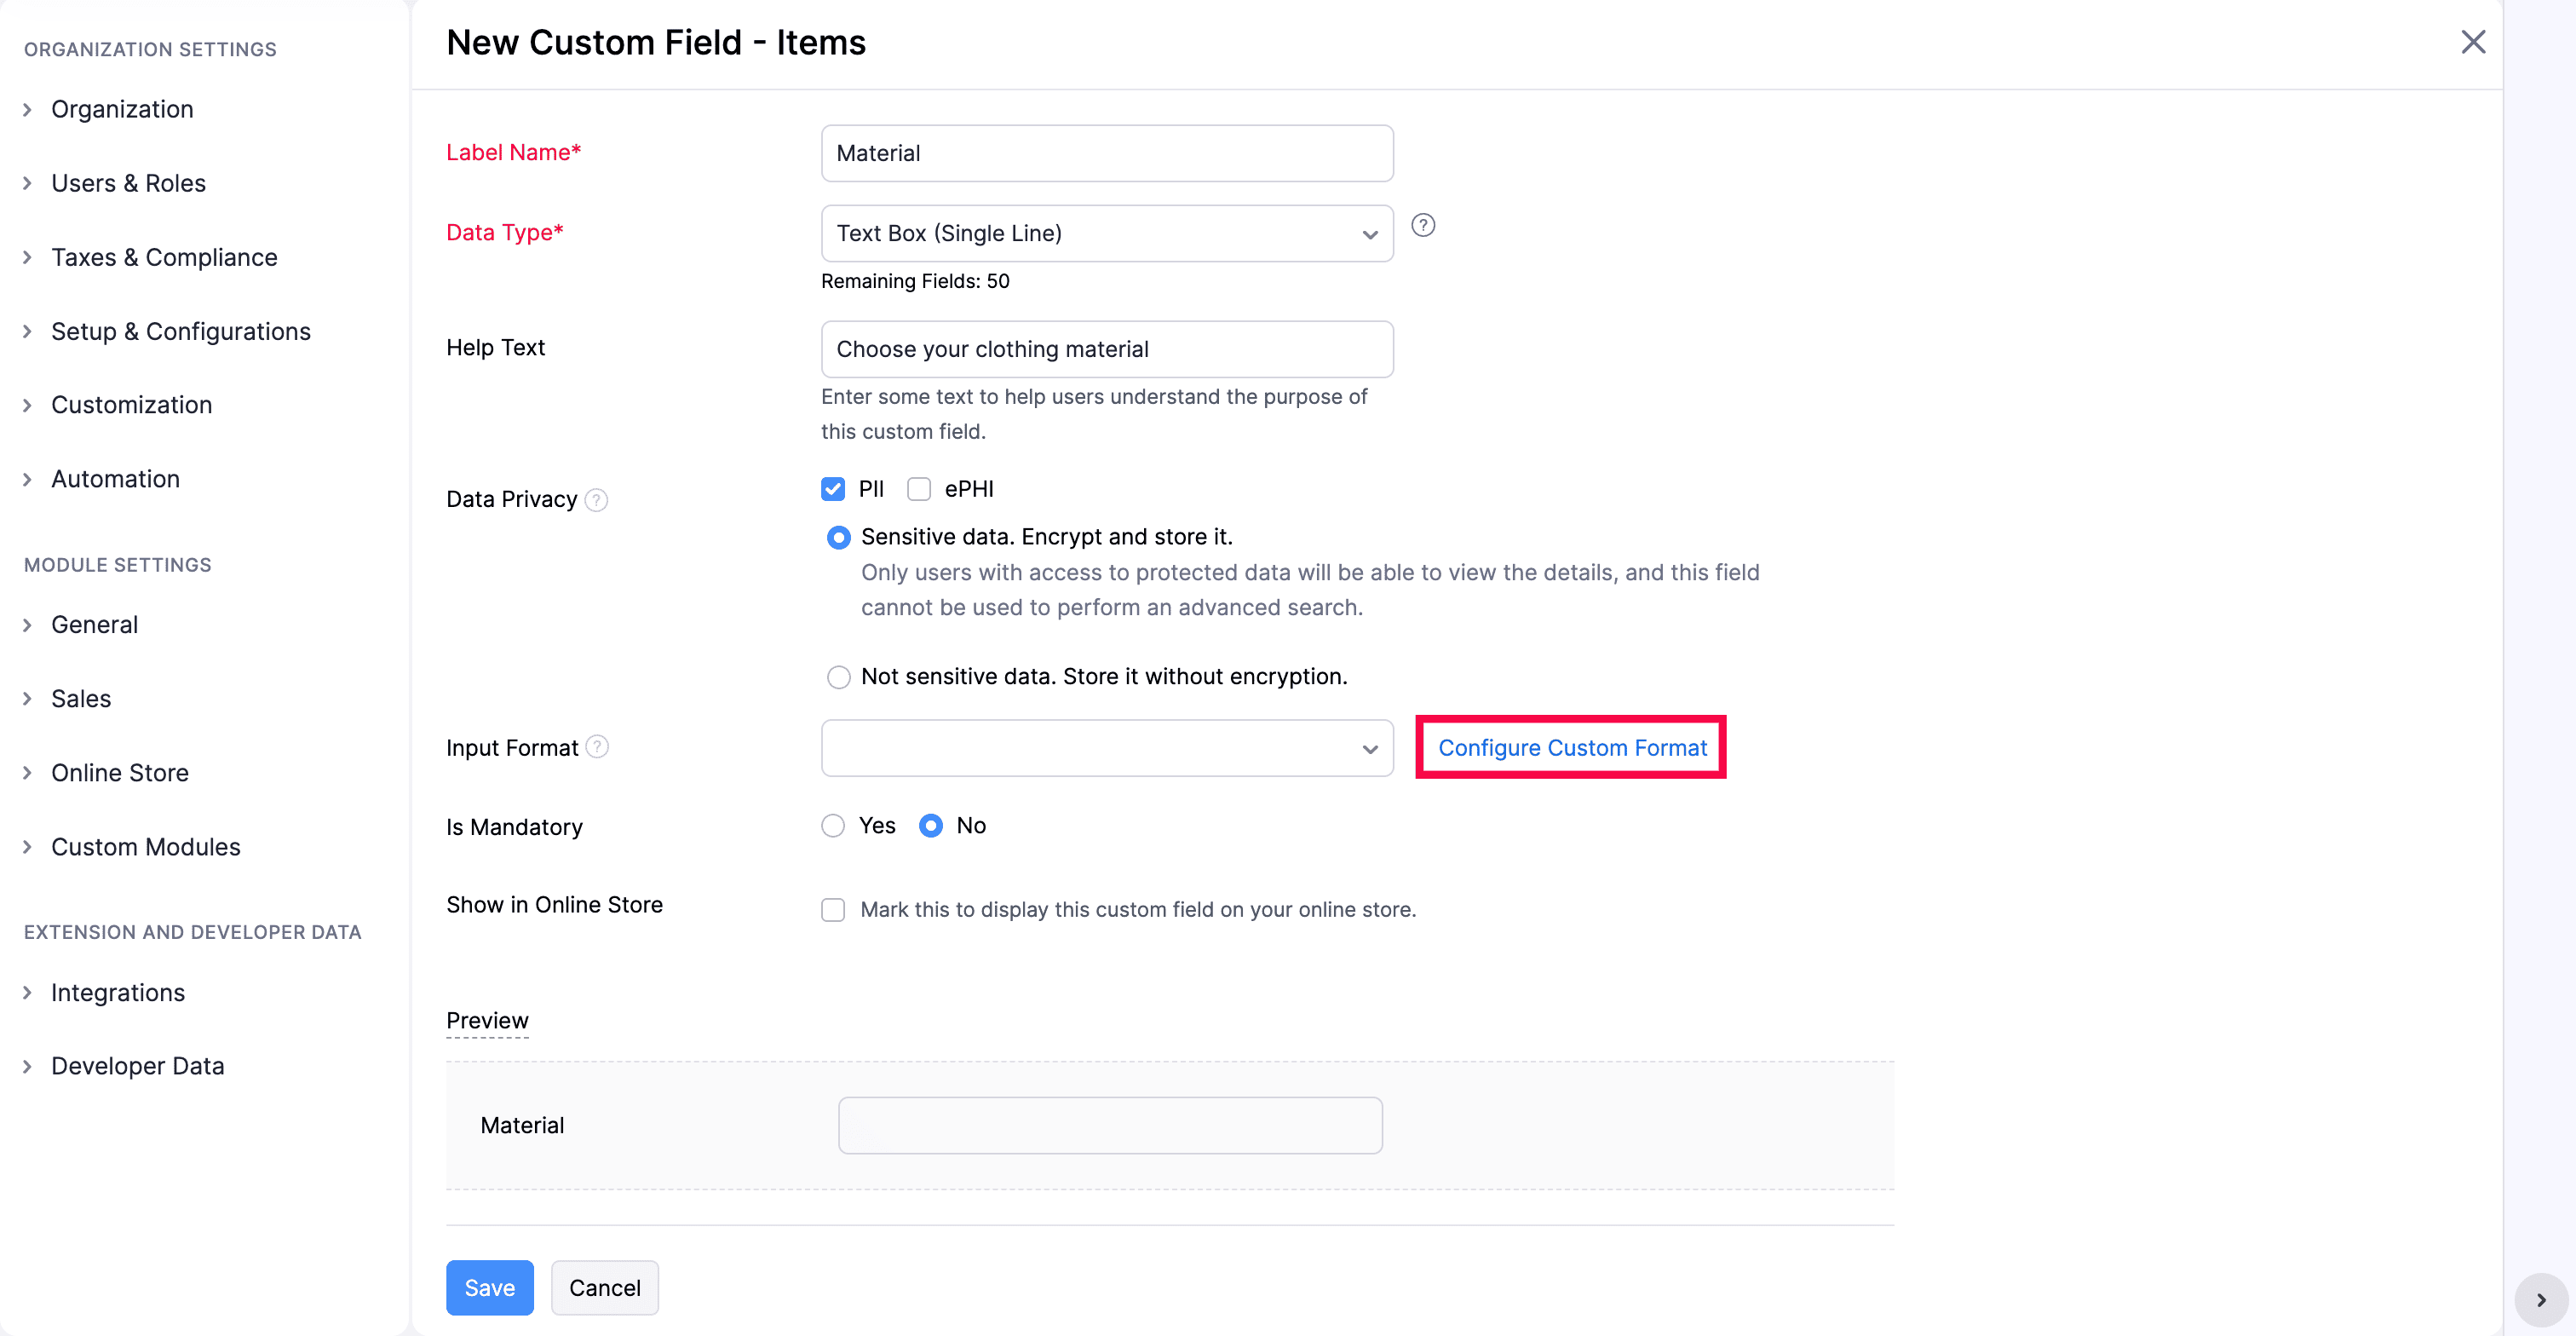
- Default Value: Enter a default value if necessary.
- Is Mandatory: Set to Yes or No.
- Show in Online Store: Enable this to display the custom field in the online store.
- Show Information to Customer: Displays the custom field value in read-only format to customers.
- Collect Information from Customer: Lets customers enter information through the custom field.
- Is Mandatory in Store: Choose Yes to make the field mandatory in the online store, or No to keep it optional.
- Show when creating transactions: Choose Yes to display the custom field while creating transactions, or No to hide it.
- In the Include in Modules field, select the module or modules where you want to display the custom field, such as Invoice, Sales Order, Quote, or All.
- Show in All PDFs: Choose Yes to display the custom field in all PDFs, or No to hide it.
- Click Save.
After creating the field, hover over it and click the dropdown arrow to view the following actions:
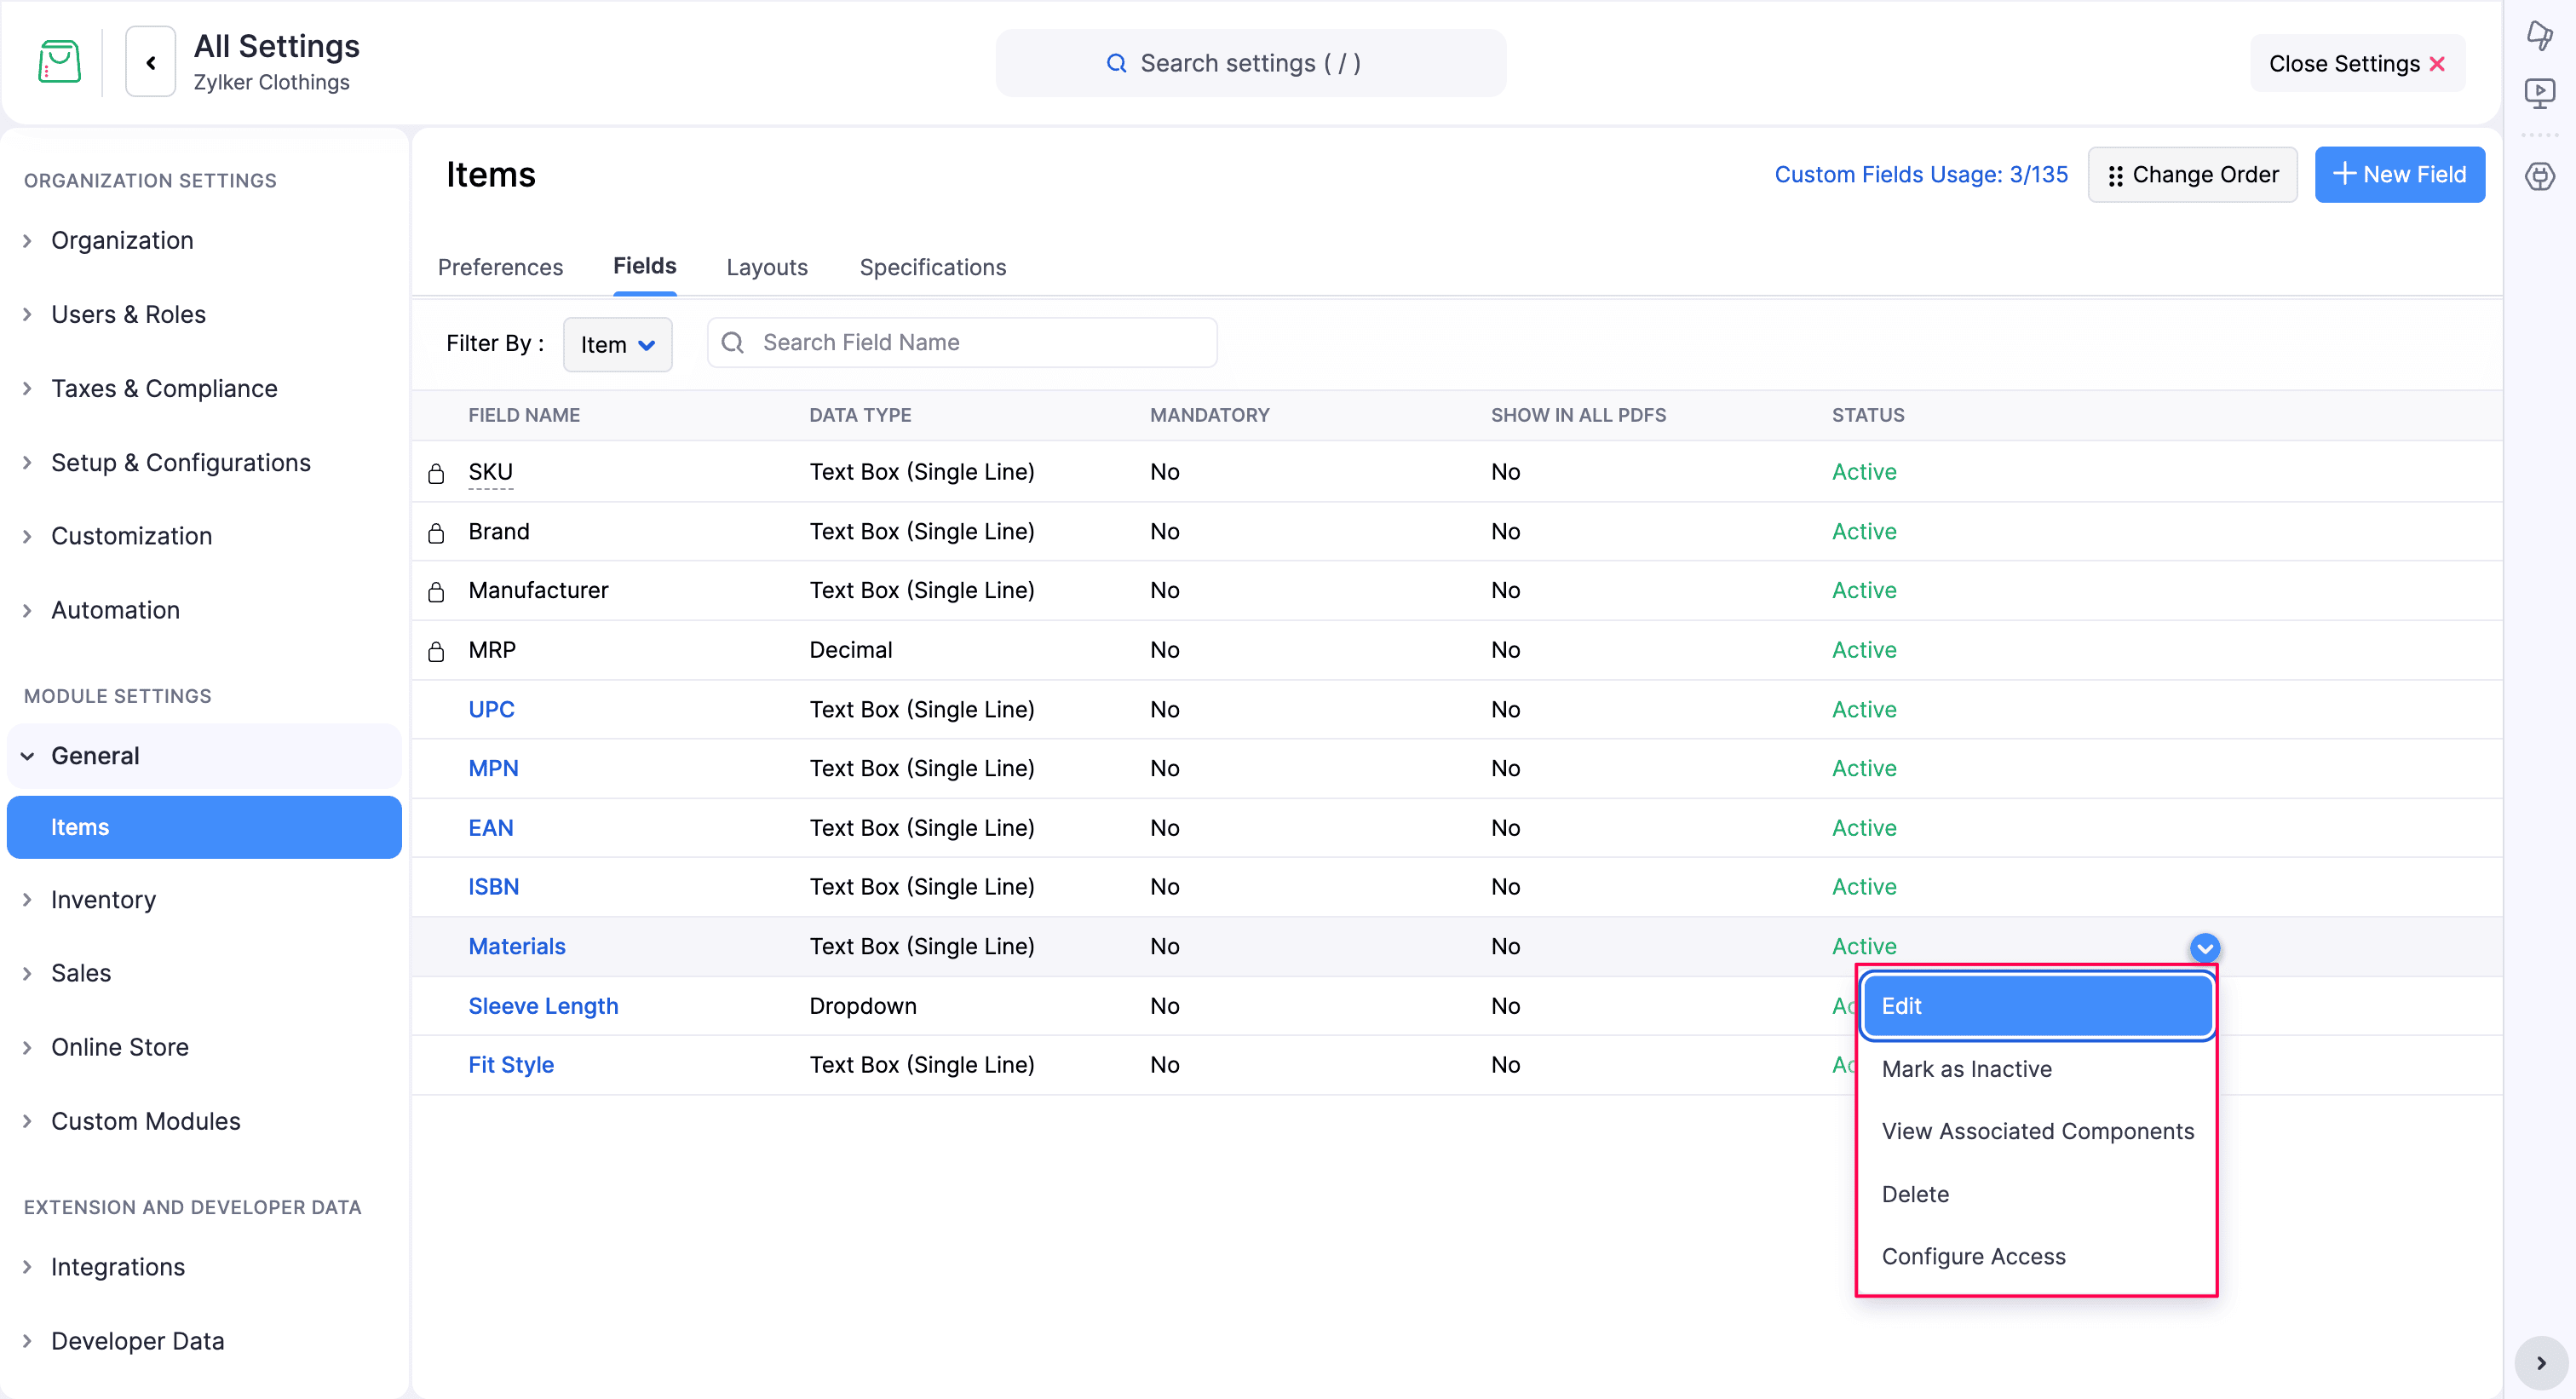
- Edit: Modify the field configuration.
- Mark as Inactive: Disable the field without deleting it.
- View Associated Components: View the components where the field is used.
- Delete: Remove the field permanently.
- Configure Access: Set access permissions for the users to access the custom field.
For permanent custom fields that are listed by default, you can hover over the field and click the dropdown arrow to view the following actions:
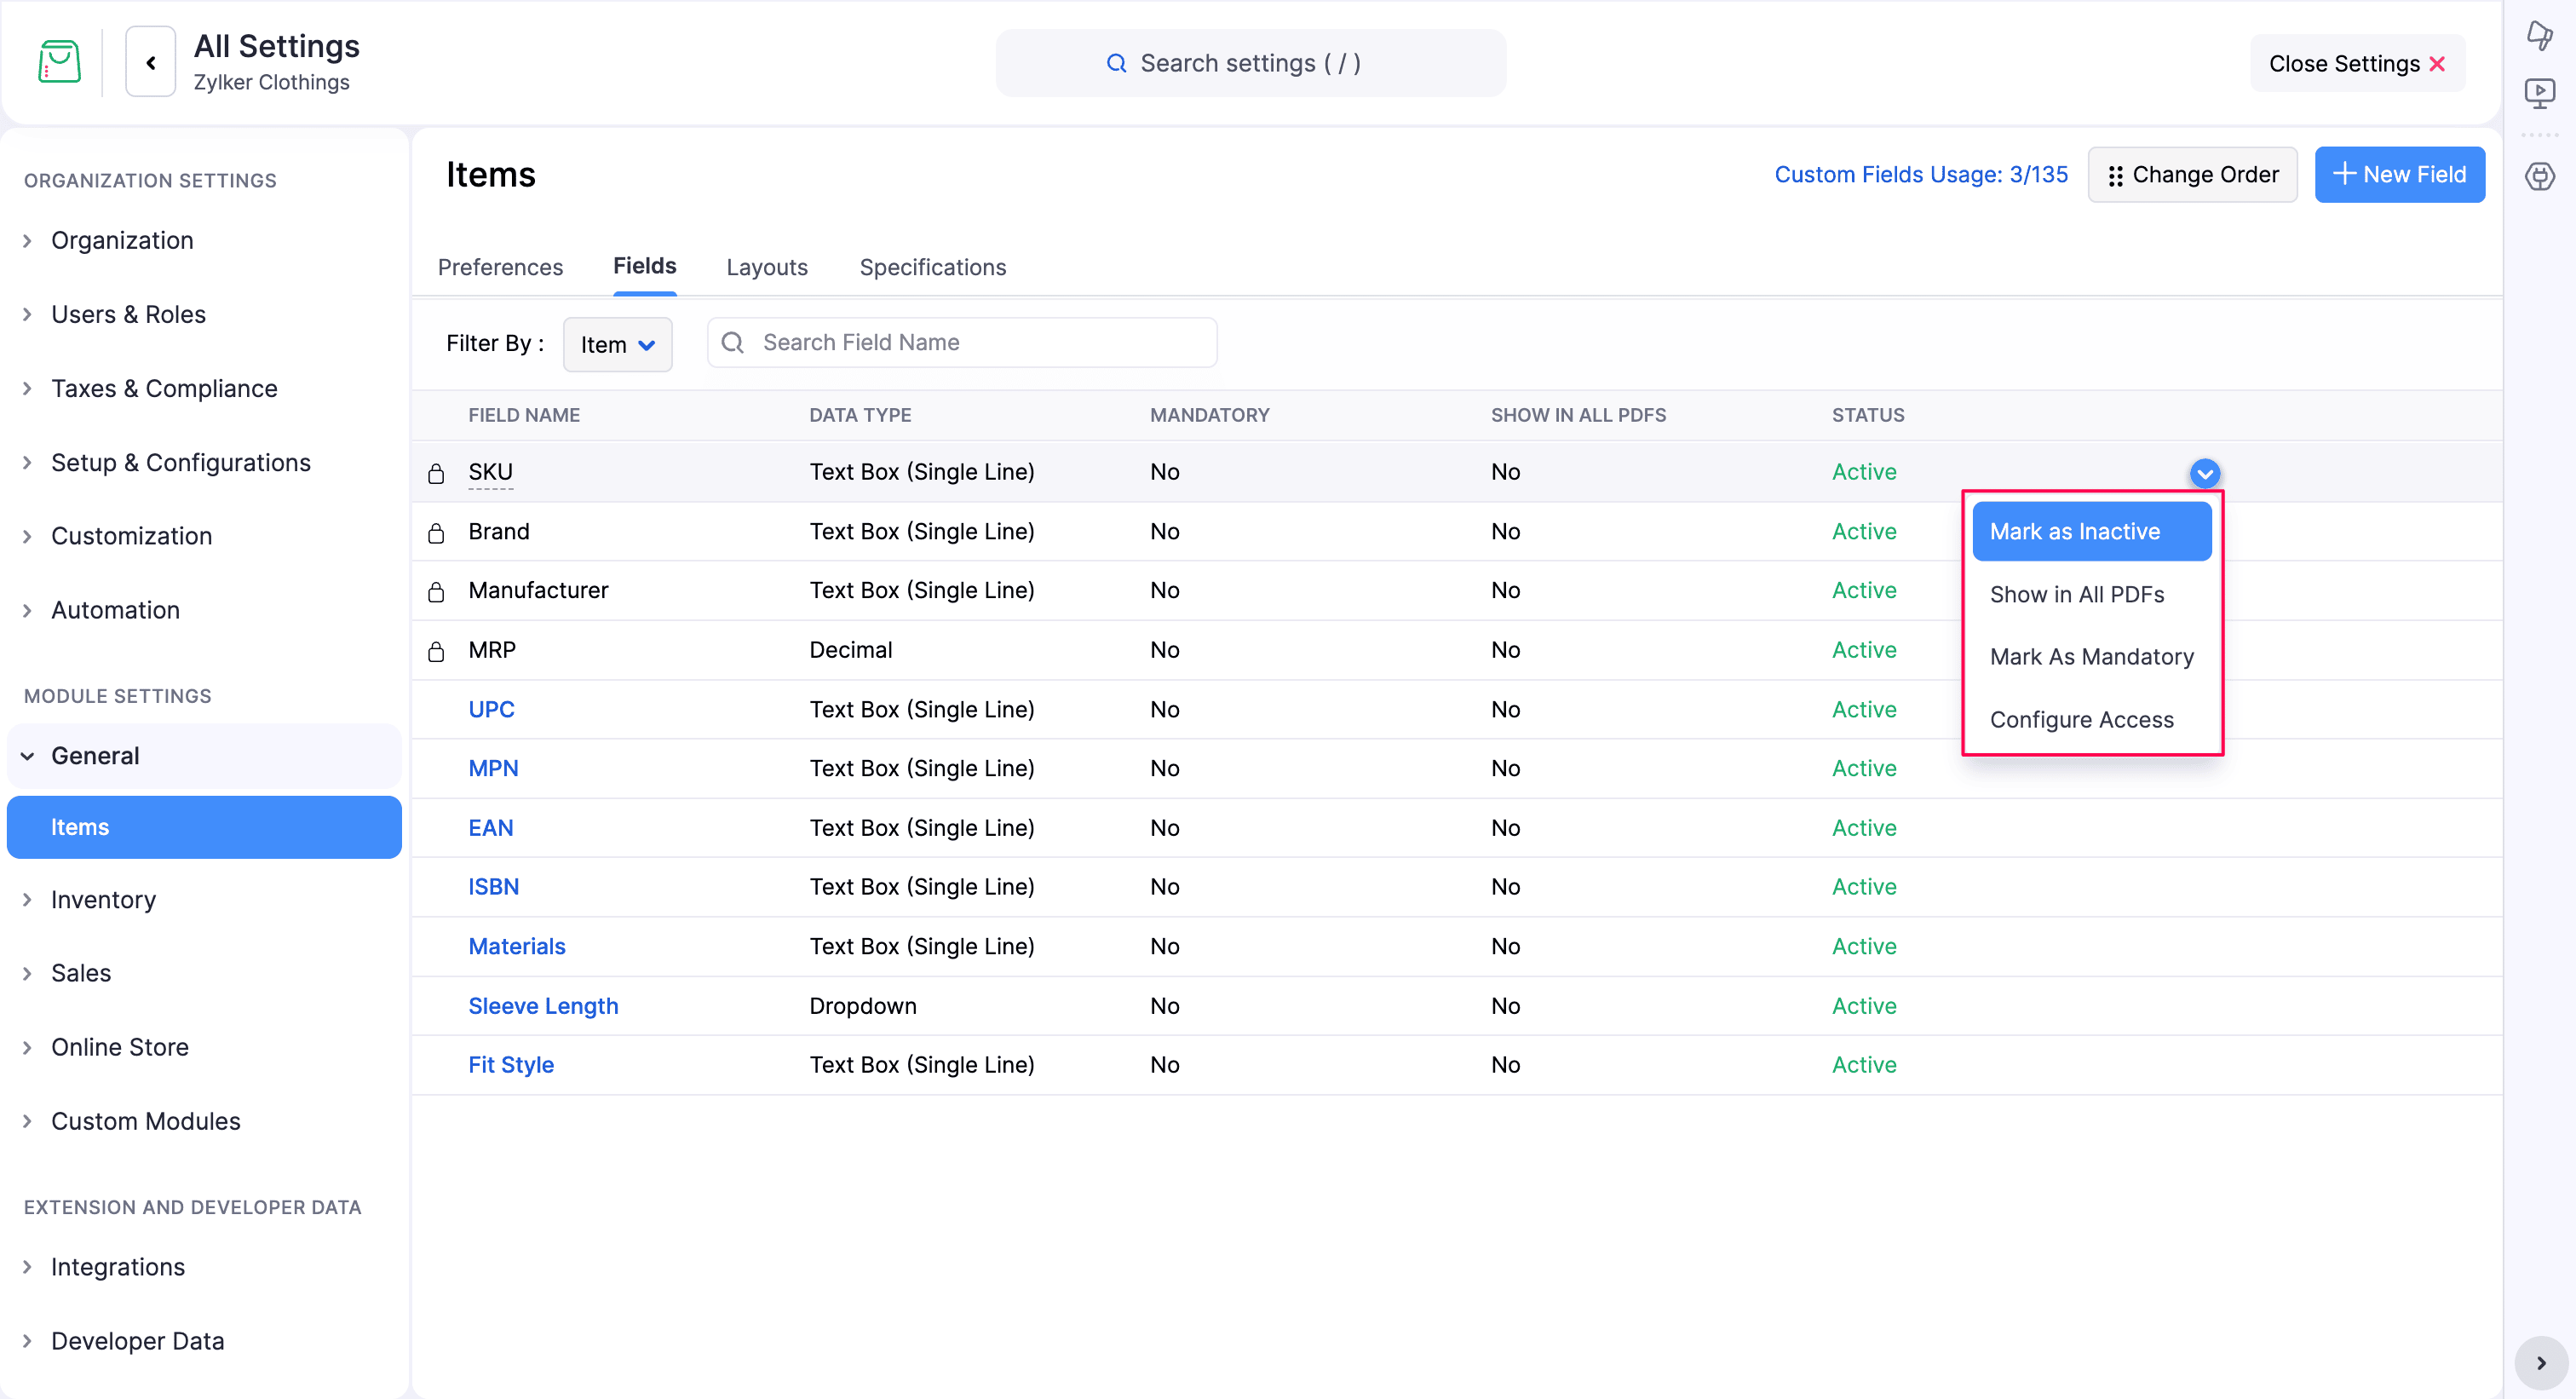
- Show in All PDFs: Include the field in all PDF documents.
- Mark as Inactive: Disable the field without deleting it.
- Mark as Mandatory: Make the field required.
- Configure Access: Set access permissions for the field.
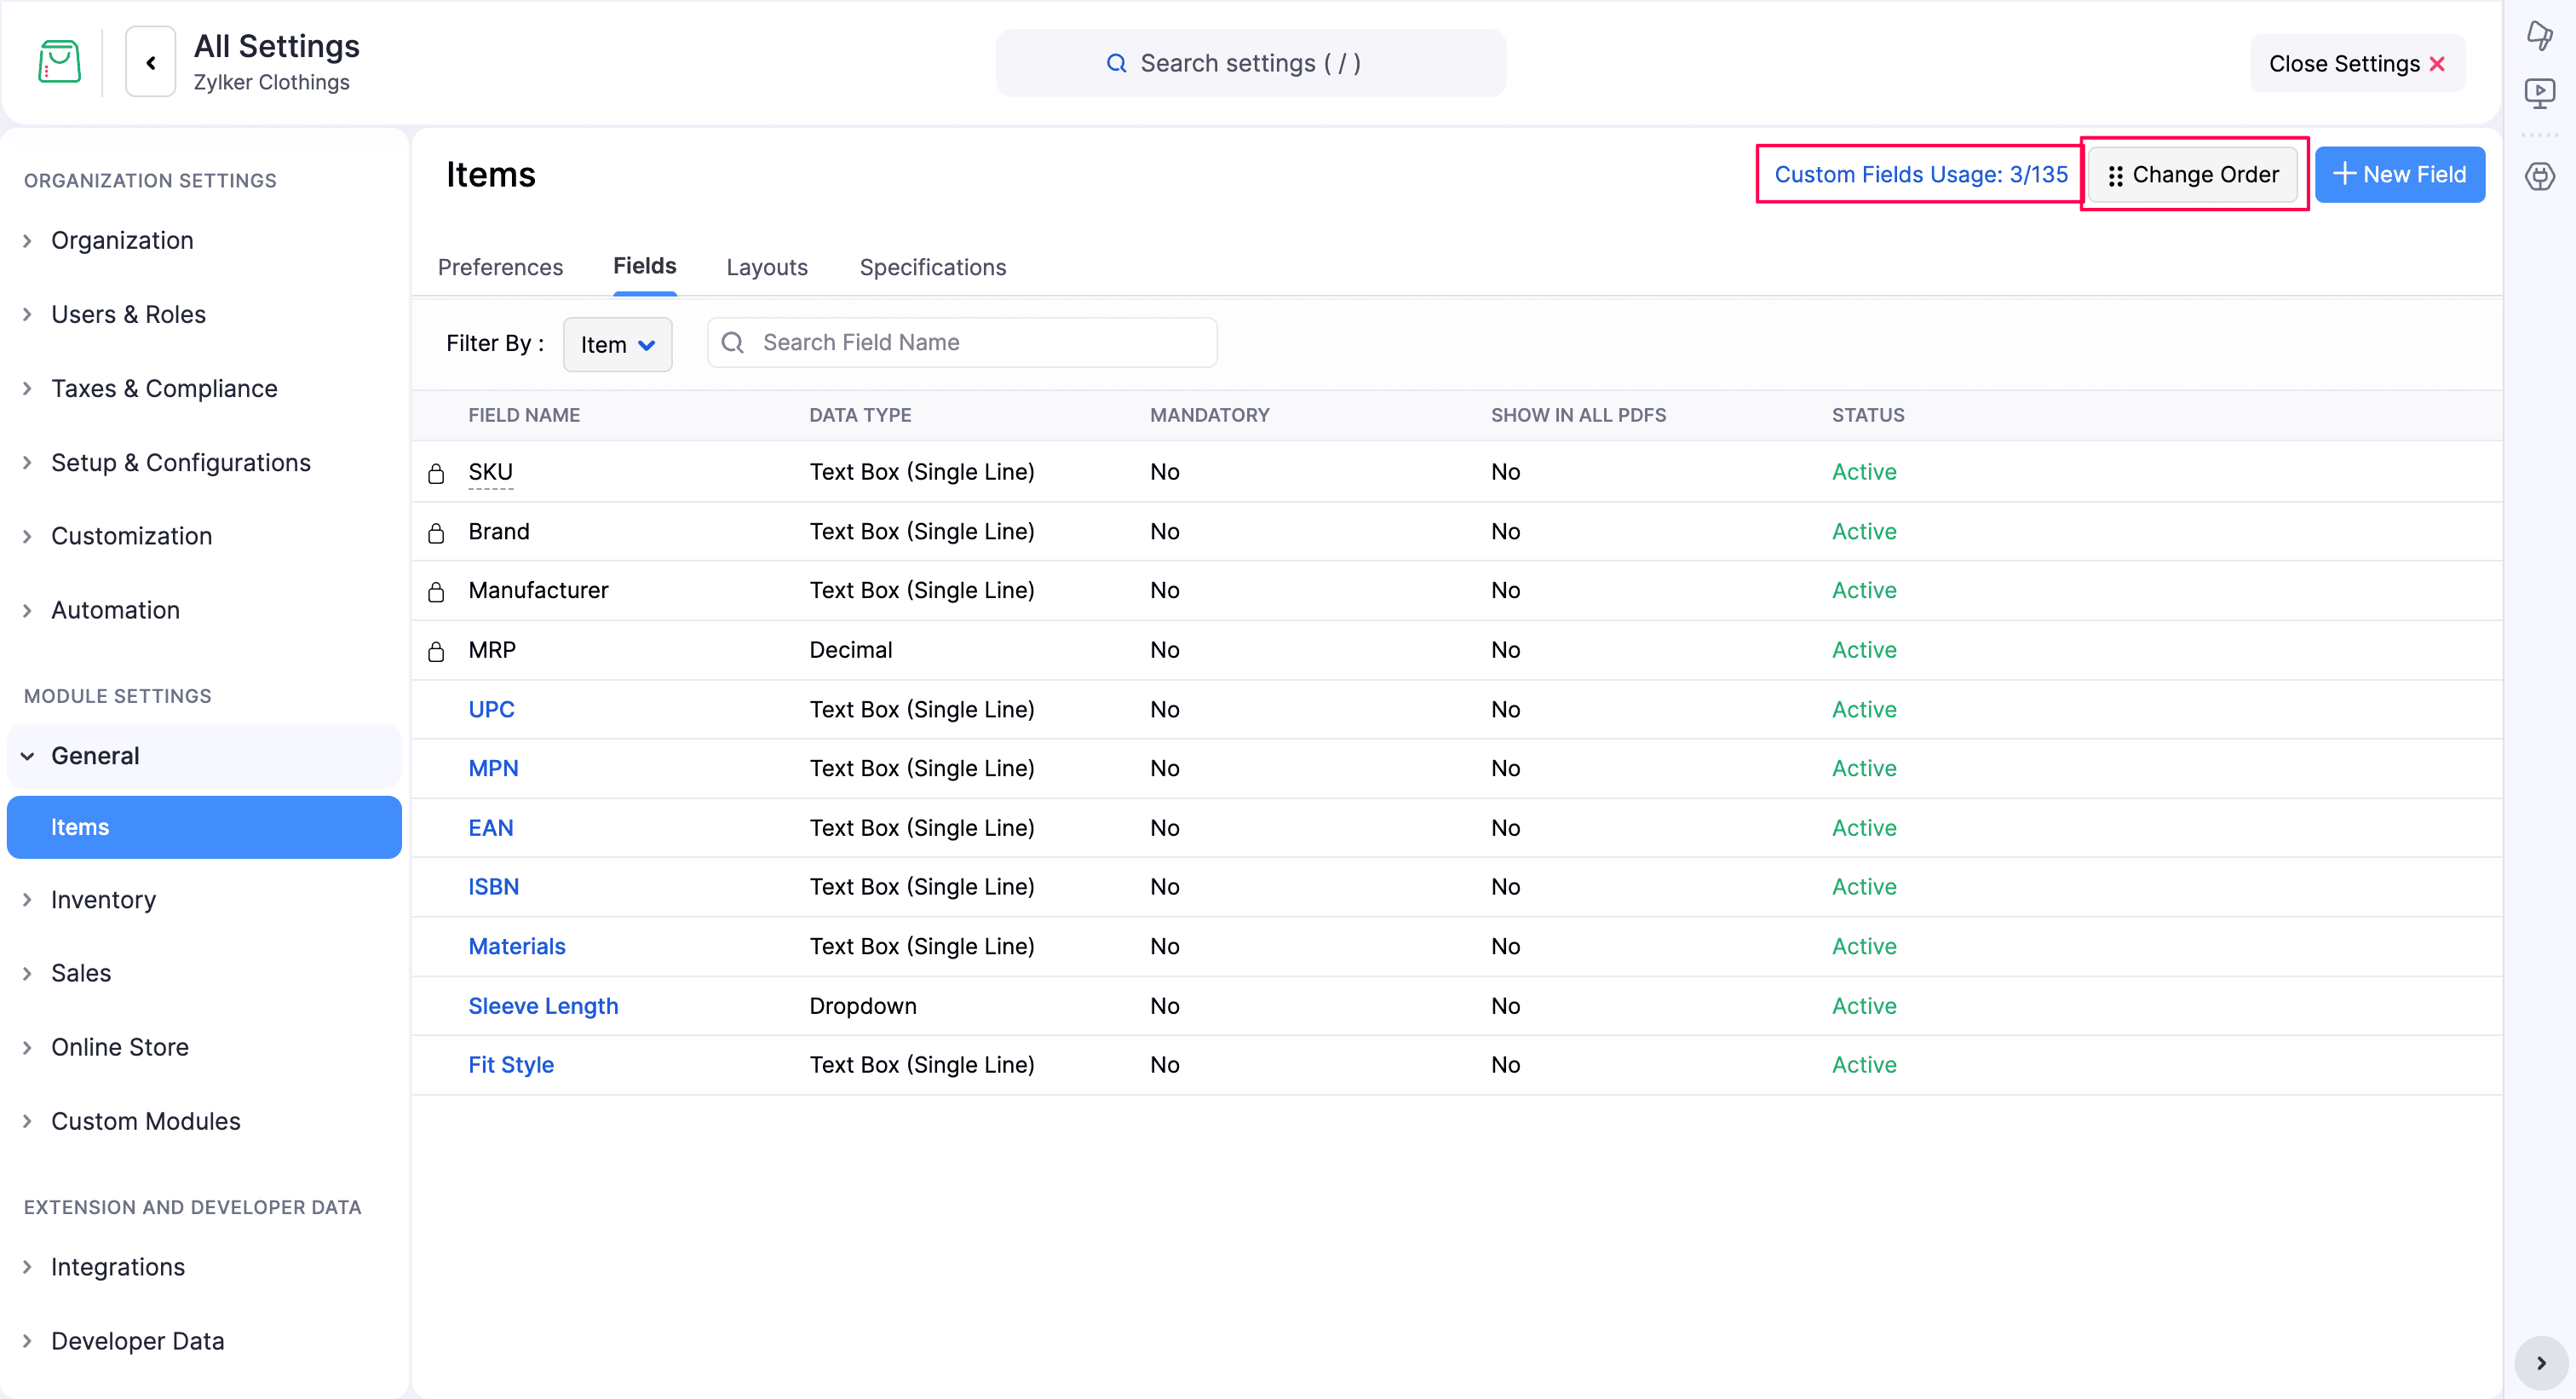
Note: These options are applicable only for the default custom fields. You can also change the order of the created custom fields as needed using the Change Order option. You can also view the Custom Fields Usage in the topbar of the Fields page.
Layouts
Layouts are a group of custom fields used to collect and display customer information through the online store. They help organize custom field data for each product based on the required preference.
Scenario: Zylker, a clothing brand, wants to collect information from customers for customizing a T-shirt with a logo. They can create a layout with the required custom fields to collect customer inputs for the design.
Add a Layout
To add a layout:
- Go to Items under Settings.
- Click the Layouts tab.
- Click Add Layout.
- In the + Add Layout page, enter a Layout Name.
- Enter a Description for the layout if required.
- Select the custom fields you want to include in the layout.
- Click Save.

The selected custom fields will be grouped together in the layout and can be used to collect customer information for product customization.
Edit a Layout
To edit a layout:
- Go to Items under Settings.
- Click the Layouts tab.
- Hover over the existing layout. The Edit and Delete options are displayed.
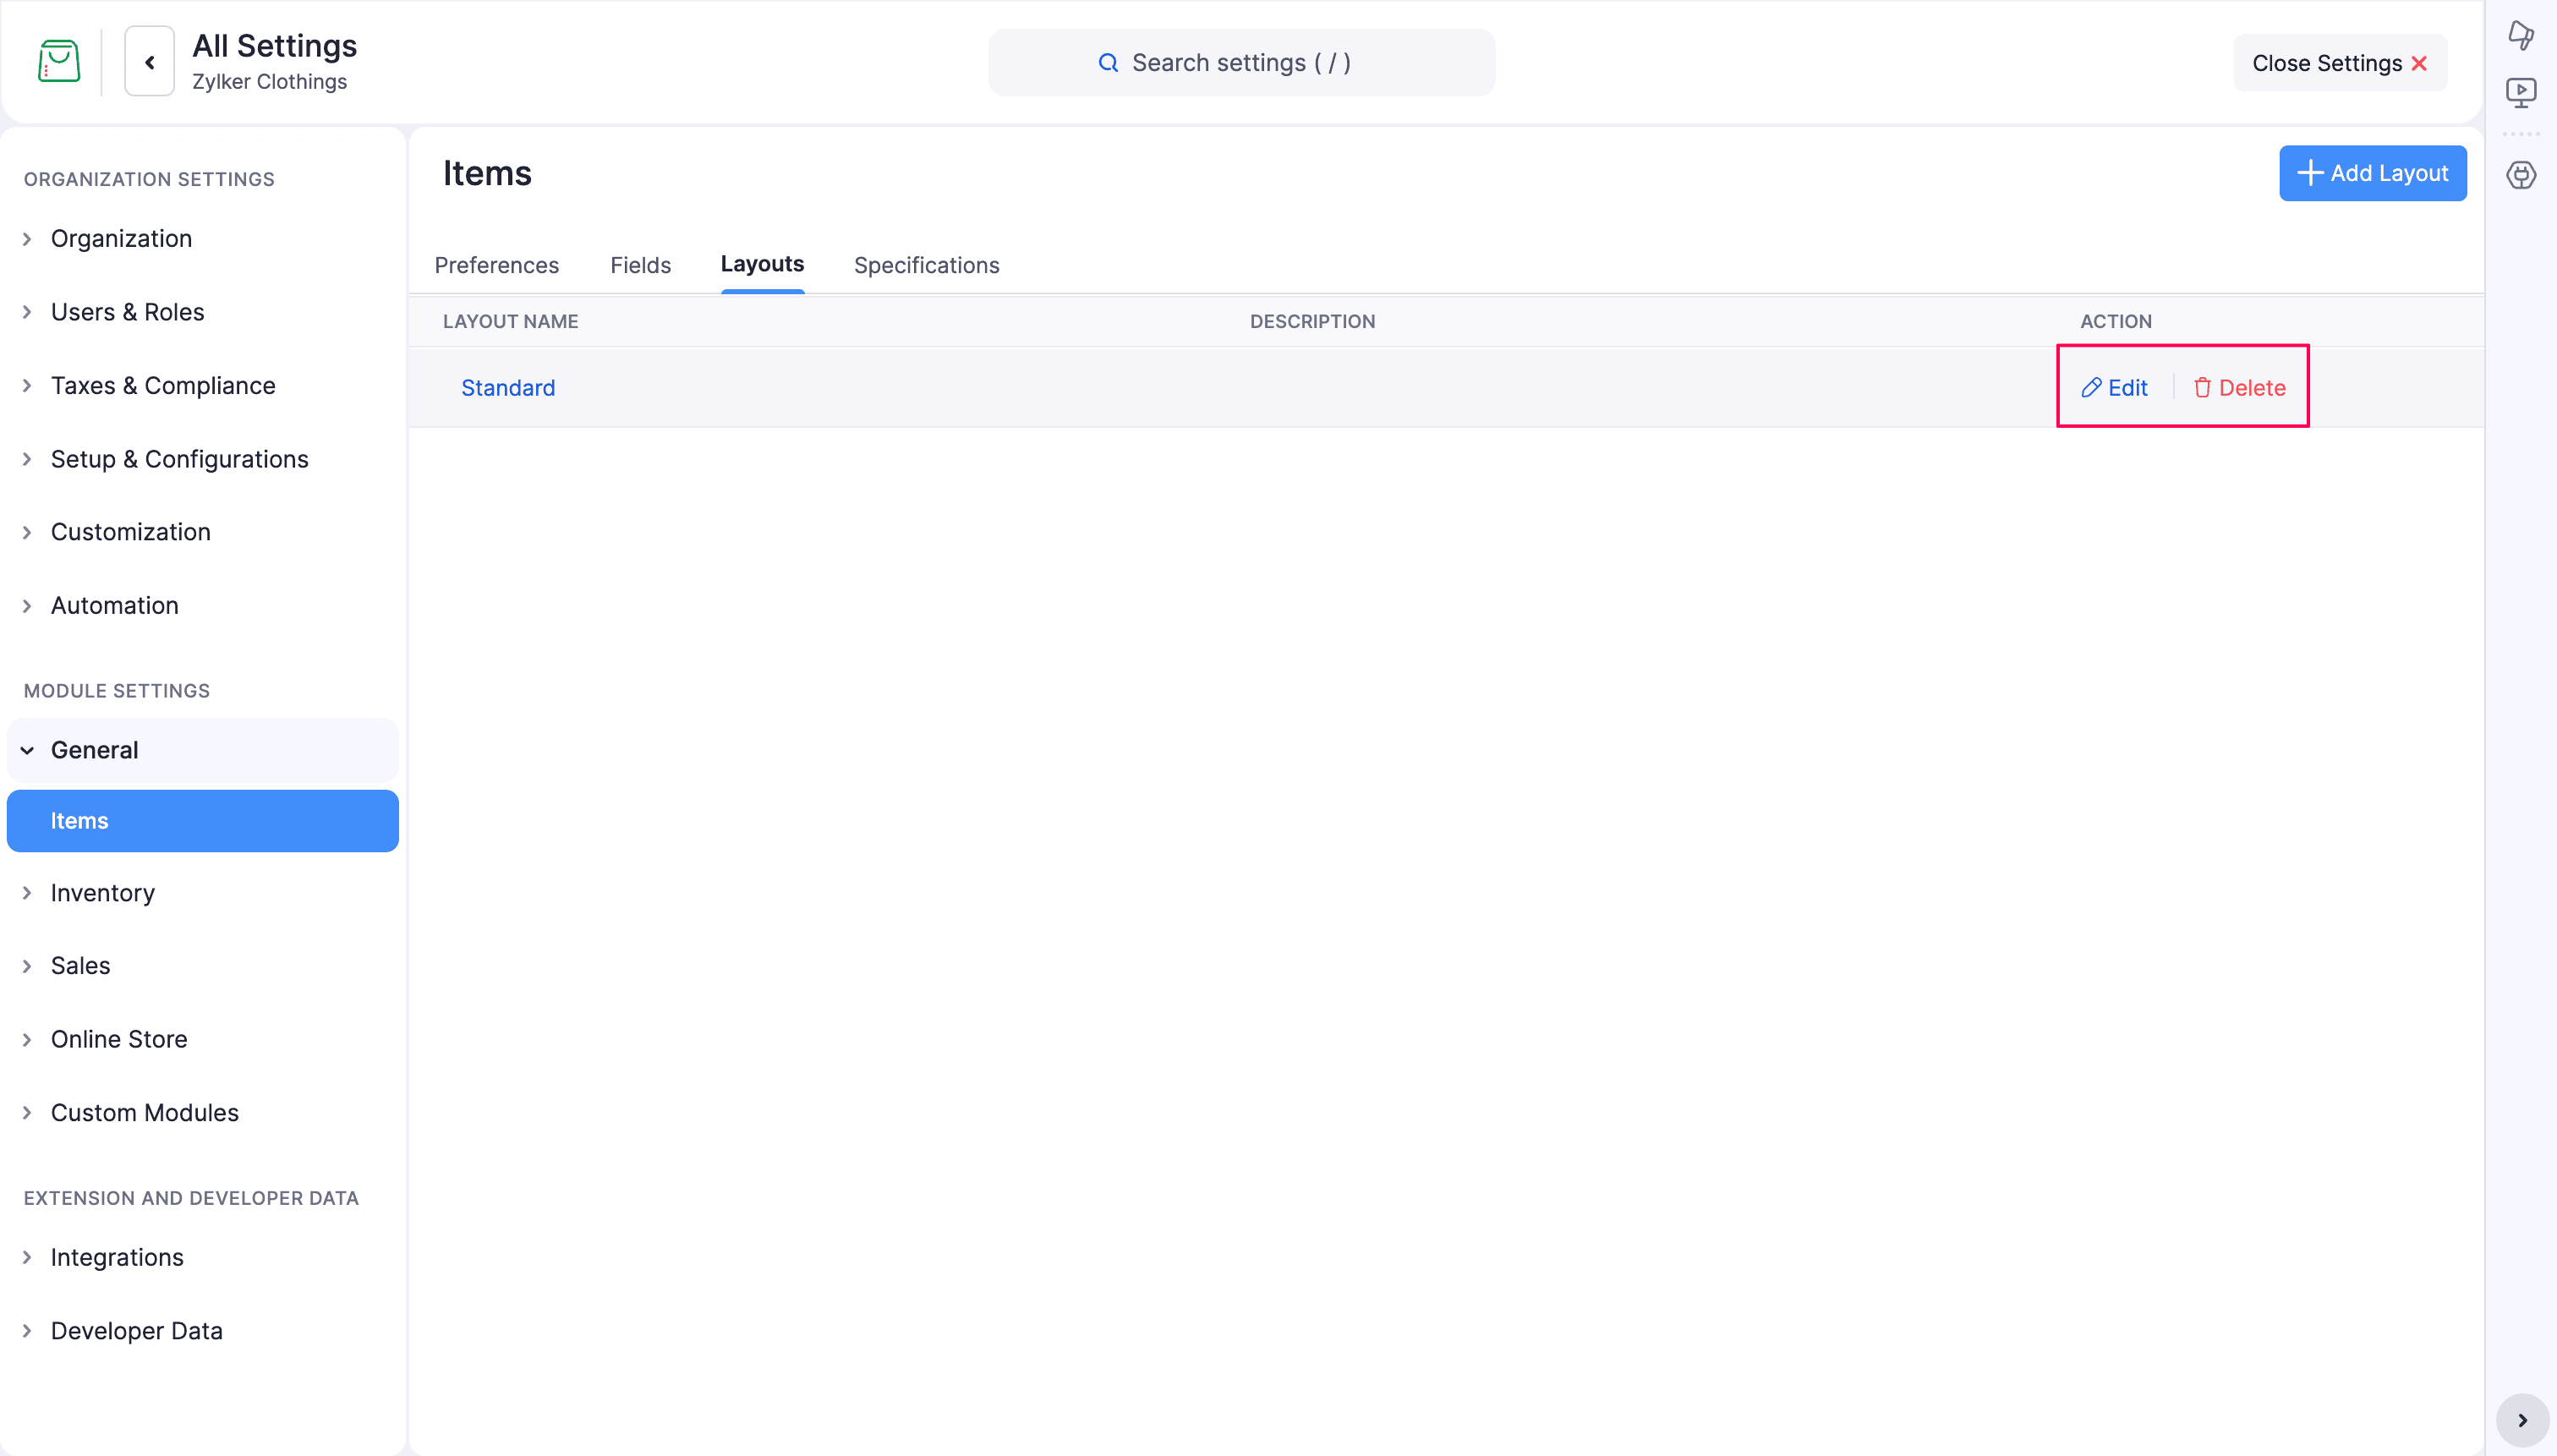
- Select Edit.
- Update the required details such as the layout name, description, and fields.
- Click Save.
Delete a Layout
To delete a layout:
- Go to Items under Settings.
- Click the Layouts tab.
- Hover over the existing layout. The Edit and Delete options are displayed.
- Select Delete.
- In the Delete Page Layout popup, click Delete.
The layout is deleted permanently and cannot be recovered.
Specifications
Specifications are used to display unique product details to customers on the product details page of the online store.
Scenario: Zylker, a mobile brand, sells mobiles through its online store. They want to list unique features such as battery capacity, storage, and software version alongside common attributes. In this case, item specifications can be created to highlight these details on the product details page.
Add a Specification
To add a specification:
- Go to Items under Settings.
- Select the Specifications tab.
- Click + Add Specification.
- In the Add Specification popup, enter the Item Specification name.
- Enter the Group Name.
- Add one or more fields and values for the specification:
- Enter the Field Name.
- Enter the Value for the field.
- Click Add Field to add another field.
- To add more groups, click Add Group.
- Click Save.
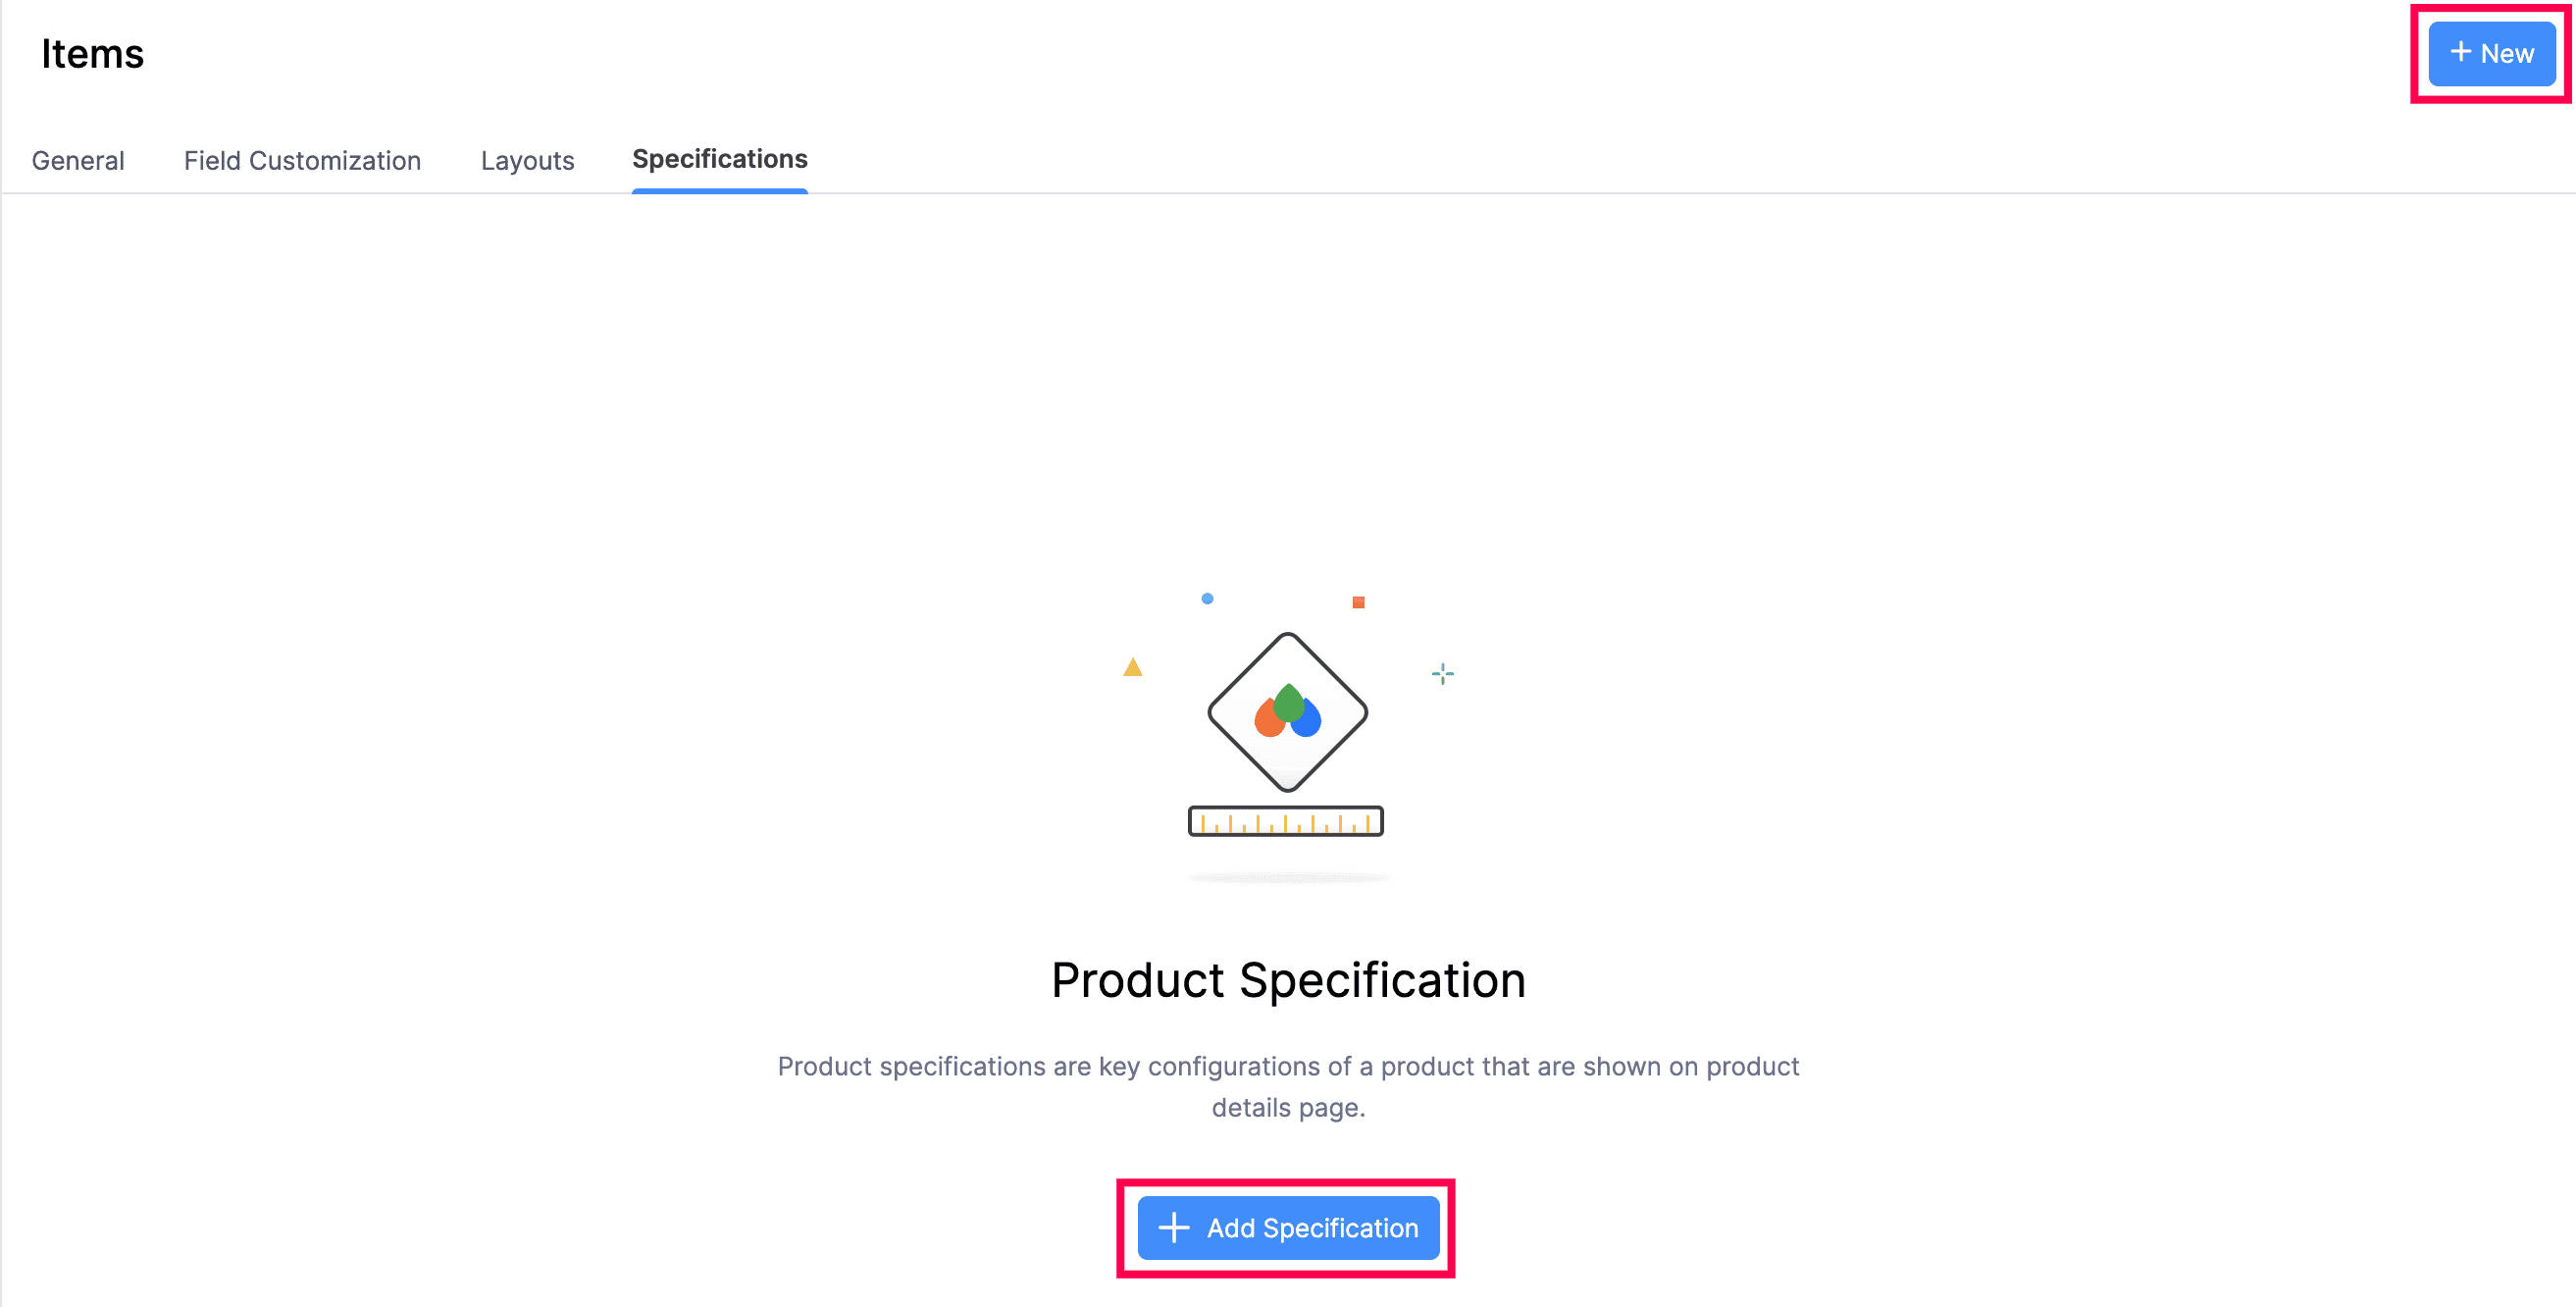
This creates a specification group with the required fields and values to display on the product details page.
Edit a Specification
To edit a specification:
- Go to Items under Settings.
- Select the Specifications tab.
- Click the existing item specification name.
- You will be redirected to the Edit Specification page.
- Edit the required details such as Group Name, Field Name, and Values.
- Click Save.
If you have multiple groups, you can reorder them as needed:
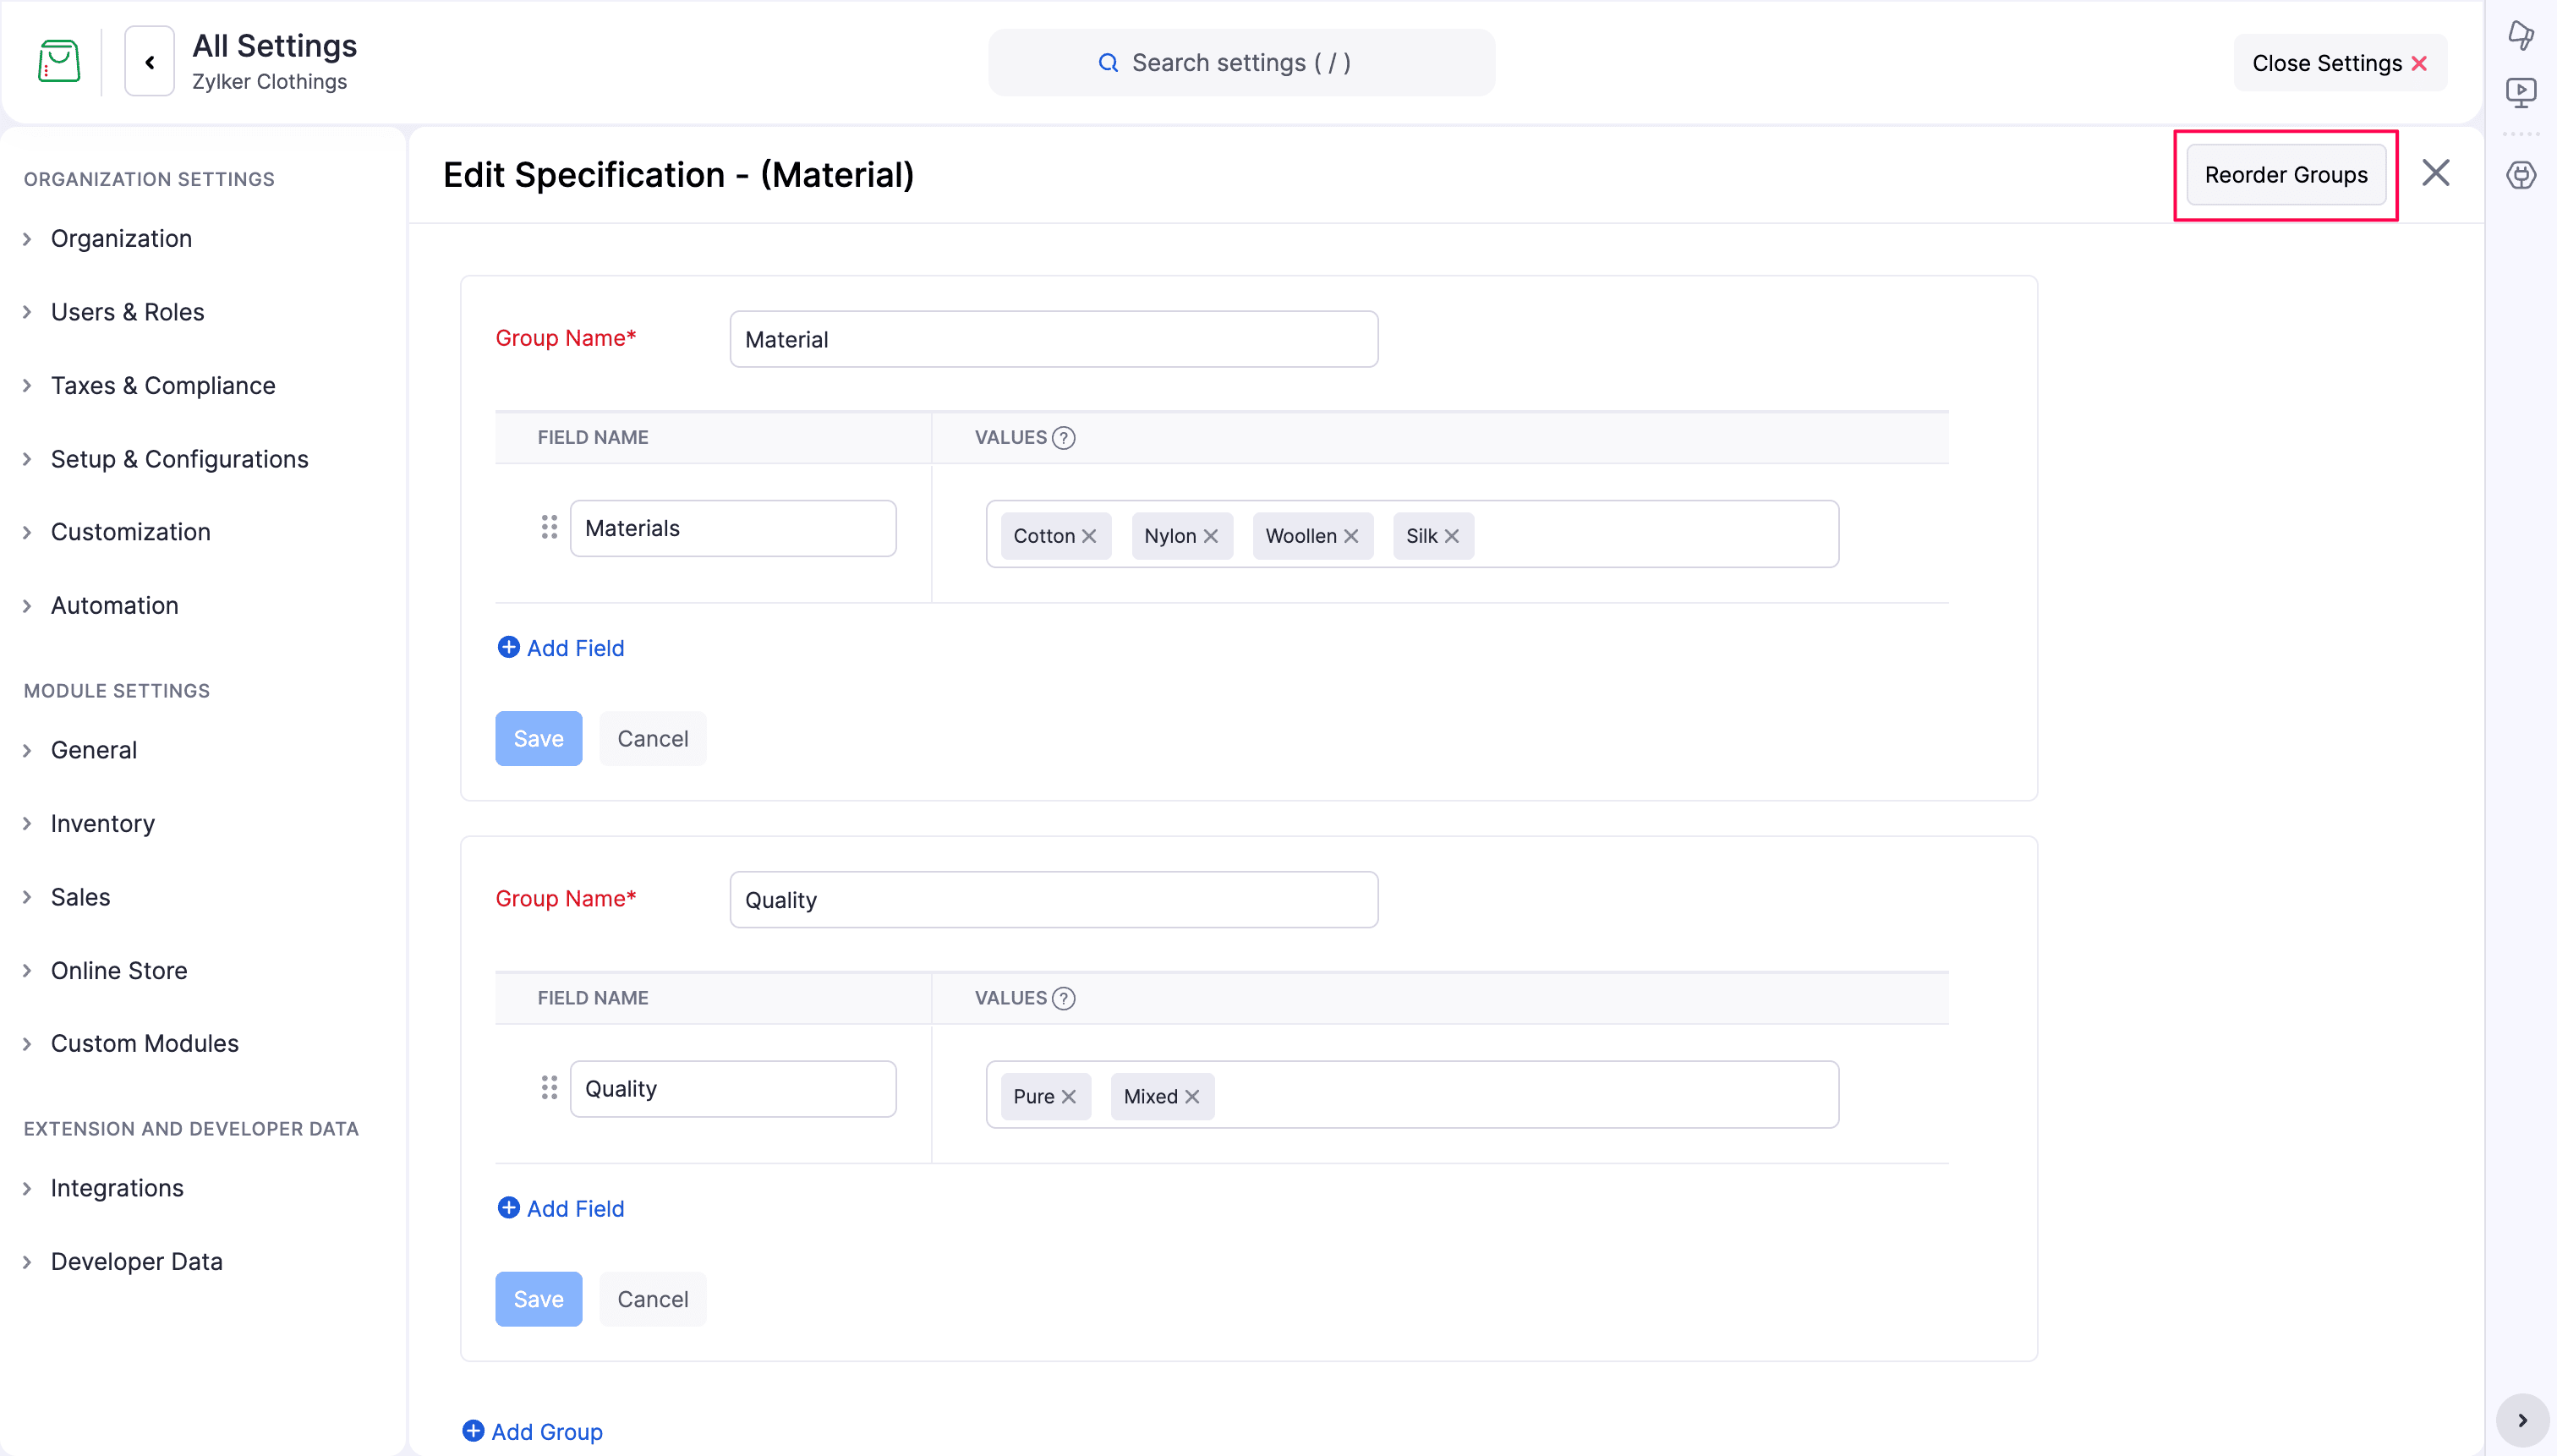
- Click Reorder Groups.
- In the Reorder Groups popup, drag the groups to change the order.
- Click Save.
Rename a Specification
To rename a specification:
- Go to Items under Settings.
- Select the Specifications tab.
- Hover over the existing item specification. The Rename and Delete options are displayed.
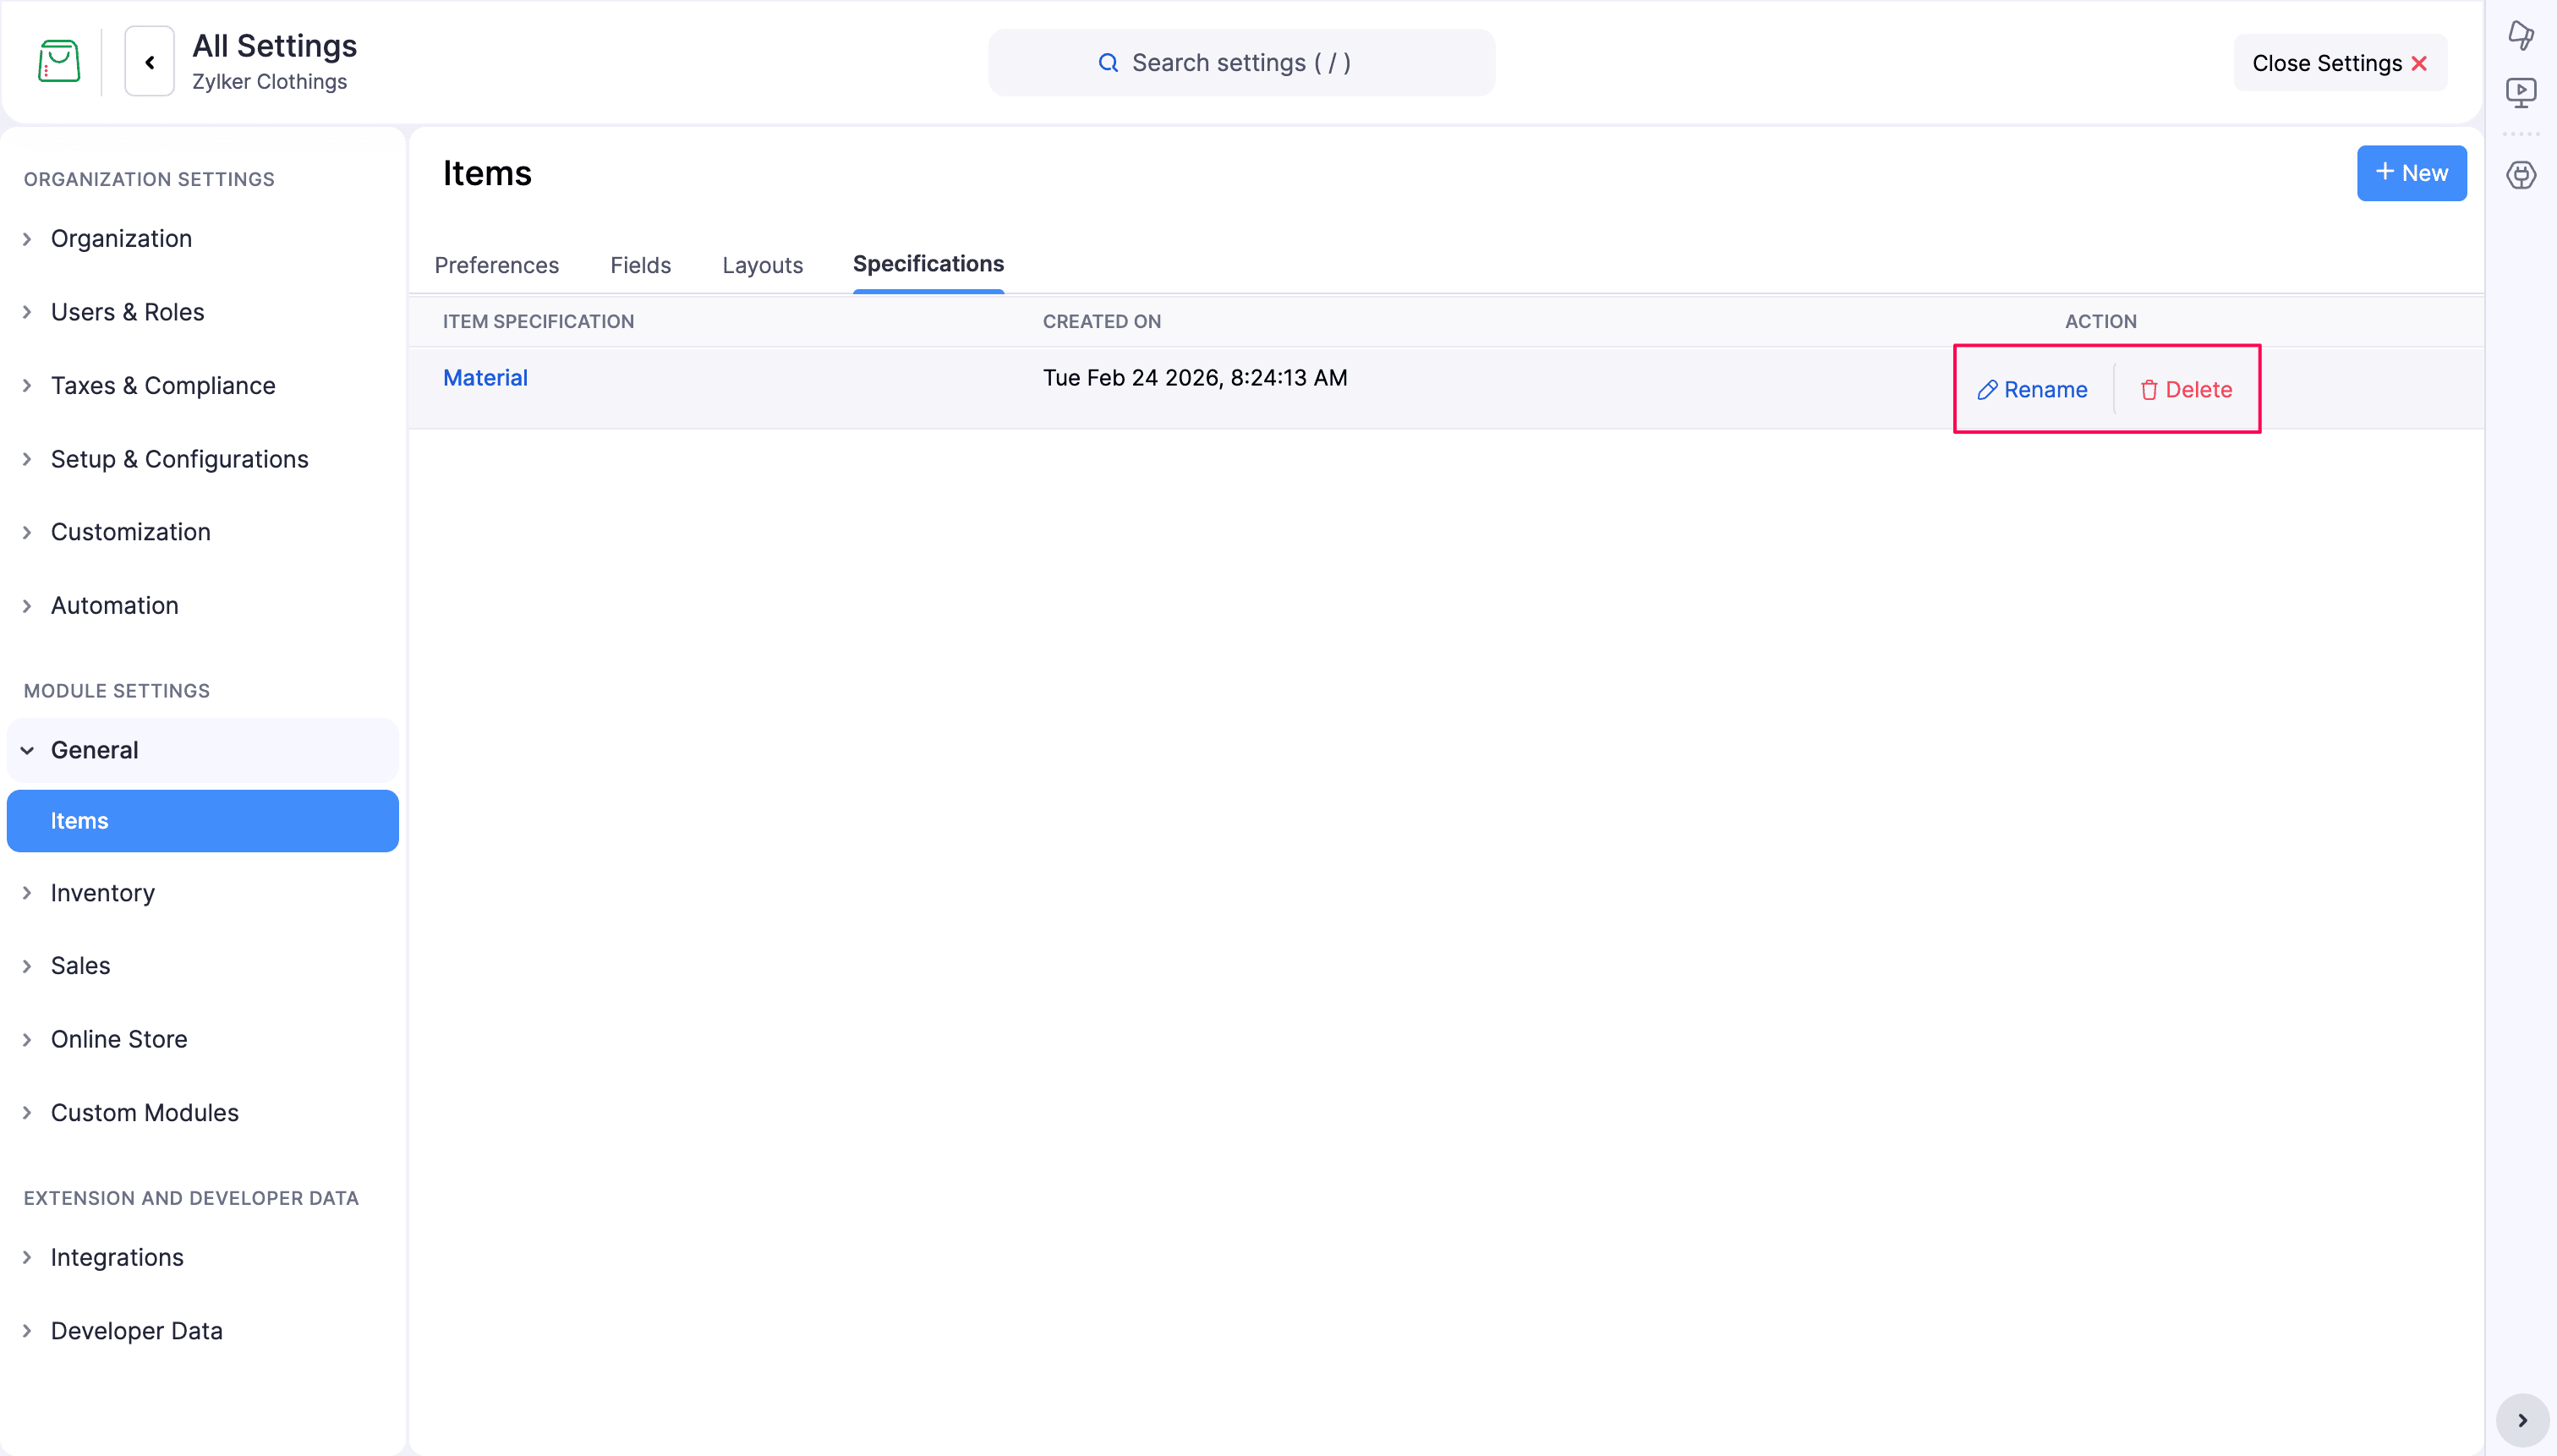
- Select Rename.
- In the Edit Specification popup, edit the item specification name.
- Click Save.
Delete a Specification
To delete a specification:
- Go to Items under Settings.
- Select the Specifications tab.
- Hover over the existing item specification. The Rename and Delete options are displayed.
- Select Delete.
- In the Delete Specification popup, click Delete.