
Taxes
Taxes are an integral part of any business. The taxes applicable to your business are determined by your business’s location and type. In Zoho Books, there are country specific taxes, multiple tax rates, and tax groups that you can configure according to your business’s needs.
Enable GST
If you didn’t enable GST while setting up your Zoho Books organisation, you can do it anytime in the Taxes page. Here’s how:
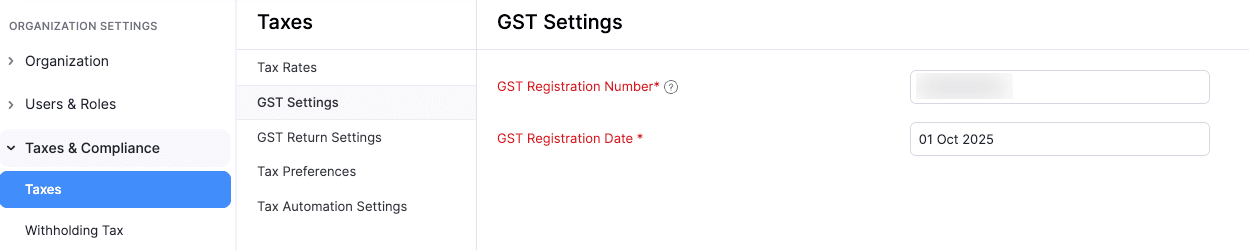
Go to Settings.
Under Organisation Settings, select Taxes under Taxes & Compliance.
In the GST Settings page, enable the toggle next to Is your business registered for GST?, and fill in the following fields:
- GST Registration Number: Enter your business’s 10-digit GST registration number.
- GST Registration Date: Select the date your business was registered under GST.
Click Save.
Your GST details will be registered. The GST Return Settings will now be enabled, and you can configure the preferences based on your business requirements. To do this:
Go to Settings.
Under Organisation Settings, select Taxes under Taxes & Compliance.
Click GST Return Settings in the Taxes pane.
In the GST Return Settings page, fill in the following fields:
- Reporting Period: Choose how you want to generate the returns in Zoho Books. The available options are: Monthly, Quarterly, and Yearly.
- Tax Return Start Date: Choose the date from which you want to start generating returns in Zoho Books. Your first GST return will be generated from this date.
- Report Basis: Choose how you want to report transactions in the return. The available options are Accrual and Cash.
Click Save.

The GST return settings will now be configured. You can now start generating your returns in Zoho Books.
Tax Rates
Default Tax Rates
Once GST is enabled, the following GST rates will be available by default in the Singapore edition of Zoho Books. These default tax rates cannot be deleted or marked as inactive. The available tax rates are listed below:
Sales
| Tax Name | Rate (%) | Description |
|---|---|---|
| GST9 [SR] | 9 | Standard-rated supplies |
| GST0 [ZR] | 0 | Zero-rated supplies |
| GST8 [SR8] | 8 | Standard-rated supplies |
Sales - Customer Accounting
| Tax Name | Rate (%) | Description |
|---|---|---|
| GST9 [SRCA-S] | 9 | Customer Accounting supply made by the supplier |
Purchases
| Tax Name | Rate (%) | Description |
|---|---|---|
| GST9 [TX] | 9 | Standard-rated purchases |
| GST0 [ZP] | 0 | Zero-rated purchases |
| GST9 [BL] | 9 | Disallowed Expenses |
| GST9 [IM] | 9 | Import of goods |
| GST9 [ME] | 9 | Import of goods under the Major Exporter Scheme |
| GST9 [IGDS] | 9 | Import of goods under the Import GST Deferment Scheme |
| GST8 [TX-8] | 8 | Standard-rated purchases |
Purchases - Reverse Charge
| Tax Name | Rate (%) | Description |
|---|---|---|
| GST9 [TXRC-TS] | 9 | Imported services and LVG (low-value goods) directly attributable to the making of the taxable supplies |
| GST9 [SRRC] | 9 | Imported services and LVG accountable by the customer under the reverse charge mechanism |
| GST8 [TXRC-TS-8] | 8 | Imported services and LVG (low-value goods) directly attributable to the making of the taxable supplies |
| GST8 [SRRC-8] | 8 | Imported services and LVG accountable by the customer under the reverse charge mechanism |
Purchases - Customer Accounting
| Tax Name | Rate (%) | Description |
|---|---|---|
| GST9 [TXCA] | 9 | Standard-rated supplies of prescribed goods subject to customer accounting |
| GST9 [SRCA] | 9 | Customer Accounting supply accountable by the customer on supplier’s behalf |
| GST8 [TXCA-8] | 8 | Standard-rated supplies of prescribed goods subject to customer accounting |
| GST8 [SRRC-8] | 8 | Customer Accounting supply accountable by the customer on supplier’s behalf |
How Tax Rates Are Auto-Applied to Items in a Transaction
A tax rate is automatically assigned to an item in a transaction based on three key details:
- Item’s Tax Category: When you create an item, you select its tax category (e.g., electronics, hardware, services). Based on the selected tax category, the GST rate that’s applicable to the item is determined.
- Customer’s GST Eligibility: When you create a customer, you mark them as GST-eligible and enter the GST Registration Number. This helps determine whether GST should be charged and how it should be handled.
- Customer’s Country/Region in Billing Address: You select the customer’s country or region in the billing address. This helps identify whether the transaction is local or overseas and ensures the correct GST rate is applied (e.g., 0% or 9%).
Based on these details, the correct GST rate is automatically applied to each item in a transaction.
Other Important Considerations on How the Tax Rate Is Applied Based On Tax Categories
- Local customers pay 9% GST for standard-rated supplies in tax categories like Default Product, Electronics, Hardware, Telecommunication Services, and Professional Services.
- Tax categories like Financial services and the import or local supply of Investment Precious Metals (IPM) are exempt from GST.
- Overseas customers are charged 0% GST for exports across all tax categories.
- Singapore-registered customers who buy Prescribed Goods (such as Blackberry devices, memory sticks, tablets, and smartphones) with a sale value over $10,000 must pay 9% GST under Customer Accounting.
Tax Operations
View Details of a Tax Rate
You can only view the details of the default tax rates. To view details of a tax rate:
- Go to Settings.
- Select Taxes under Taxes and Compliance.
- In the Taxes pane, click Tax Rates.
- Hover over the default tax rate, click the dropdown on the right, and choose View.

You’ll now see the details of that tax rate.
View Associated Records of a Tax Rate
You can only view the associated records for the tax rates you created manually. To view the associated transactions of a tax rate:
- Go to Settings.
- Select Taxes under Taxes and Compliance.
- In the Taxes pane, click Tax Rates.
- Hover over the tax rate, click the dropdown on the right, and choose View Associated Records.
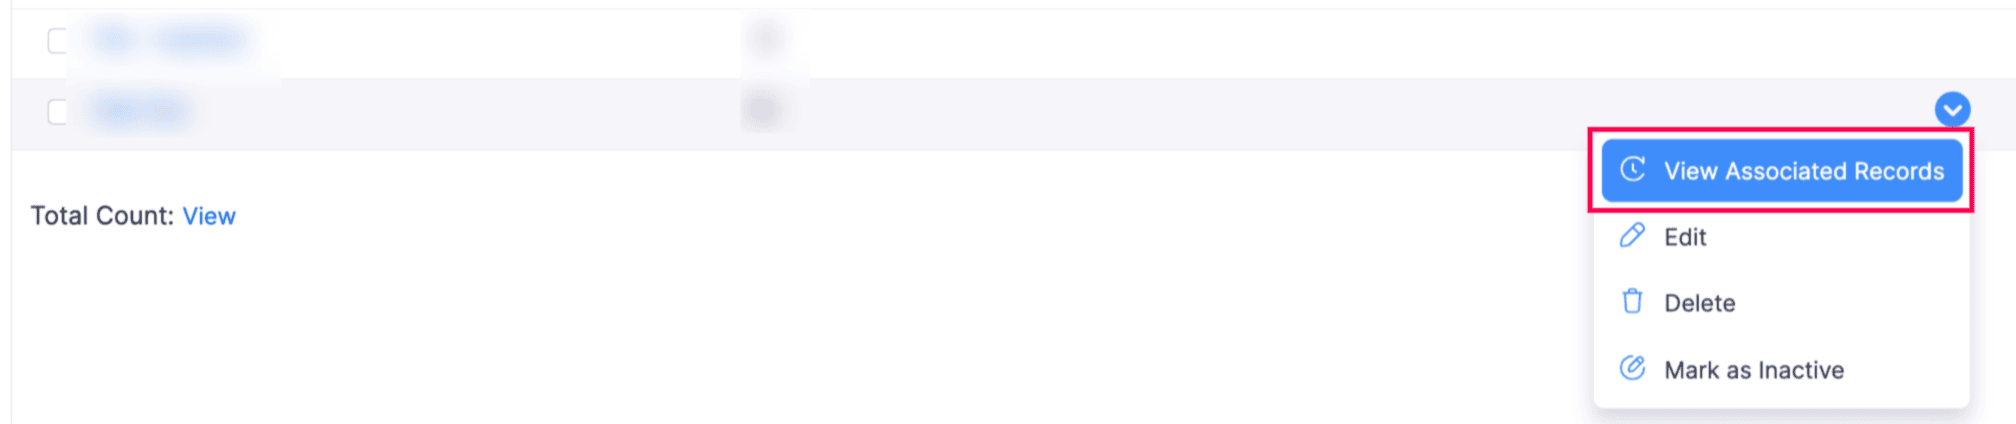
In the Associated Records panel on the right, you’ll view all sales and purchase transactions listed under the Sales and Purchases dropdown.
Enable Taxes for Your Customers and Vendors
Enable Taxes for Your Customer
After you enable Taxes for your organisation, you can enable it for your customers and enter their GST details to ensure the correct tax rate is applied when creating transactions. To enable taxes for your customer:
- Go to Sales on the left sidebar, and select Customers.
- Click + New in the top right corner to create a new customer, or select an existing customer and click Edit on the Customer Details page.
- In the New Customer or Edit Customer page, complete the required fields.
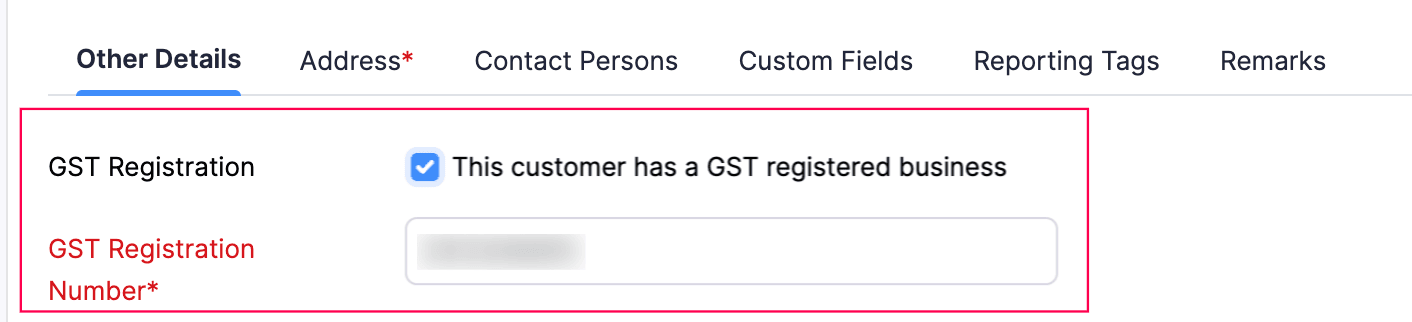
- Next, go to the Other Details tab. In the GST Registration field, check This customer has a GST registered business, and enter the customer’s GST registration number.
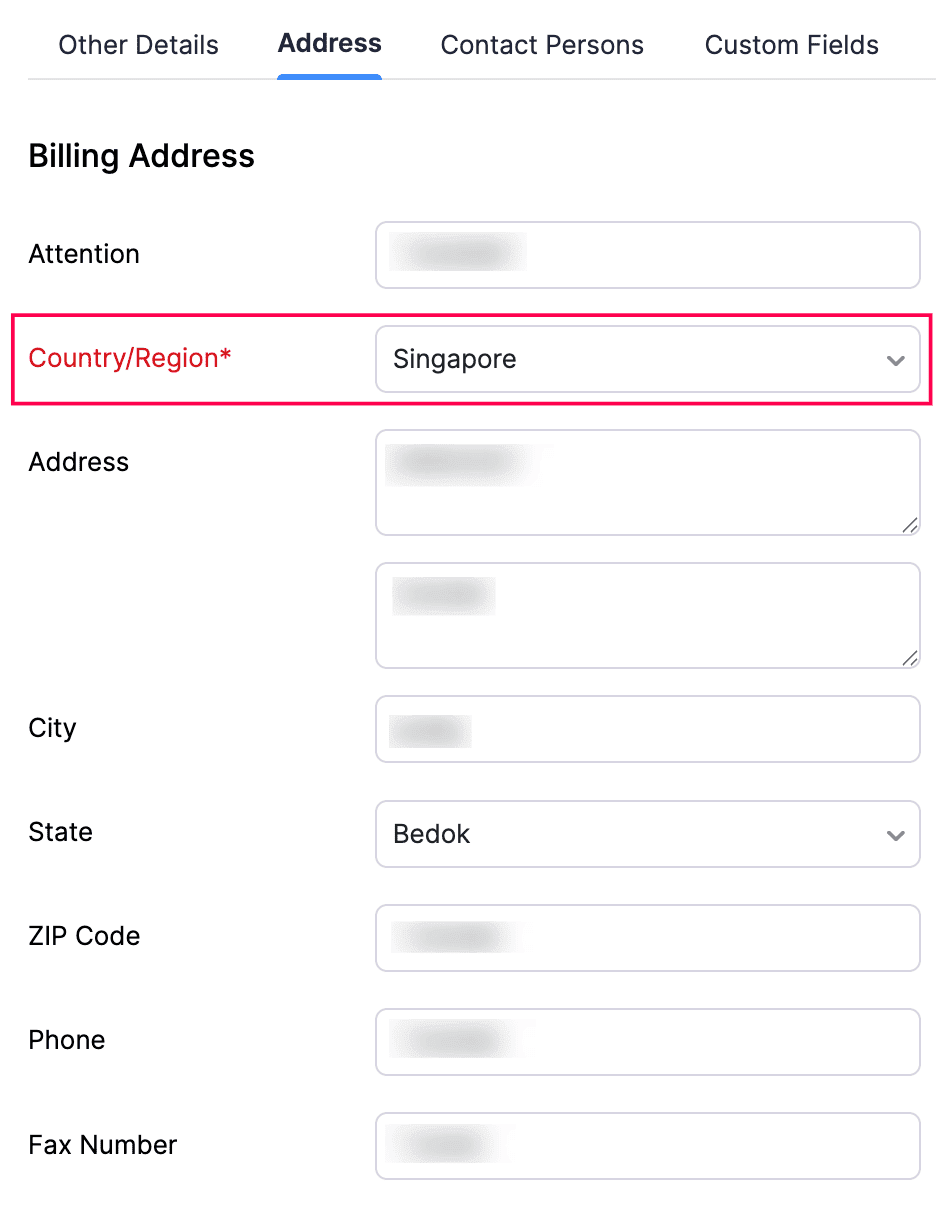
- In the Address tab, under Billing Address, select the customer’s country in the Country/Region field.

- Click Save.
Taxes will now be enabled for the customer. When you now create a transaction for the customer, the tax rates will automatically apply based on each item’s category.
Enable Taxes for Your Vendor
After you enable Taxes for your organisation, you can enable it for your vendors and enter their GST details to ensure the correct tax rate is applied when creating transactions. To enable taxes for your vendor:
- Go to Purchases on the left sidebar, and select Vendors.
- Click + New in the top right corner to create a new vendor, or select an existing vendor and click Edit on the Vendor Details page.
- On the New Vendor or Edit Vendor page, complete the required fields.
- Next, go to the Other Details tab. In the GST Registration field, check This vendor has a GST registered business, and enter the vendor’s GST registration number.

- In the Address tab, under Billing Address, select the vendor’s country in the Country/Region field.
- Click Save.
Taxes will now be enabled for this vendor.
Non-Taxable Sections
Apart from the taxes applied to transactions, some transactions are tax-exempt or out of scope. These transactions use specific codes, which include:
| Non-Taxable Sections | Non-Taxable Codes | Description |
|---|---|---|
| Regulation 33 Exempt Supplies | ES33 | Use this when you sell GST-exempt goods or services that meet Regulation 33 conditions. |
| Non-Regulation 33 Exempt Supplies | ESN33 | Use this when you sell GST-exempt goods or services that do not meet Regulation 33 conditions. |
| Exempt Purchases | EP | Use this when you purchase GST-exempt goods or services. |
| Non-Registered | NR | Use this when you purchase goods or services from vendors who aren’t registered under GST. |
| Out of Scope Sales | OS | Use this when you sell goods or services completely outside Singapore. |
| Out of Scope Purchases | OP | Use this when you purchase goods or services completely outside Singapore. |
Insights:
- Regulation 33 (Singapore GST) allows businesses to treat certain supplies as exempt. This rule is important for financial institutions, exporters, and businesses dealing with cross-border transactions.
- Regulation 33 applies to the interest income on deposit of money in a financial institution in Singapore, realised exchange gain or loss, interest charged on customers when goods are sold to them on credit, and on the interest income received from bonds.
- It does not apply to the sale or lease of residential properties, investments in precious metals, local financial services, or digital payment tokens. These are treated as Non-Regulation 33 exempt supplies.
Modify GST Settings
Prerequisite: You cannot edit the settings if tax returns have already been generated. To make changes, delete the existing returns first.
After setting up GST for your organization, you can update the settings as needed. To modify GST settings :
- Go to Settings.
- Select Taxes under Taxes & Compliance.
- In the Taxes pane, choose GST Settings.
- Under Is your business registered for GST?, make the required changes.
- Click Save.
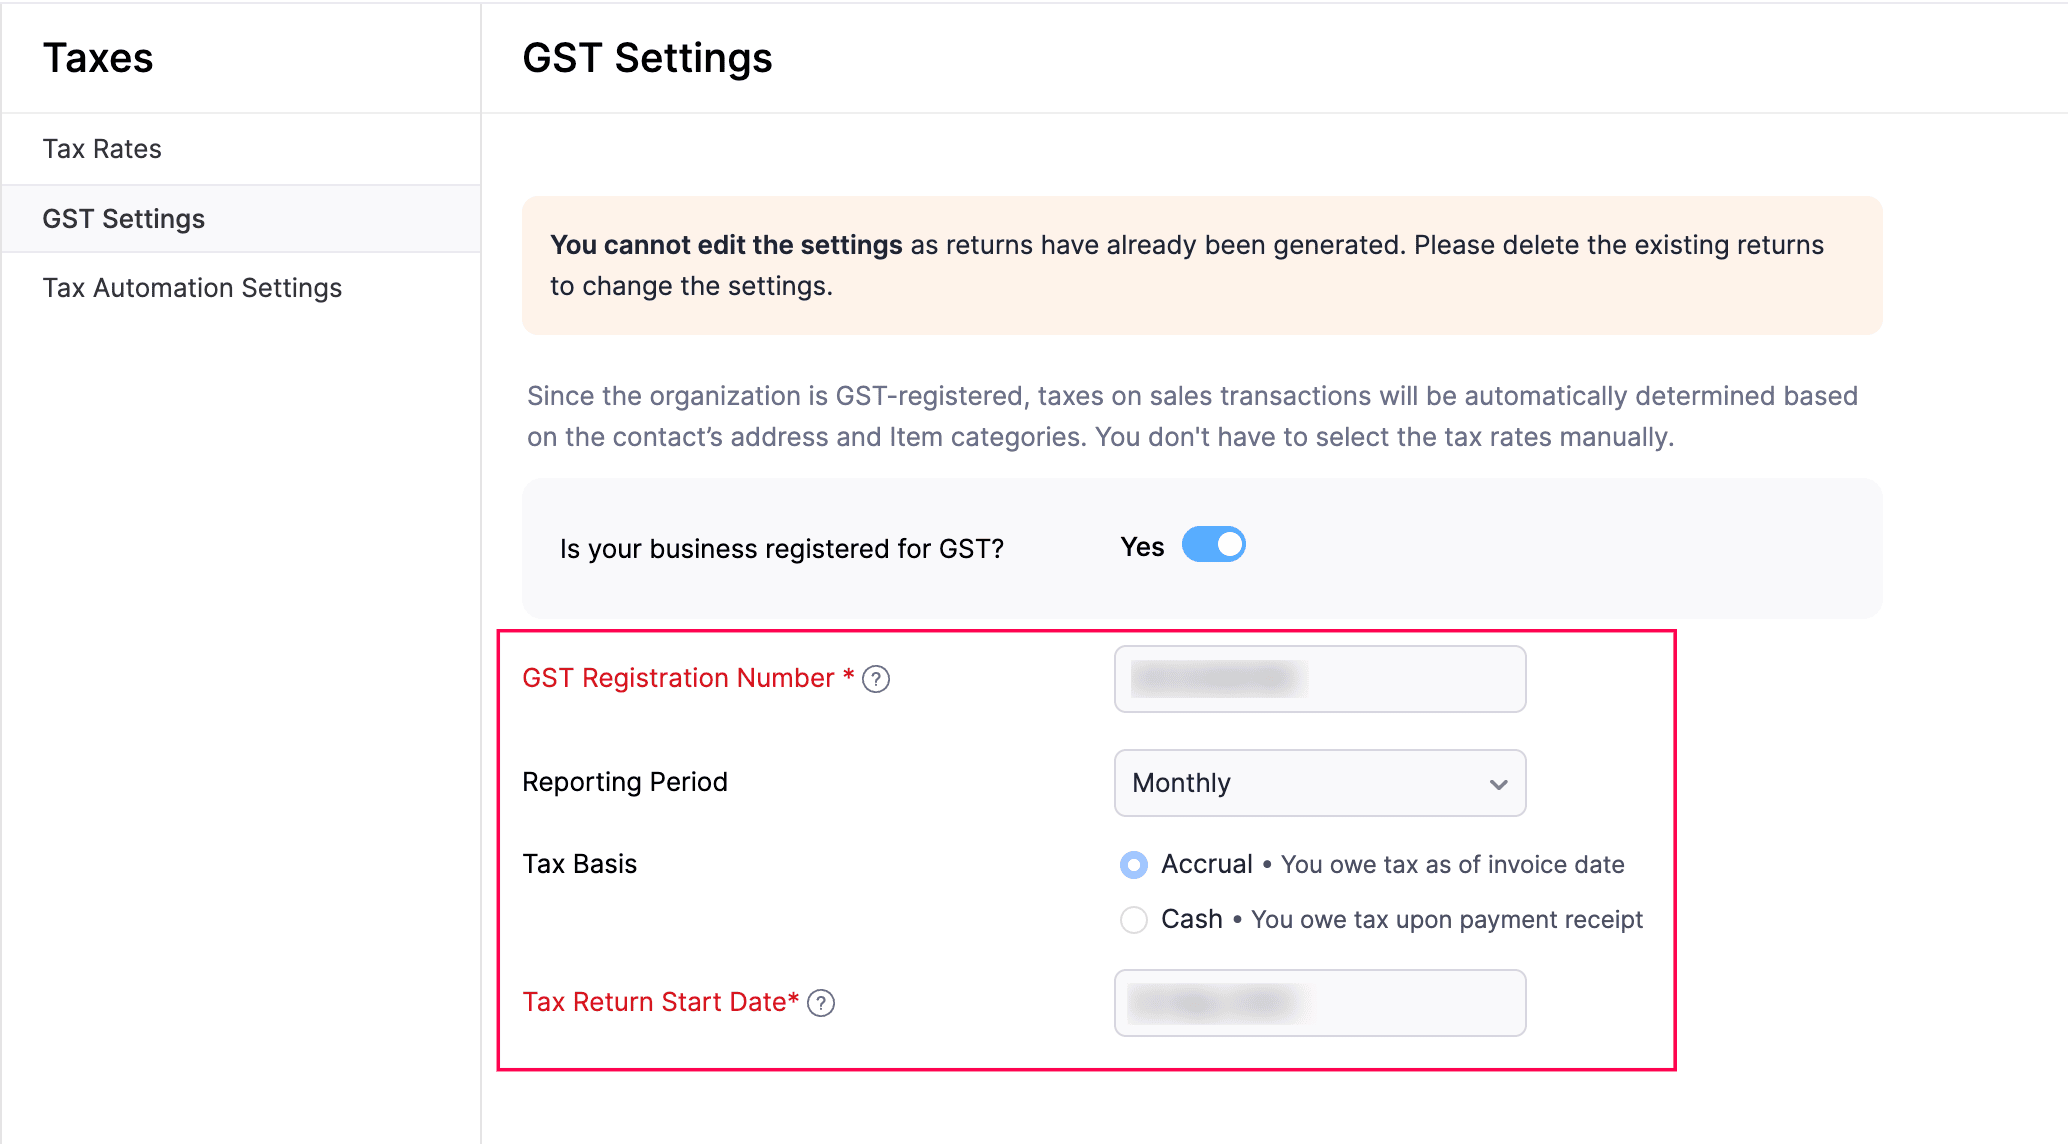
Your organization’s GST details will be updated with the new information.
Insight: Taxes on sales transactions are automatically calculated using the customer’s address and item categories, so there’s no need to select tax rates manually.
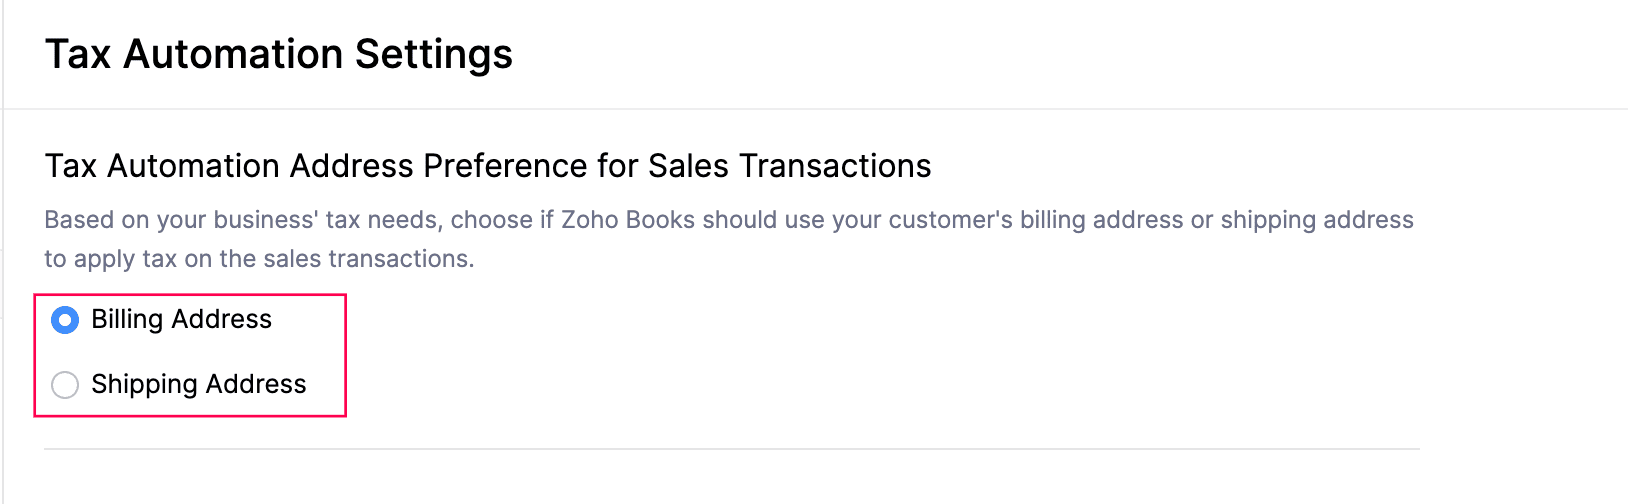
Tax Automation Settings
Configure the Tax Automation Address Preferences for Sales Transactions
You can set up tax automation address preferences for your sales transactions in Zoho Books. To do this:
- Go to Settings.
- Select Taxes under Taxes & Compliance.
- In the Taxes pane, choose Tax Automation Settings.
- Under Tax Automation Address Preference for Sales Transactions, choose one of the following:
- Billing Address: Use your customer’s billing address to apply tax to the sales transaction.
- Shipping Address: Use your customer’s shipping address to apply tax to the sales transaction.
- Click Save.
The tax will now be applied to your customer’s sales transactions based on the address you selected.
Reverse Charge
The Reverse Charge is a mechanism under the Goods and Services Tax that applies when you receive imported services or low-value goods (valued at SGD 400 or less) from overseas suppliers.
Apply Reverse Charge to Purchase Transactions
To apply a reverse charge to a purchase transaction:
- Go to Purchases on the left sidebar and select Bills or Expenses.
- Click + New in the top right corner.
- Enter the required transaction details.
- Check This transaction is applicable for reverse charge.
- Click Save.
Once saved, the transaction will be recorded with reverse charge.
Disable Taxes
Note: You cannot disable taxes if tax returns have been generated. Delete the existing returns before you disable taxes.
To disable taxes:
- Go to Settings.
- Select Taxes and Taxes & Compliance.
- Click GST Settings on the left sidebar.
- Hover over Is your business registered for GST? and toggle it to No.
- Click Save.
Taxes will now be disabled for your organisation.
 Yes
No
Yes
No
Thank you for your feedback!