
Integrate Zoho Inventory With ICICI Bank
Note:
- This integration is currently available only upon request. If you’d like to use it, contact icici-support@zohofinance.com. However, organisations that have already set up the integration can continue using it.
- This integration is available only for users in the India edition of Zoho Inventory created under the zoho.in domain.
- Transaction charges, if any, are applicable as per the Schedule of Charges of ICICI Bank which differs from person to person. Zoho does not charge any additional fees.
Zoho Inventory now partners with ICICI Bank - one of the largest banks in India to let you make payments directly from Zoho Inventory. Let’s take a scenario to explain this better:
Scenario: Peter runs a retail business. He makes and receives payments online for all his sales and purchases. Logging into his bank’s internet banking portal every time to make a payment makes it inconvenient and time consuming. He immediately integrates his Zoho Inventory organisation with his ICICI Bank Corporate account. He now settles bills and even makes advance payments–all without logging into the ICICI Bank CIB (Corporate Internet Banking) Portal.
Prerequisites:
- An ICICI Bank corporate current account with internet banking.
- An active paid subscription to any one of the Zoho Finance apps.
- Multi-Factor Authentication (MFA), excluding Security Key and Passkey, must be enabled for your Zoho account. Learn how to enable MFA.
Benefits of the Integration
- Make online payments to your vendors directly from Zoho Inventory without logging into ICICI Bank CIB (Corporate Internet Banking) Portal.
- Make advance payments and bulk bill payments to a vendor.
- Set up approval workflows (bill approval in Zoho Inventory and payment approval in the CIB Portal) to keep an eye on all payments made.
Connect to ICICI Bank
Connect your corporate bank account to Zoho Inventory by following these simple steps:
Note: This is a user-level integration and only the user who had set up the integration will be able to access or make payments using it. Deleting the user will disable the integration automatically.
1. Setup
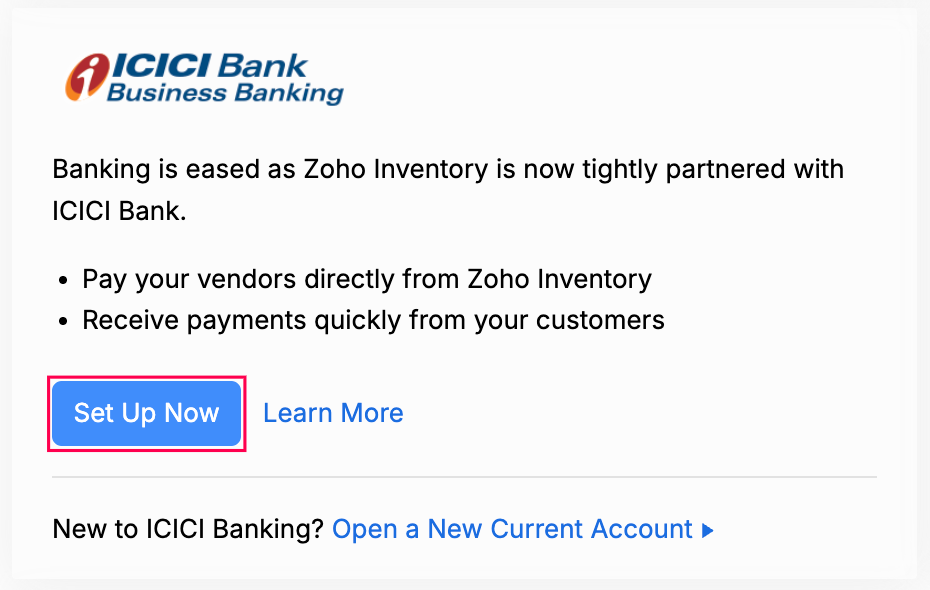
Go to Settings, and click Vendor Payments under Online Payments.
To continue setting up the integration, choose one of the following options based on whether you already have an ICICI Bank Current Account:
If you are a new user to ICICI Bank:
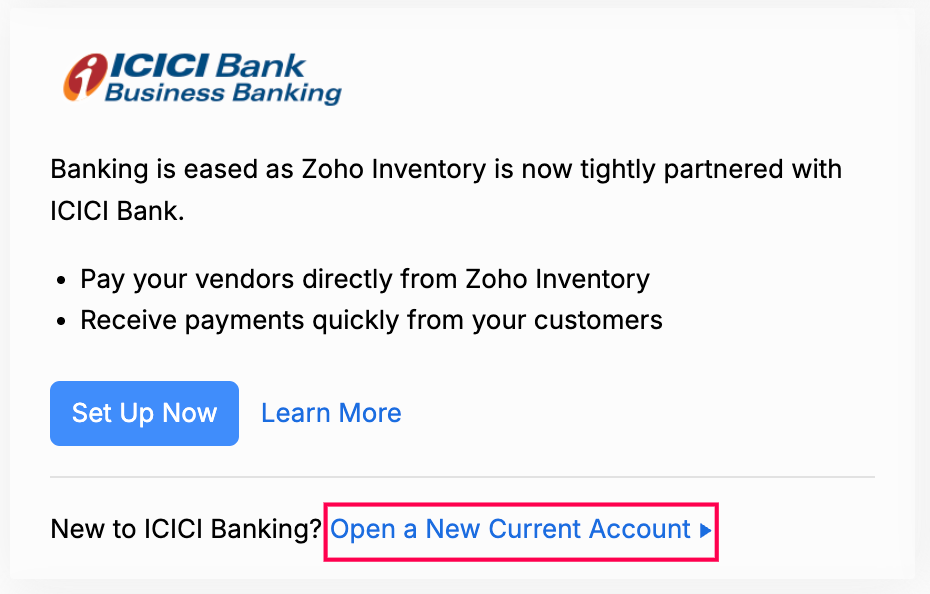
- Request for a new current account by clicking Open a New Current Account (You can also request for a new account directly from the Vendor Payments page).
- Enter your Name and contact details in the screen that follows.
- Read and agree to the terms and click Proceed.
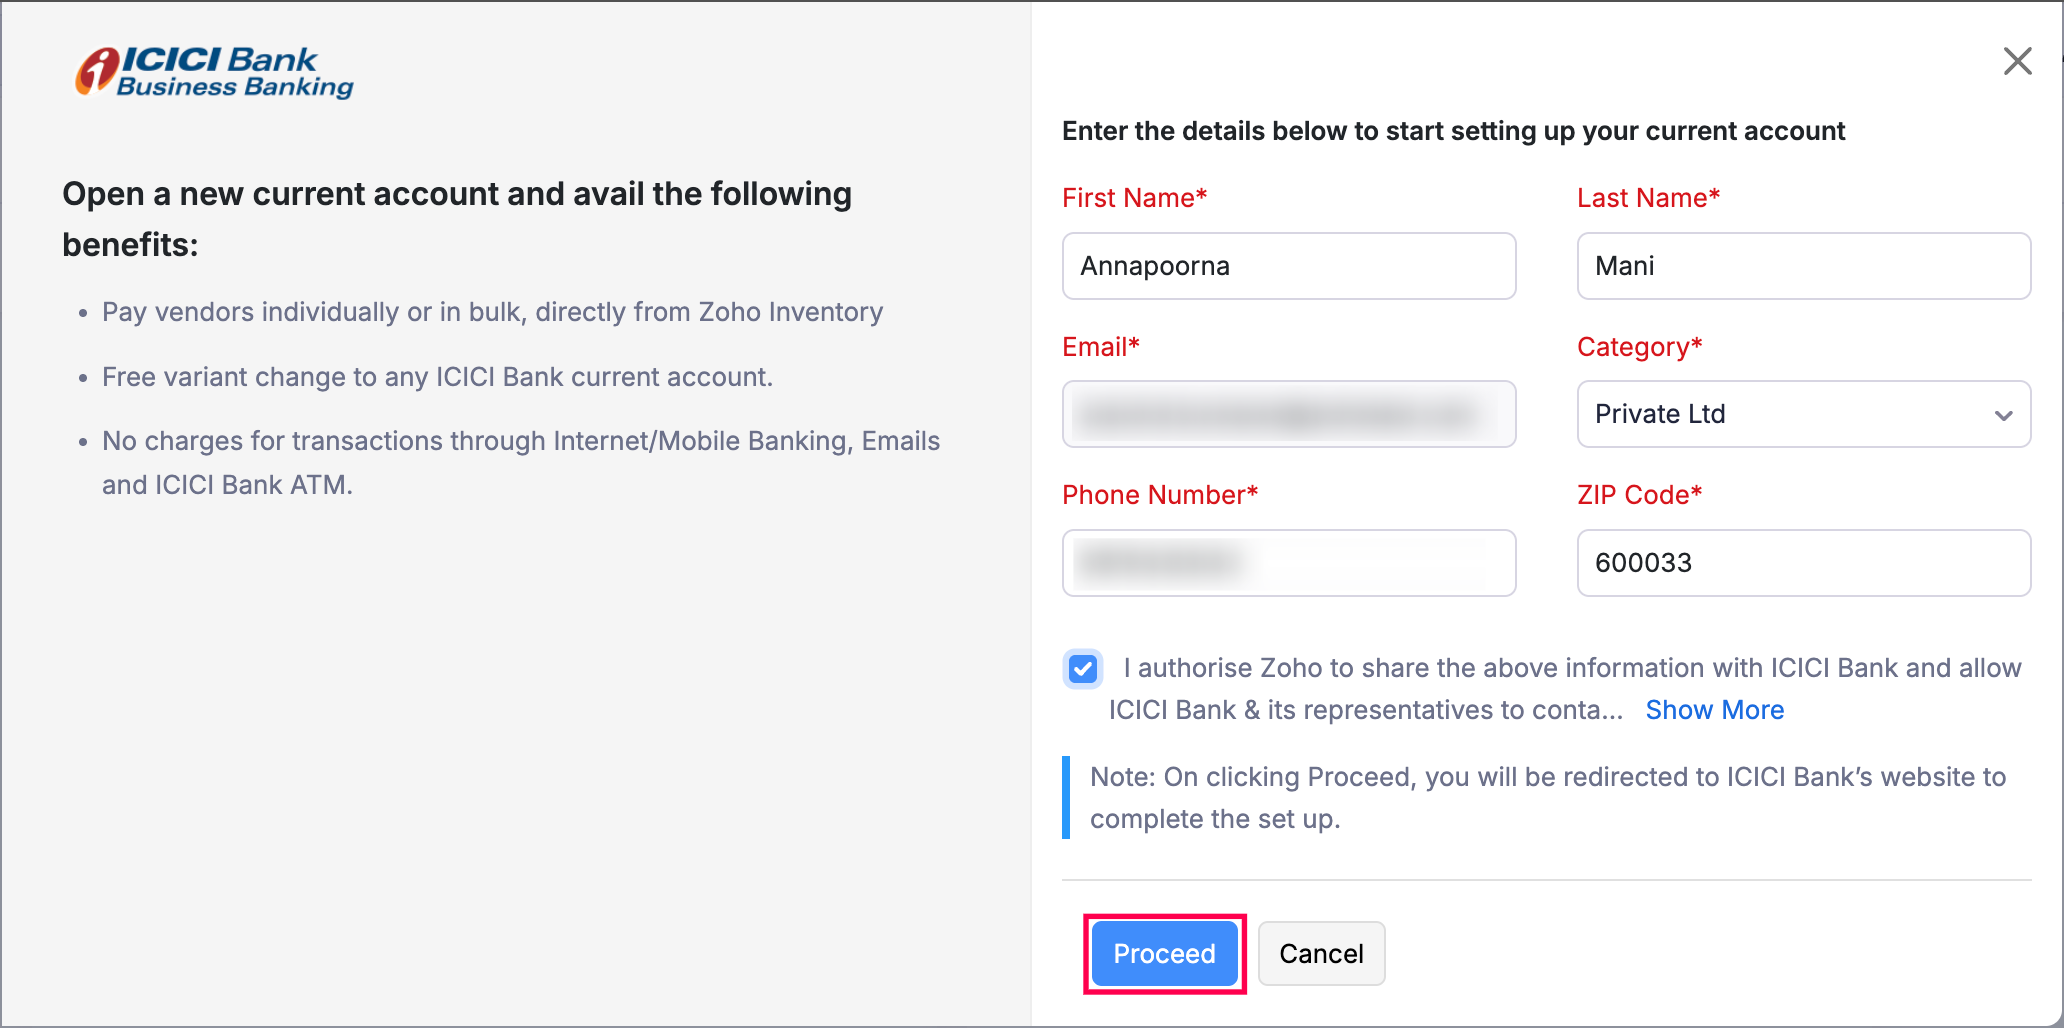
You will be redirected to ICICI Bank to complete the setup. (The bank executives might get in touch with you to complete the process.) Once that’s done, you can set up the integration using your User ID and Corporate ID.
If you are an existing user of ICICI Bank:
- Click Set up Now under ICICI Bank.
- In the pop-up that appears, enter your CIB Portal Login ID if you’ve created one in the portal. If you haven’t created one earlier, enter your credentials in this format: CorporateID.UserID.
- Enter your Corporate ID and User ID. You can find them both in ICICI’s CIB portal under Profile > Personal Details.
Insight: Your Corporate ID and User ID will be populated if your CIB Portal’s Login ID format is CorporateID.UserID.
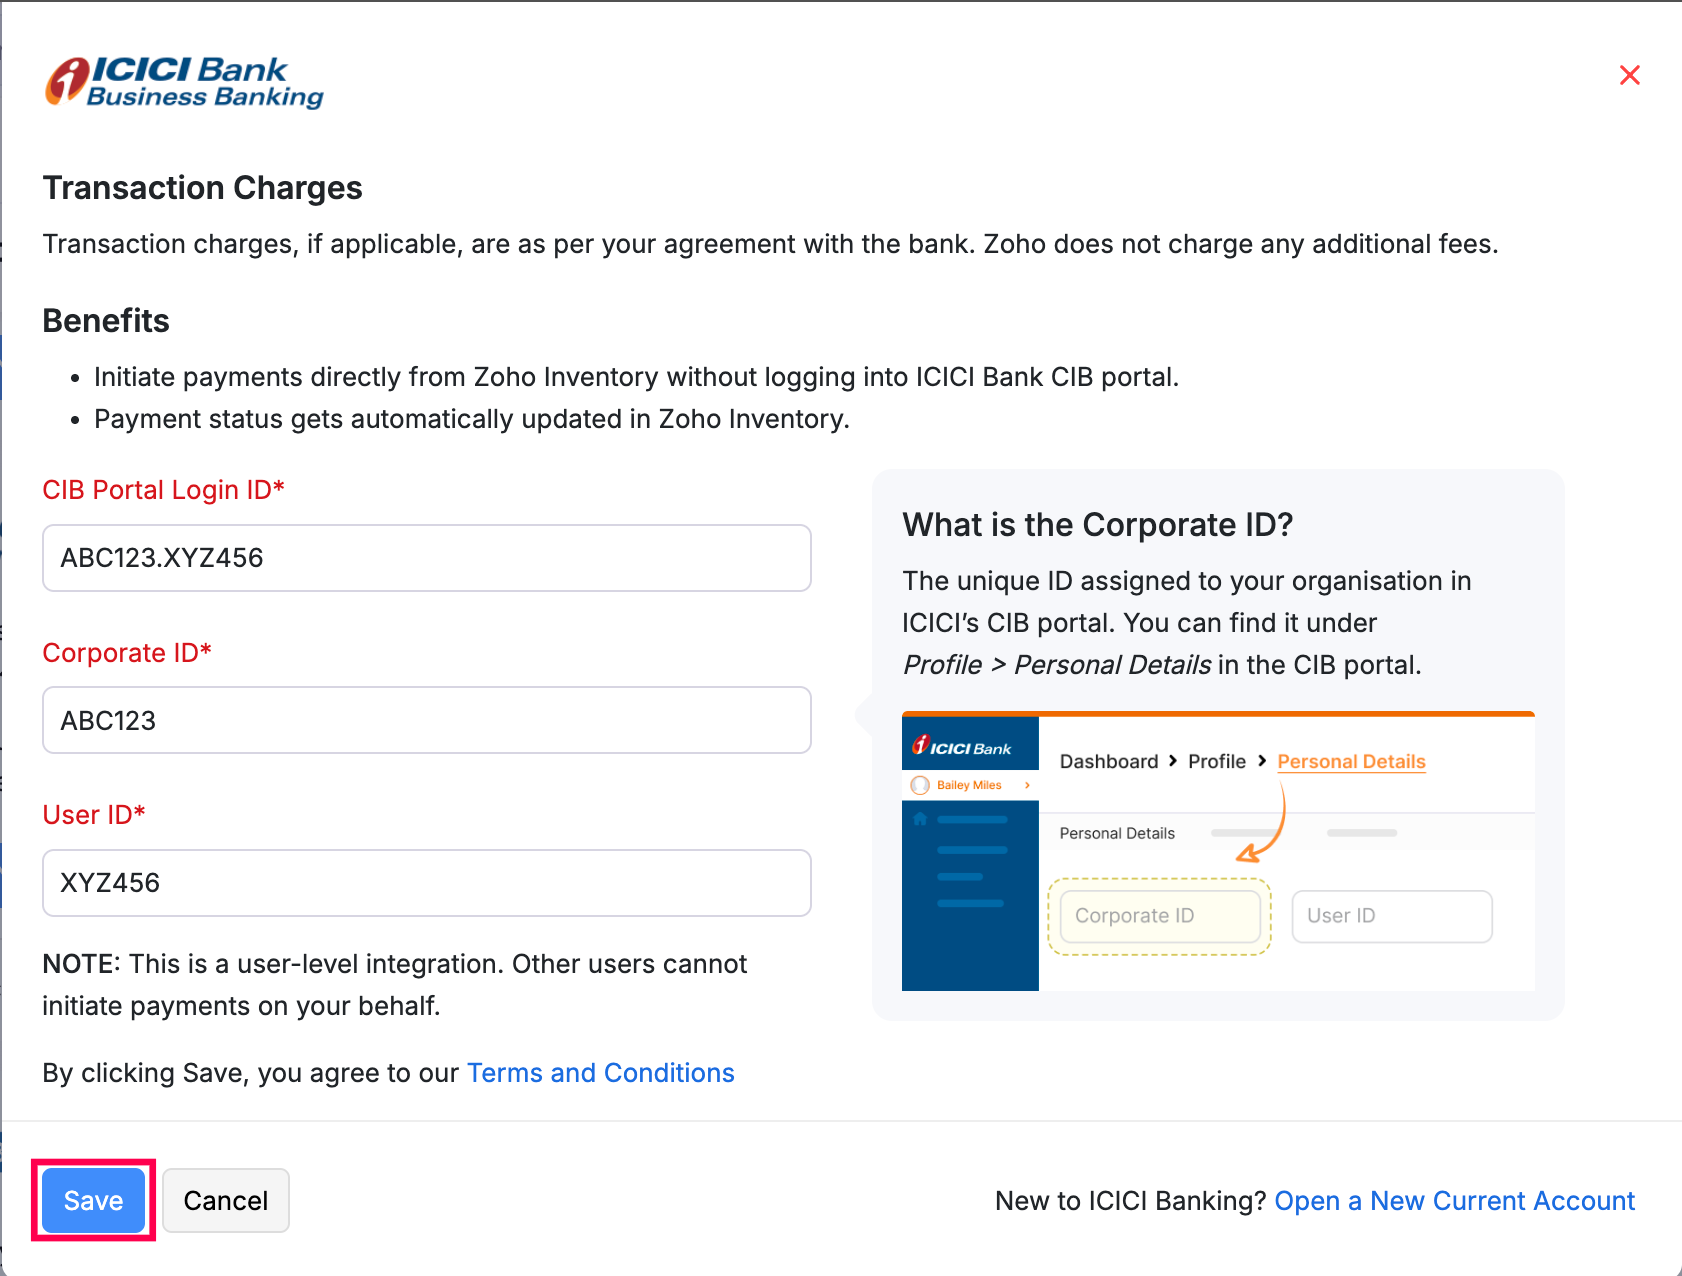
- Click Save.
You will have initiated the integration.
Warning: Once you have set up the integration with these credentials, you will not be able to edit them in Zoho Inventory. You must disable the integration and set it up once again with the new credentials.
2. Verify Documents
After initiating the integration in Zoho Inventory, you will have to contact your bank or relationship manager to complete the document verification. You will be required to submit the documents communicated by the ICICI Bank representative for verification. Once you’ve submitted your documents, please wait for your bank or relationship manager to confirm that the verification is complete.
Note: ICICI Bank may charge a processing fee for this process.
3. Approval
After verifying the documents, you need to approve it in the CIB Portal. Until then, your Account Status will be Pending.
To approve the integration:
Click Approve in ICICI Bank CIB Portal under the Pending Activities section.
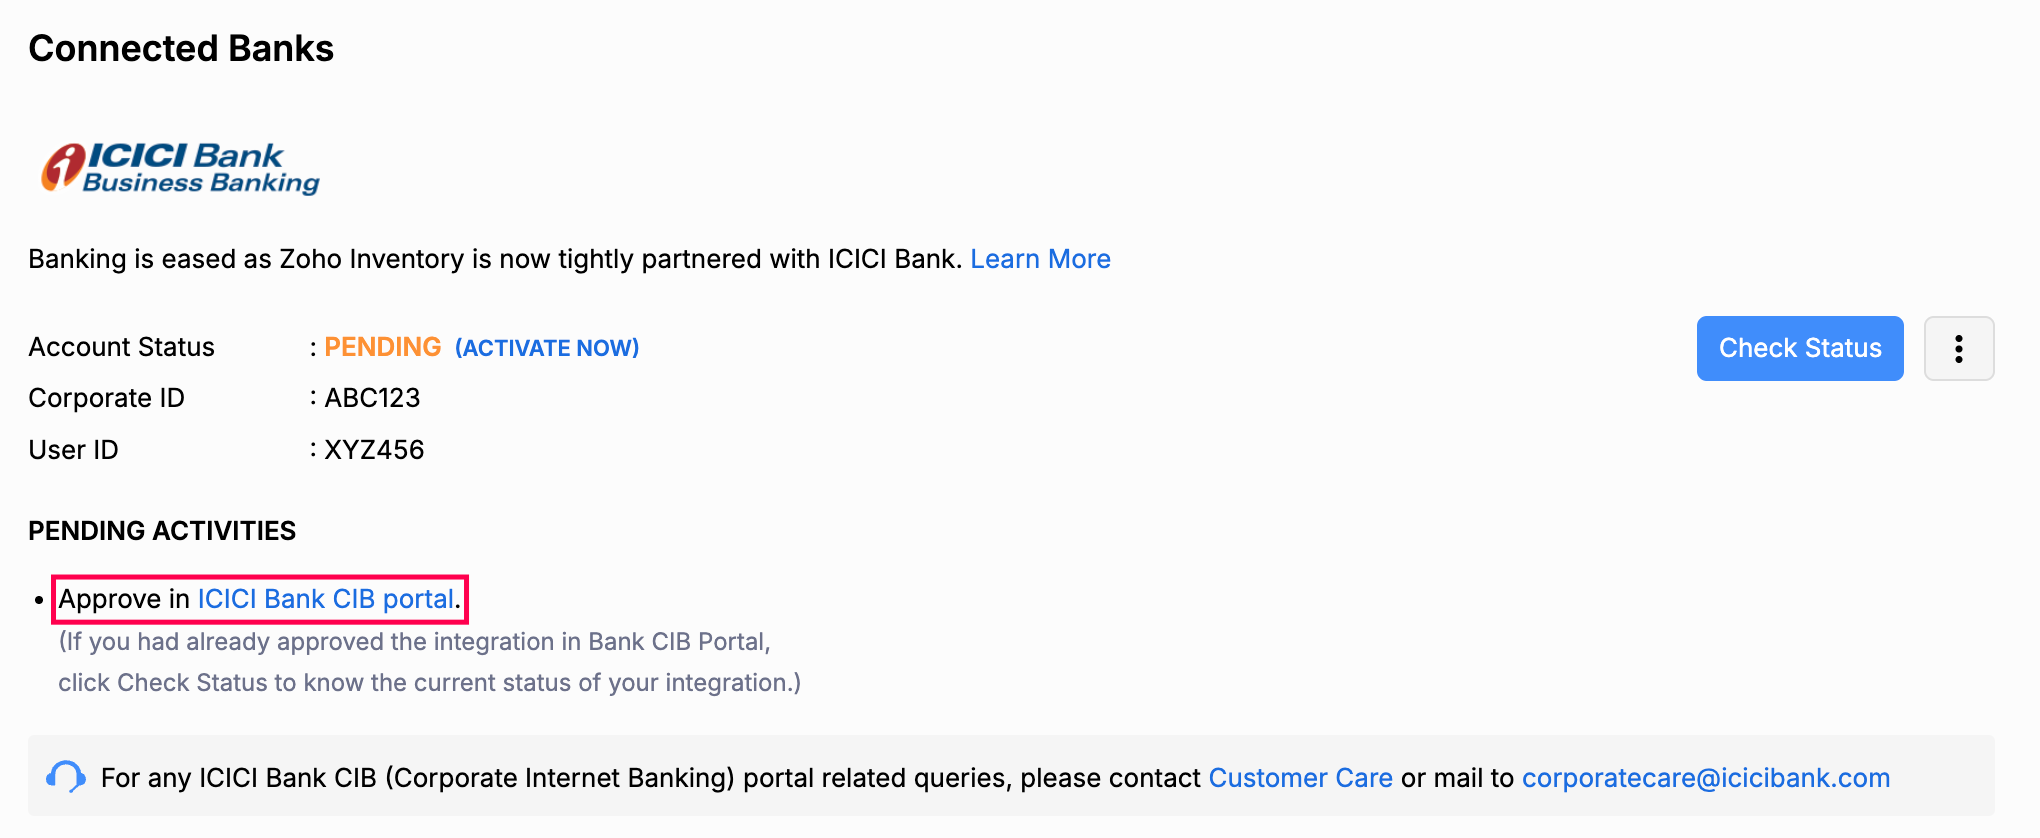
Note: You can also click Activate Now next to the Pending status and proceed to approve the integration or log in directly to the ICICI Bank CIB portal.
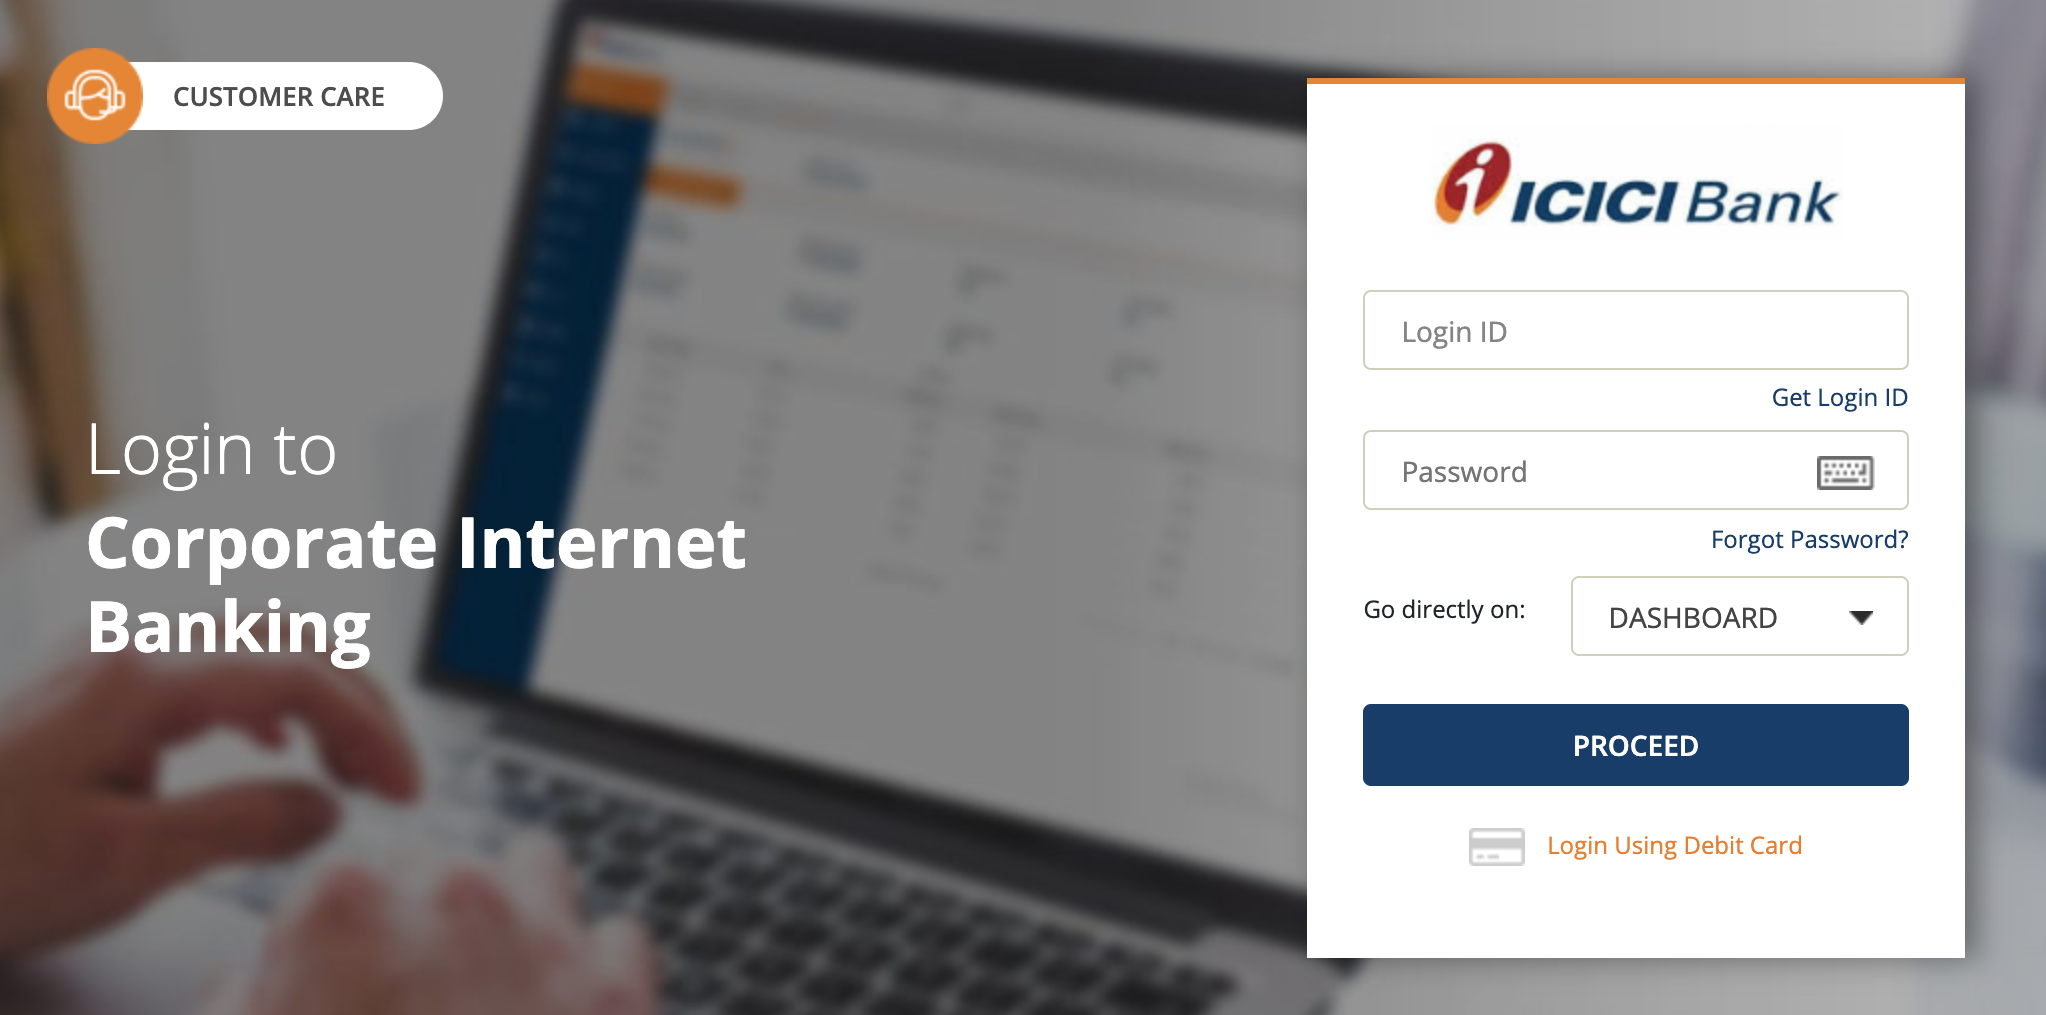
- Click Proceed and you’ll be redirected to the CIB login page.
- Enter your ICICI Bank CIB Portal Login ID and Password.
Insight: If you haven’t created a Login ID for your CIB Portal, enter your CorporateID.UserID in the given field.
Click Proceed to login.
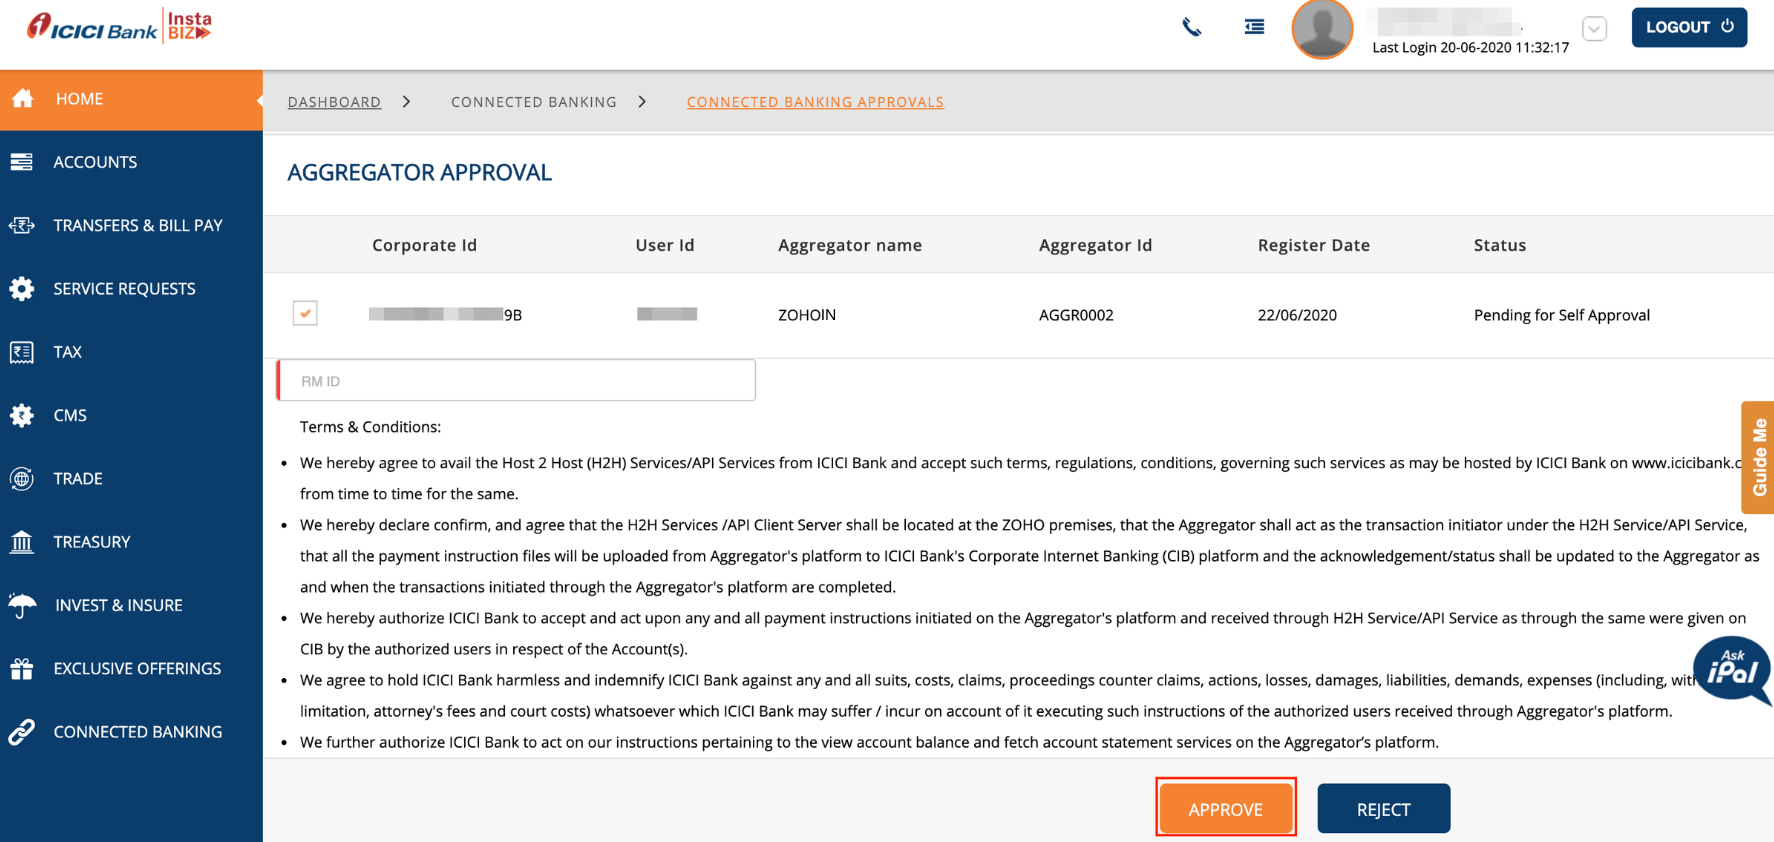
Go to Connected Banking and click the Connected Banking Approvals tab.

Check the box near the Corporate ID and User ID that you would like to approve.
Read the Terms and Conditions and click Approve.
In the screen that follows, enter the One Time Password sent to your registered mobile number.
Complete the integration by clicking Confirm.
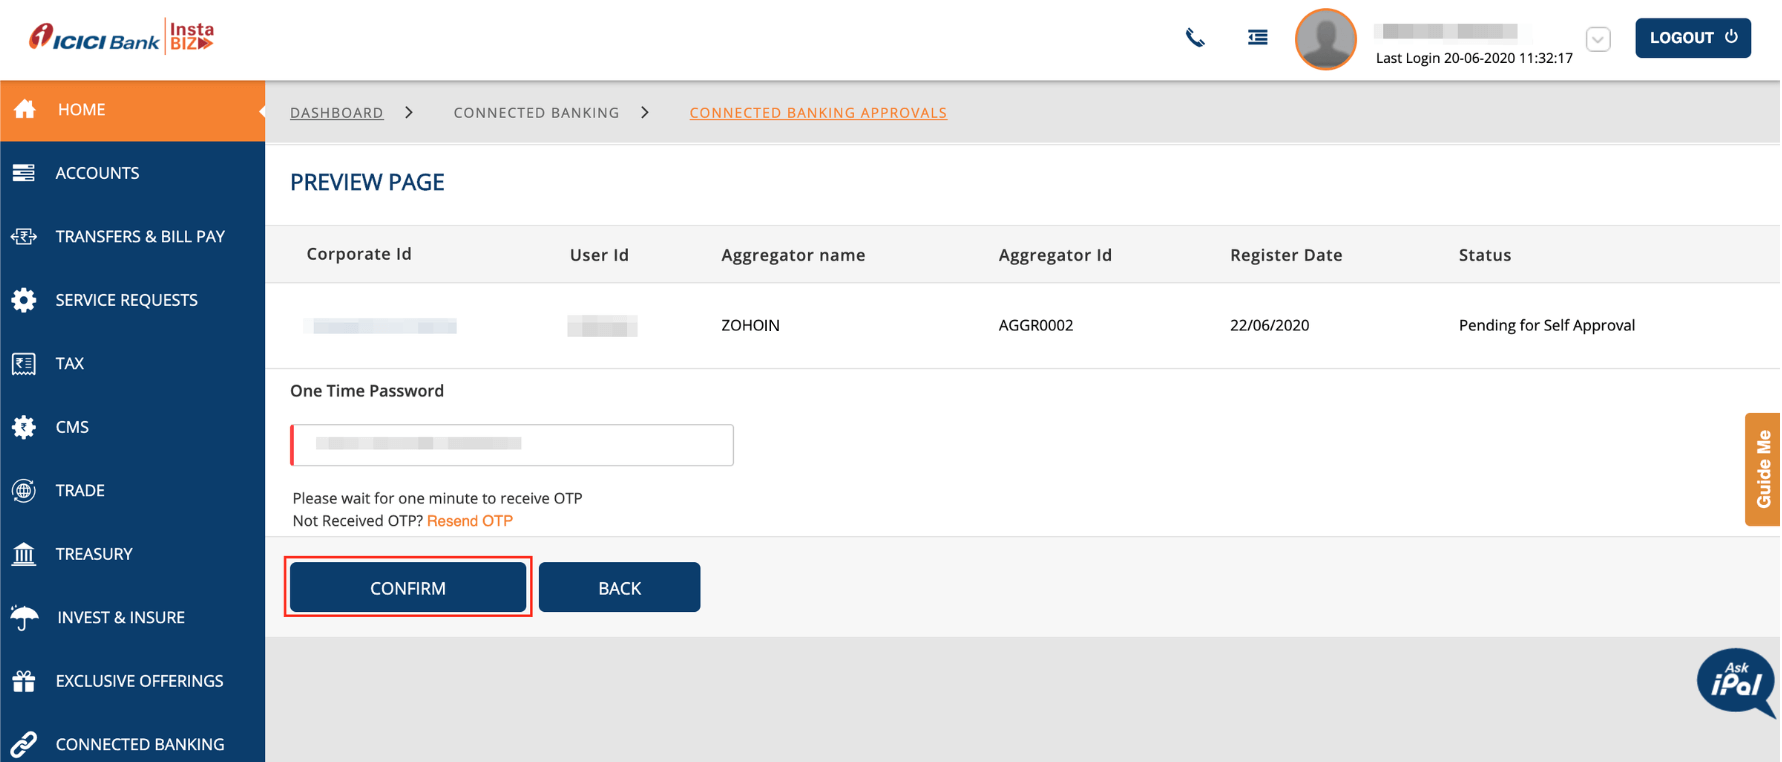
Check the status of the integration in Zoho Inventory by clicking Check Status (Available in the Vendor Payments tab).
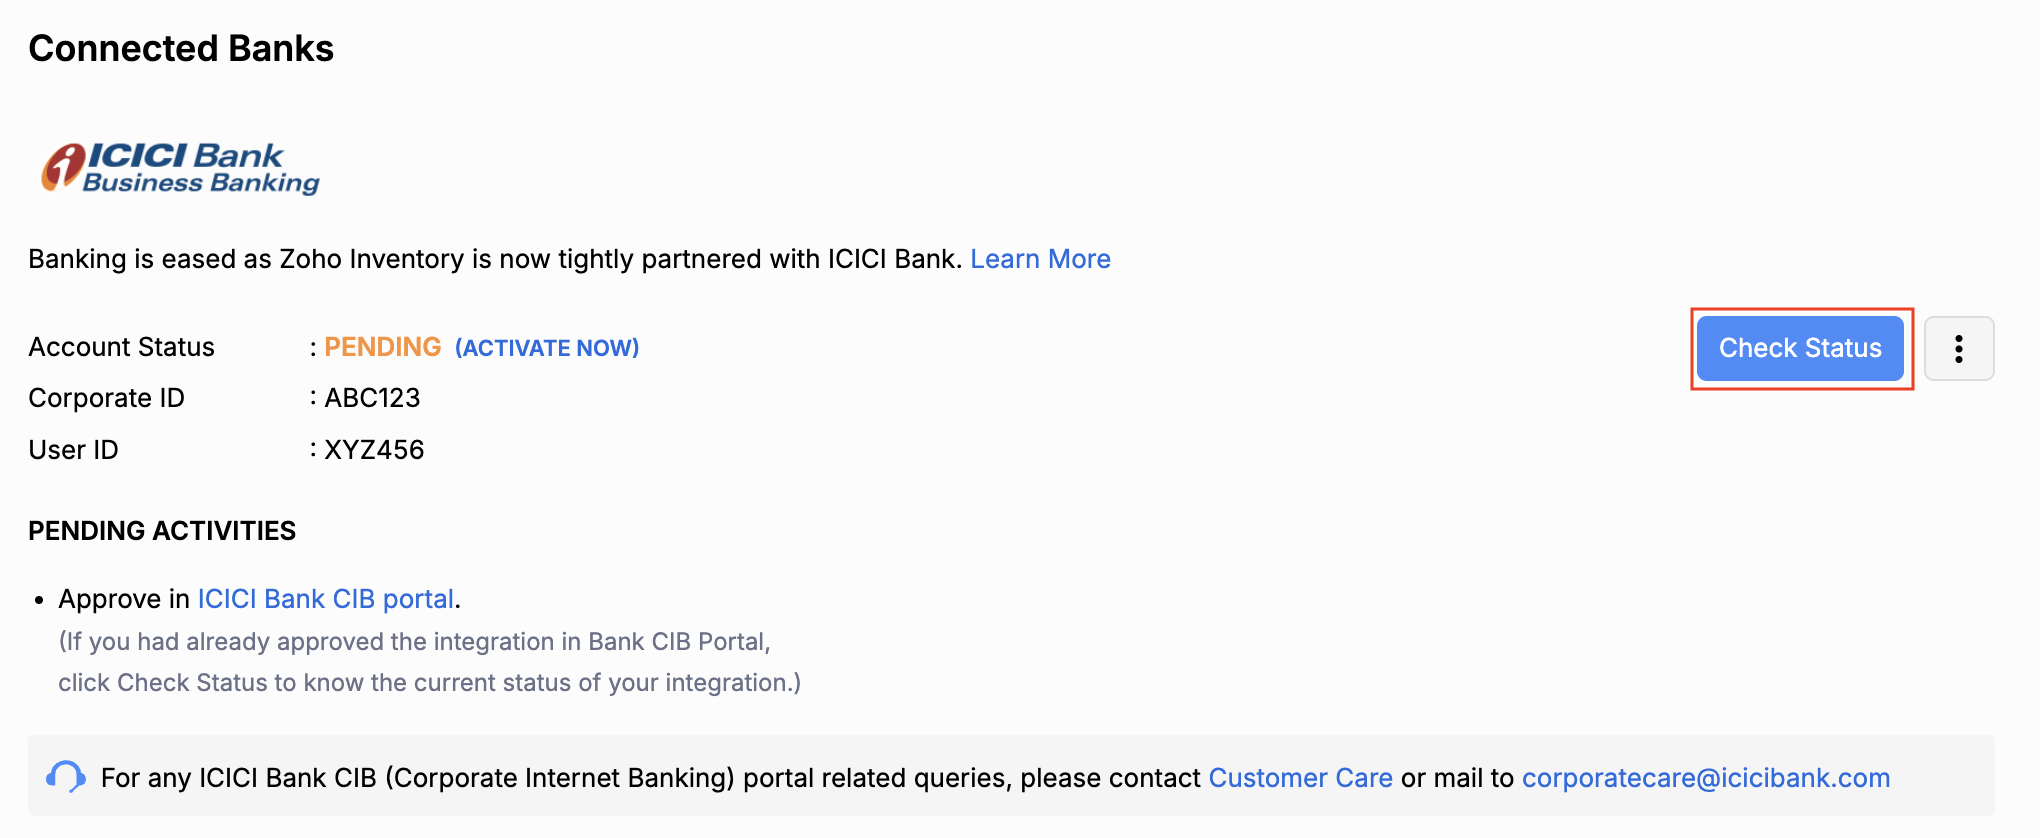
Once the integration is active, you will receive a notification in Zoho Inventory and your account status will be Active.
4. Add Bank Account
Once your integration is active, select your primary account to make payments under the Pending Activities section in the Vendor Payments tab.
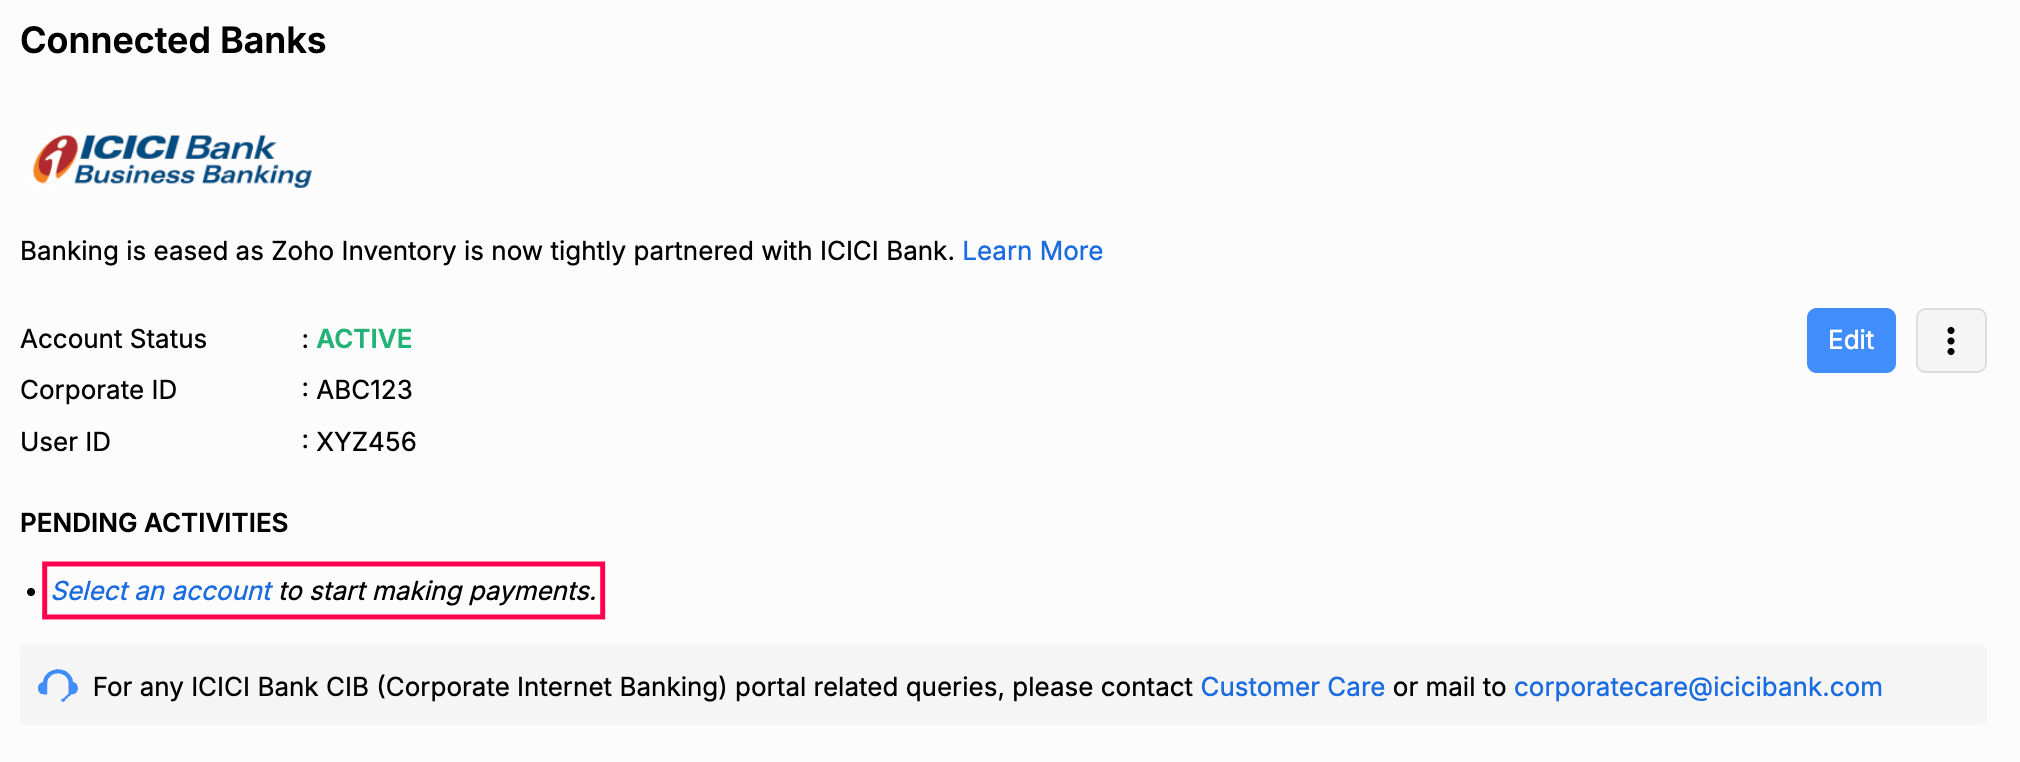
- Click Select an Account under ICICI Bank.
- Click the dropdown in the Bank Account to Make Payment field and click + Add New to include a new account (or choose your existing ICICI Bank account).
- Enter your bank account details in the pop-up and click Save and Select.
This account will be your default account while initiating payments.
Add Vendor’s Bank Account Details
Once you have integrated your bank account, you can add your vendor’s bank account details to start making payments from Zoho Inventory. To do so:
Insight: By default, only the admins will be able to add vendor’s bank account details. You can edit a role (Go to Settings > Users and Roles > Roles > Edit Role) and provide permissions for other users to add, edit and delete vendor’s bank account details.
- Go to Purchases and then Vendors and select the particular vendor.
- Click the More dropdown and select Add Bank Account.
- Enter the vendor’s bank account details in the pop-up that appears.
Insight: The IFSC you enter will be validated immediately so you can verify the code and then save your vendor’s bank account details.
- Click Save.
Make Payments via Zoho Inventory
Once you have added your vendor’s bank account details, you can start making payments. In Zoho Inventory, you can:
Make Individual Bill Payment
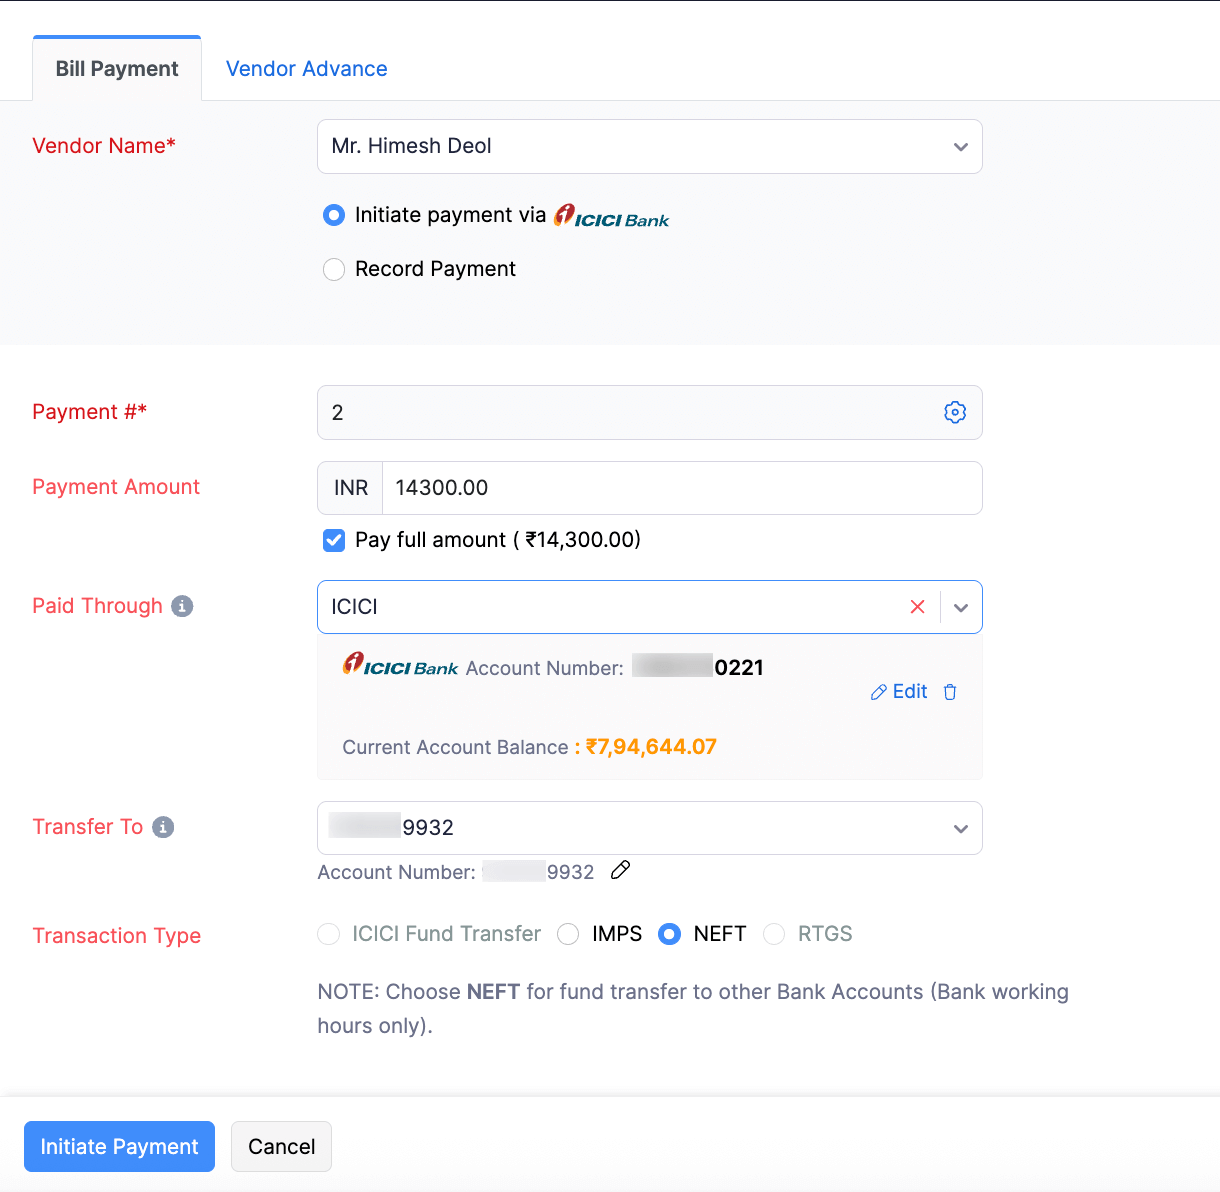
Make quick payments to your vendors when a bill is received and settle dues. To start making payments:
Go to the Bills module under Purchases on the left sidebar.
Select the bill for which you need to make the payment.
Click Pay via ICICI Bank in the options on the top bar.

Enter the payment details in the pop-up that appears.
| Fields | Description |
|---|---|
| Balance Due | The total sum of money due for payment. |
| Amount | The Amount you would like to pay. You can choose to make complete or partial payments towards the bill. |
| From Account | The account from which you want to make the payment. Choose one from the list of bank accounts linked to Zoho Inventory or add a new bank account. You can also view your account balance and make it your primary account to make payments by checking the Make this primary option. |
| To Account | The account to which you would like to make the payment. |
| Transaction Type | The Transaction Type from the available fund transfer options such as ICICI Bank Fund Transfer, IMPS, RTGS, and NEFT. |
The transfer types are:
ICICI Fund Transfer: Transfers funds immediately to ICICI Bank accounts (24/7).
IMPS: Transfers funds below ₹2 lakhs instantly to all bank accounts (24/7).
NEFT: Transfers funds to all bank accounts in batches during bank working hours.
RTGS: Transfers funds exceeding ₹2 lakhs instantly to all bank accounts during bank working hours.
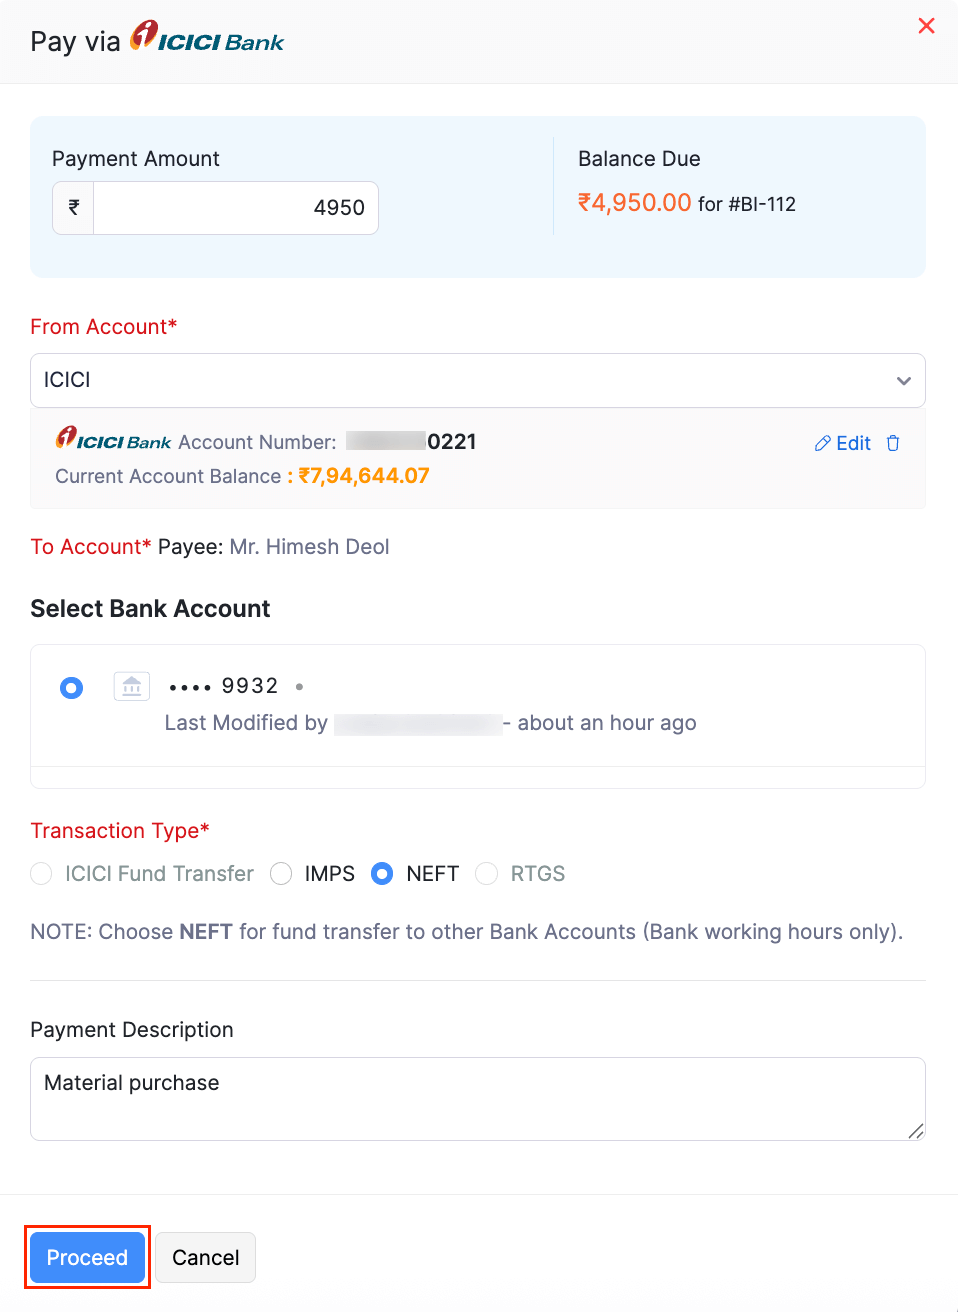
Click Proceed.
In the following screen, enter the OTP (One Time Password) sent to your registered mobile number.
Insight: If you didn’t receive your OTP, please try again after some time. If the issue persists, contact support.
Enter the Token, which is a unique 4-8 digit number used to initiate payments through your ICICI bank account securely.
Click Submit to make your payment.

The status of your payment will be either Cleared or Uncleared in the Payments Made tab based on the transaction type and the approval workflow you’ve chosen.
Insight: A transaction is in the Cleared status when the payment has been processed by ICICI Bank and will be deposited in the vendor’s account soon (based on the transaction type chosen).
A transaction is in the Uncleared status when the payment has been initiated from Zoho Inventory but is yet to be processed at ICICI Bank. A few reasons for this include the approval workflow in the portal, the checker not approving the transaction, a bank holiday or transaction was initiated outside bank timings for NEFT/IMPS.
If you have enabled an approval workflow in your CIB portal,
Login to your ICICI Bank CIB Portal.
Navigate to the Transfers and Bill Payments module in the left sidebar page.
Go to Transaction Approvals from the menu and click Pending on Me/Pending on Others.
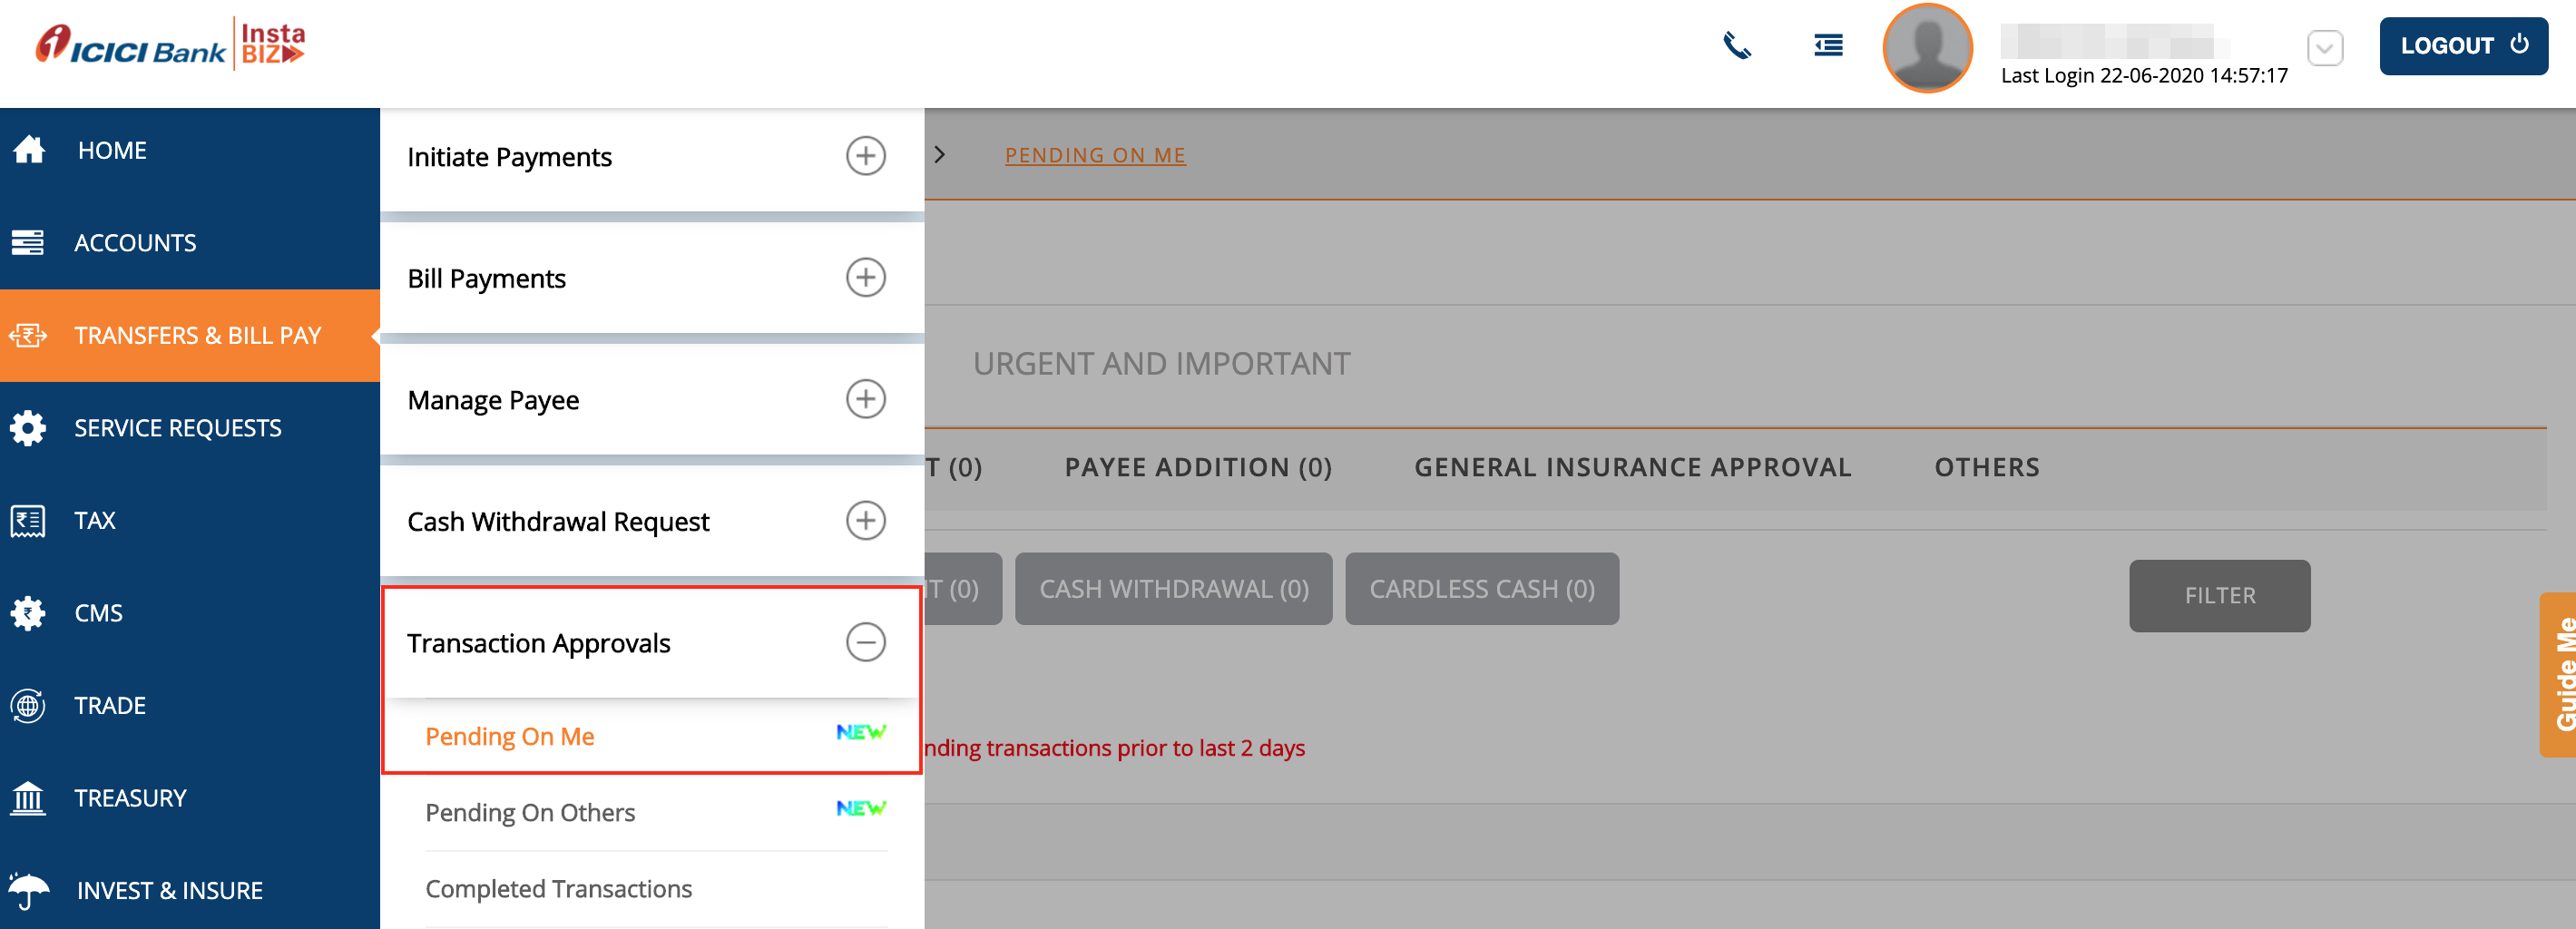
You will be able to find the transactions Pending for Approval listed under it.
Click the Actions dropdown to Approve or Reject the transaction.
Insight: By default, transactions initiated from Zoho Inventory will have to be approved by a user with the permission to approve the specific amount.
Make Multiple Bill Payments
You will be able to make payments for multiple bills at once to a single vendor using this integration. Here’s how:
Go to the Payments Made module and click + New.
Select a vendor and all their associated bills will be listed.
Click Initiate Payment via ICICI Bank and enter the other details.
Verify your details and click Initiate Payment.
Enter the One Time Password(OTP) sent to your registered mobile number on the screen that follows.
Enter the Token, which is a unique 4-8 digit number used to initiate payments through your ICICI bank account securely.
Note: You should generate the token in the ICICI Bank CIB portal to enter it in Zoho Inventory. Learn how
- Click Submit.
The payment will be initiated from Zoho Inventory.
Make Advance Payments
You will be able to make advance payments for your vendors once you add their bank account details.
Note: This feature is available only for organisations that have enabled GST.
To make advance payments:
- Go to the Payments Made module and click + New.
- Navigate to the Vendor Advance tab.
- Choose the vendor for whom you would like to make payment and select the option Initiate Payment via ICICI Bank.
- Enter all the tax related details such as the Source and Destination of Supply, Reverse Charge, and TDS.
- Enter the Amount to be paid.
- Select the account from which you want to make the payment in the From Account option.
- Select the To Account and the Transaction Type.
- Verify your details and click Initiate Payment.
- Enter the One Time Password(OTP) sent to your registered mobile number.
- Enter the Token, which is a unique 4-8 digit number used to initiate payments through your ICICI bank account securely.
- Click Submit.
Your payment will be initiated.
Disable the Integration
If you ever want to stop making payments via your ICICI Bank account from Zoho Inventory or change your account details, you can disable the integration.
Warning: Disabling the integration in Zoho Inventory will disable it from other integrated Zoho Finance applications as well.Once disabled, you will not be able to track the status of any uncleared transactions.
To disable:
- Go to Settings, and click Vendor Payments under Online Payments.
- Click Disable next to ICICI Bank.
- Read the terms and click the option I understand, disable my integration.
Note: Deleting your Zoho Inventory organisation or removing the user who set up the integration, will delete the integration.
Pro Tip: You can receive online payments from customers by integrating Zoho Inventory with ICICI Bank eazypay.
Note: Write to us at icici-support@zohofinance.com if you have any queries regarding the ICICI bank integration.