


Paytm Payment Gateway

Paytm enables businesses to accept customer payments online. Configure Paytm in Zoho Inventory using your merchant credentials to allow customers to make payments for invoices through Paytm.
Obtain Paytm Credentials
Before you configure Paytm in Zoho Inventory, you must obtain your merchant credentials from the Paytm Business Dashboard.
To obtain the credentials:
- Sign in to the Paytm Business Dashboard or the Paytm for Business mobile app.
- Click Developers in the left navigation menu and select API Keys.
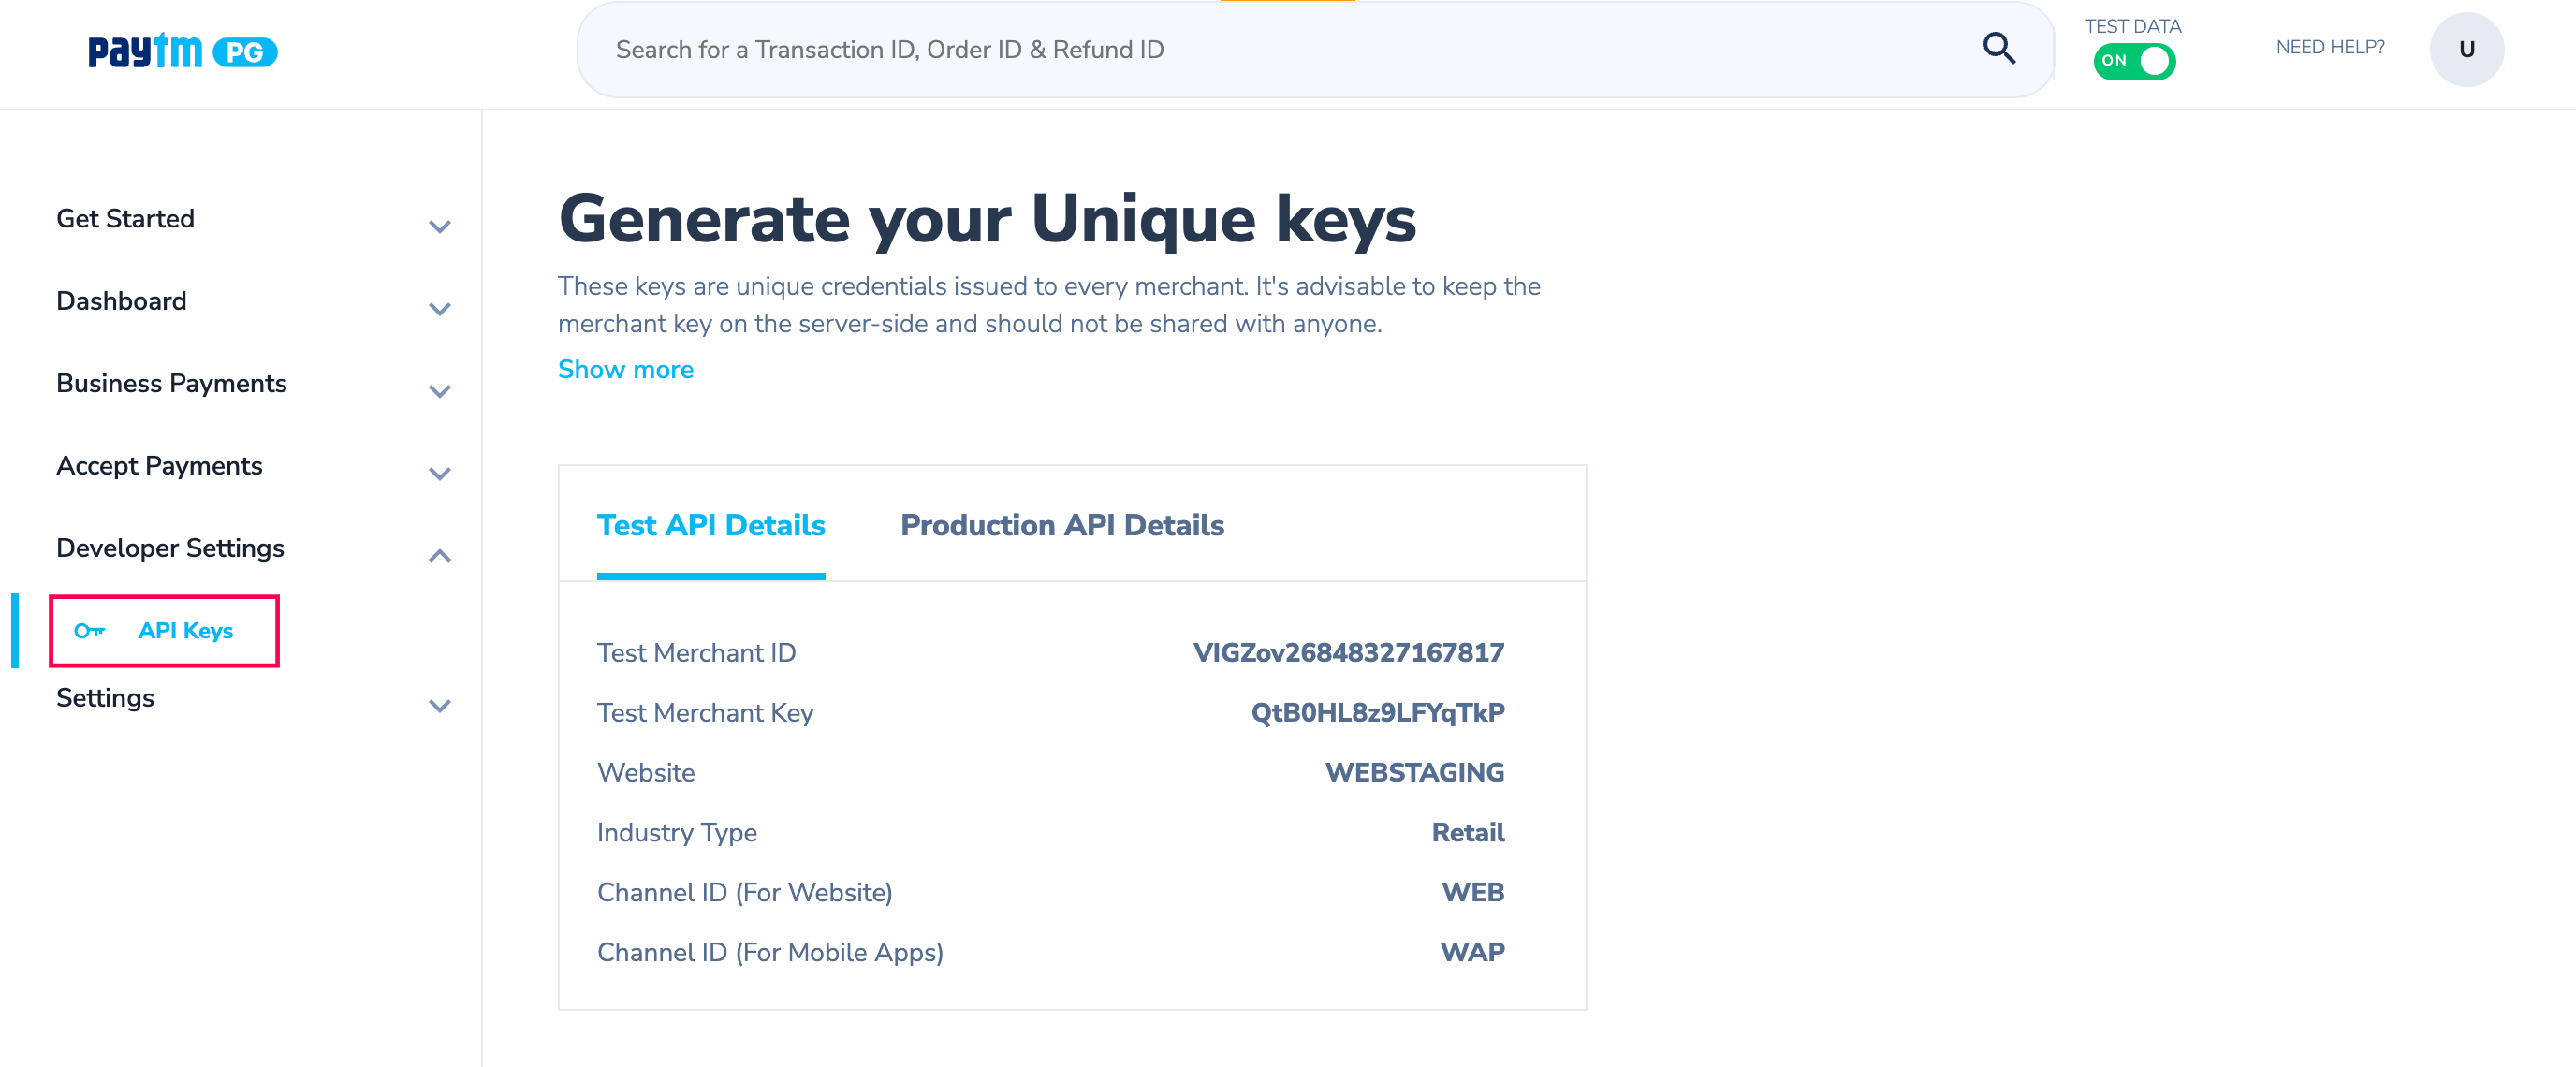
- Choose the required environment:
- Staging – for testing transactions.
- Production (Live) – for actual customer transactions.
- Locate your Merchant ID (MID) on the API Keys page or under your account profile details.
- Click Generate Now to create or reveal your Merchant Key.
- Copy the Merchant ID and Merchant Key.
Keep these credentials ready before proceeding with the setup in Zoho Inventory.
Set Up Paytm
After obtaining your Paytm credentials, configure Paytm in Zoho Inventory.
To set up Paytm:
- Log in to your Zoho Inventory organization.
- Click the Gear icon in the top-right corner to go to Settings.
- Select Customer Payments under Online Payments.
- Click Set Up Now next to Paytm.
- Click Add Merchant ID next to Configure Payment Terminal.
- Enter the following details copied from Paytm:
- Merchant ID
- Merchant Key
- Click Save.
Paytm will be configured successfully and will be available as a payment option for your customers.
Configure Payment Terminal
After setting up Paytm, you can add terminal devices to your merchant accounts to enable in-person payment collection.
Add Terminal Devices
You can add terminal devices to a merchant ID to process in-person payments through specific Paytm hardware.
To add a terminal device:
- Log in to your Zoho Inventory organization.
- Click the Gear icon in the top-right corner to go to Settings.
- Select Customer Payments under Online Payments.
- Click Manage next to Paytm.
- Hover over the merchant ID to which you want to add a terminal device.
Fill in the following details:
| Field | Description |
|---|---|
| Terminal ID | The unique identifier assigned to the Paytm terminal device. |
| Terminal Name | A name to identify and distinguish the terminal device within your organisation. |
| Payment Gateway | The payment gateway assigned to process transactions through this terminal. |
- Click Save.
Record a Terminal Payment From an Invoice
Use the invoice’s Details page when you want to record payment for a specific invoice.To record a terminal payment from an invoice:
- Go to the Invoices module under Sales from the left sidebar.
- Select the invoice for which you want to record payment.
- Click the Record Payment dropdown.
- Select Pay with Terminal.
- Enter the amount.
- Select the terminal payment provider in the Payment Gateway field.
- Select the Terminal Device.
- Choose whether it is a Card or UPI payment from Payment Type.
- Click Proceed.
If the full invoice amount is recorded, the invoice status changes to Paid. If only part of the invoice amount is recorded, the invoice status changes to Partially Paid.
Record Paytm Terminal Payments
After setting up Paytm, you can record payments received through the Paytm terminal from the Payments Received module.
To record the payment:
- Go to the Payments Received module under Sales from the left sidebar.
- Click + New in the top right corner.
- Select the customer from whom you received the payment.
- Enter the amount received.
- Select Paytm as the Payment Mode.
- Enter the Paytm terminal transaction details.
- Apply the payment to the customer’s invoice.
- Click Save.
The payment will be recorded against the selected customer and invoice.
More Actions
You can manage your existing Paytm terminal devices using the following actions.
Edit Terminal Device
You can update the details of an existing terminal device at any time.
- Log in to your Zoho Inventory organization.
- Click the Gear icon in the top-right corner to go to Settings.
- Select Customer Payments under Online Payments.
- Click Manage next to Paytm.
- Hover over the terminal device you want to edit and click the More icon.
- Make the necessary changes and click Save.
Mark a Terminal Device as Inactive
You can mark a terminal device as inactive to temporarily disable it without removing it from your configuration.
- Log in to your Zoho Inventory organization.
- Click the Gear icon in the top-right corner to go to Settings.
- Select Customer Payments under Online Payments.
- Click Manage next to Paytm.
- Hover over the terminal device you want to mark as inactive and click the More icon.
- Click Mark as Inactive.
Delete Terminal Device
You can delete a terminal device that is no longer needed.
- Log in to your Zoho Inventory organization.
- Click the Gear icon in the top-right corner to go to Settings.
- Select Customer Payments under Online Payments.
- Click Manage next to Paytm.
- Hover over the terminal device you want to delete and click the More icon.
- Click Delete and OK to confirm the action.
Troubleshoot Terminal Payment Setup
If Zoho Inventory does not accept the terminal value, check the details in your provider dashboard and try again.
Use this checklist:
- Confirm that you copied the value from the correct terminal setup.
- Check whether the provider generated a new authorization code after the previous one expired.
- Confirm that the terminal is active in the provider dashboard.
- Verify that you selected the matching provider in Zoho Inventory.
- Contact your payment provider if the terminal value is not visible in the provider dashboard.
After correcting the details, update the provider settings in Zoho Inventory and save the changes.