

In-app Notifications

Zoho Books lets you create in-app notifications to notify your users of an event or a significant activity that has taken place in your organisation. You will be able to set this for all the modules and also choose when to trigger the notification.
Note: When an in-app notification is triggered, it runs in the background, so it doesn’t interrupt your work in Zoho Books. You can continue using the app while it executes. Depending on the action, it may take a few minutes.
Scenario: The sales team has made a sale worth $100,000 in your organisation. All the admins and users of the organisation may not be aware of the sale. Triggering an in-app notification for invoices whose total is above the organisation’s average sale value notifies all the users of the organisation.
Create In-app Notifications
To associate in-app notifications with workflow rules, you must first create them. Here’s how:
- Go to Settings in the top right corner of the page.
- Select Workflow Actions under Automation.
- In the Workflow Actions pane, select In-app Notifications.
- Click + New In-app Notification in the top right corner.
- Enter a Name for the notification.
- Select the required Module.
- Select the Recipients. You can select users, roles, and associated contacts.
- Enter the Message to be displayed as the notification. Click Insert Placeholders to add dynamic values to the message.
- Click Save.
The next time the workflow is triggered, the selected recipients are notified in the Notifications icon. Click it to view the details.
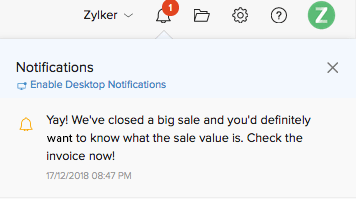
Associate In-app Notifications with Workflow Rules
The in-app notifications you create should be associated with workflow rules so that they are triggered automatically when the required conditions are met. To associate in-app notifications with workflow rules:
- Go to Settings.
- Select Workflow Rules under Automation.
- Click + New Workflow Rule in the top right corner.
- Enter the necessary details. See Workflow Rules.
- Under Actions, choose In-app Notifications as the Type and select the notification you want to associate with the workflow rule.
- Click Save.
Now, whenever the criteria is met, the workflow rule will be triggered, which in turn will trigger the in-app notification.
Edit In-app Notifications
If you want to update the details of an in-app notification, you can edit it. Here’s how:
- Go to Settings in the top right corner of the page.
- Select Workflow Actions under Automation.
- In the Workflow Actions pane, select In-app Notifications.
- Hover over the in-app notification you want to edit, click the dropdown to the right, and select Edit.
- Make the necessary changes and click Save.
Filter In-app Notifications
You can find in-app notifications easily by filtering them by the module for which they were created. To filter:
- Go to Settings in the top right corner of the page.
- Select Workflow Actions under Automation.
- In the Workflow Actions pane, select In-app Notifications.
- Under Module, select a module from the dropdown. The in-app notifications created for the selected module will be displayed.
Delete In-app Notifications
Warning: Deleting an in-app notification is permanent and cannot be undone. If the in-app notification is associated with a workflow rule, the workflow rule will not be executed.
If you no longer require certain in-app notifications, you can delete them. Here’s how:
- Go to Settings in the top right corner of the page.
- Select Workflow Actions under Automation.
- In the Workflow Actions pane, select In-app Notifications.
- Hover over the in-app notification you want to delete, click the dropdown to the right, and select Delete.
- Confirm your action by clicking Delete in the pop-up.
 Yes
Yes