
Vendor Payments
Payment Statuses of a Vendor Payment
Depending on whether you’ve enabled approvals for payments or not, a vendor payment goes through the following statuses:
| Payment Status | Description | Applicable When | |
|---|---|---|---|
| Draft | The vendor payment is created but not yet processed. | Approvals is enabled or disabled | |
| Pending Approval | The vendor payment is waiting for approval. | Approvals is enabled | |
| Approval Rejected | The vendor payment is rejected for approval. | Approvals is enabled | |
| Approved | The vendor payment is approved and can now be applied to bills. | Approvals is enabled | |
| Paid | The vendor payment is recorded. | Approvals is enabled or disabled | |
| Void | The vendor payment is marked as void and will not be processed. | Approvals is enabled or disabled |
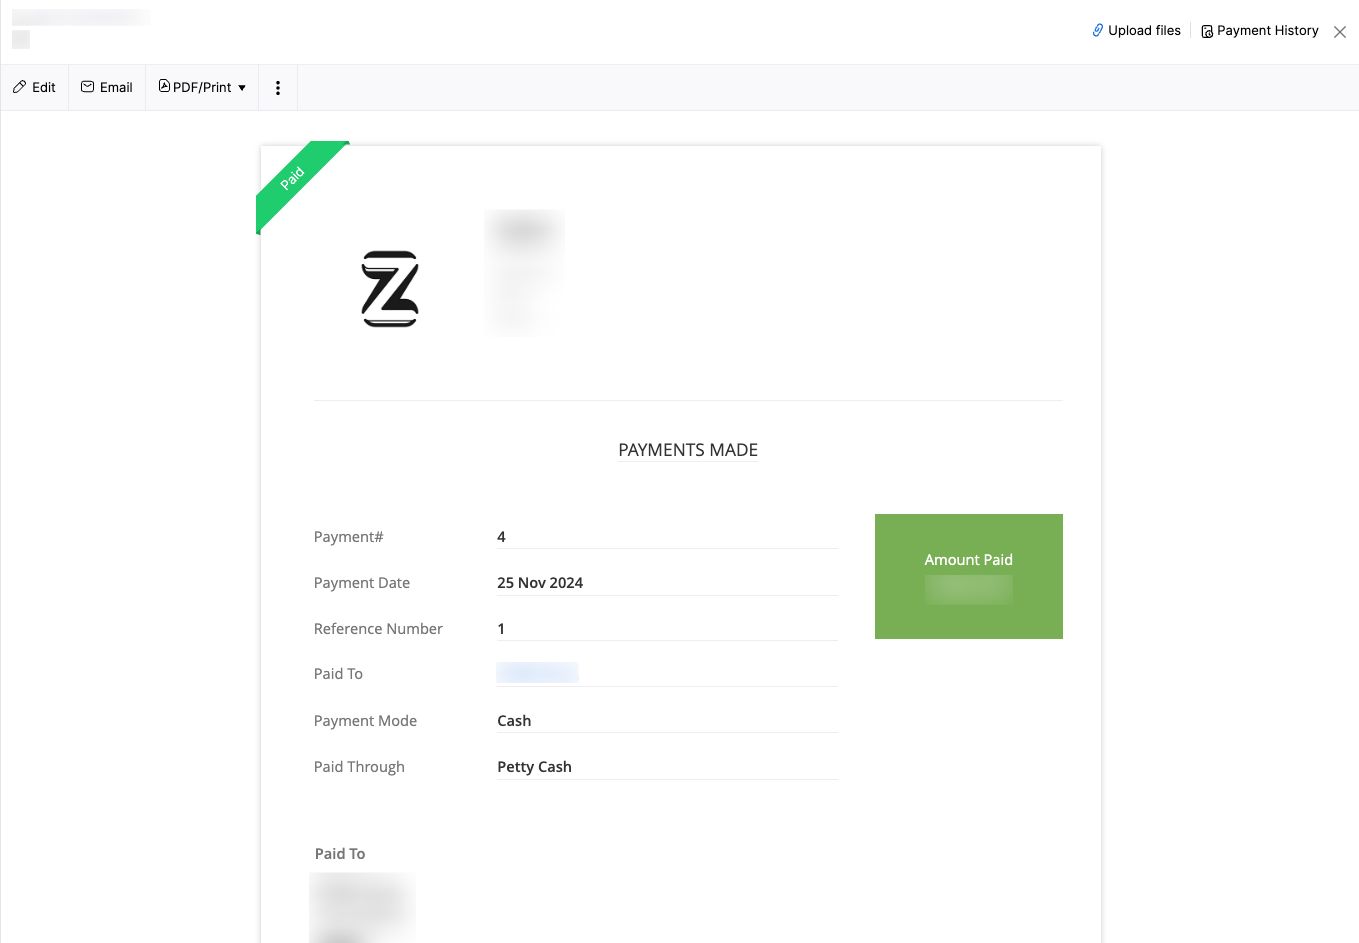
View Payments Made
To view payments already recorded for your vendors:
- Log in to your Zoho Books organization.
- Go to Purchases on the left sidebar, and select Payments Made.
- Choose a payment you want to view.
On the Payment Details page, you can now view the payment information.
Record a Vendor Payment
To record a vendor payment for a vendor:
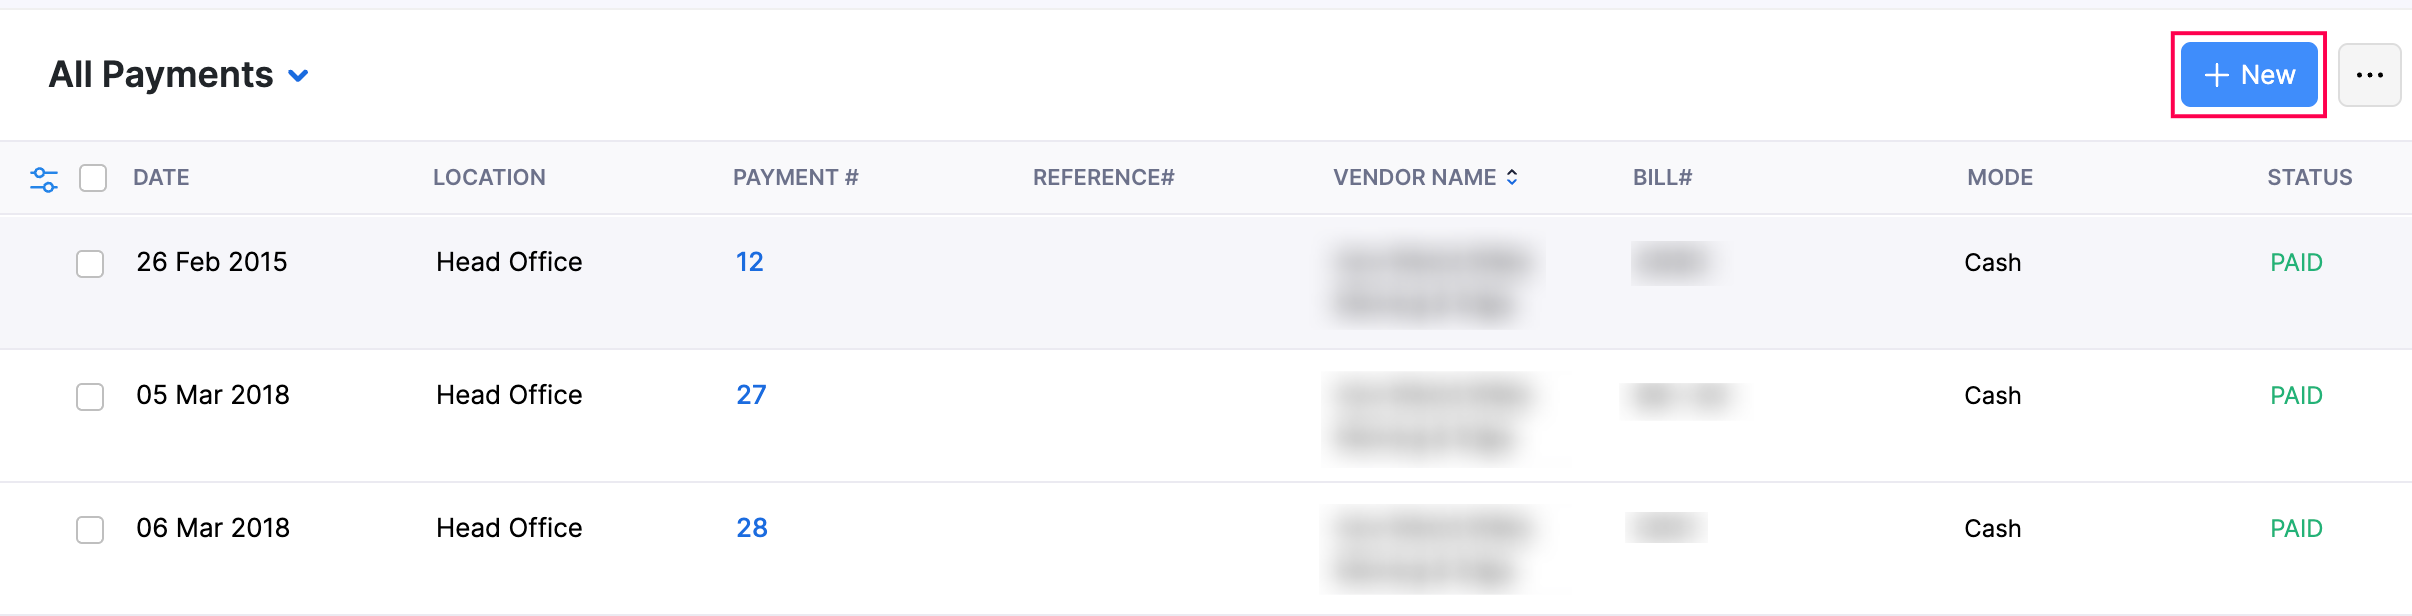
- Go to Purchases on the left sidebar, and select Payments Made.
- Click + New in the top right corner.
- In the Record Payment page, complete the following fields:
Vendor Name: Choose the vendor for this vendor payment.
Branch: If you’ve enabled Branches, choose the branch from the dropdown.
Location: If you’ve enabled Locations choose the location from the dropdown.
Payment#: If you’ve enabled auto-generation of payment numbers, this field will be filled in automatically. To enter it manually:
- Click the Settings icon on the right.

- In the Configure Payment Number Preferences popup, select Add Payment Number manually for this payment.
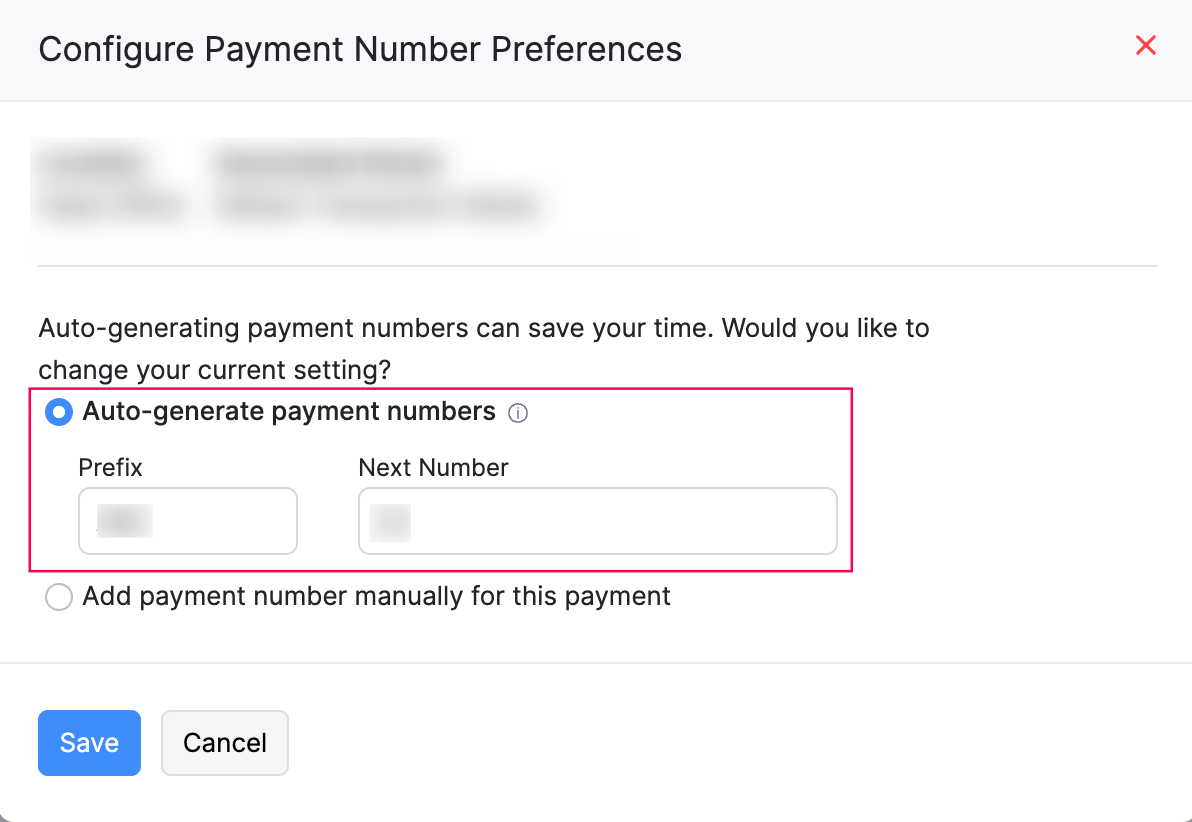
- Enter a prefix and the payment number, and click Save.
Payment Made: Enter the amount you’re paying. A popup will ask if you want to apply this amount to the bill. Click Yes to apply it, or No to record the extra as an excess payment.
Payment Date: Choose the date for the payment.
Payment Mode: Choose the payment mode. Click + Configure Payment Mode from the dropdown to add a new payment mode.
Paid Through: Select the account you used to make the payment.
- In the table below, you can view the unpaid bills. Under the Payments column, enter the amount you want to pay. Click Pay in Full to pay the entire bill.
Note: Click Clear Applied Amount to remove the entered amounts under the Payments column for the displayed vendor bills.
- Notes: Add internal notes if required (not visible to the vendor).
- Attachments: Click Upload File to add supporting documents.
- Click Save to save the payment as a draft, or Save as Paid to immediately mark it as paid.
The payment for the bill will now be recorded.
Import Vendor Payments
Scenario: Zylker Inc is migrating from another accounting system and wants to import all the existing vendor payments in bulk. Using the Import Payments option, Zylker can import all the vendor payments into Zoho Books effortlessly instead of having to add them manually.
If you already have vendor payments stored locally or you’re migrating to Zoho Books from another accounting system, you can easily import them. Here’s how:
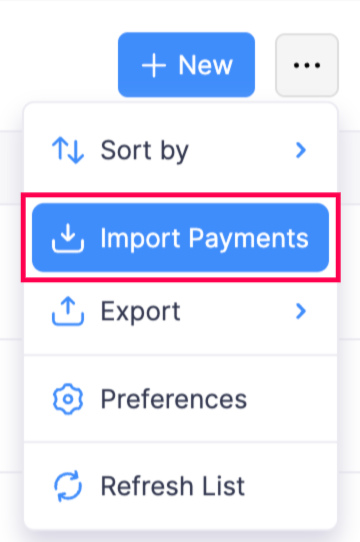
- Go to Purchases on the left sidebar, and select Payments Made.
- Click the More icon in the top right corner and select Import Payments from the dropdown.
- On the Import Bill Payments page, click Choose File to select the file you want to import.
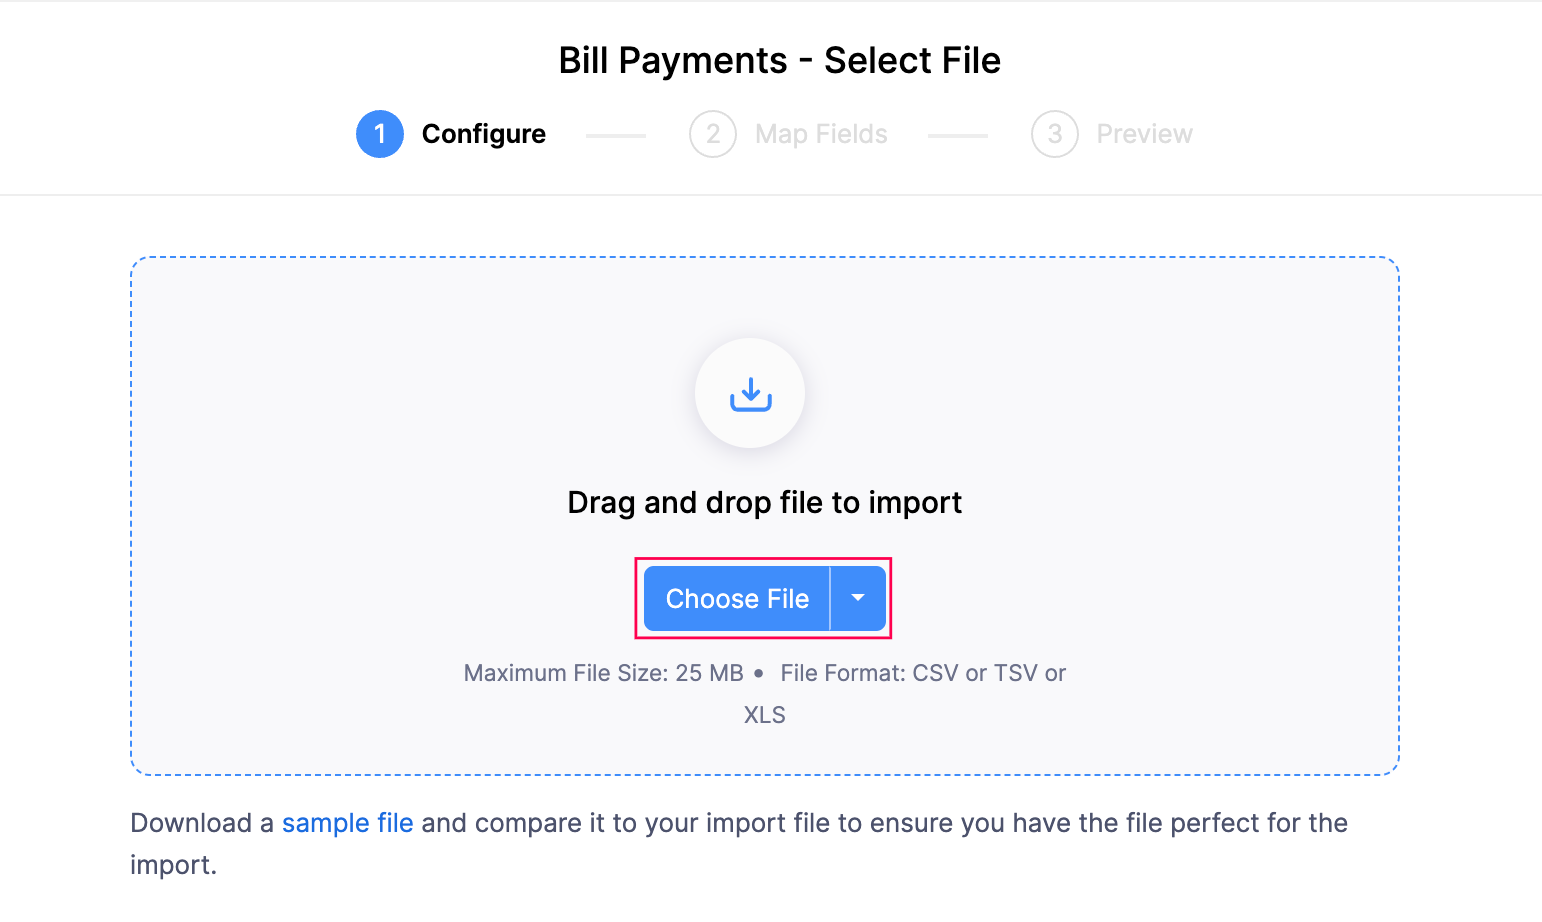
Notes:
- You can only import files in CSV, TSV, and XLS formats.
- The file size must not exceed 10MB.
Pro Tip: You can download the sample file to use as a reference for the required format. If needed, you can enter your data directly in the sample file before importing.
- After you select the file, under the Configure tab, complete the following fields:
- Character Encoding: The default is UTF-8 (Unicode). Ensure you select the correct encoding based on your file.
- File Delimiter: The default is Comma(,). Modify it if required based on the delimiter used in your import file.
- Auto-generate Payment Numbers: Payment numbers will be generated automatically.
Insight: If your file is in a different format, convert it to a supported format (CSV, TSV, or XLSX), using an online or offline converter.
- Click Next >.
- In the Map Fields tab:
- Default Data Formats: The default Decimal Format will be 1234567.89 and the default Date Format is Select format at field level. Click Edit to customize it if needed.

- Map the fields based on your preference. Click Save these selections for use during future imports if you want to reuse the mapped fields for future imports.

- Click Next >.
- In the Preview page, review the fields you’ve mapped, and click Import.
The selected file containing the payments will now be imported into Zoho Books.
Record an Excess Payment for Your Vendor
To record an excess payment for your vendor:
- Go to Purchases on the left sidebar, and select Payments Made.
- Click + New in the top right corner.
- In the Record Payment page, enter the total amount (bill amount + excess amount) in the Payment Made field. When prompted, click Yes to confirm it covers the total of the bills.
- Click Save as Draft or Save as Paid depending on how you want to save the payment.
- In the Excess Payment popup that appears, click the Edit icon to choose where to record the excess payment.
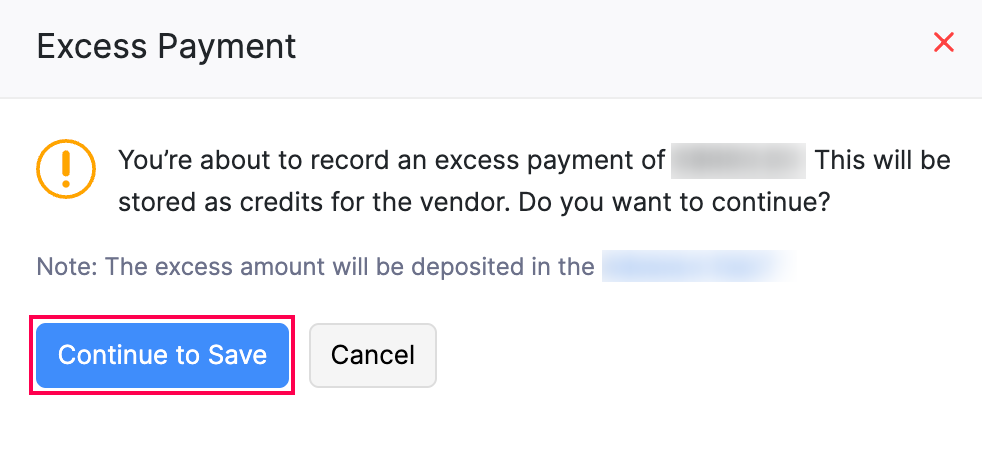
- Click Continue to Save.
The excess payment will now be stored as vendor credits. You can use these credits later to pay future bills of the same vendor. Learn how vendor credits work.
Record a Refund for a Vendor Payment
Prerequisite: You can record a refund only if there’s an unused extra amount recorded for that vendor.
If the vendor refunds part or all of a vendor payment, you can record it in Zoho Books. Here’s how:
- Go to Purchases on the left sidebar, and select Payments Made.
- Choose the vendor payment for which you want to record a refund.
- In the Payment Details page, click the More icon at the top and choose Refund from the dropdown.

- On the Refund page, verify the details. In the To Account field, select the account where you want to record the refund.
- Click Save.
The refund will now be recorded in Zoho Books.
 Yes
No
Yes
No
Thank you for your feedback!