
Creating Expenses
There are various ways to create your expenses. In this help document you will learn how to create expenses using the web and iOS applications in Zoho Expense.
Ways to Record Expenses
You can record expenses in multiple ways using Zoho Expense:
- Upload receipts for autoscan and expenses will be created automatically
- Bulk add expenses
- Create expenses from card statements
- Create per diem expenses
- Create expenses manually
Set Expense Preferences
Before you create an expense, you can set default values for fields you use frequently. These values will be automatically pre-filled every time you create an expense, saving you time and effort.
For example, you might not change the paid through account for your expenses so often. So, selecting the paid through account every time you create an expense can become redundant. You can now set the paid through account for your expenses as the default values while creating an expense.
Note: You can set default values only for the Billable, Tax Inclusive, Personal, and all the custom fields present while creating an expense.
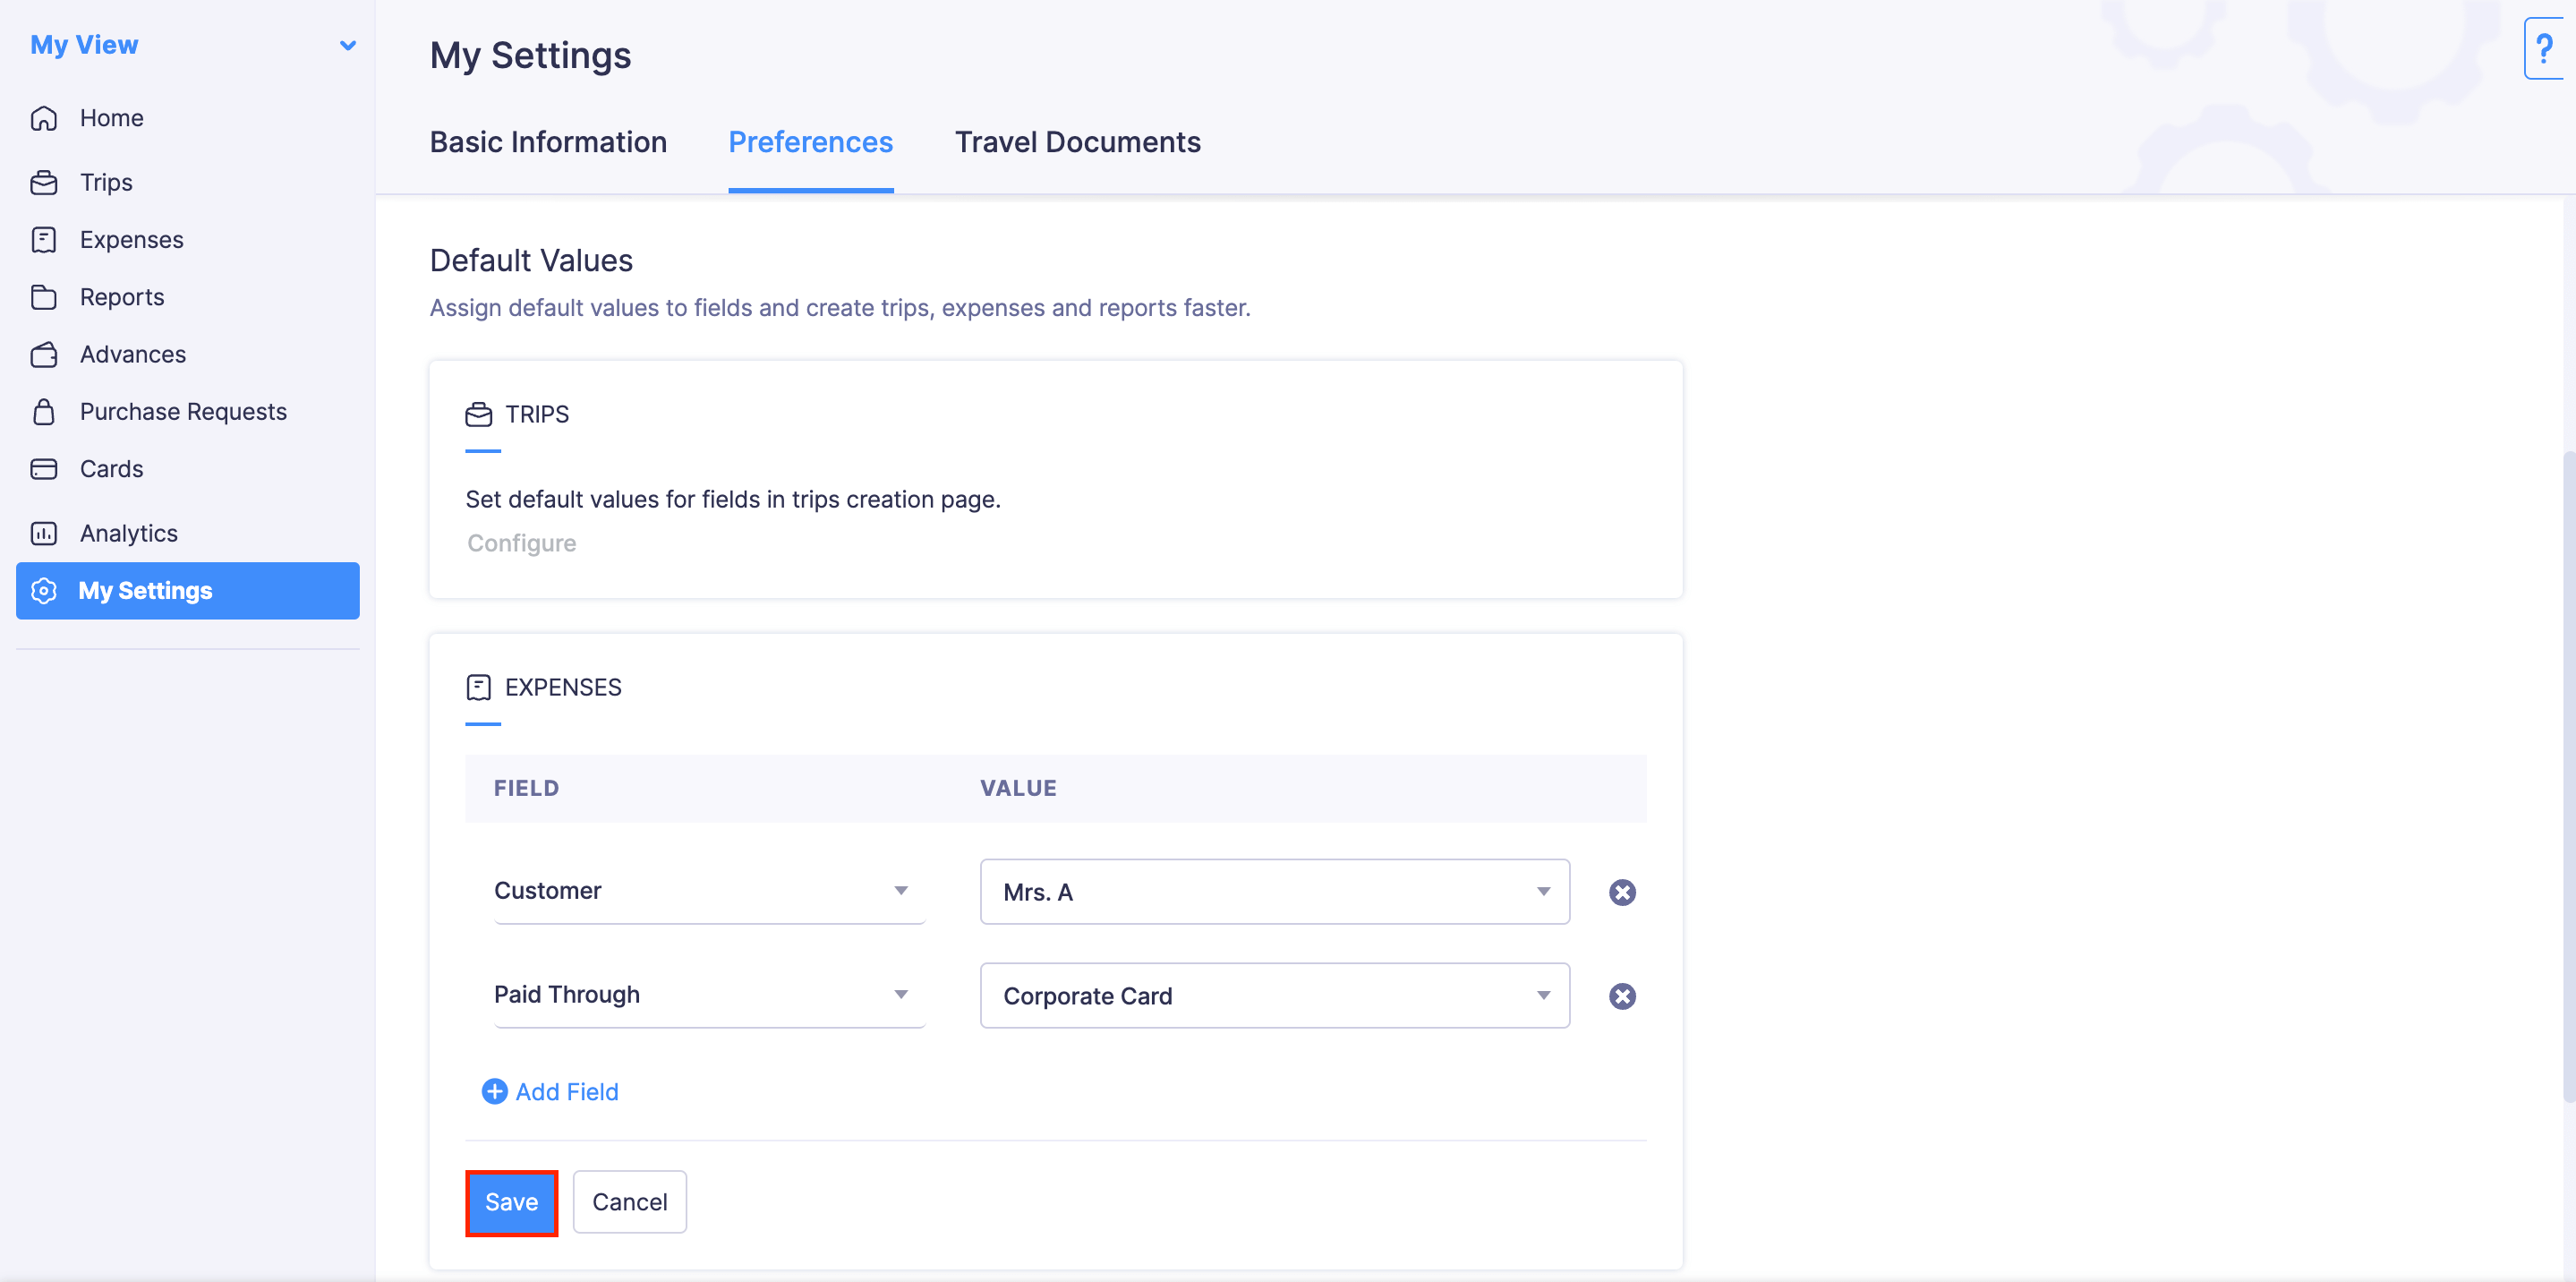
To set default values for your expenses:
- Go to My Settings on the left sidebar.
- Navigate to Preferences tab.
- Click Configure under Expenses.

- Select the fields and enter the values.
- Click Save.
Create Expenses Manually
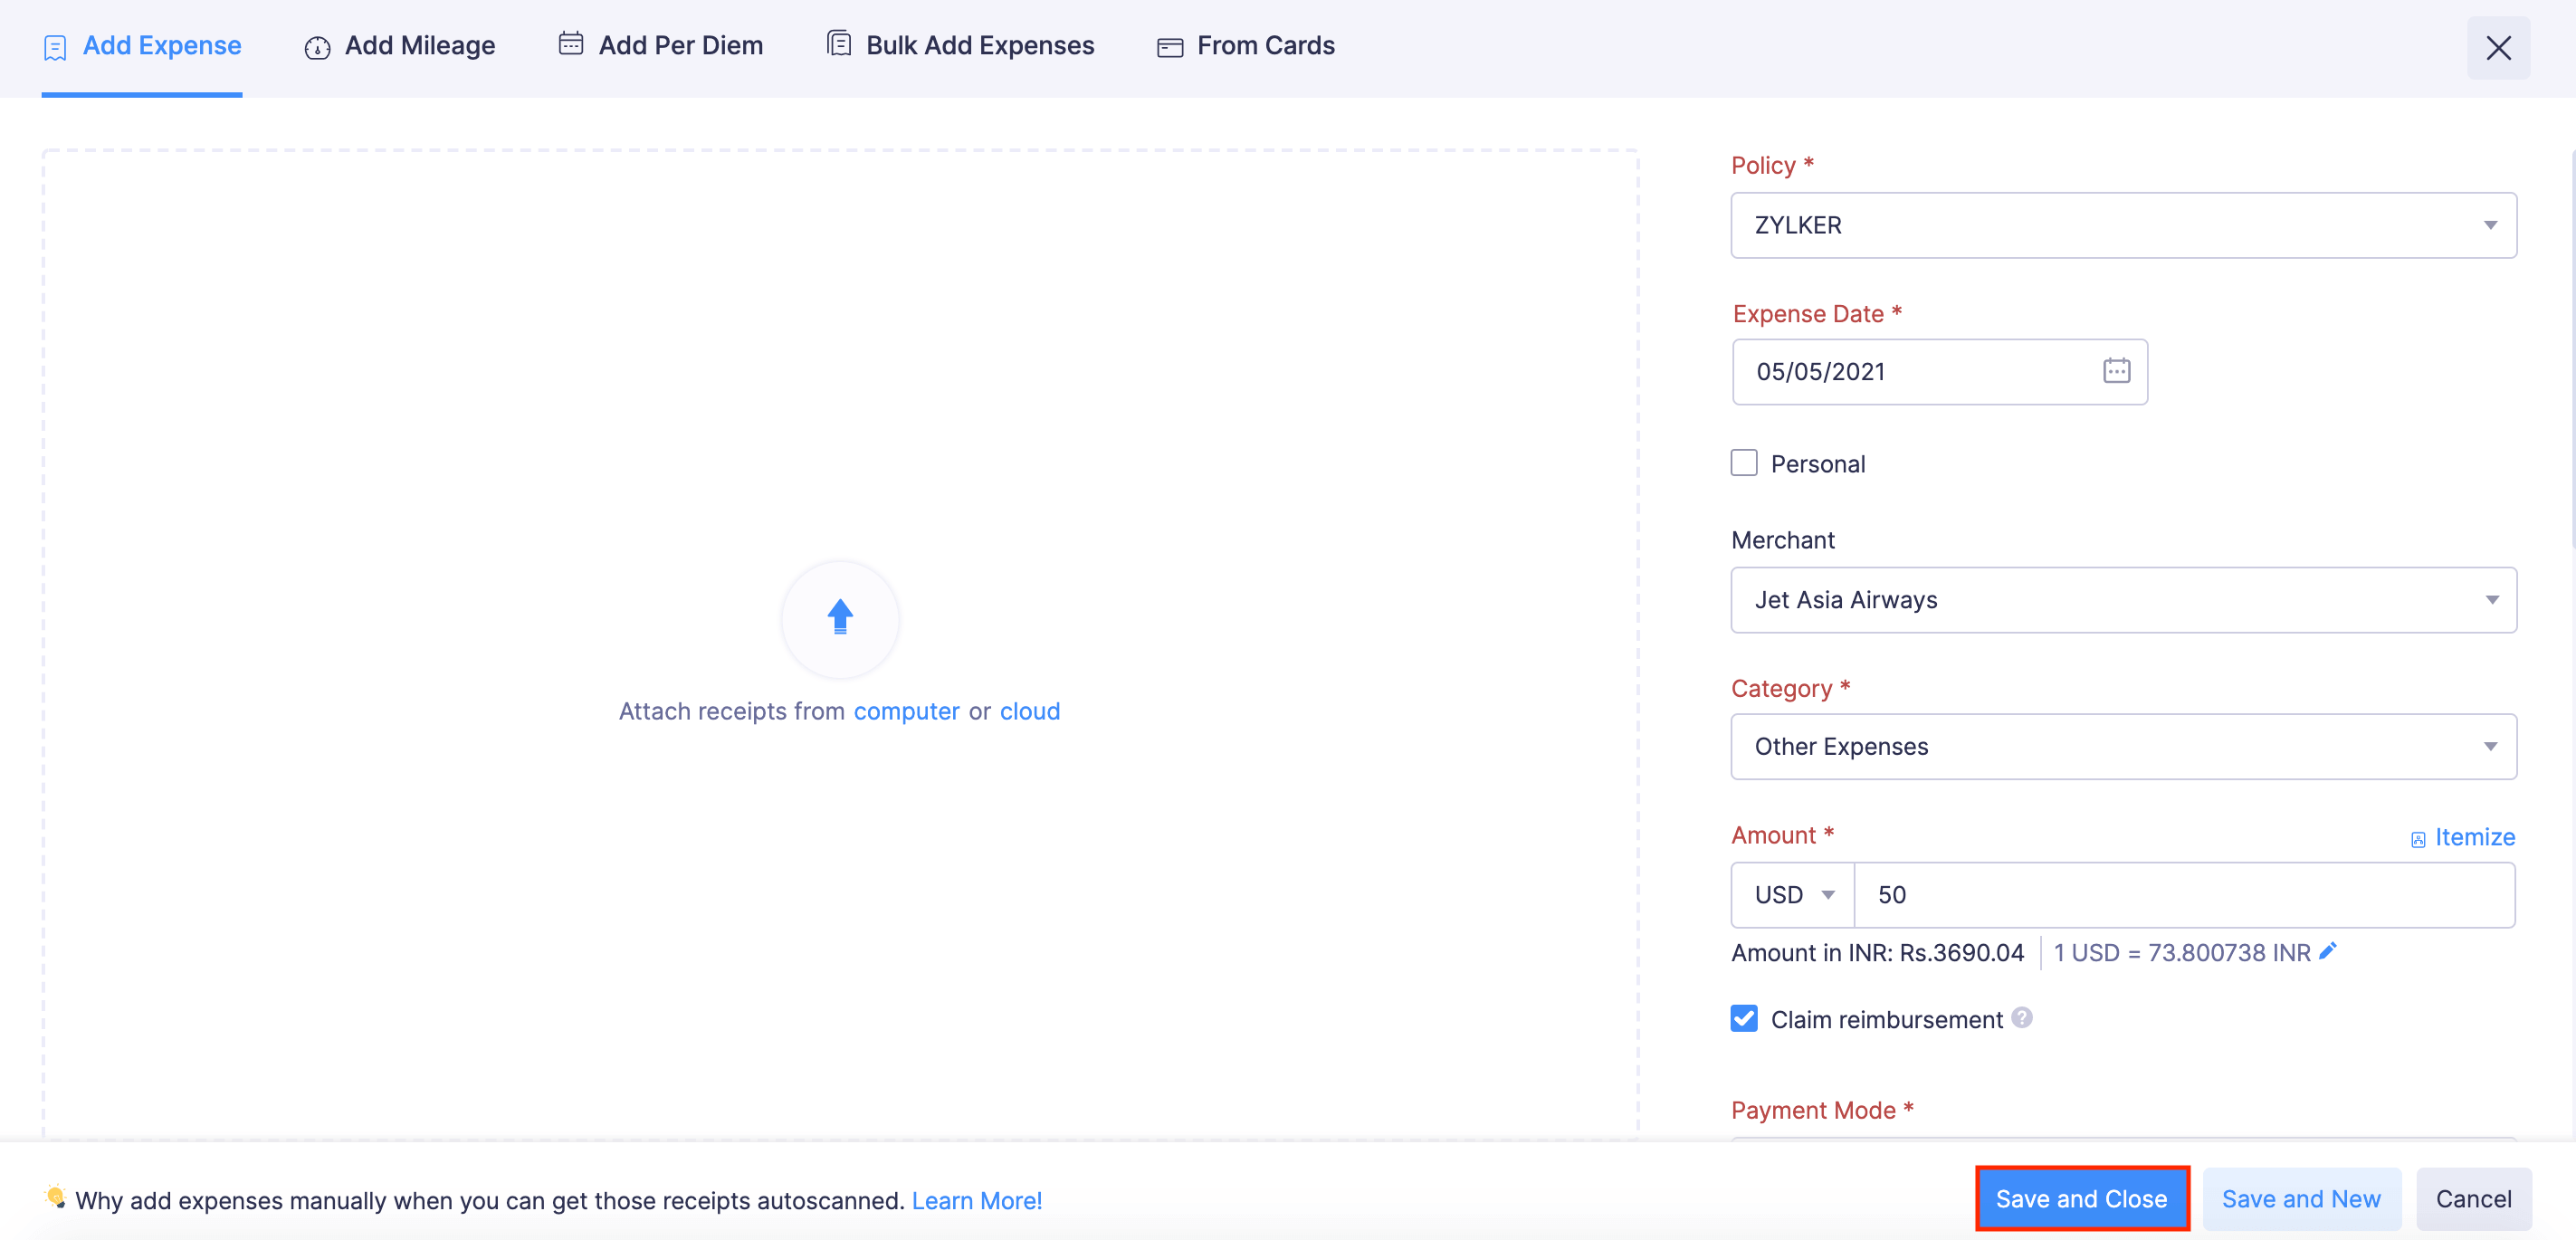
You can create expenses manually in Zoho Expense. To create a new expense:
- Go to the Expenses module on the left sidebar.
- Click + New Expense in the top right corner.
(OR)
Click the icon next to the Expenses section on the left sidebar. - Fill in details such as Date, Category, Amount, etc.
- Upload receipts, if necessary.
- Mark the Personal option if you’ve incurred a personal expense.
- Check the Claim Reimbursement option if the expense involves spending from your pocket.
- Mark the Billable option if you want to bill your expenses to your customers.
- Choose the customer you want to bill from the Customer dropdown.
- Select a report from the Add to Report dropdown to add this expense to an existing report or add to a new report.
- You can include employees or contact persons to your expense from the Attendees dropdown.
- You can also associate tags to your expenses. Select the tag you want to associate with your expense, from the Tags dropdown.
- Click Save and Close to save your expense.
(OR)
Click Save and New to save and create a new expense.
Upload or Drag-drop Receipts
Once you upload or drag and drop a receipt in Zoho Expense, you can convert it into an expense. To do this:
- Go to the Expenses module on the left sidebar.
- Click the View button on the top of the page to view the receipts that haven’t been converted into expenses yet.
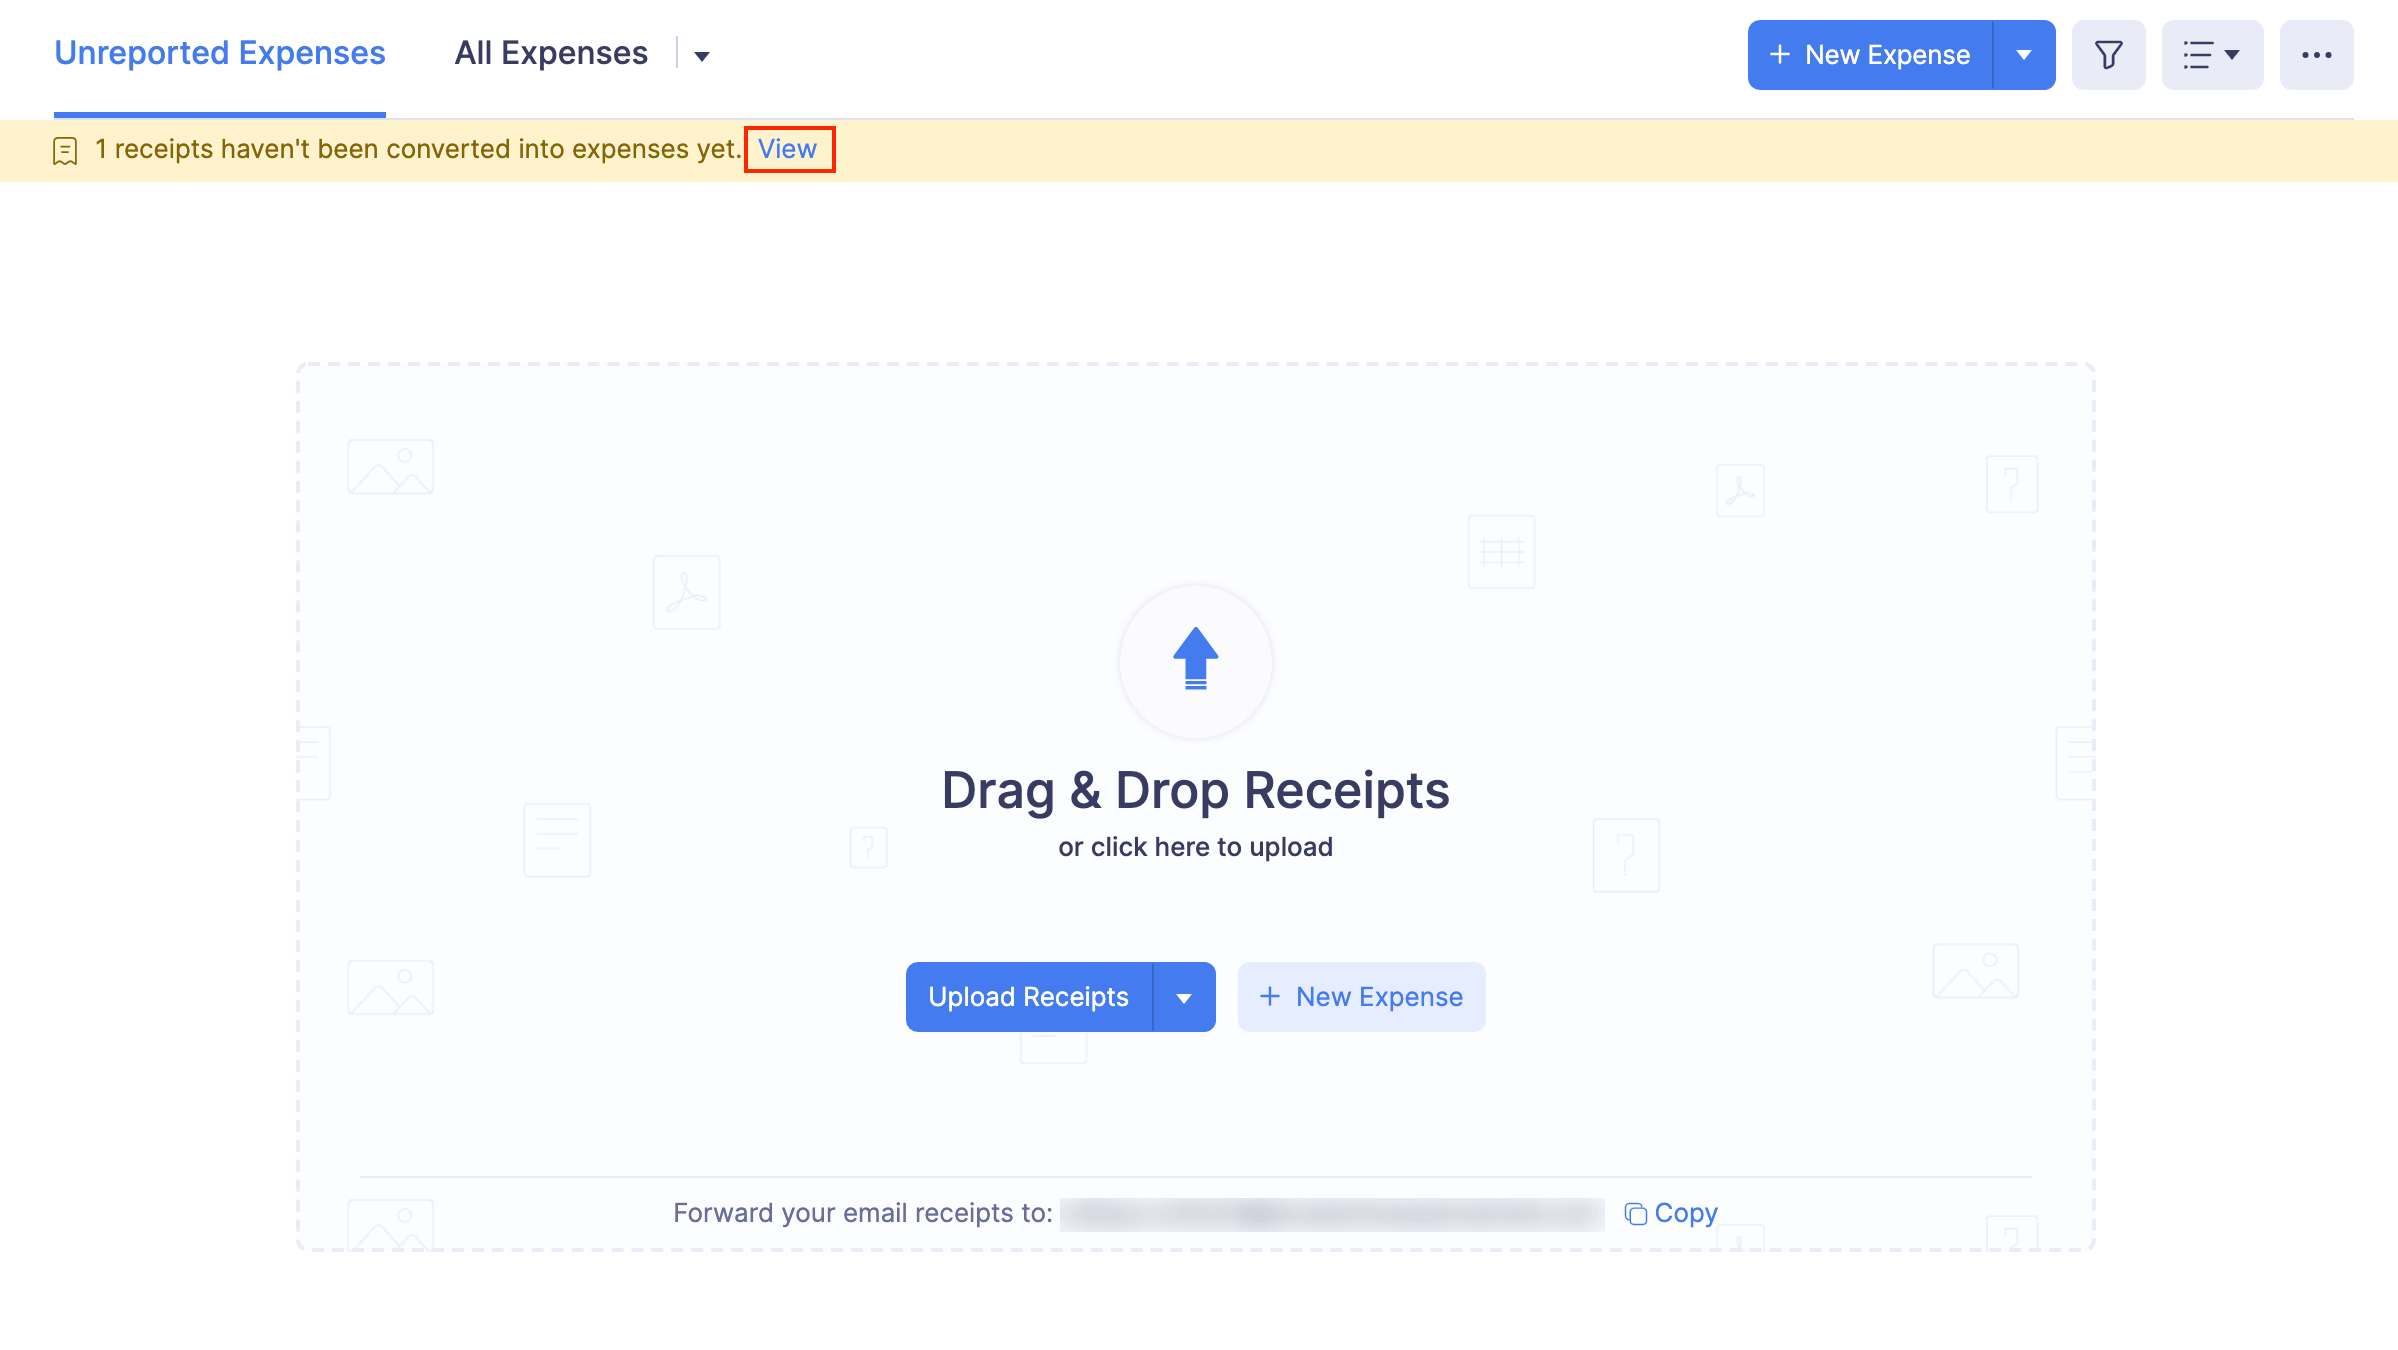
- Click Add Manually in the receipt you want to convert to an expense.
- Enter the expense details like date, category, amount, etc.,
- Click Save and Close and an expense will be created for the receipt.
(OR)
Click Save and Next, if you want to convert the next receipt into an expense.
Record Per diem Expenses
Per diem is a daily allowance that an organization provides to an employee while they travel for work. Employees can create per diem expenses for individual days or for an entire trip.
To record per diem expenses:
Click the + icon next to Expenses on the left sidebar and navigate to the Add Per Diem tab.
(Or)
Go to Expenses and select Add Per Diem from the + New Expense dropdown at the top right corner.
If you want to associate the per diem expense to a report, select a report from the Add to Report dropdown or add to a new report.
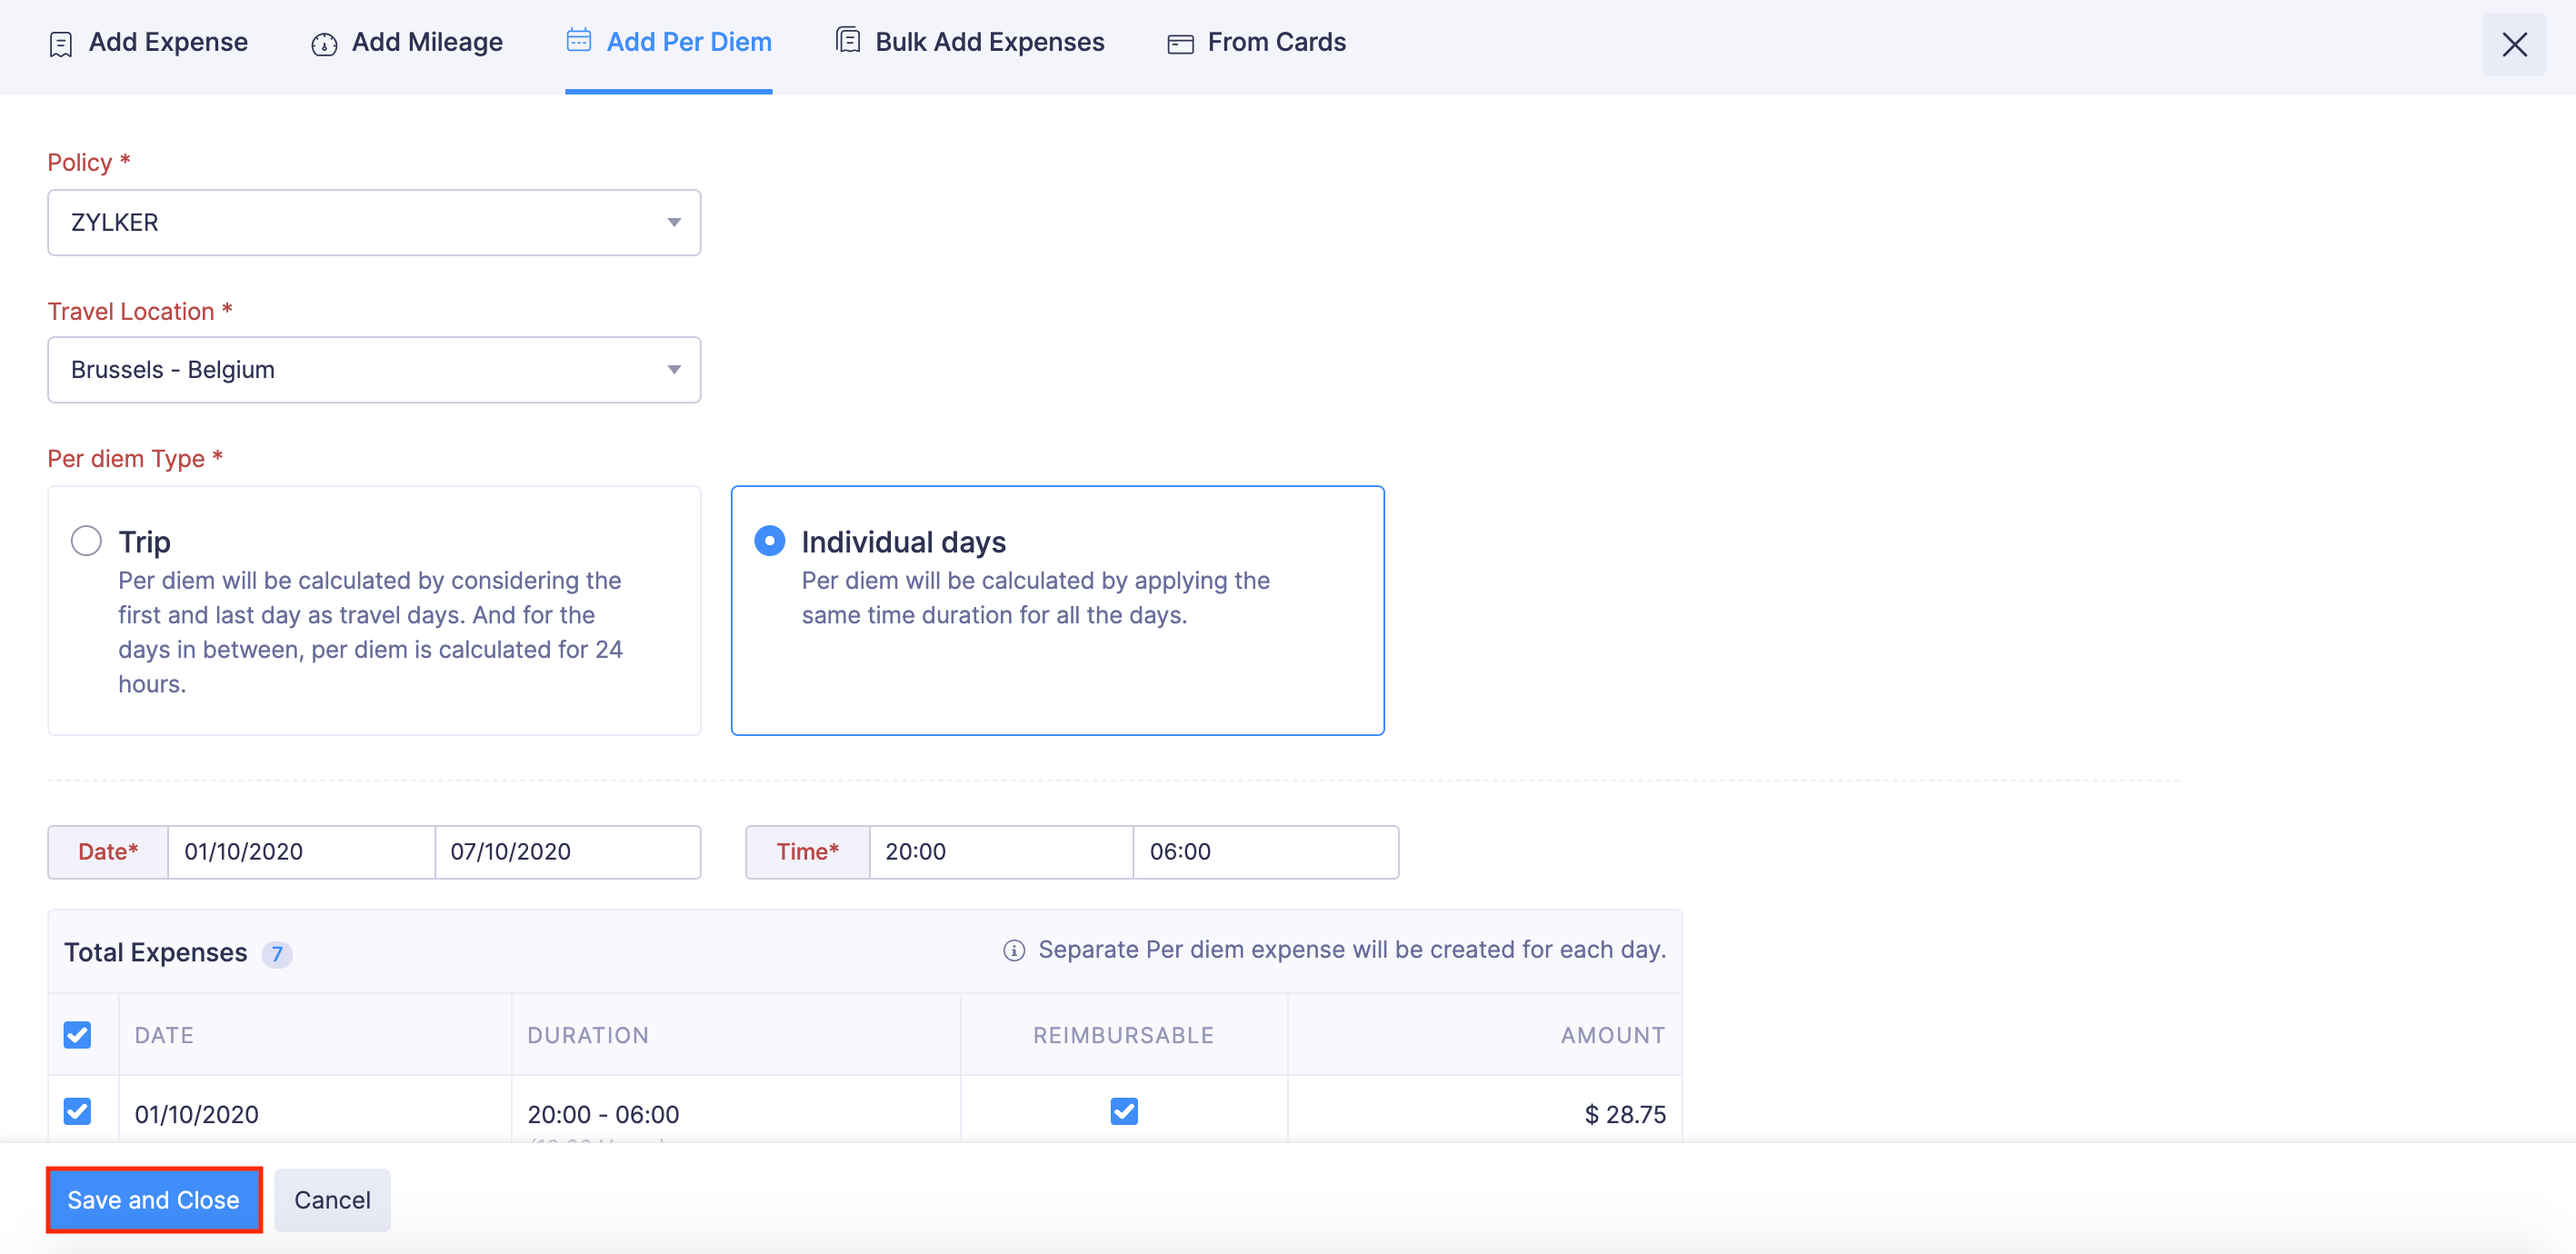
Select a policy from the Policy dropdown.
Choose a per diem type. There are two types of per diem:
- Trips
- Individual Days
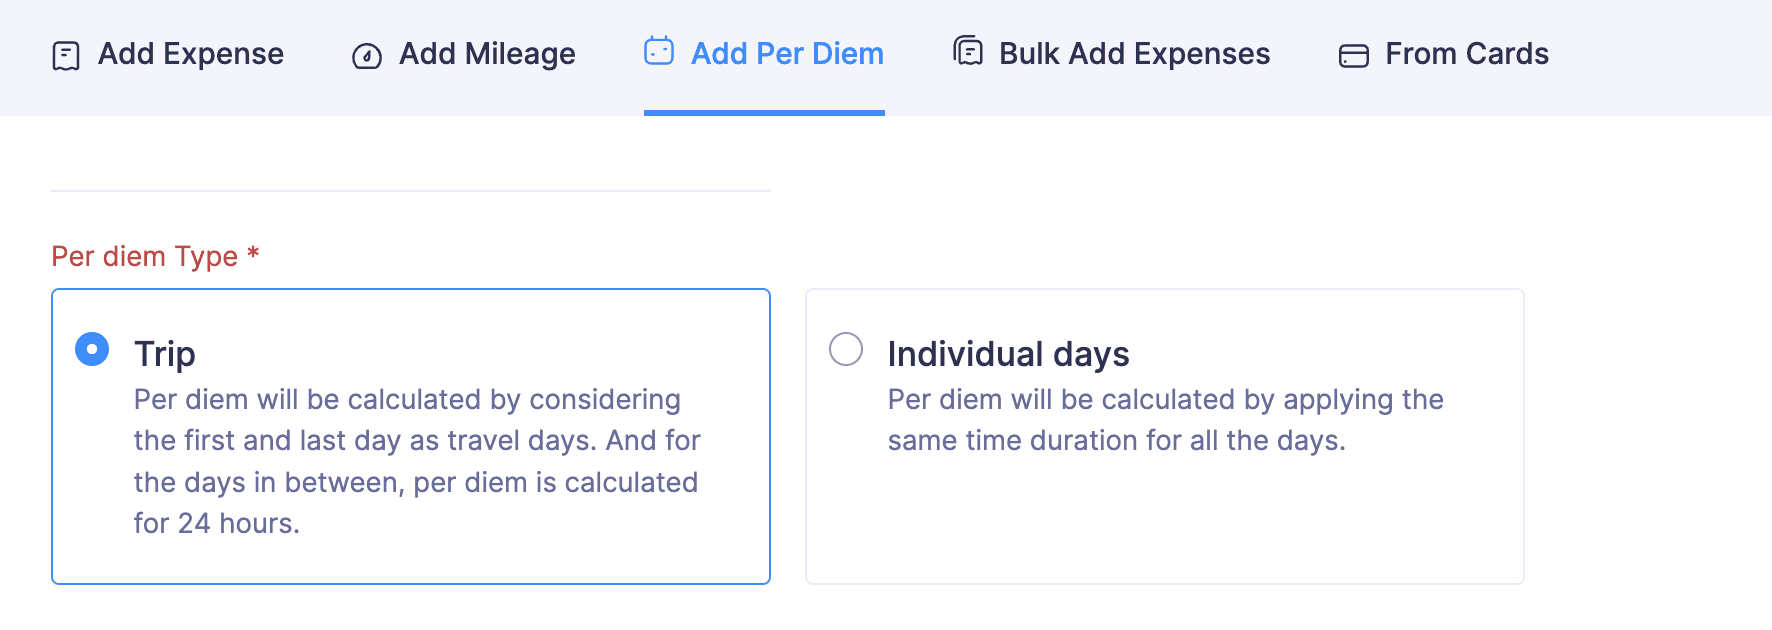
Trip: If you want to calculate per diem for the entire trip, select the per diem type as Trip. For instance, if you record per diem for a duration from 09:00 to 17:00 hours from 14 January to 17 January, then per diem expense for 14 January will be calculated from the start time (09:00 hours) to the end of the day (23:59 hours). Similarly for 17 January, the duration will be calculated from the beginning of the day (00:00) to the end time (17:00). For all other days, the duration will be considered as 24 hours.
Individual Days: If you want to calculate per diem for each day, select the per diem type as Individual Days. For instance, if you record per diem for a duration from 09:00 to 17:00 hours from 14 January to 17 January, then per diem will be calculated for eight hours each day.
If you choose to create per diem expenses based on Trip
- Enter your Departure Location, Date, and Time.
- Similarly, enter the Arrival Location, Date, and Time.
- Click Calculate Per Diem. Per diem will be calculated based on the rules configured by your admin by including all the hours from the start time on the first travel day to the end time on the last travel day. For the days in between, per diem is calculated for 24 hours.
- In the page that opens, mark the checkboxes of the per diem rates that you want to record, and click Save and Close.
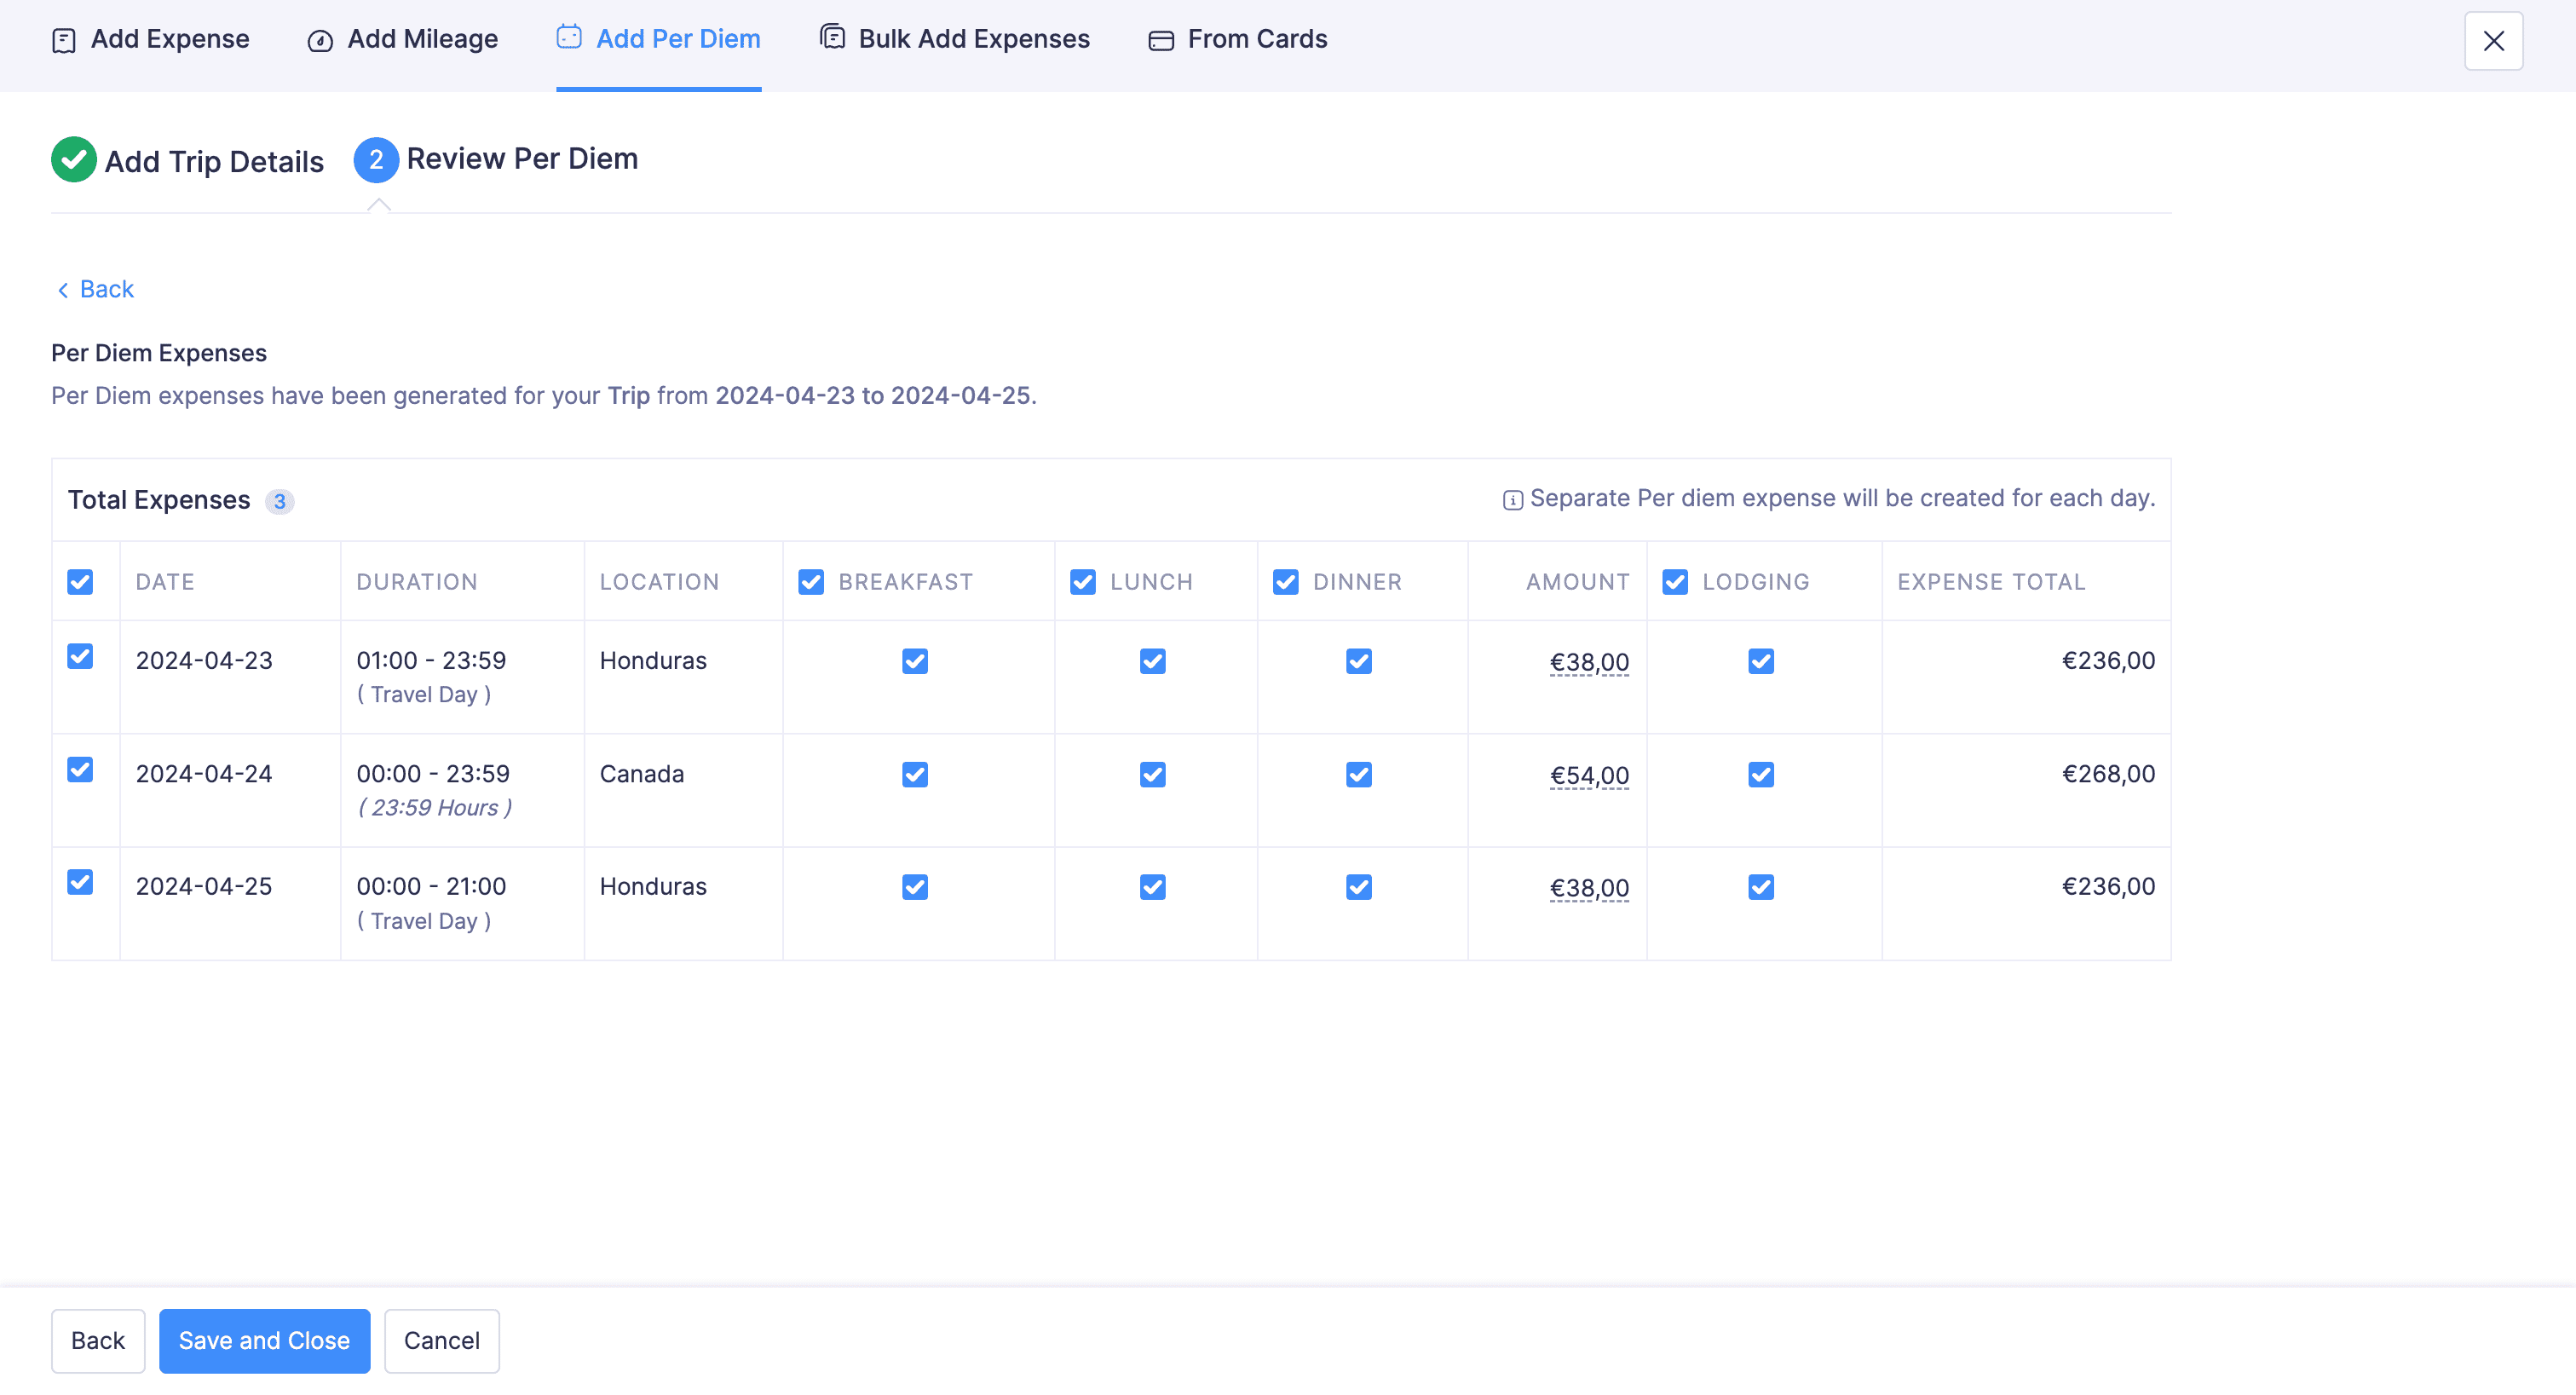
Note: For your first and last travel days, your departure or arrival location will be used as the per diem locations as configured by your admin.
If you choose to create per diem expenses based on Individual Days
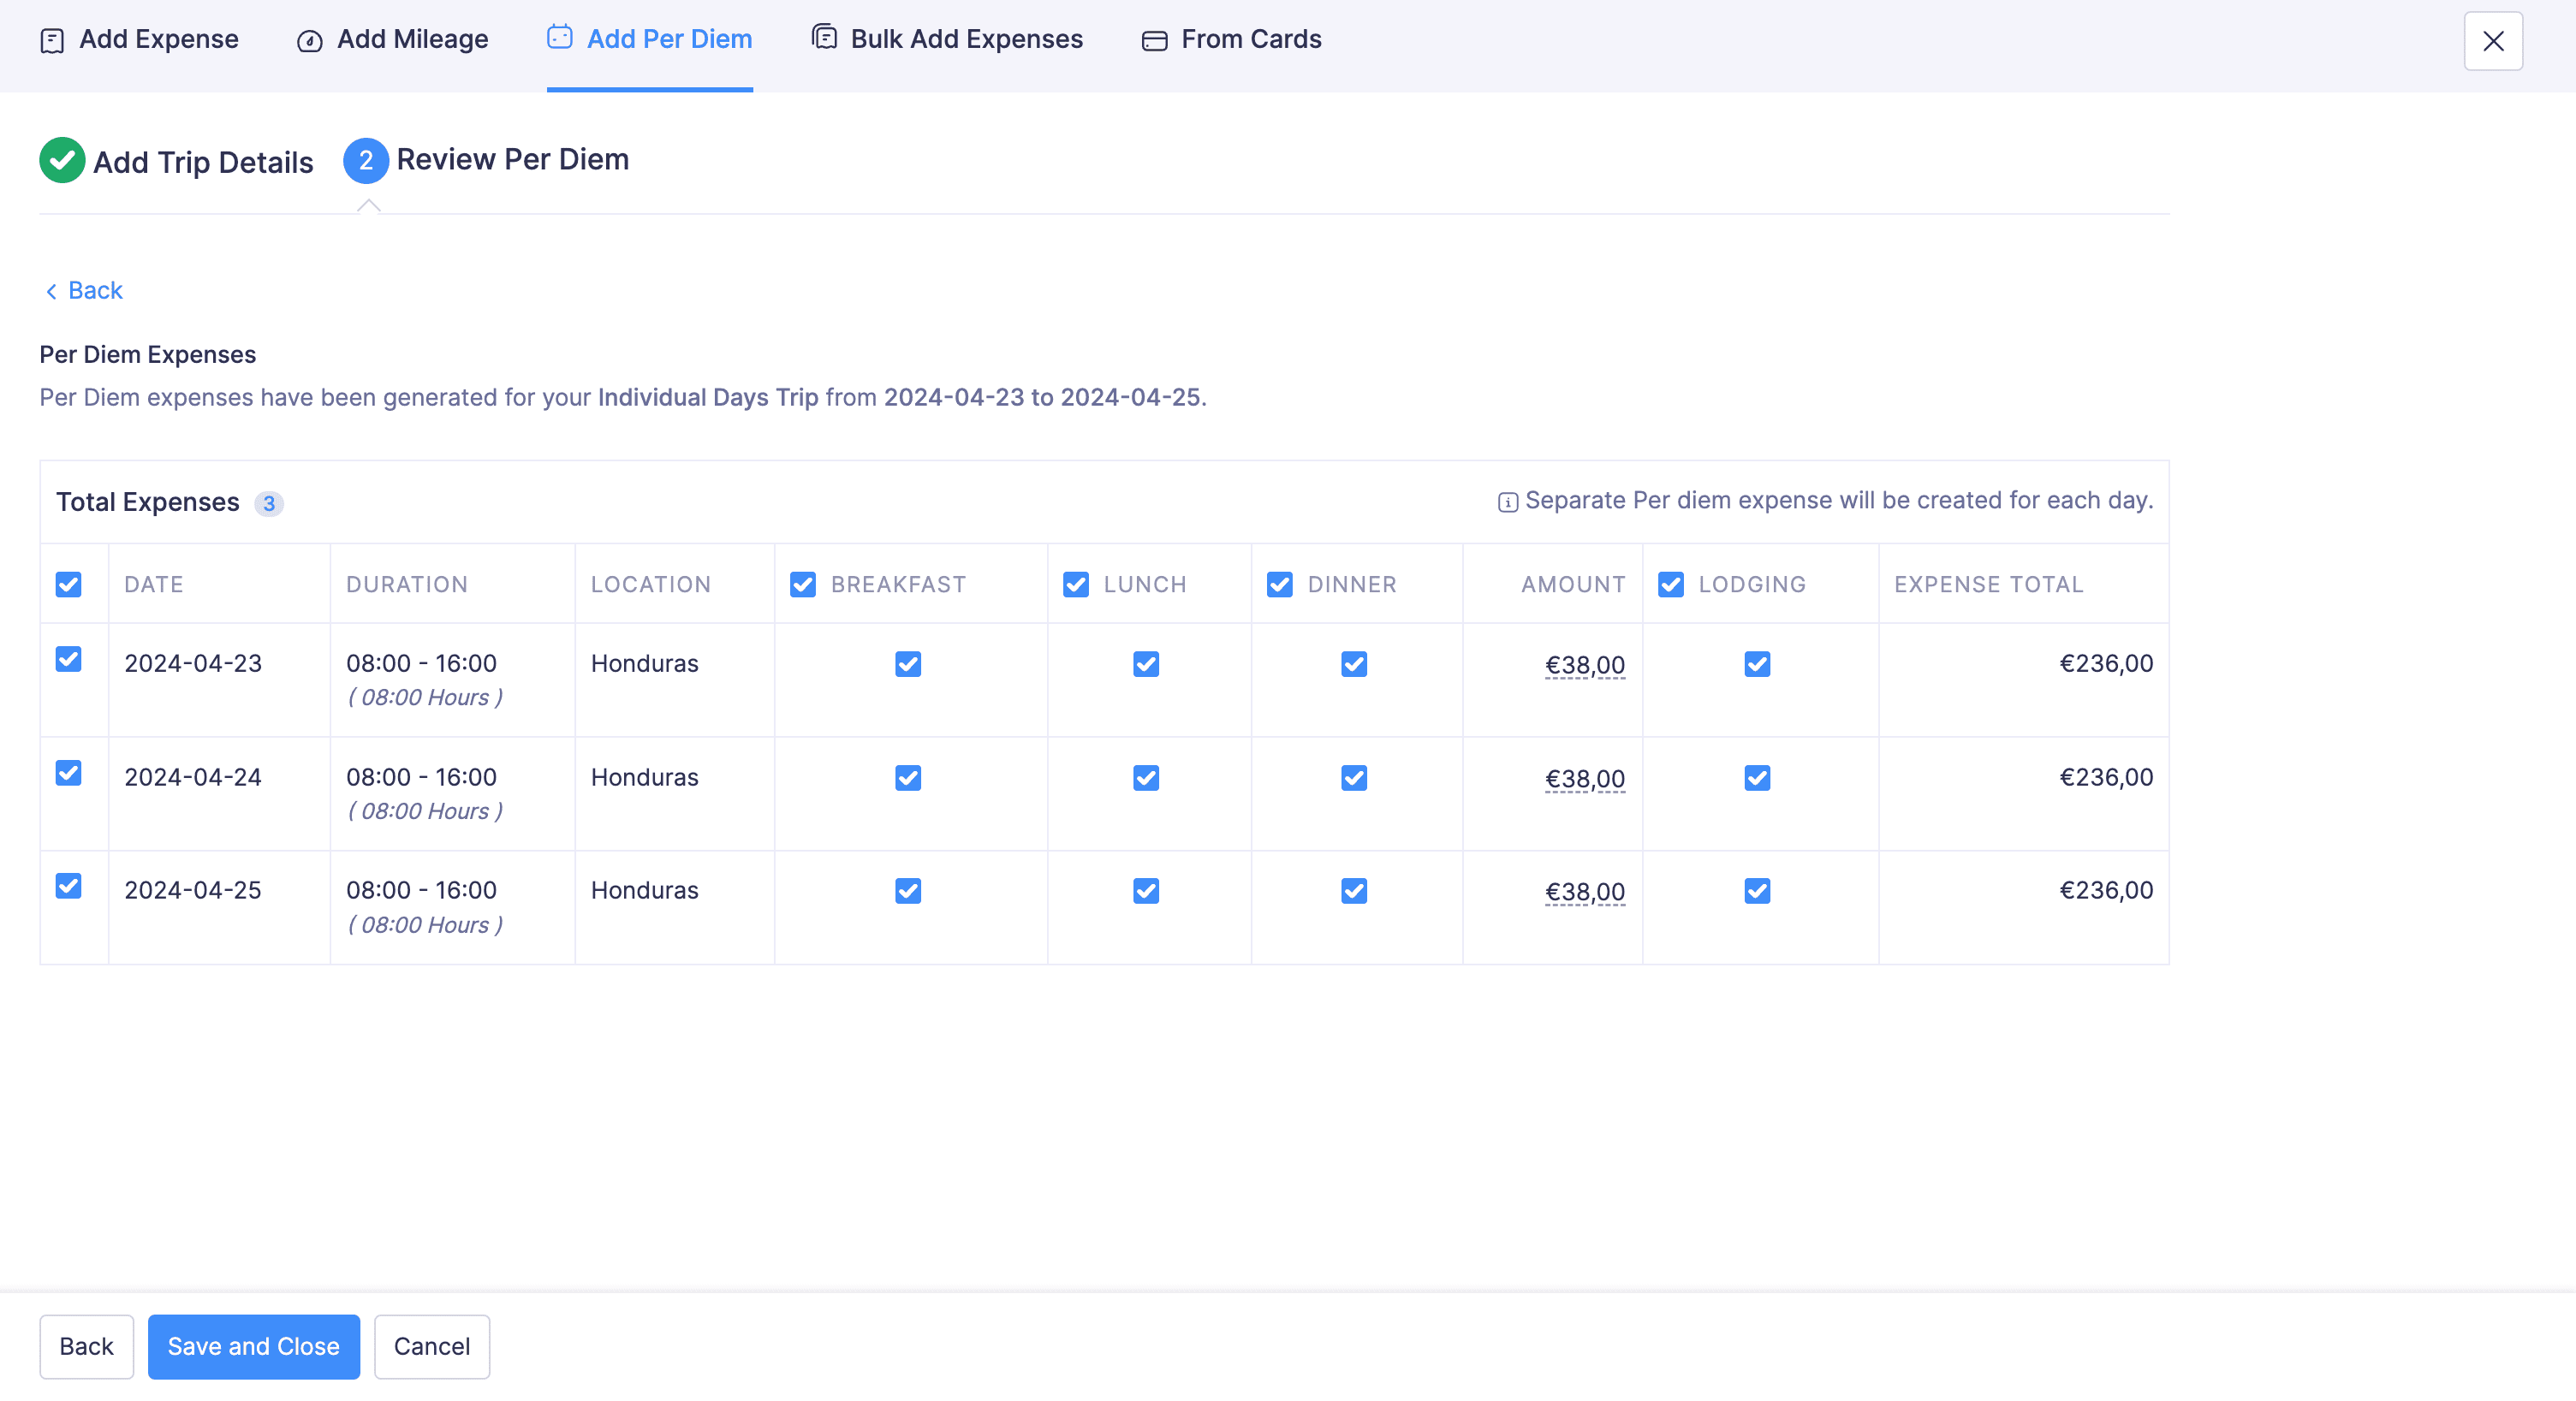
- Select the Travel Location from the dropdown.
- Choose the first and last dates of visit.
- Enter the daily start and end time.
- Click Calculate Per Diem.
- In the page that opens, the per diem rates calculated for each day of your trip will be displayed. These rates are calculated by applying the same time duration for all the days based on the per diem rates configured.
- Mark the checkboxes of the per diem rates that you want to record, and click Save and Close.
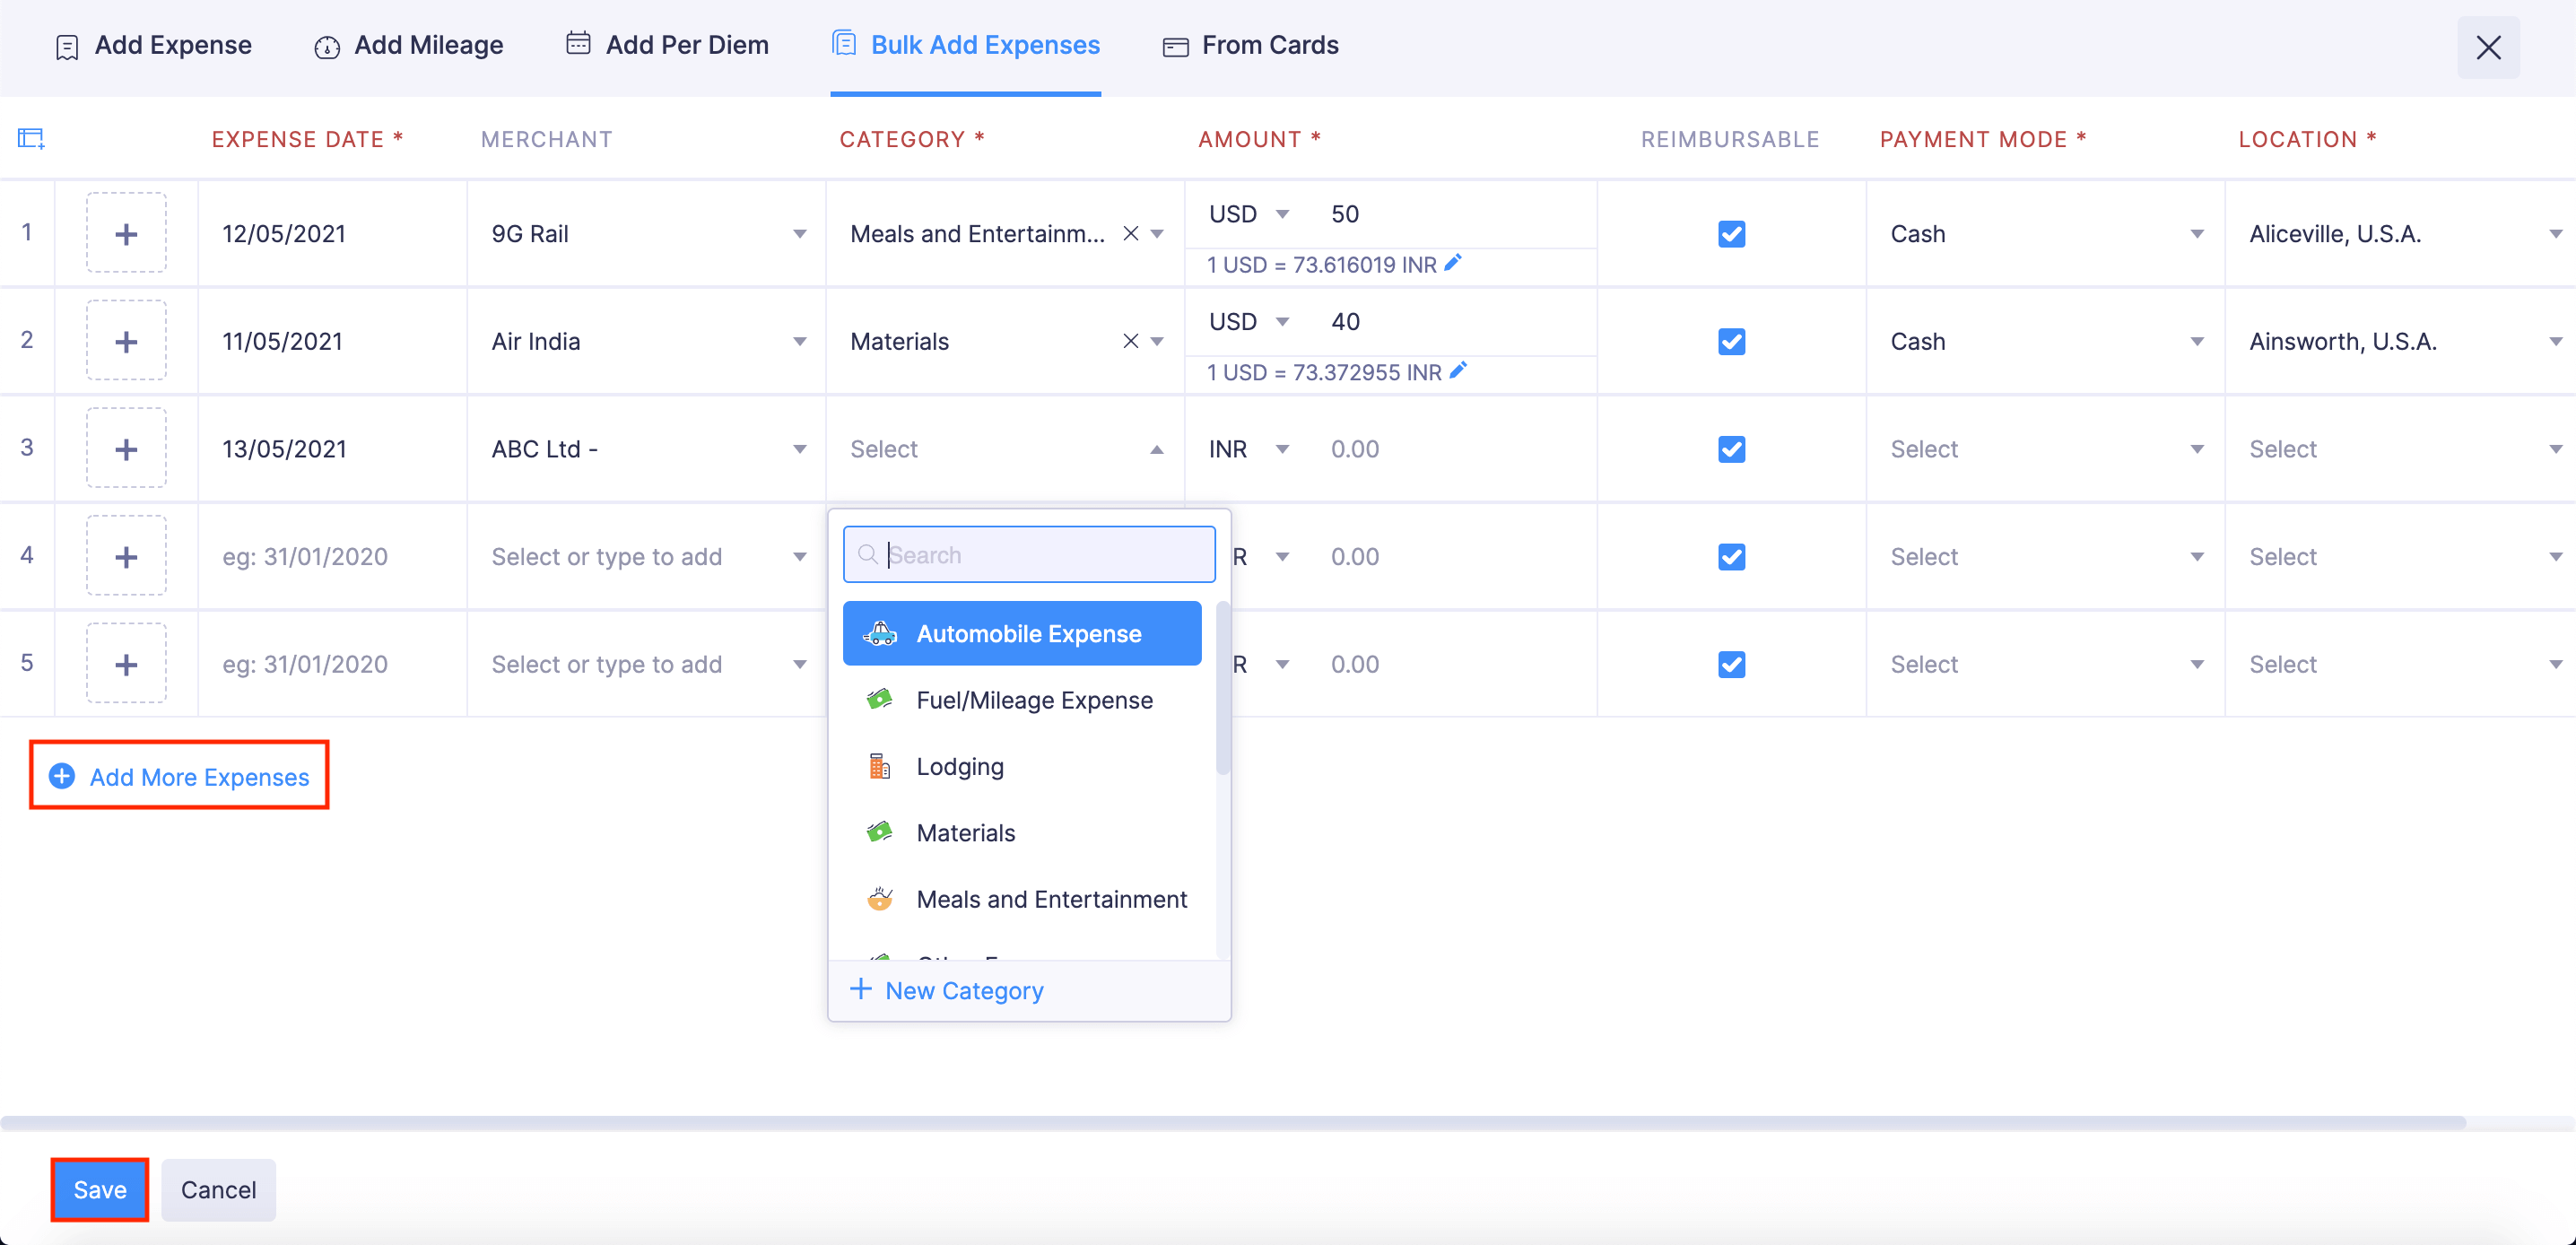
Bulk Add Expenses
To add expenses in bulk:
- Click the icon next to Expenses on the left sidebar and navigate to Bulk Add Expenses tab.
- Enter relevant information such as date, category, amount, etc.,
- Click + to attach receipts, if necessary.
- Check the Reimbursable option if your expenses are reimbursable.
- If you want to add more expenses, click + Add More Expenses and enter the expense details.
- After entering the details of all the expenses, click Save.
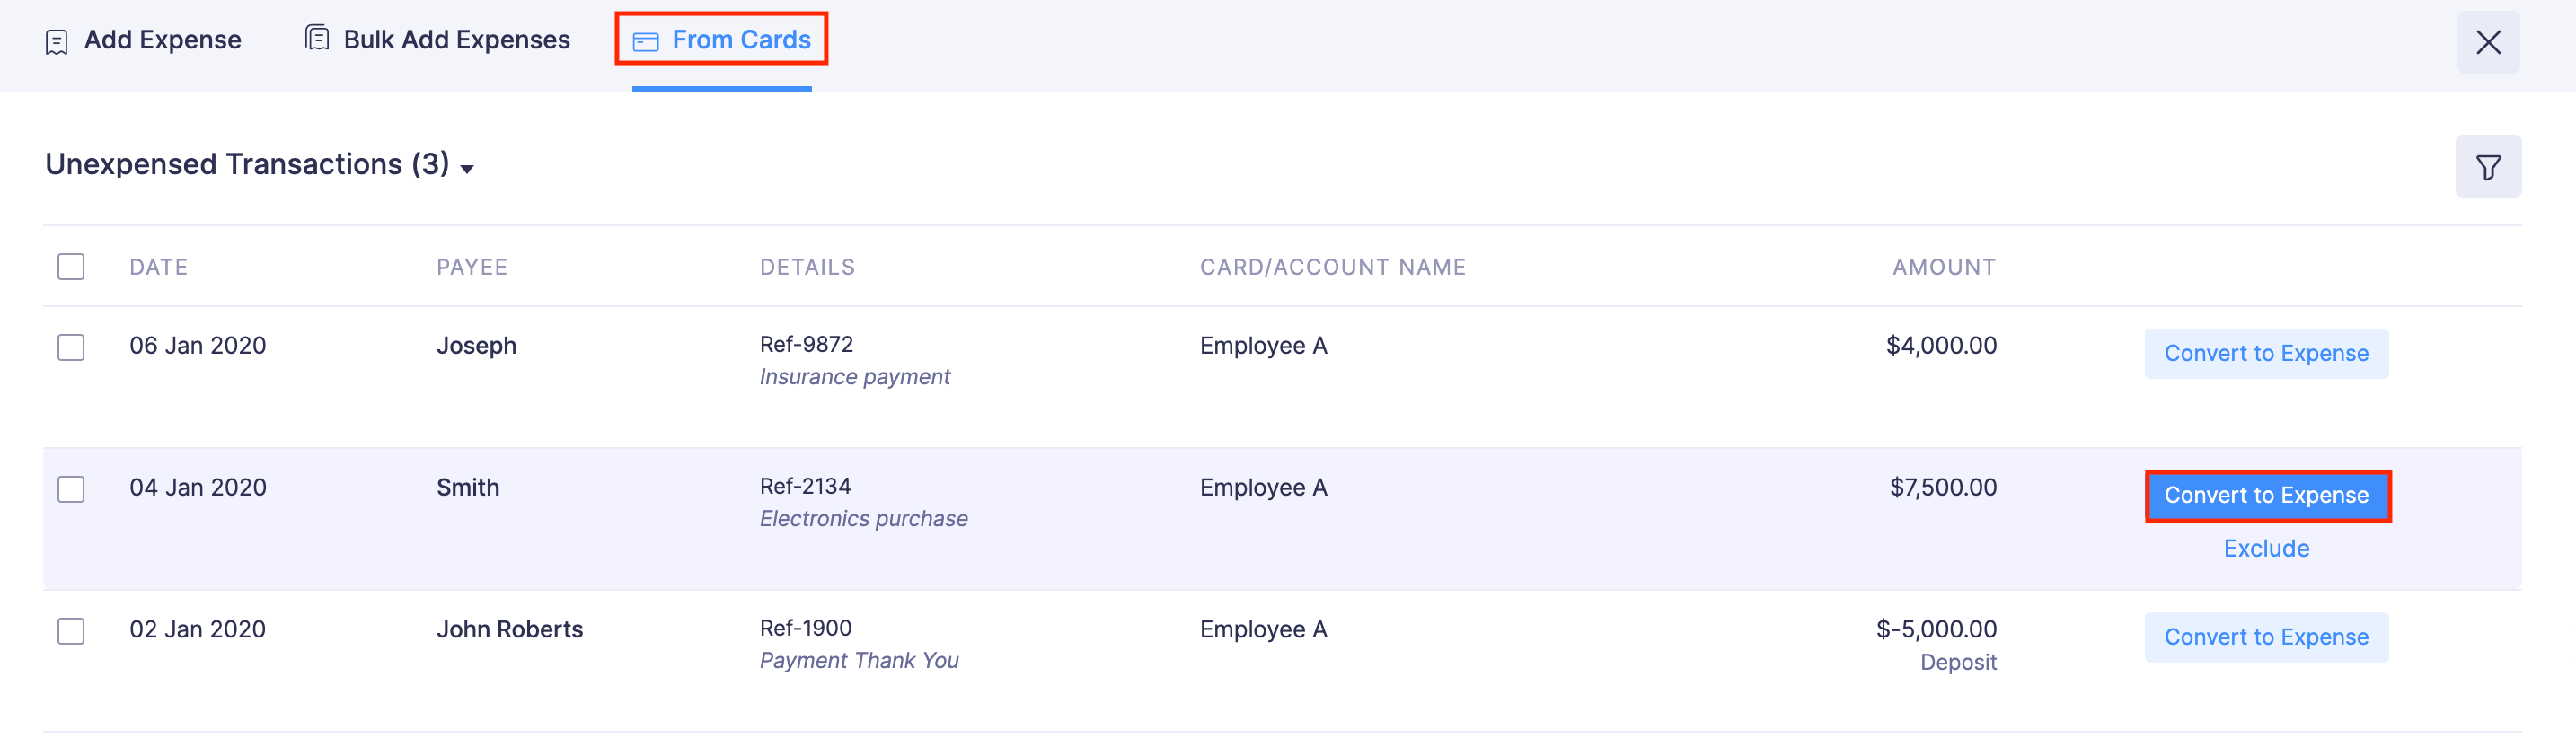
Create Expenses from Card Statements
If the admin has enabled auto-matching/creation of corporate card expenses under Expense Preferences, expenses will be automatically created for corporate card transactions. Otherwise, the users can create expenses from their card transactions manually.
Prerequisites:
- The corporate card expenses that are created will be non-reimbursable.
- While creating expenses from the card transactions, you cannot modify the expense amount.
To create expenses from a card transaction manually:
- Click the icon next to Expenses on the left sidebar.
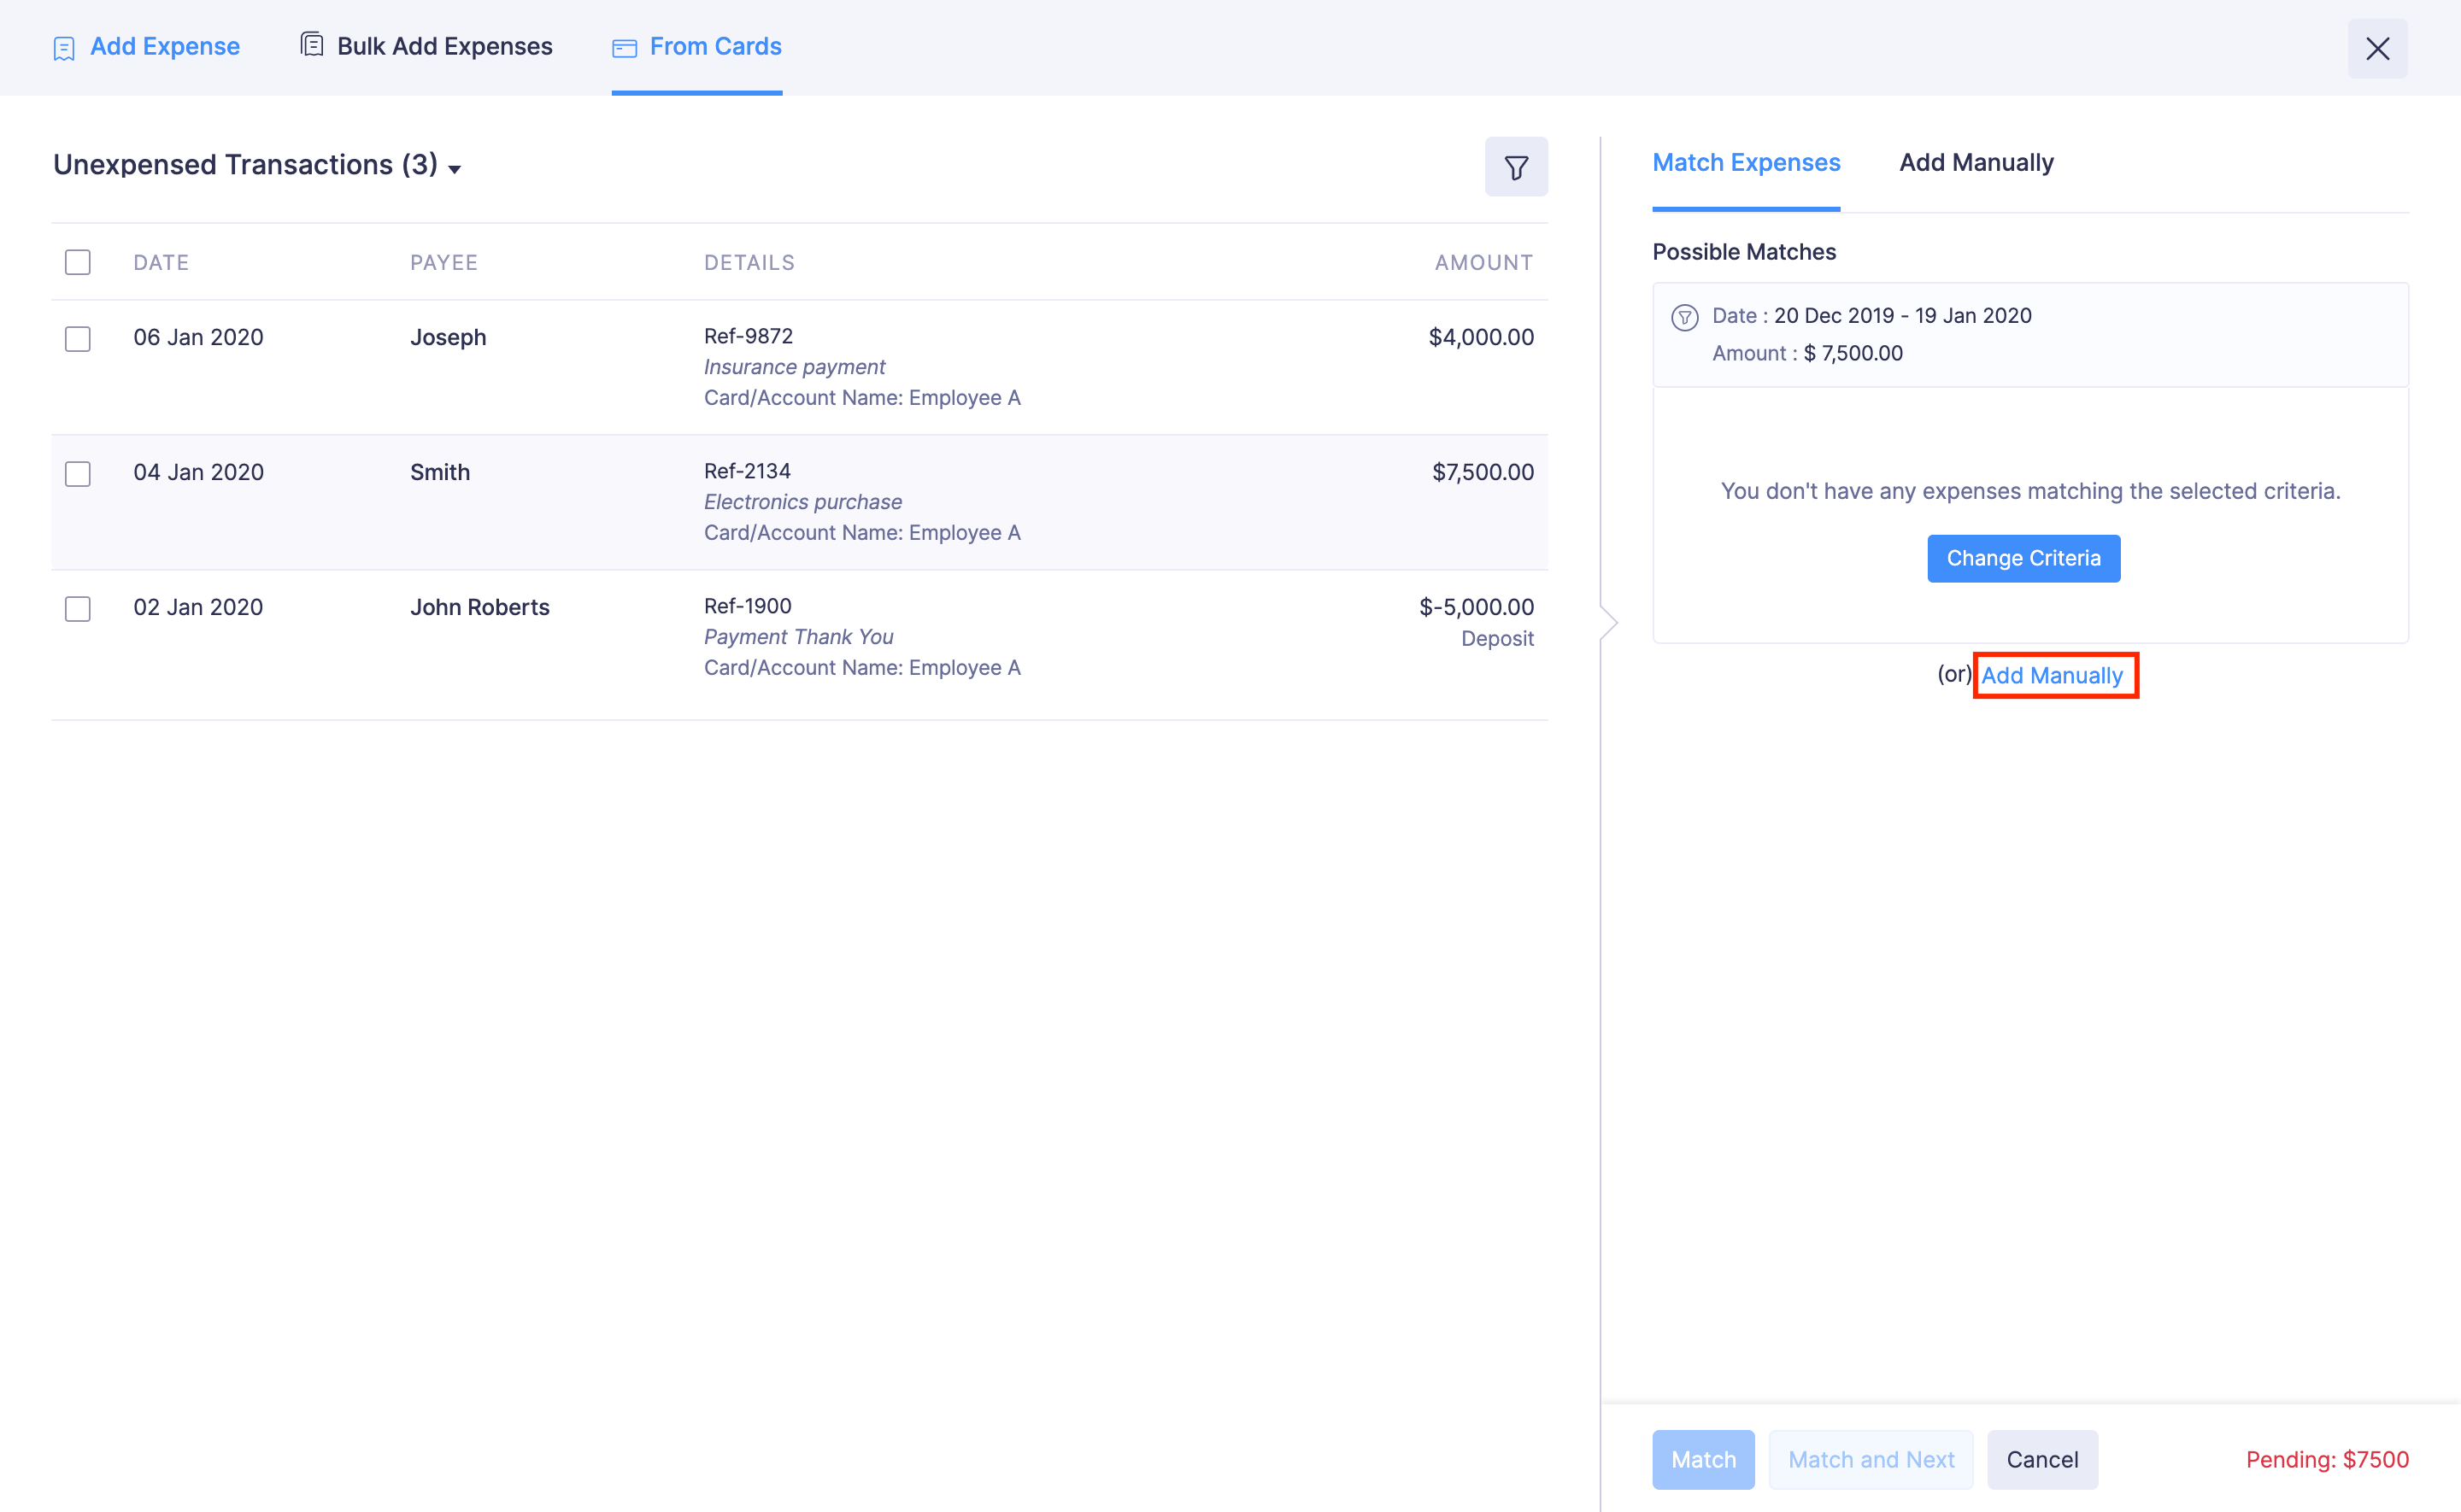
- Navigate to From Cards tab and click Convert to Expense at the right corner of the transaction you want to convert to an expense.
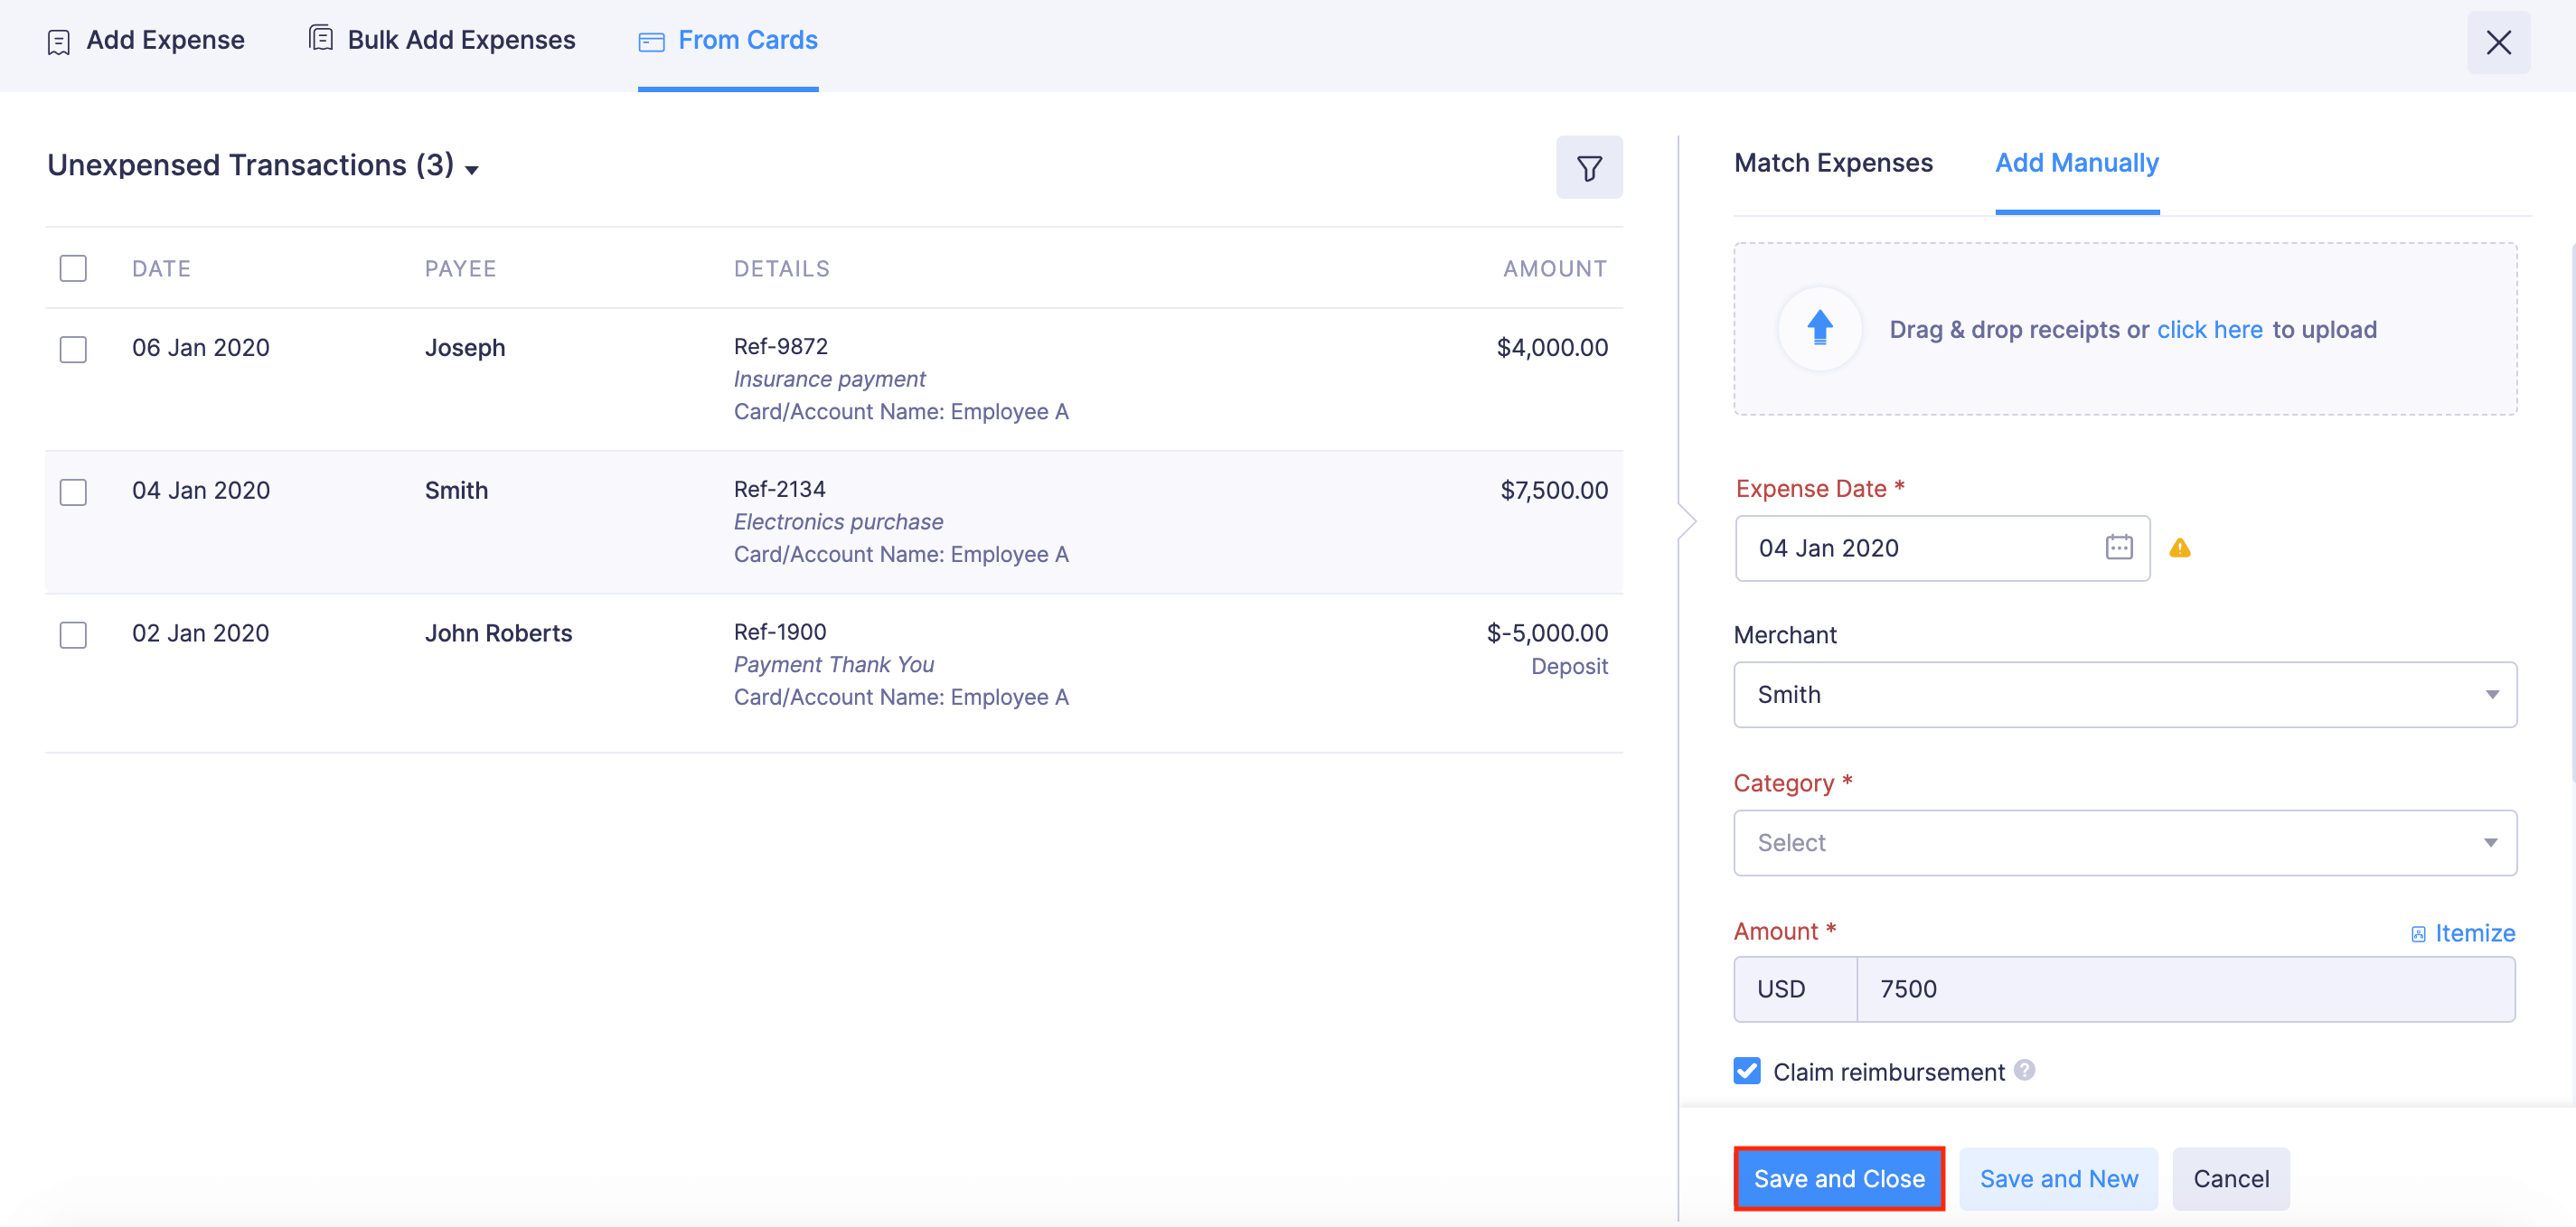
- Click Add Manually and enter the required details.
- Click Save and Close and an expense will be created.
Notes:
- Sometimes you might have created expenses manually for the transactions made in your card. In this case, you can match the unexpensed card feeds with the existing expenses in Zoho Expense.
- Some of the transactions made through your card may not be incurred for your business. In such cases, you can exclude these transactions from converting them into expenses.
Import Expenses
Expenses can be imported in two file formats:
- CSV - Comma Separated Values
- TSV - Tab Separated Values
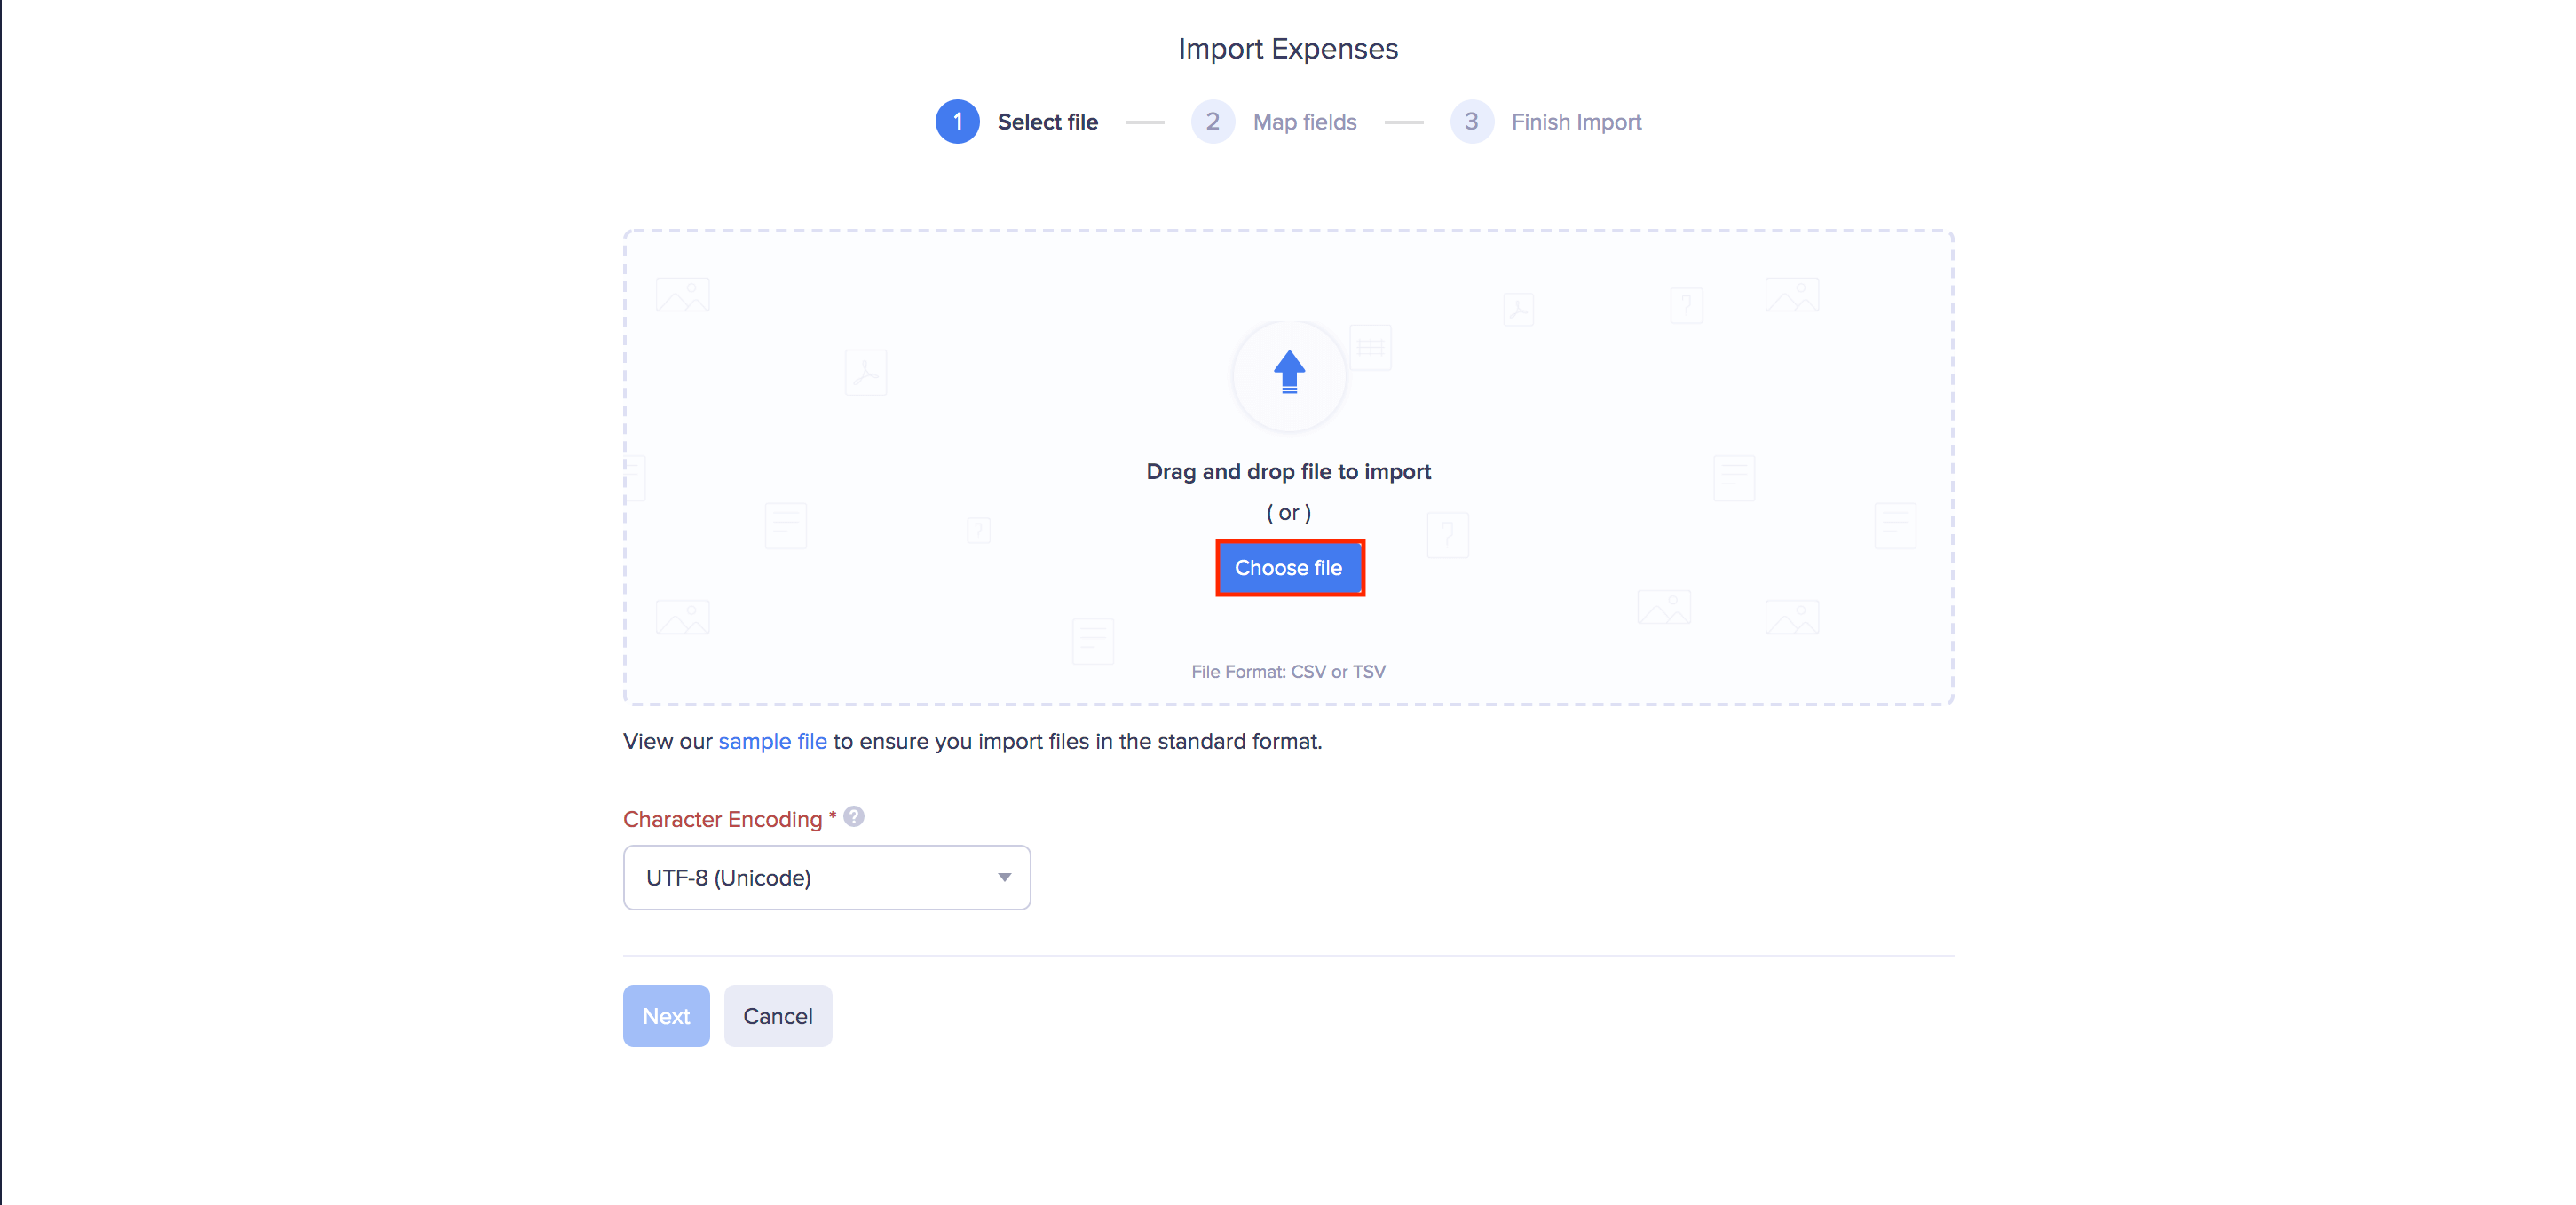
To import expenses:
- Go to the Expenses module on the left sidebar.
- Click the More icon at the top right corner of the page.
- Select Import Expenses.
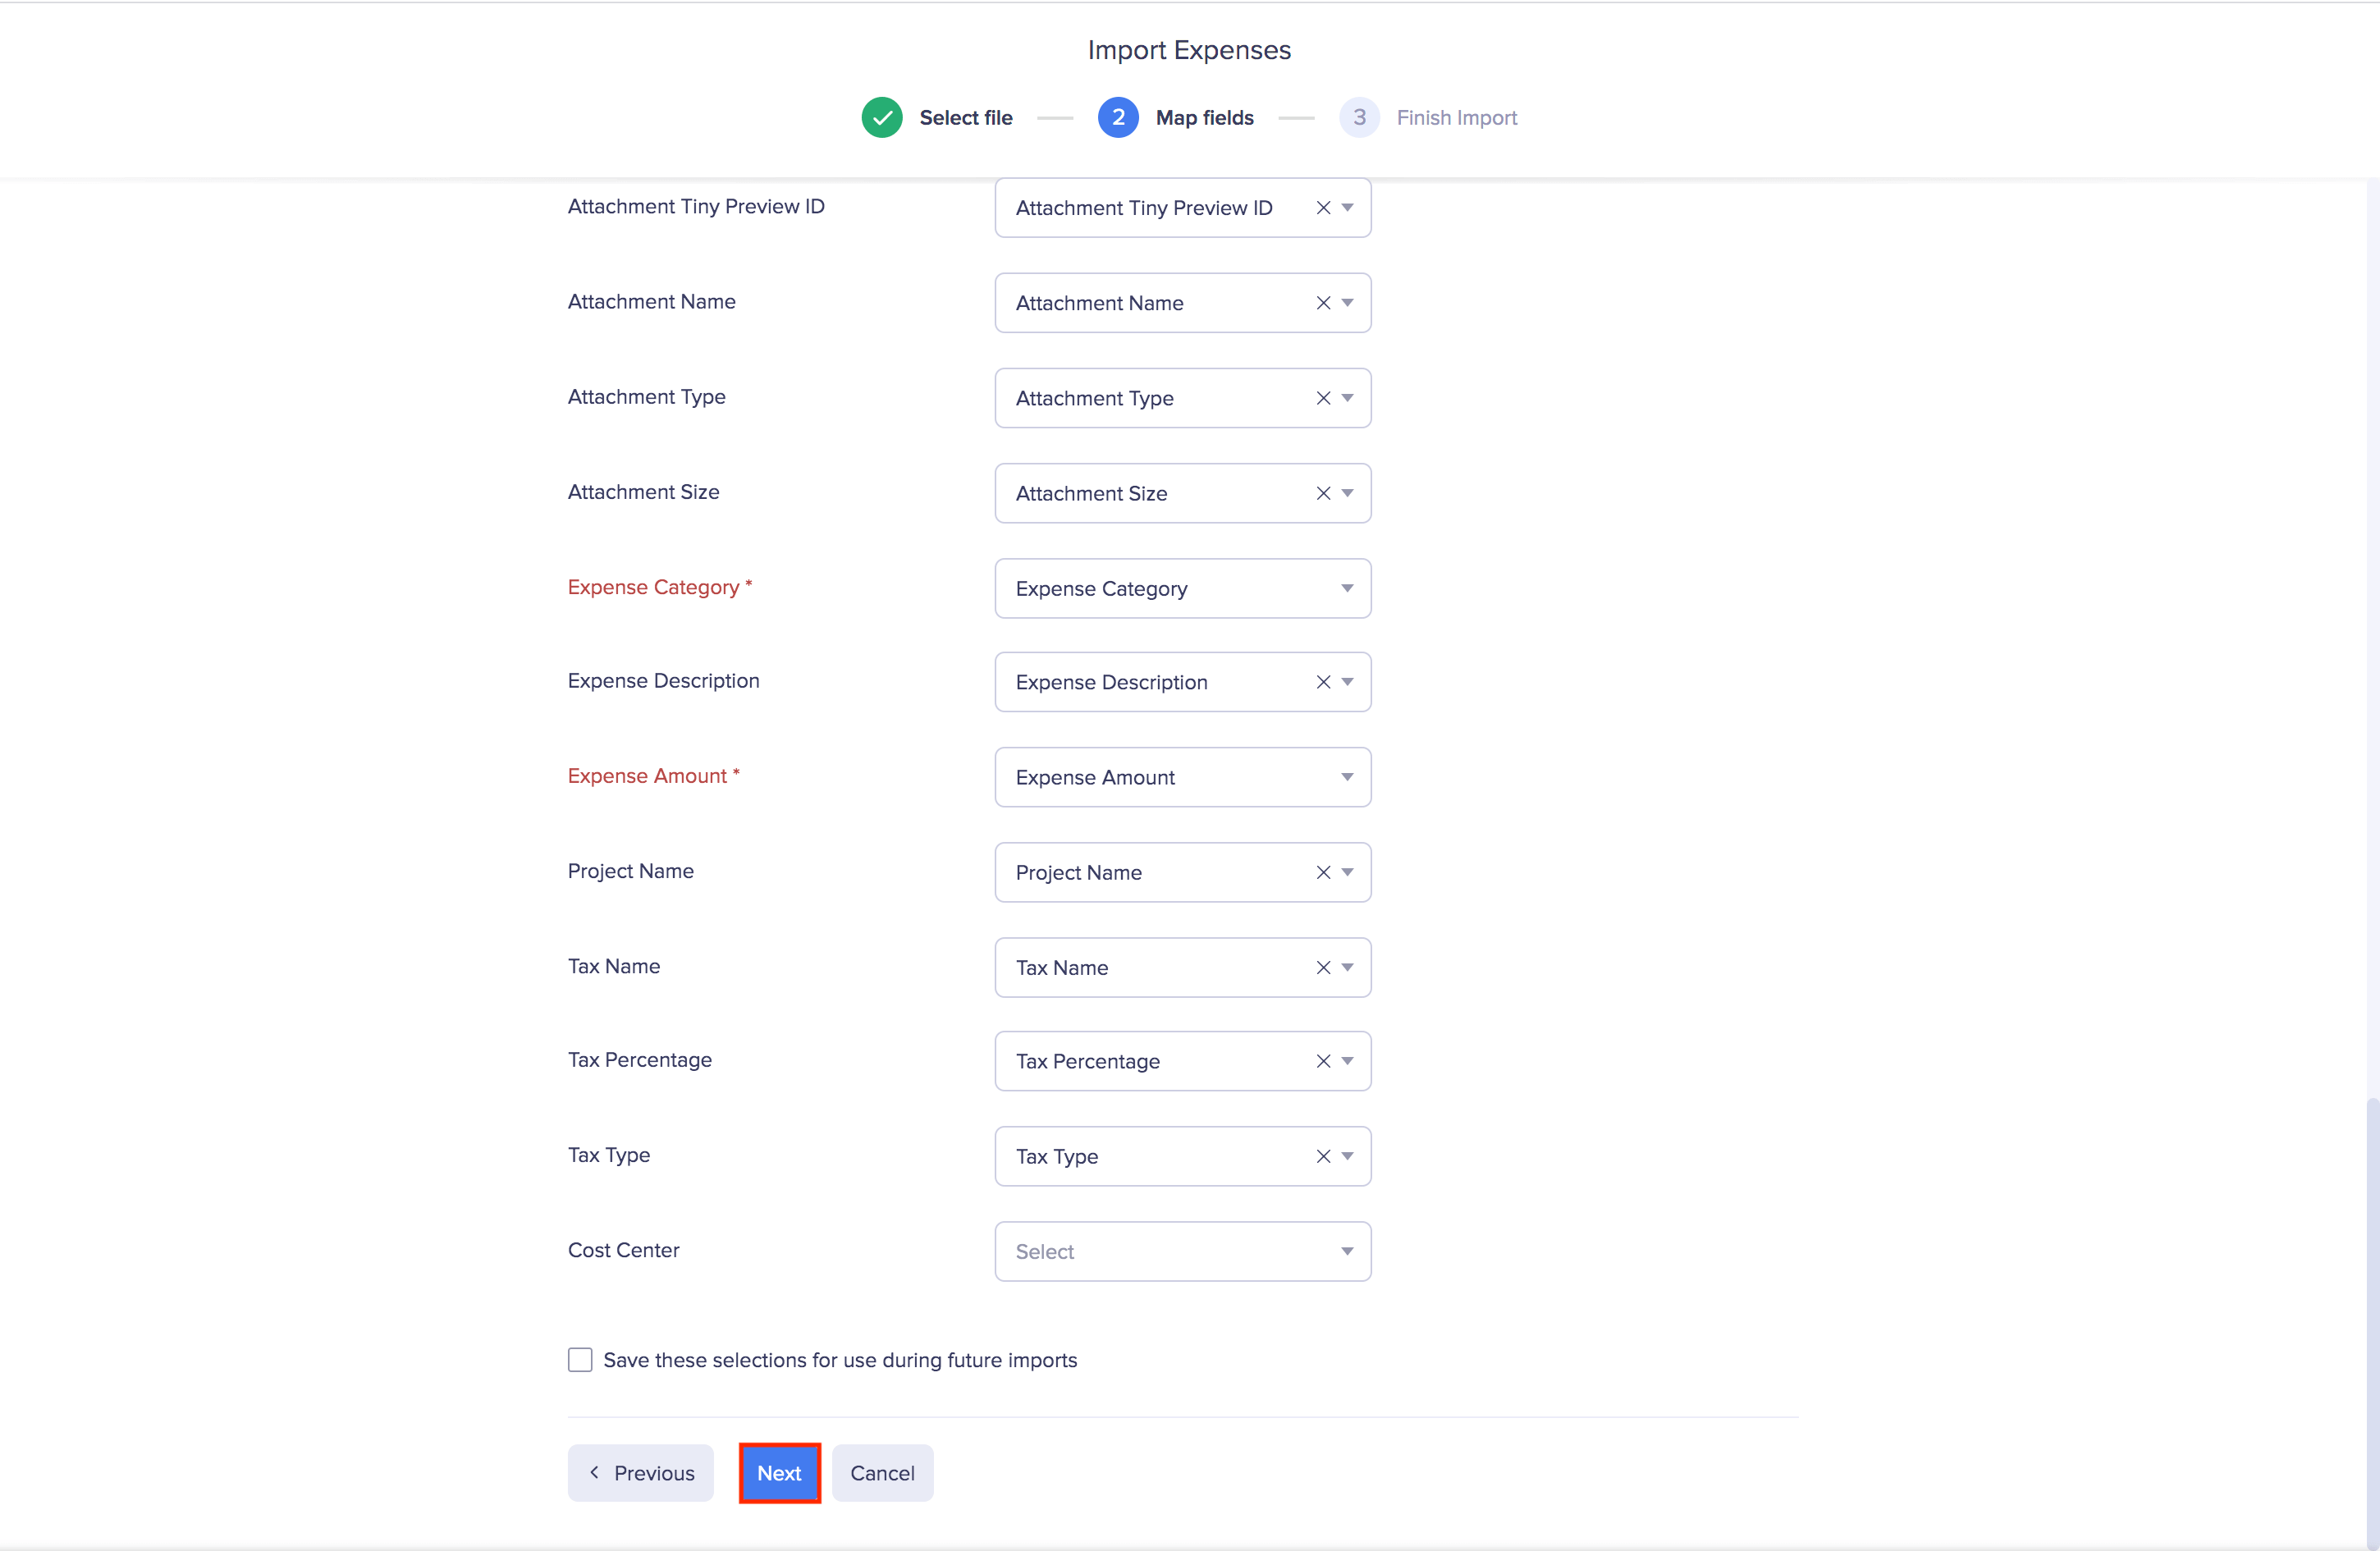
- In the first step, drag and drop a file you want to upload or click Choose File to choose a file from your desktop or a cloud account. If you want to upload another file instead of the selected file, click Replace File and choose another file.
- Click Next.
- In the next step, the best match to each field in Zoho Expense will be auto-mapped with the fields in the imported file. If there are unmapped fields, map them manually. Also, if you leave some fields unmapped, they will not be imported into Zoho Expense. If you want to save the existing mapping for future imports, mark the Save these selections for use during future imports checkbox.
- Click Next.
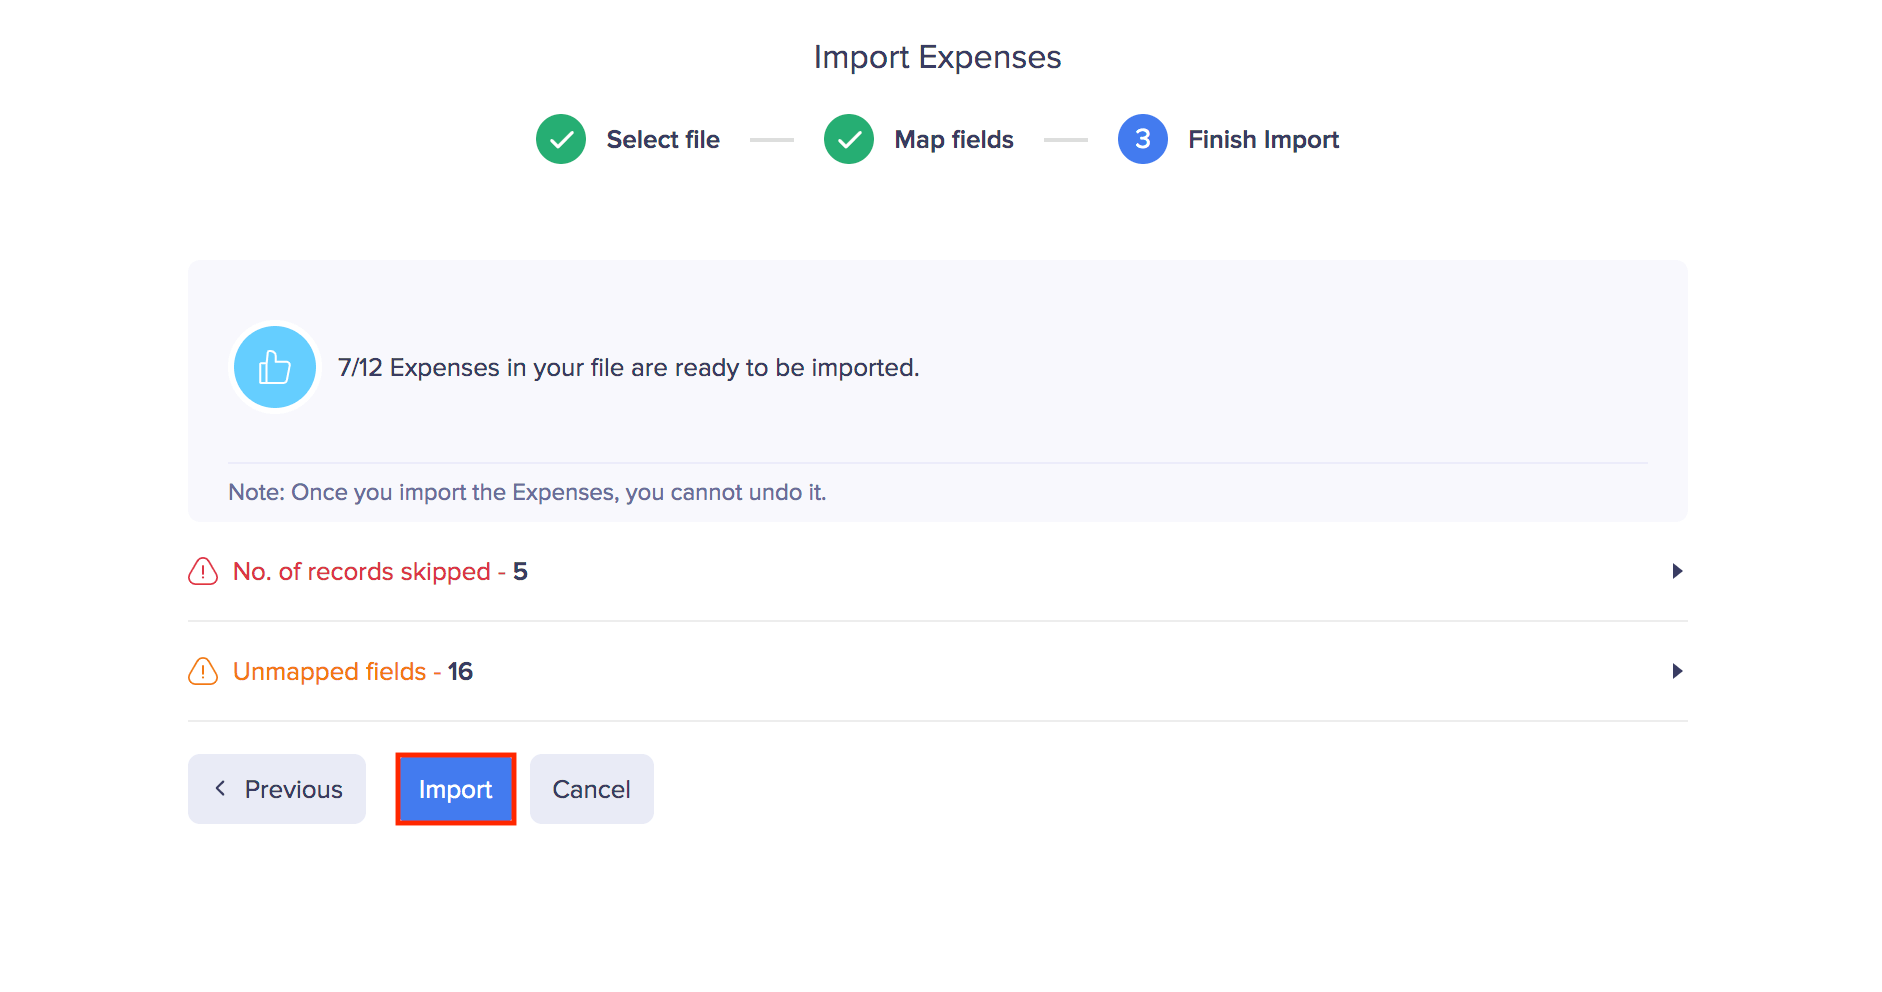
- Once you have mapped all the relevant fields, click Import to import expenses into Zoho Expense. All your imported expenses will be listed under Unreported Expenses in the Expenses module.
Ways to Record Expenses
You can record expenses in multiple ways using Zoho Expense:
- Upload receipts for autoscan and expenses will be created automatically
- Create expenses from card statements
- Record per diem expenses
- Create expenses manually
- Mileage Expenses
Set Expense Preferences
Before you create an expense, you can set default values for fields you use frequently. These values will be automatically pre-filled every time you create an expense, saving you time and effort.
For example, you might not change the paid through account for your expenses so often. So, selecting the paid through account every time you create an expense can become redundant. You can now set the paid through account for your expenses as the default values while creating an expense.
Note: You can set default values only for the Billable, Tax Inclusive, Personal, and all the custom fields present while creating an expense.
To set default values for your expenses:
Note: You can configure default values only for the fields enabled by your admin in the web app.
- Open the Zoho Expense app on your device.
- Tap the Menu icon in the top left corner, select Settings.
- Navigate to Preferences.
- Tap + Add Field under Expenses.
- Select the fields for which you want to set default values.
- Tap Done.
- Select the value you want to set as default from the dropdown.
- Tap + Add Field to add more fields.
- Tap Save.
Create Expenses from Card Statements
If the admin has enabled auto-matching/creation of corporate card expenses under Expense Preferences, expenses will be automatically created for corporate card transactions. Otherwise, the users can create expenses from their card transactions manually.
Notes:
- The corporate card expenses that are created will be non-reimbursable.
- While creating expenses from the card transactions, you cannot modify the expense amount.
To create expenses from a card transactions manually:
- Open the Zoho Expense app on your device.
- Tap the Menu icon in the top left corner.
- Navigate to the Expenses module.
- Tap the + icon at the bottom right corner.
- Select From Cards. All the expensed transactions from your cards will be listed.
- Tap the transaction that you would like to add manually.
- Tap Add Manually.
- In expense creation screen, fill in the necessary details.
- Tap Save Expense.
(Or)
- Navigate to the Cards module.
- Tap the card with unexpensed transactions.
- Tap the transaction that you would like to add manually.
- Tap Add Manually.
- In expense creation screen, fill in the necessary details.
- Tap Save Expense.
Notes:
- Sometimes you might have created expenses manually for the transactions made using your card. In this case, you can match the unexpensed card feeds with the existing expenses in Zoho Expense.
- Some of the transactions made through your card may not be incurred for your business. In such cases, you can exclude these transactions from converting them into expenses.
Record Per diem Expenses
Per diem is a daily allowance that an organization provides to an employee while they travel for work. Employees can create per diem expenses for individual days or for an entire trip.
To record per diem expenses:
- Open the Zoho Expense app on your device.
- Tap the Menu icon in the top left corner.
- Click the + icon at the top right corner and tap Expenses form the dropdown.
(Or)
- Navigate to the Expenses module.
- Tap the + icon at the bottom right corner.
- Select Add Per Diem.
- If you want to associate the per diem expense to a report, select a report from the Report dropdown.
- Select a policy from the Policy dropdown.
- Choose a per diem type. There are two types of per diem:
- Trips
- Individual Days
Trip: If you want to calculate per diem for the entire trip, select the per diem type as Trip. For instance, if you record per diem for a duration from 09:00 to 17:00 hours from 14 January to 17 January, then per diem expense for 14 January will be calculated from the start time (09:00 hours) to the end of the day (23:59 hours). Similarly for 17 January, the duration will be calculated from the beginning of the day (00:00) to the end time (17:00). For all other days, the duration will be considered as 24 hours.
Note: For your first and last travel days, your departure or arrival location will be used as the per diem locations as configured by your admin.
Individual Days: If you want to calculate per diem for each day, select the per diem type as Individual Days. For instance, if you record per diem for a duration from 09:00 to 17:00 hours from 14 January to 17 January, then per diem will be calculated for eight hours each day.
If you choose to create per diem expenses based on Trip:
- Enter your Departure Location, Date, and Time.
- Similarly, enter the Arrival Location, Date, and Time.
- Fill in the other necessary details.
- Tap Calculate Per Diem. Per diem will be calculated based on the rules configured by your admin by including all the hours from the start time on the first travel day to the end time on the last travel day. For the days in between, per diem is calculated for 24 hours.
- Tap the per diem rates you want to exclude. In the pop-up, tap Exclude this per diem.
- Tap Save and Close.
If you choose to create per diem expenses based on Individual Days:
- Select the Travel Location from the dropdown.
- Choose the first and last dates of visit in the Date field.
- Enter the daily start and end time in the Time field.
- Fill in the other necessary details
- Tap Calculate Per Diem.
- The per diem rates calculated for each day of your trip will be displayed. These rates are calculated by applying the same time duration for all the days based on the per diem rates configured.
- Tap the per diem rates you want to exclude. In the pop-up, tap Exclude this per diem.
- Tap Save and Close.
Create Expenses Manually
Here’s how you can create expenses manually in the Zoho Expense iOS app.
- Open the Zoho Expense app on your device.
- Tap the + icon in the top right corner.
- Tap Expense.
(Or)
- Tap the Menu icon in the top left corner.
- Navigate to the Expenses module.
- Tap the + icon at the bottom right corner.
- Select Add Expense.
- Select a report from the dropdown to add this expense to an existing report or tap the + icon to add to a new report.
- Fill in details such as Category, Amount, etc.
- Verify the Date.
- Upload receipts, if necessary.
- Enable the Personal toggle if you’ve incurred a personal expense.
- Enable the Claim Reimbursement toggle if the expense involves spending from your pocket.
- Enable the Billable toggle if you want to bill your expenses to your customers.
- Choose the customer you want to bill from the Customer dropdown.
- You can also associate tags to your expenses. Select the tag you want to associate with your expense, from the Tags dropdown.
- Tap Save.
Mileage Expenses
You can create a mileage expense to report the fuel expenses in Zoho Expense. Read our help document to learn more about mileage expenses.
 Yes
No
Yes
No
Thank you for your feedback!