
Form 24Q
What is Form 24Q?
Form 24Q is a tax form used in India to report TDS (Tax Deducted at Source) on salary payments. It is required to be filed to the Indian government by employers or persons responsible for deducting TDS on salary payments.
The Form 24Q consists of four quarters, with each quarter representing three months ending in June (for Q1), September (for Q2), December (for Q3), and March (for Q4). Employers are required to file the form every quarter, with the deadline for filing being the last day of the month following the end of the quarter.
Note: The deadline for filing Form 24Q for the fourth quarter (Jan - March) is on May 31st and not April 30th, as mandated by the government. Form 24Q requires detailed information about the salary payments made to each employee, including the amount of salary, TDS deducted, and the employee’s PAN (Permanent Account Number). The form also requires the employer’s details, such as the TAN (Tax Deduction and Collection Account Number) and the address of the business.
You can follow the below steps to file your Form 24 Q.
Form 24Q in Zoho Payroll
In Zoho Payroll, the Form 24Q module can generate the text file based on each employee’s salary and TDS information. Based on the employee details, challans, and the quarterly salary data in Zoho Payroll, a standardised text file that complies with the Income Tax Department’s requirements will be generated automatically and will be available for download in Zoho Payroll.
What is a text file? The text file is a standardised digital document that contains all the necessary information required for filing Form 24Q. It includes details about your employees, their salaries, TDS deductions, and challan details. This file is specifically formatted to comply with the Income Tax Department’s requirements.
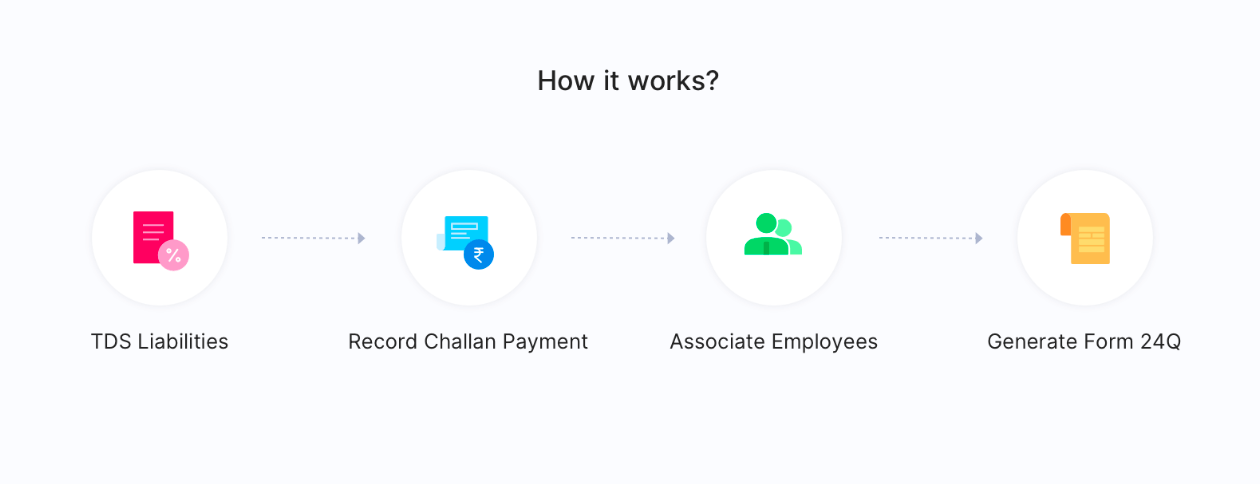
Zoho Payroll also keeps a copy of the text file for its records and any future reference. Let’s see how you can generate the text file in Zoho Payroll.
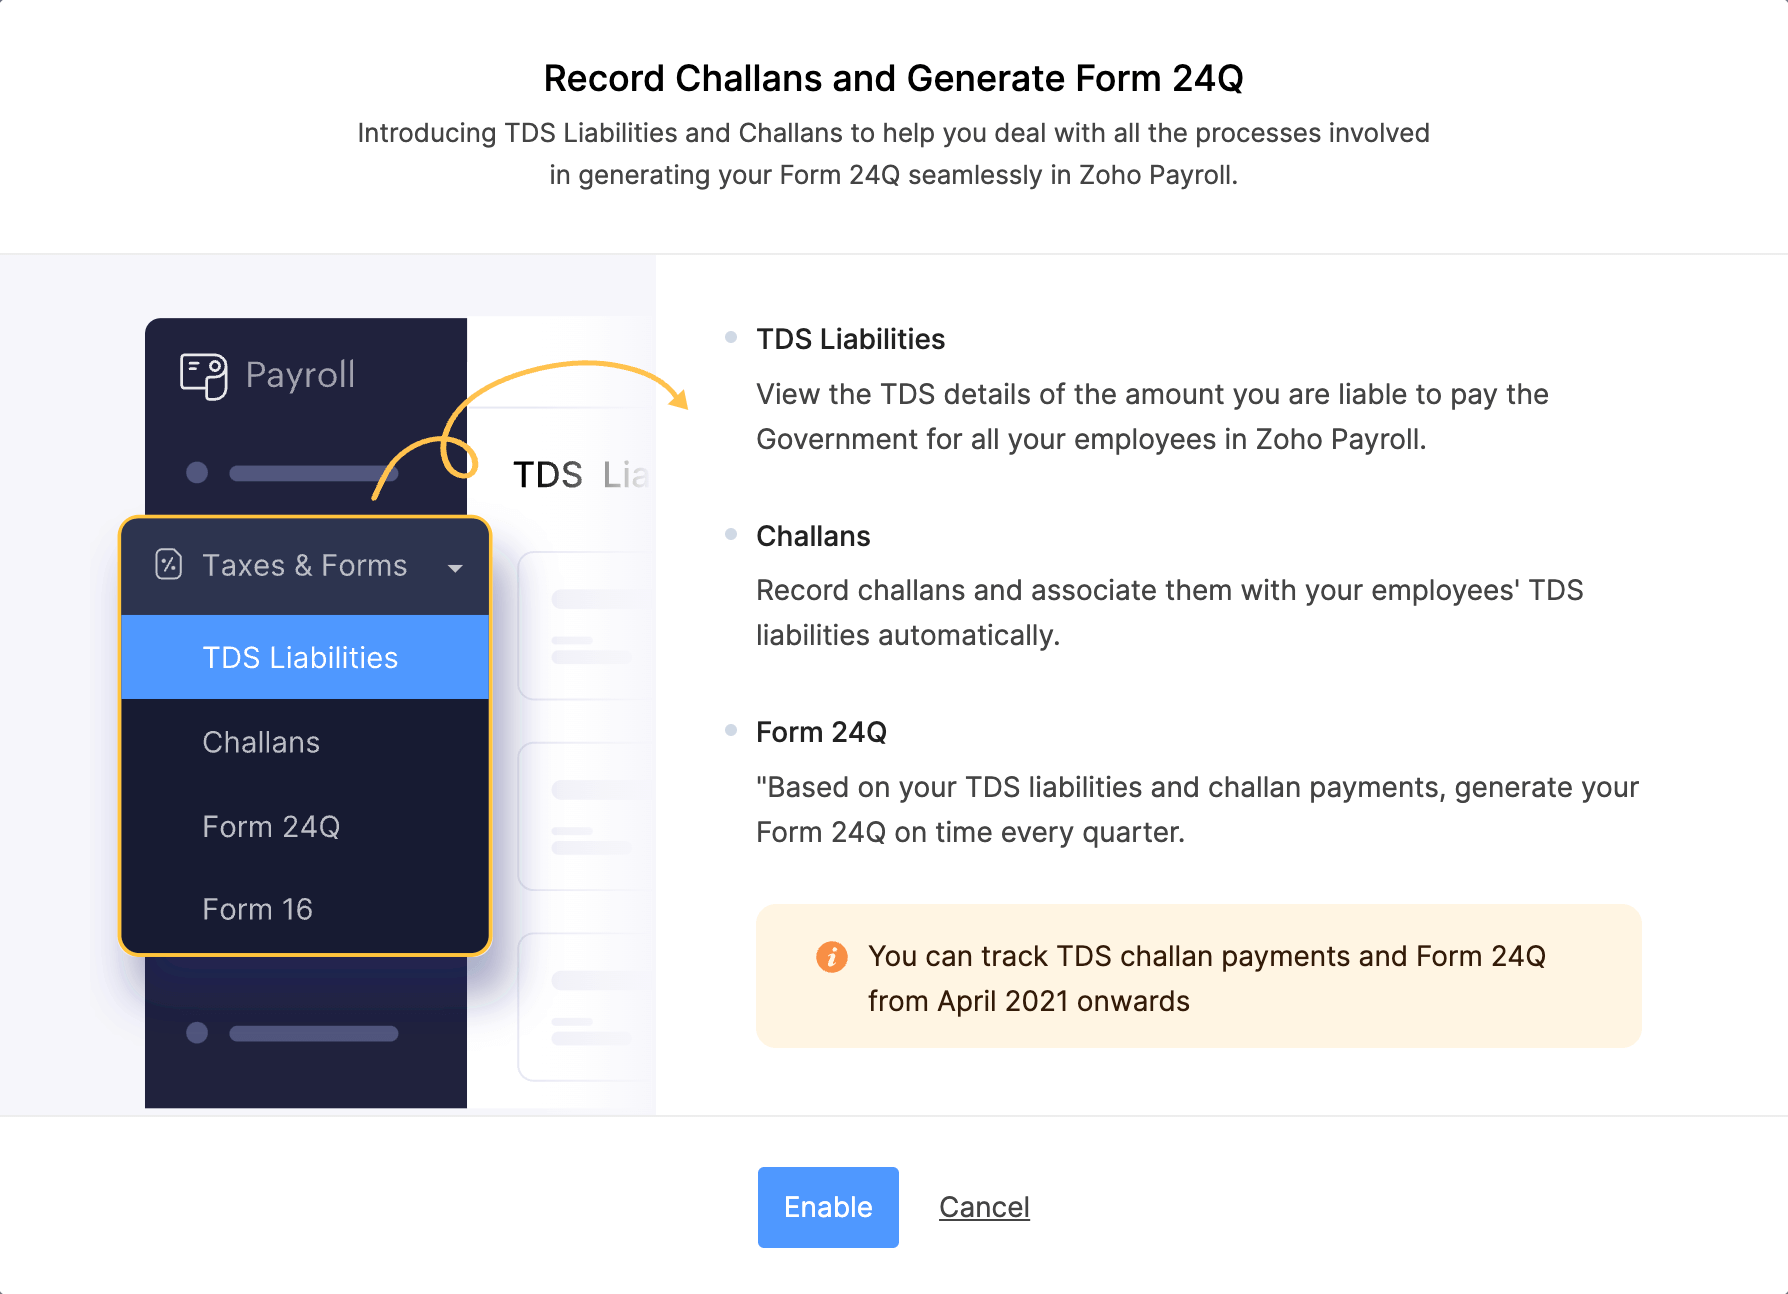
Enable Form 24Q
Prerequisites
- You need to enable the feature first to view the TDS Liabilities, Challans and Form 24Q modules.
- Click View Details on the left sidebar and click Enable.
Step 1: Generate & Download Text Files in Zoho Payroll
Ensure to complete the below prerequisites to generate and download text files.
Prerequisites
- Ensure that the employees’ PAN and employer’s TAN are correct.
- Make sure that the pay run has been processed for the quarter you want to generate the text file.
- Record the challan and associate the payment amount with the TDS liabilities of employees.
Here’s how you can generate the text file in Zoho Payroll:
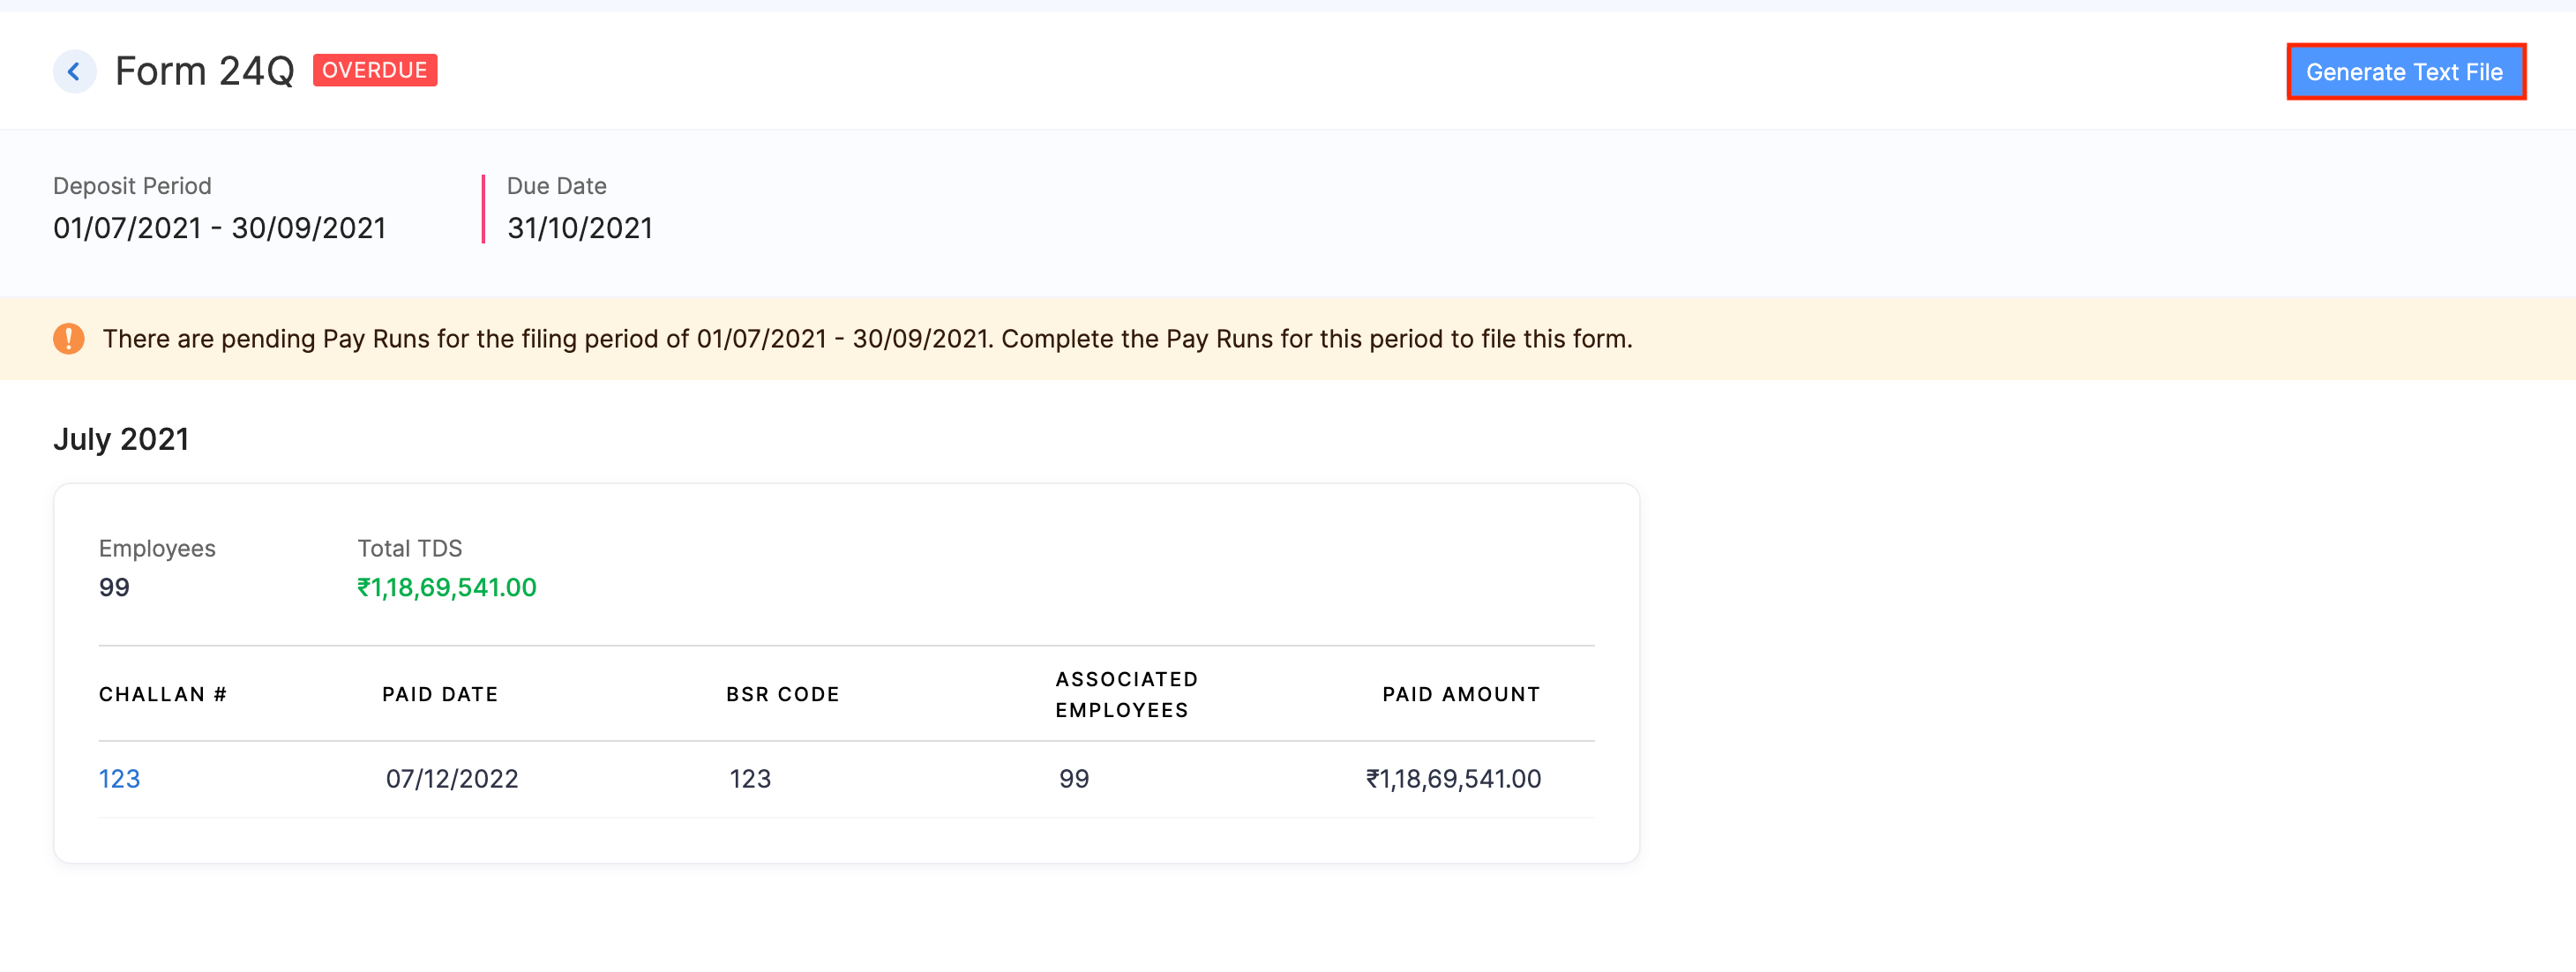
- Go to Taxes and Forms on the left sidebar and click Form 24Q.
- Select the quarter for which you’ve processed the pay run.
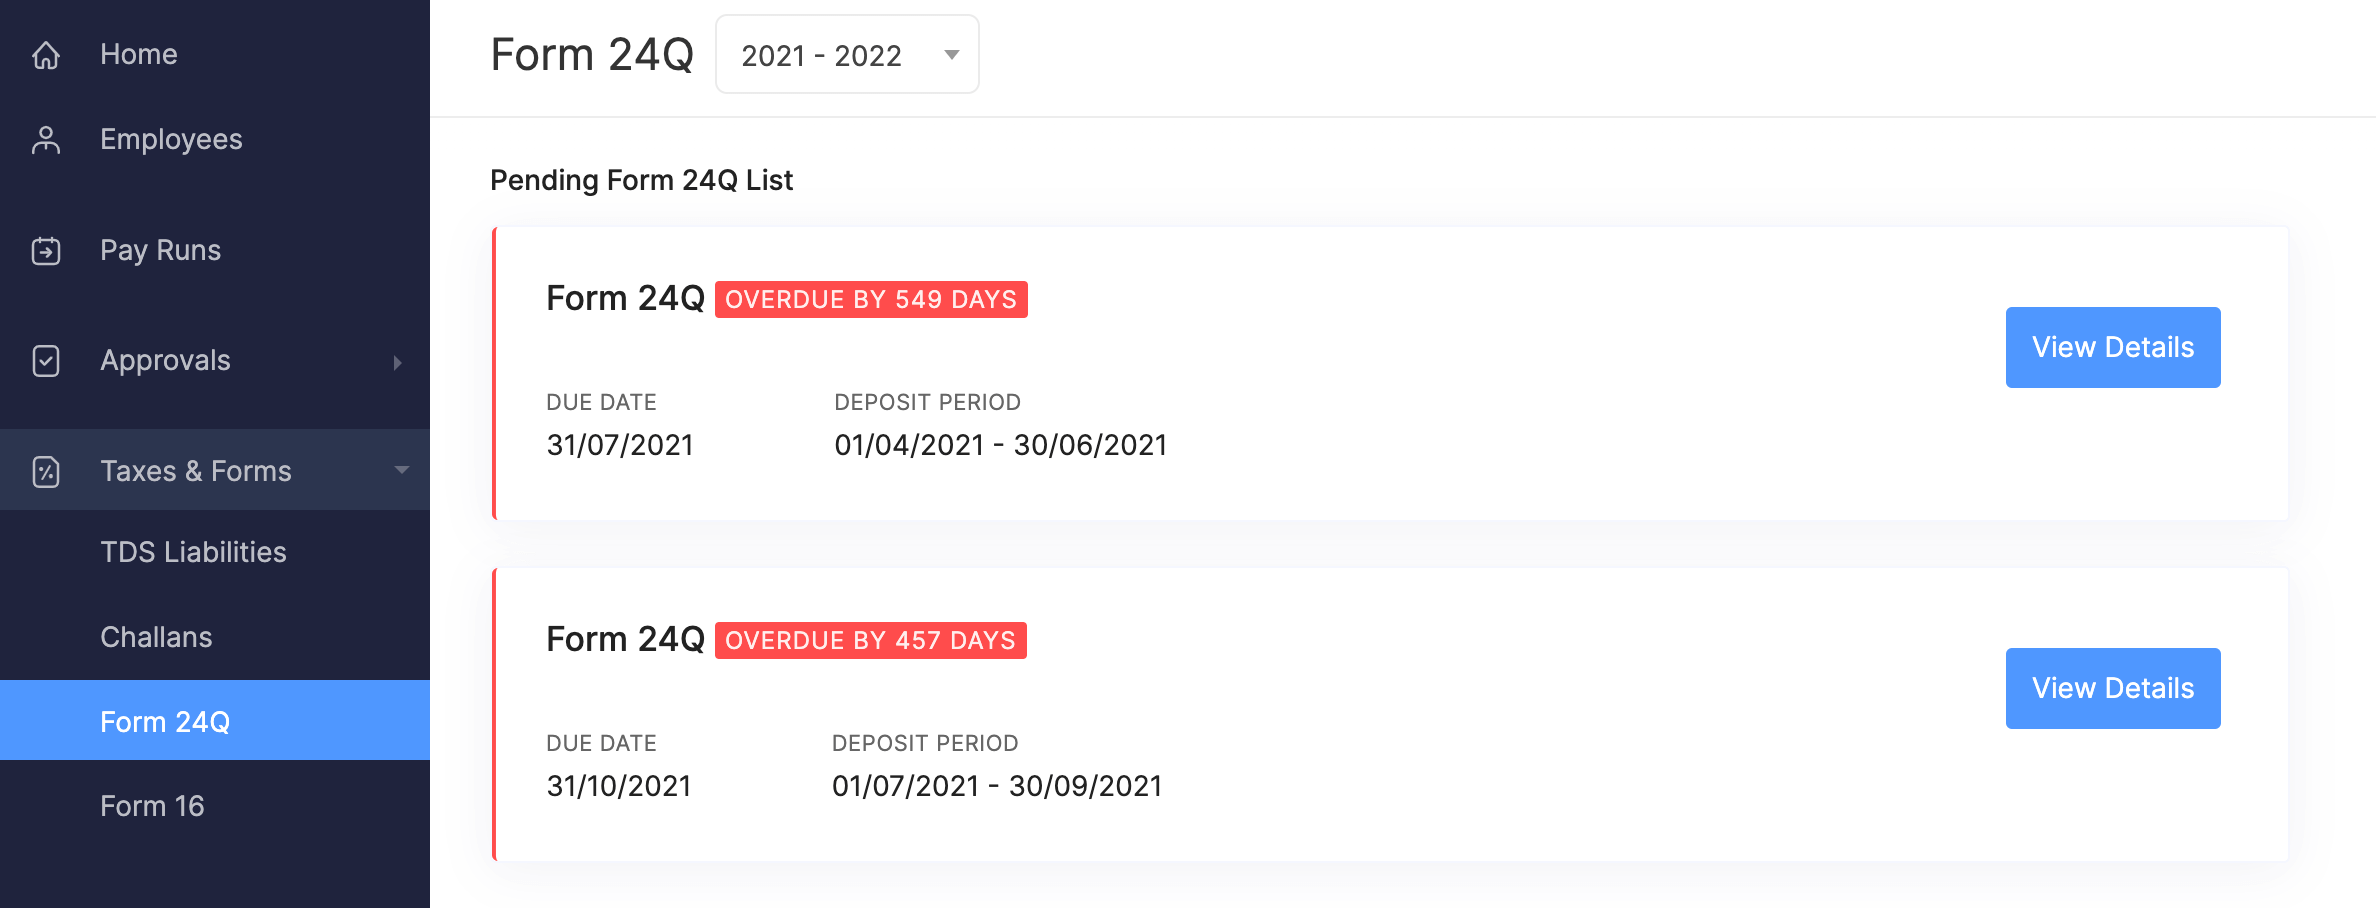
- Click View Details.
You can view the Deposit Period, Due Date for filing Form 24Q, challan number and the TDS Liabilities associated with it.
- Click Generate Text File in the top right corner.
Note: You will not be able to generate text file if you’re still yet to process pending pay run for the filing period.
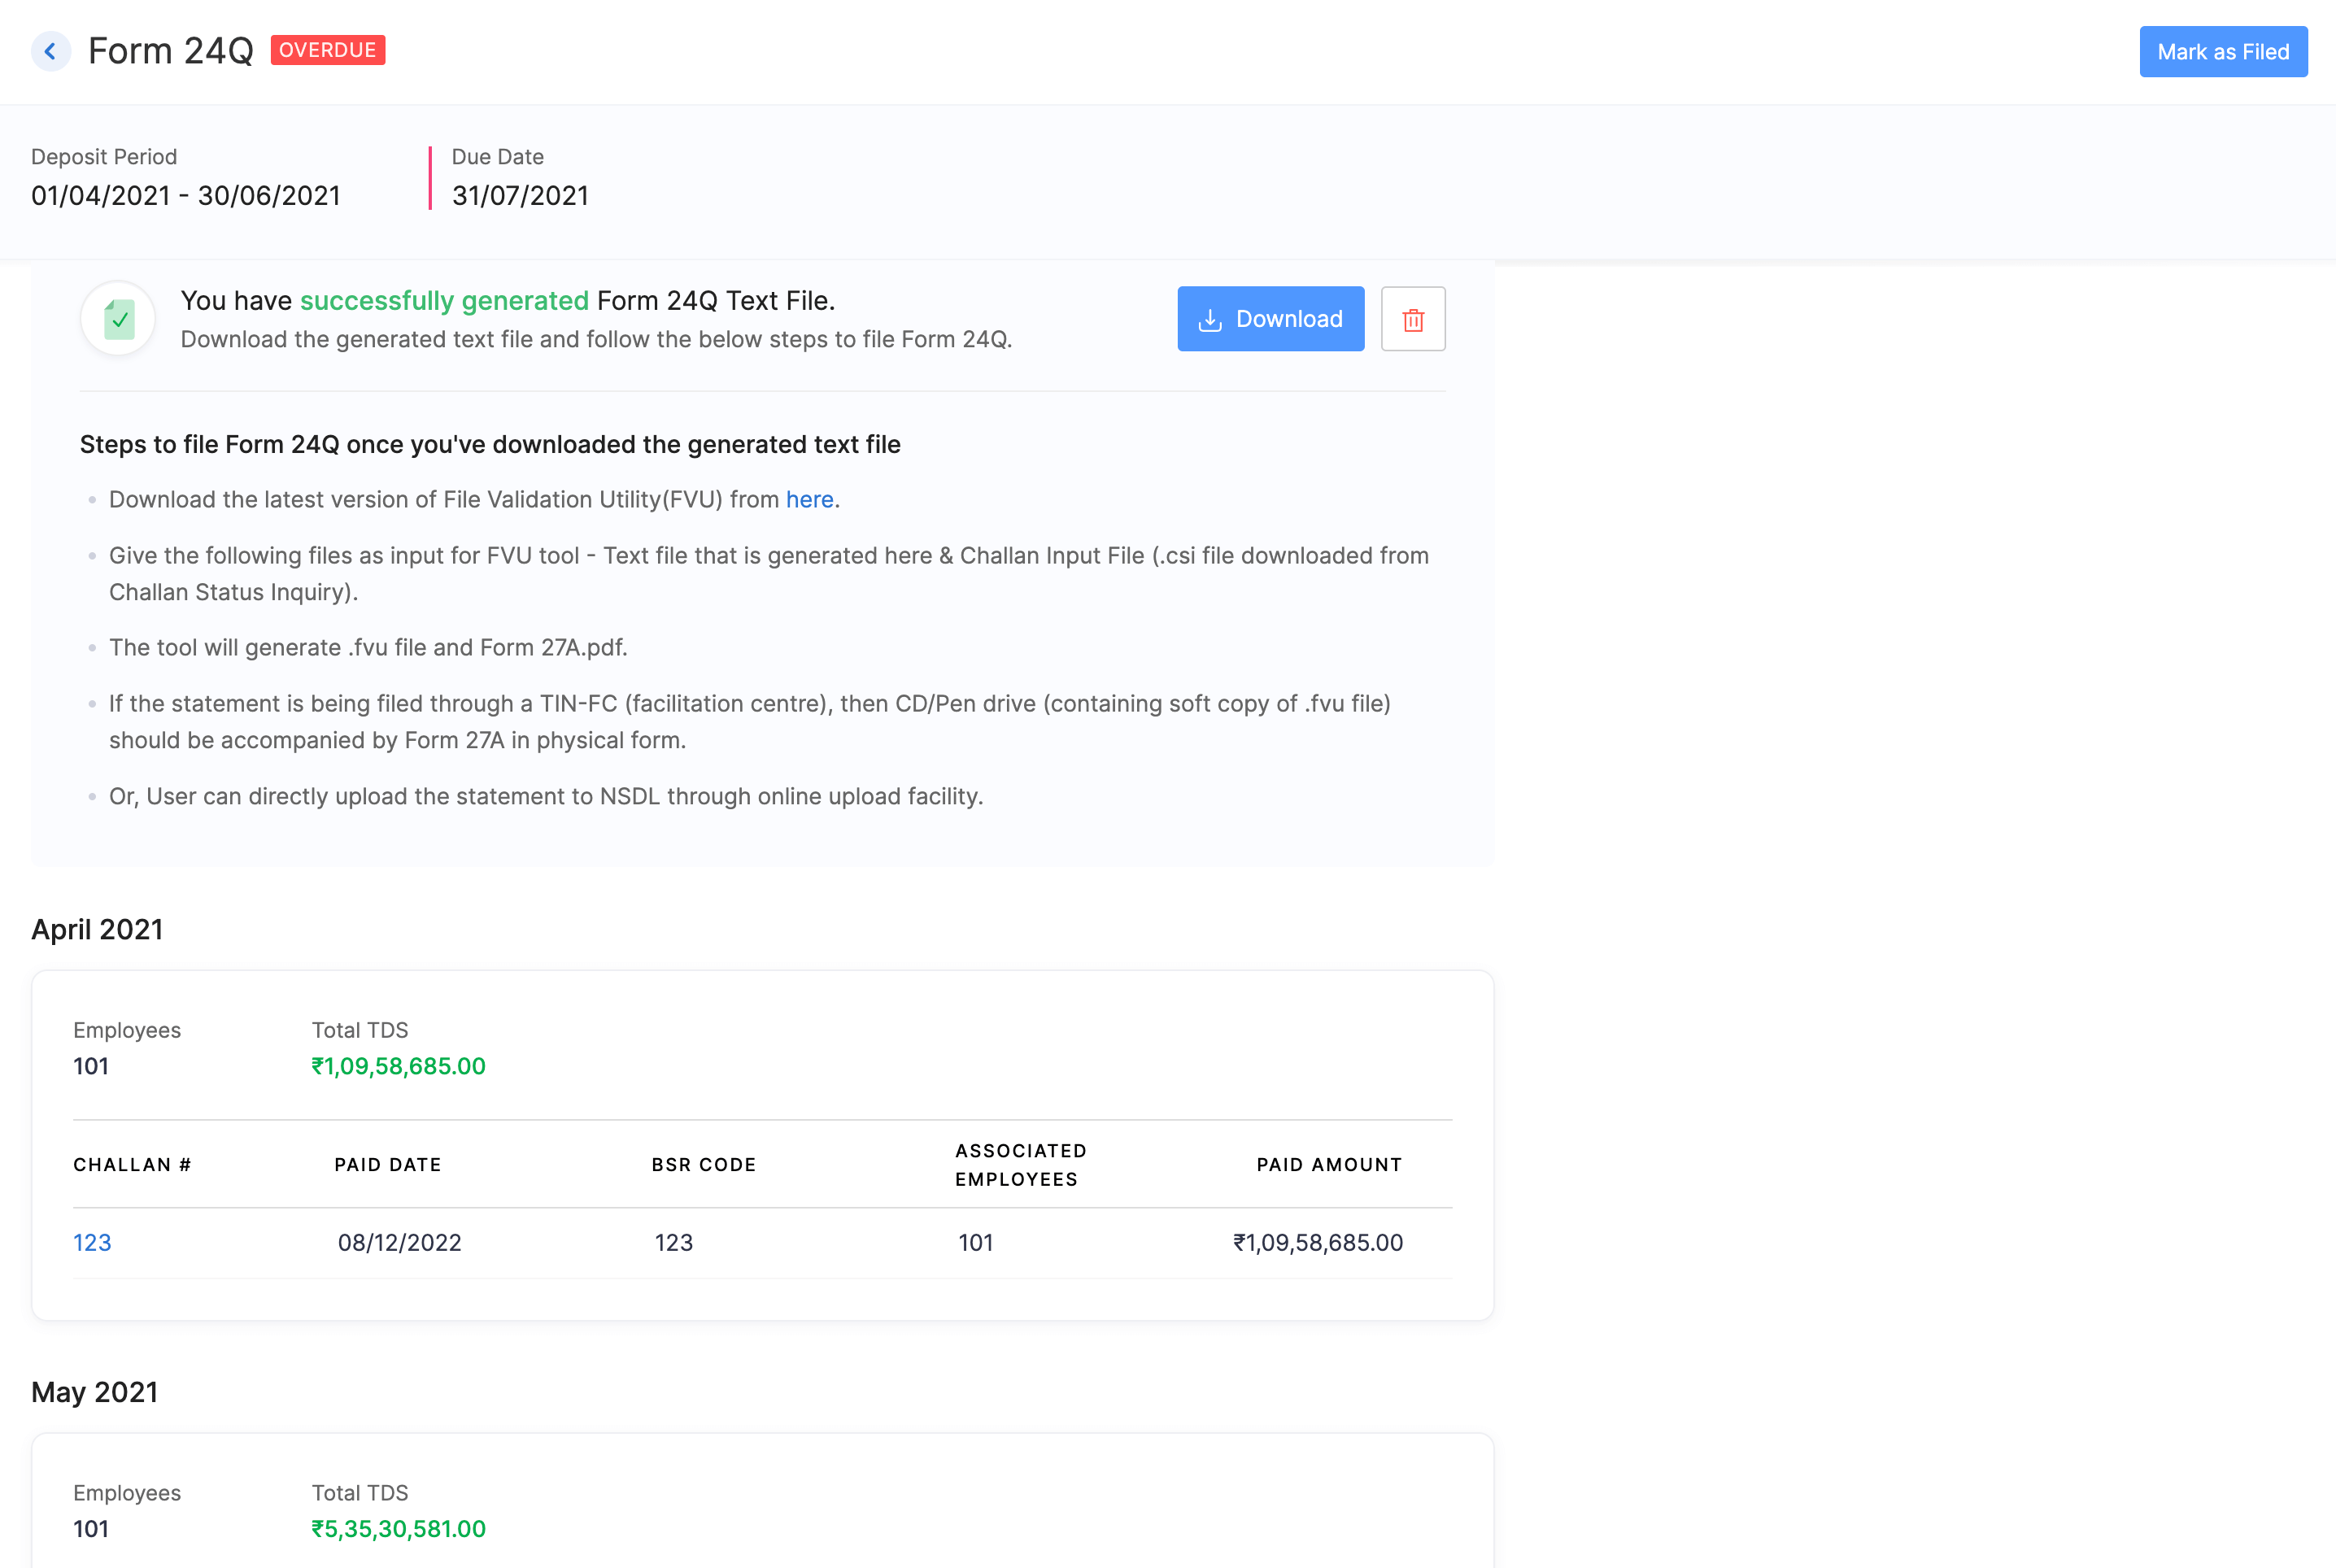
- Verify the Employer and Responsible Person details. If you want to change the details, click the Edit icon.
- Click Generate.
Once you generate the text file, you can download it to use for FVU generation and proceed with filing Form 24Q. To download the text file, click Download.
Step 2: Download the CSI (Challan Status Inquiry) File
You’ll need to download the CSI file from the Income Tax Department’s portal and use it as a reference when preparing your TDS return.
What is the CSI file?
The CSI (Challan Status Inquiry) file is a crucial document that contains details about the tax payments made by you as a TDS deductor. It includes information such as the challan number, payment date, amount paid, and other relevant details.
Unlike the text file generated by Zoho Payroll, which contains employee-specific data, the CSI file is focused solely on the tax payments made. It’s essential for validating the TDS amounts declared in your return with the actual tax deposited.
Prerequisites: Before you download the CSI file, ensure that you have a TAN, and that the TDS payments that you have made reflect in the Payment History page of the Income Tax portal.
If you are yet to login to Income Tax portal, here’s how you can download the CSI file:
- Go to Income Tax Department’s portal.
- In the Quick Links section, click Download CSI file
- Login to the portal using TAN and mobile number.
- Select the Payment Dates (From and To Date)
- Click Download Challan File.
If you have already logged in to Income Tax Department’s portal, here’s how you can download the CSI file.
- Click E-File and select E-Pay Tax.
- Switch to the Challan Status Inquiry (CSI) File tab.
- Select the Payment Dates (From and To Date)
- Click Download Challan File.
Step 3: Validating Your Form 24Q Text File
Once you have successfully generated and downloaded the text file from Zoho Payroll, and the CSI file you’ve downloaded from the Income Tax Department, the next critical step is to validate it using the File Validation Utility (FVU) provided by the Income Tax Department. This process ensures that your file adheres to the prescribed legal format.
You need to download the FVU to validate the text file you’ve downloaded from Zoho Payroll. Here’s how:
Downloading FVU:
- Go to the Protean Tinpan website.
- Download the latest FVU for the period you are filing.
Install FVU on your device. Ensure you have the necessary system requirements met.
Insight: The FVU tool requires you to download Java, if you haven’t already as it a Java-based utility tool.
Once installed, locate the FVU application on your device and open it.
- In the TDS/TCS Input File Name with Path field, browse and upload the text file you’ve downloaded from Zoho Payroll.
- In the Challan Input File Name with Path, browse and upload the CSI file you’ve downloaded from the Income Tax portal.
- In the Error / Upload & Statistics Report File Path, browse and enter / paste the file path, where you want the error file to be downloaded.
- In the Consolidate file name with path, browse and enter/paste the file path, where you want the .fvu file to be downloaded
- After selecting the file, click Validate.
FVU will start analysing the text file to check for errors or discrepancies.
For any assistance with validating the .fvu file, you can contact support@zohopayroll.com.
Step 4: Upload the Form 24Q File
- Log in to Income Tax Department’s portal.
- Log in using your TAN details.
- Click e-File, then navigate to Income Tax Forms and select File Income Tax Forms.
- Click File Now next to Form 24Q.
- Upload the .fvu file that was generated in the previous step.
- Click Proceed to e-Verify.