
OAuth
OAuth 2.0 in Zoho Payments allows third-party applications to securely access user data without sharing passwords. It uses access tokens for limited, time-bound access to specific resources, ensuring that only trusted apps can interact with Zoho Payments. You can generate an OAuth token to authenticate API calls at the organization level. This provides secure, centralized access to resources across your organization using a single client setup.
Here are a few important points to note while generating and managing tokens for API calls:
- Registering your application as a client and generating the authorization code is a one-time process.
- After you receive the code, generate the access and refresh tokens to initiate API calls.
- When the access token expires, use the refresh token to re-generate a new one. You don’t need to register your application or generate the authorization code again, as it is a one-time process.
- You can continue using the refresh token until you decide to revoke it.
Watch the video or follow the steps below to understand how to create OAuth tokens.
1. Register a New Client
To begin, register your application in the Zoho’s Developer Console to obtain your Client ID and Client Secret.
Notes:
- Only users with the Account Owner or Admin role in Zoho Payments can generate an OAuth token.
- Registering your application and generating the authorization code, access token, and refresh token (Steps 1–3) is a one-time process.
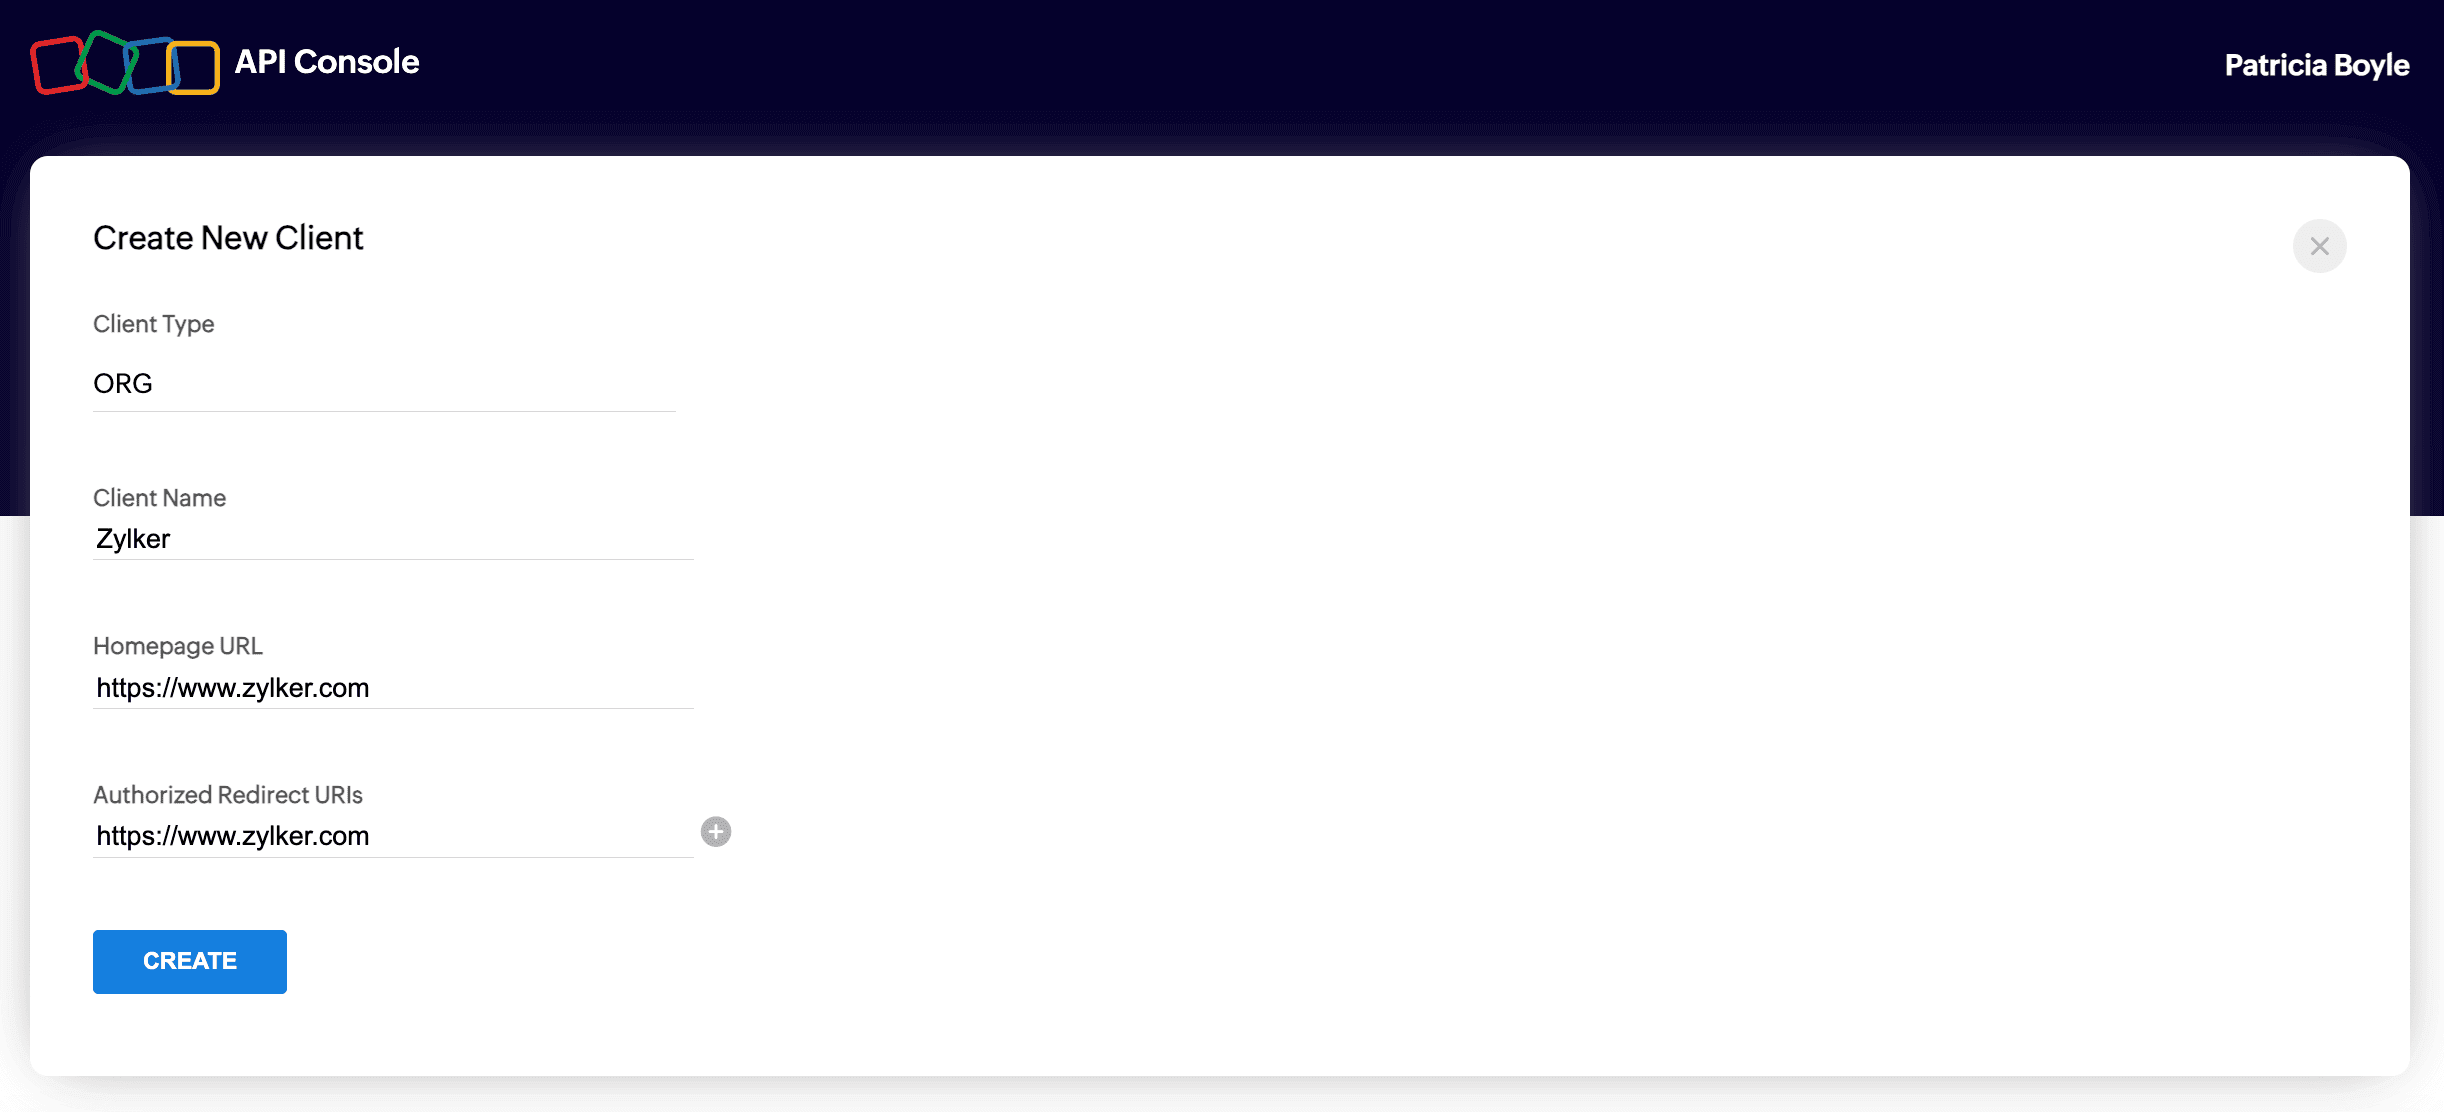
To register your application:
- Go to the Zoho Zoho's Developer Console and ensure that the client type is set to ORG in the URL.
- Enter the Client Name, Homepage URL, and the Authorized Redirect URIs.
| Parameter | Description |
|---|---|
| Client Name | A name to identify your application. |
| Homepage URL | The URL of your application’s homepage or main website. |
| Authorized Redirect URIs | The URL to which you’ll be redirected once access is granted. Ensure it’s the same as the one used in your OAuth requests. |
-
Click Create.
Your Client ID and Client Secret will be generated. You can access them from the Client Secret tab in the Zoho Developer Console.
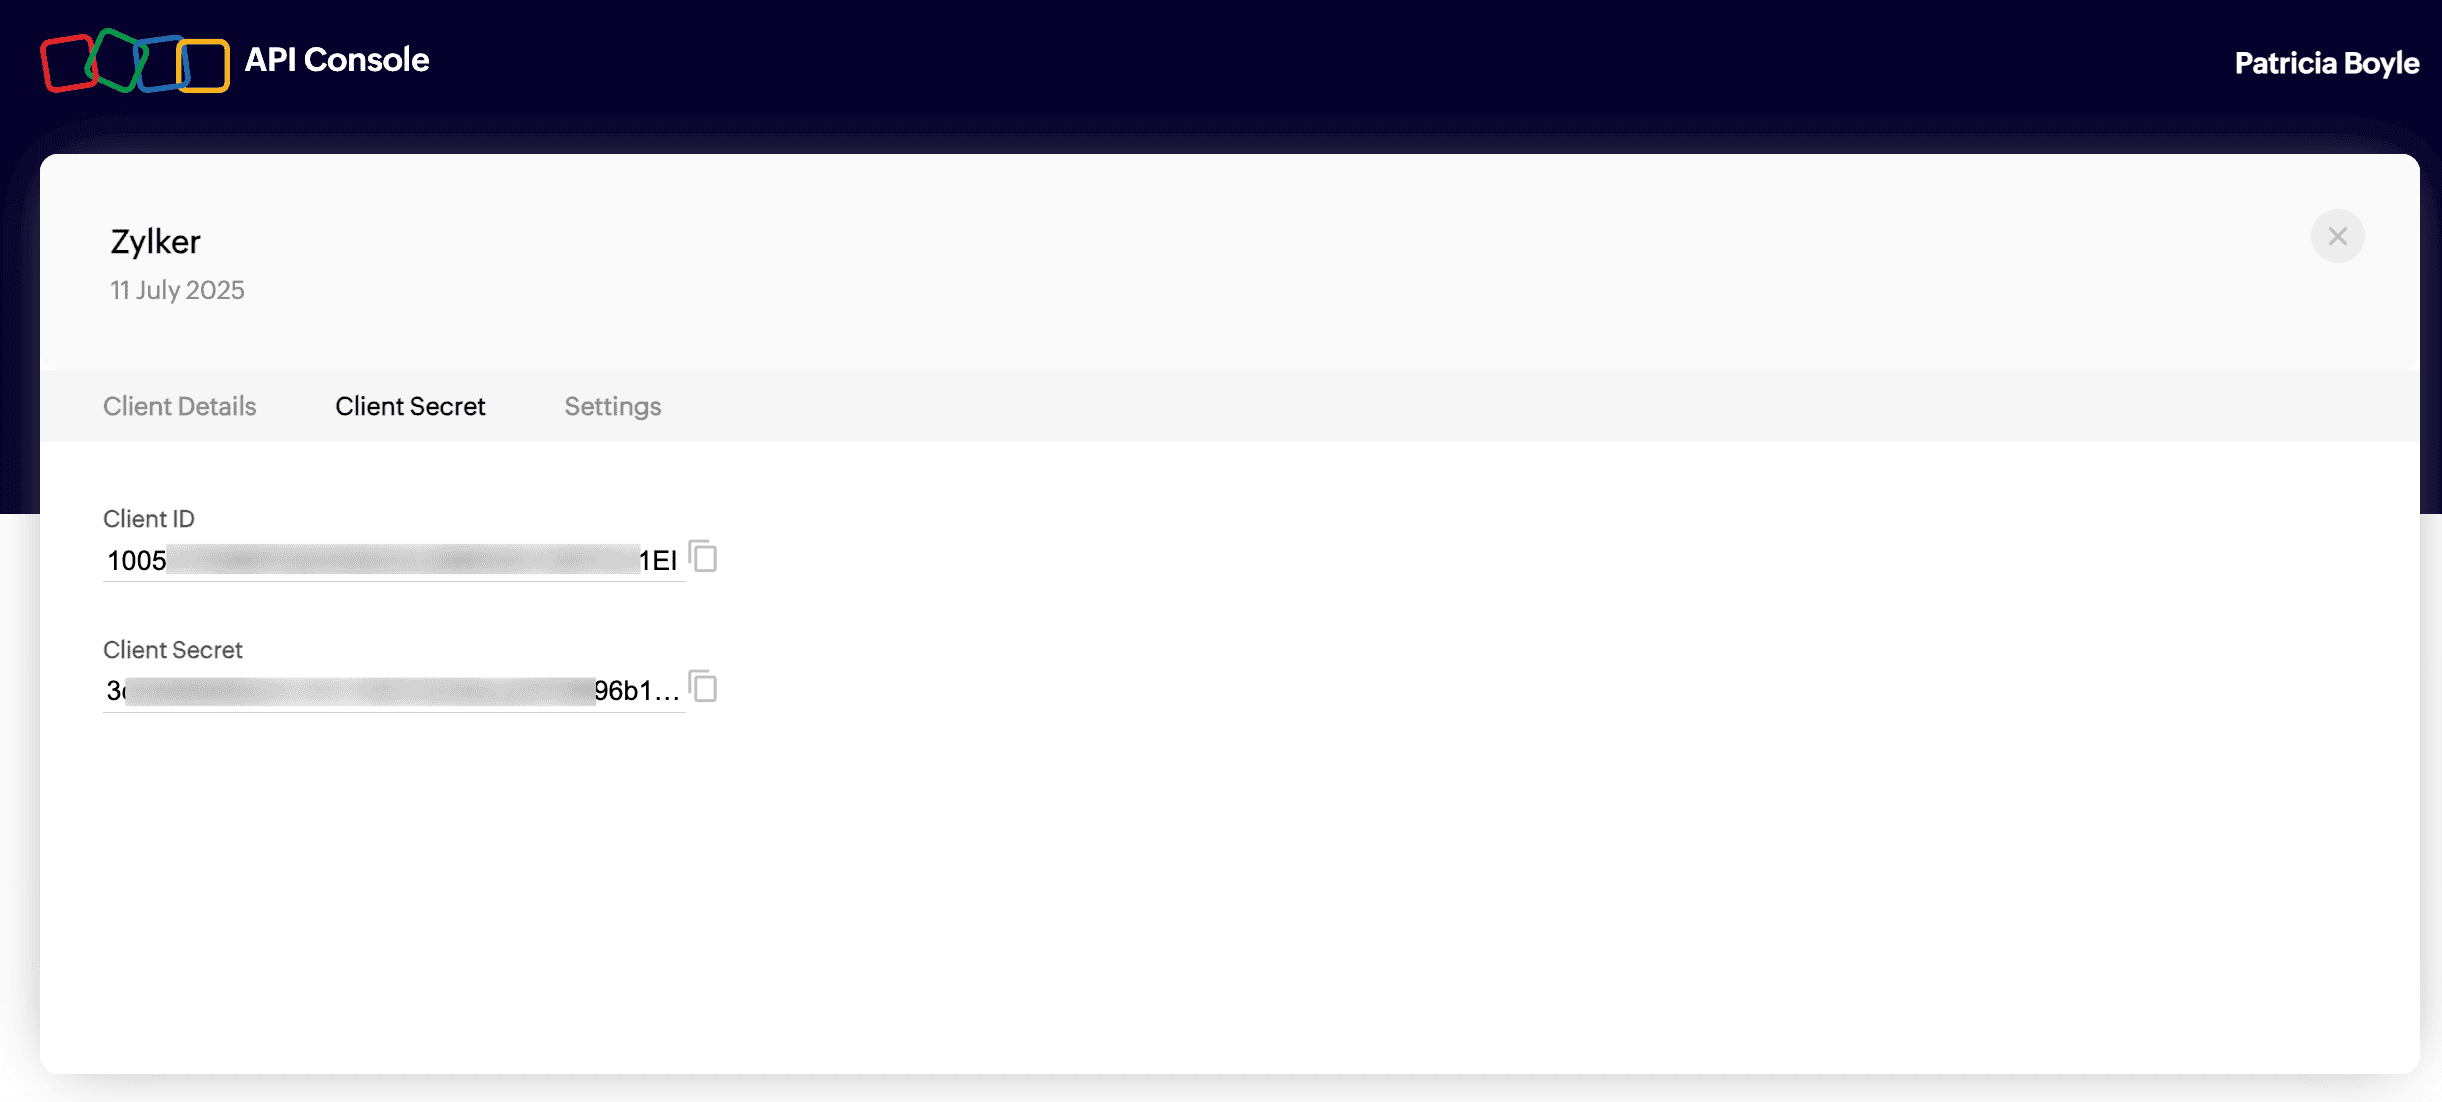
Note: Keep your credentials secure and do not share them with anyone.
2. Generate an Authorization Code
Once you have the client credentials, make a GET request to generate the authorization url to retrieve the authorization_code. Use the following request URL add the parameters listed below to complete the request.
- Method:
GET - Request URL:
https://accounts.zoho.com/oauth/v2/org/auth
Note: The authorization code is valid for only 3 minutes. Generate the access and refresh tokens before it expires.
- Compose the request URL using the following parameters.
| Parameter | Description |
|---|---|
| scope* | The scopes your application requires. Use commas to separate multiple scopes. Refer to the section below for scopes. |
| client_id* | The unique ID available under Developer Console > Your Client > Client Secret. |
| soid* | This is your Zoho Payments account ID, in the format zohopay.{account_id}. |
| response_type* | This must be set to code. |
| redirect_uri* | Your callback URL with an authorization code and response token. It should be the same URL that you used during registration. |
| state | A random string value (can be a number, a character, or a string of characters) used to describe the authorization request. |
| access_type | This can be set to online or offline. Online provides an access token valid for one hour. Offline provides an access token and a refresh token. |
* Indicates mandatory fields.
Scopes in Zoho Payments:
| Scope | Description | Available Types |
|---|---|---|
| Customers | Access to customer-related APIs. | ZohoPay.customers.CREATE ZohoPay.customers.READ |
| Payment Methods | Access to payment method-related APIs. | ZohoPay.paymentmethods.READ ZohoPay.paymentmethods.UPDATE ZohoPay.paymentmethods.DELETE |
| Payments | Access to payments-related APIs. | ZohoPay.payments.CREATE ZohoPay.payments.READ ZohoPay.payments.UPDATE |
| Refunds | Access to refund-related APIs. | ZohoPay.refunds.CREATE ZohoPay.refunds.READ |
Once this authorization URL is composed, your request will look like this:
https://accounts.zoho.com/oauth/v2/org/auth?scope=ZohoPay.payments.CREATEe&client_id=1005xxxxxxxxxxxxxxxxxxxxxxxxx&soid=zohopay.8xxxxxxxx3&state=xxxxxxxx&response_type=code&redirect_uri=https://www.zylker.com/&access_type=offline
-
Copy and paste the GET URL in your browser. This will list the account for which you want to grant access.
-
Click Accept to grant access to your Zoho Payments account data.
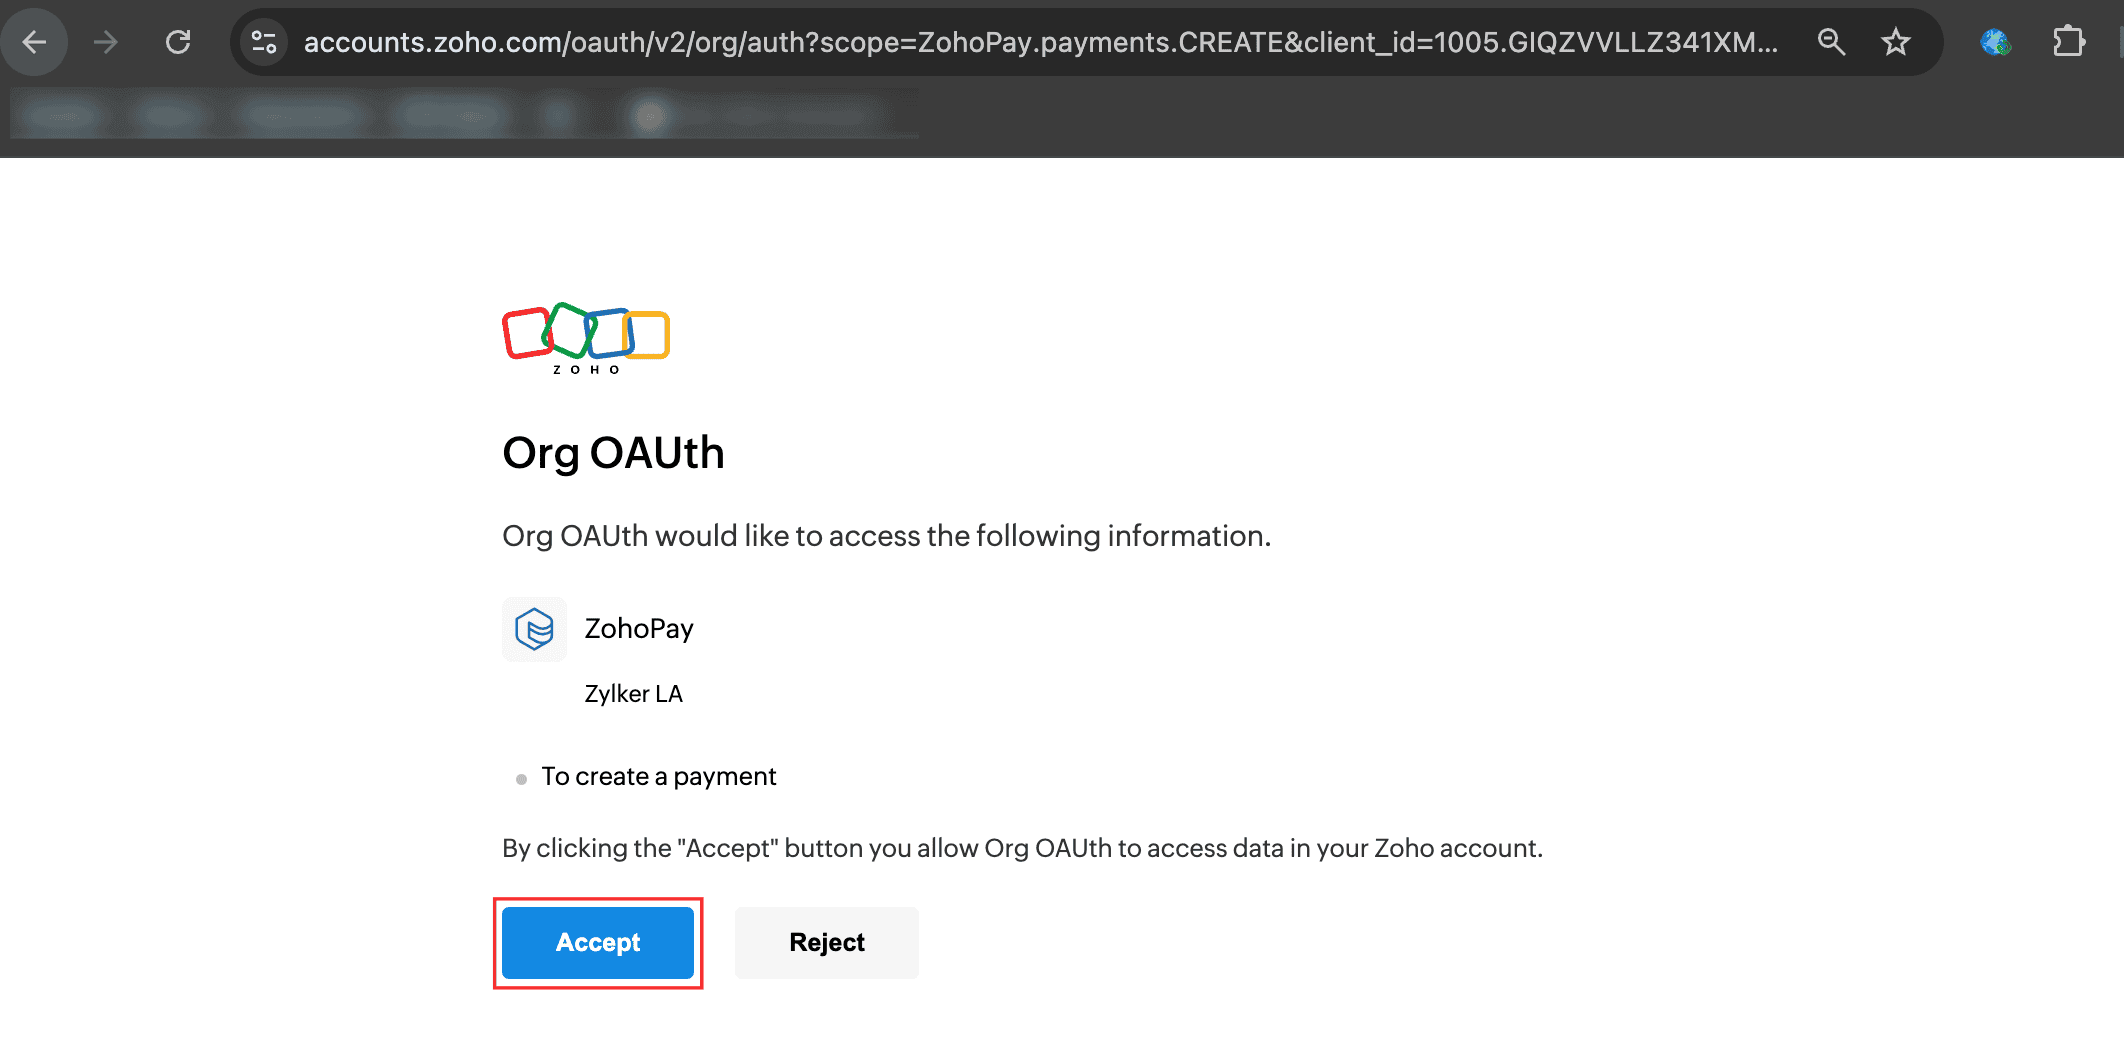
Note: Only the data associated with the scopes you’ve specified will be accessible after the user grants permission.
After granting access, you’ll be redirected to the specified Redirect URI. You can retrieve the authorization_code from the code parameter, along with other parameters.
https://www.zylker.com/?state=xxxxxxx&code=1005.xxxxxxxxxxxxxxxxxxxxxxxxxxxxxxxxxxxxxxxc&location=us&accounts-server=https%3A%2F%2Faccounts.zoho.com
Note: The authorization code is valid for only one minute. You must generate the access and refresh tokens within this time. If the code expires, generate a new authorization code again (Step 2).
3. Generate Access and Refresh Tokens
Once you have the authorization, make a POST request with the required parameters to generate an access_token. Use the following URL: https://accounts.zoho.com/oauth/v2/token?
| Parameter | Description |
|---|---|
| code* | The code obtained from the previous step. |
| client_id* | A unique ID displayed under Developer Console > Your Client > Client Secret. |
| client_secret* | A unique confidential string displayed under Developer Console > Your Client > Client Secret. |
| redirect_uri* | Your callback URL with an authorization code and response token. It should be the same URL that you used during registration. |
| grant_type* | This will be authorization_code. |
* Indicates mandatory fields.
The response to your request will include both an access_token and a refresh_token :
access_token: Expires after a certain period, as indicated by theexpires_inparameter in the response.refresh_token: Permanent and can be used to generate a newaccess_tokenonce the current one expires.
Note: A user can have up to 20 refresh tokens. If this limit is exceeded, the oldest refresh token will be automatically deleted, even if it is in use.
https://accounts.zoho.com/oauth/v2/token?code=1000.dd7exxxxxxxxxxxxxxxxxxxxxxxx9bb8.b6c0xxxxxxxxxxxxxxxxxxxxxxxxdca4&client_id=1000.0SRSxxxxxxxxxxxxxxxxxxxx239V&client_secret=fb01xxxxxxxxxxxxxxxxxxxxxxxxxxxxxxxx8abf&redirect_uri=https://www.zylker.com/&grant_type=authorization_code
4. Call an API
When calling an API, the access token must be included in the request header and cannot be passed as a request parameter.
- Header Name:
Authorization - Header Value:
Zoho-oauthtoken {access_token}
5. Generate Access Tokens from Refresh Tokens
Access tokens have limited validity, typically expiring in one hour, but can be used without restriction during this time. Once an access token expires, your application must use the refresh token to obtain a new access token.
Note: When the access token expires, use the refresh token to re-generate a new one. The refresh token can be used multiple times until you revoke it.
To generate a new access token, make a POST request with the given parameters to the following URL: https://accounts.zoho.com/oauth/v2/token?
| Parameter | Description |
|---|---|
| refresh_token* | The refresh token obtained from the previous step. |
| client_id* | The Client ID received during client registration. |
| client_secret* | The Client Secret received during client registration. |
| grant_type* | This will be refresh_token. |
* Indicates mandatory fields.
https://accounts.zoho.com/oauth/v2/token?refresh_token=1000.8ecdxxxxxxxxxxxxxxxxxxxxx5cb7.4638xxxxxxxxxxxxxxxxxxxxxxebdc&client_id=1000.0SRSxxxxxxxxxxxxxxxxxxxx239V&client_secret=fb01xxxxxxxxxxxxxxxxxxxxxxxxxxxxxxxx8abf&grant_type=refresh_token
Revoke a Refresh Token
To revoke a refresh token, make a POST request with the given parameters to the following URL: https://accounts.zoho.com/oauth/v2/token/revoke?
| Parameter | Description |
|---|---|
| token | The refresh token that you want to revoke. |
https://accounts.zoho.com/oauth/v2/token/revoke?token=1000.8ecdxxxxxxxxxxxxxxxxxxxxxxxx5cb7.4638xxxxxxxxxxxxxxxxxxxxxxxxebdc
Your refresh tokens have now been revoked, and you can’t use them to generate new access tokens to initiate API calls
If you wish to generate tokens again, you will need to repeat the entire process.
 Walkthrough of Zoho Payments personalized to your business needs