Zoho CPaaS Plugin for WordPress
Zoho CPaaS Plugin for WordPress helps you configure your Zoho CPaaS account in your WordPress site. It allows you to send transactional emails from WordPress using your Zoho CPaaS account.
To make sure that emails from your website are considered valid and authentic, you need to use only authorized server configuration to send emails. Configuring email servers for your websites can be too technical and complex. To make it simple, in WordPress Sites, you can directly install the Zoho CPaaS WordPress Plugin to easily use any Agent in your Zoho CPaaS account to send transactional emails from your site.
Zoho CPaaS Plugin for WordPress - Requirements
To use the Zoho CPaaS plugin for Wordpress, you need to have a self-hosted Wordpress site for your domain.
- A Zoho CPaaS Account
- A self-hosted WordPress site
- PHP 5.6 or later
How to install Zoho CPaaS Plugin in WordPress?
- Login to your self-hosted WordPress account and navigate to the Admin Dashboard.
- Navigate to Plugins > Add New section of the Dashboard from the left panel.
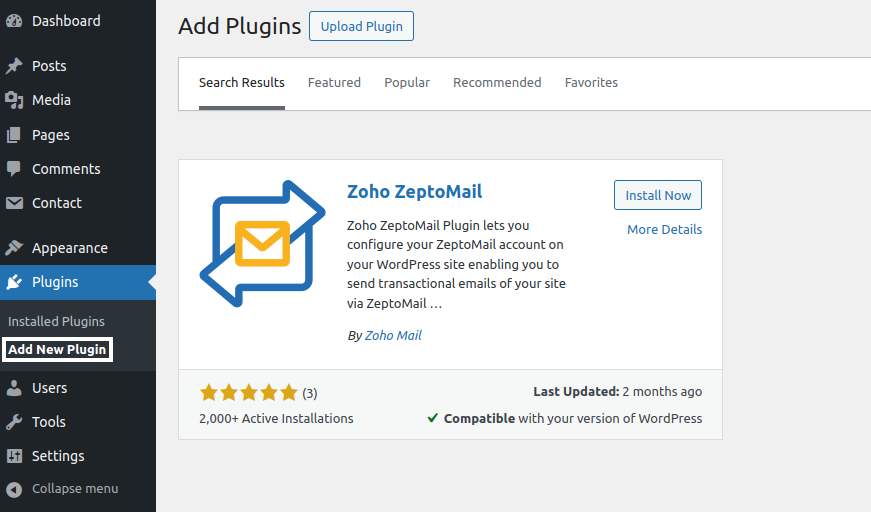
- Search for Zoho CPaaS Plugin using the Search bar and click the Install Now button next to the plugin.
- You can also install the Zoho CPaaS Plugin from here.
- To begin using the plugin, go to the Plugins > Installed Plugins Section.
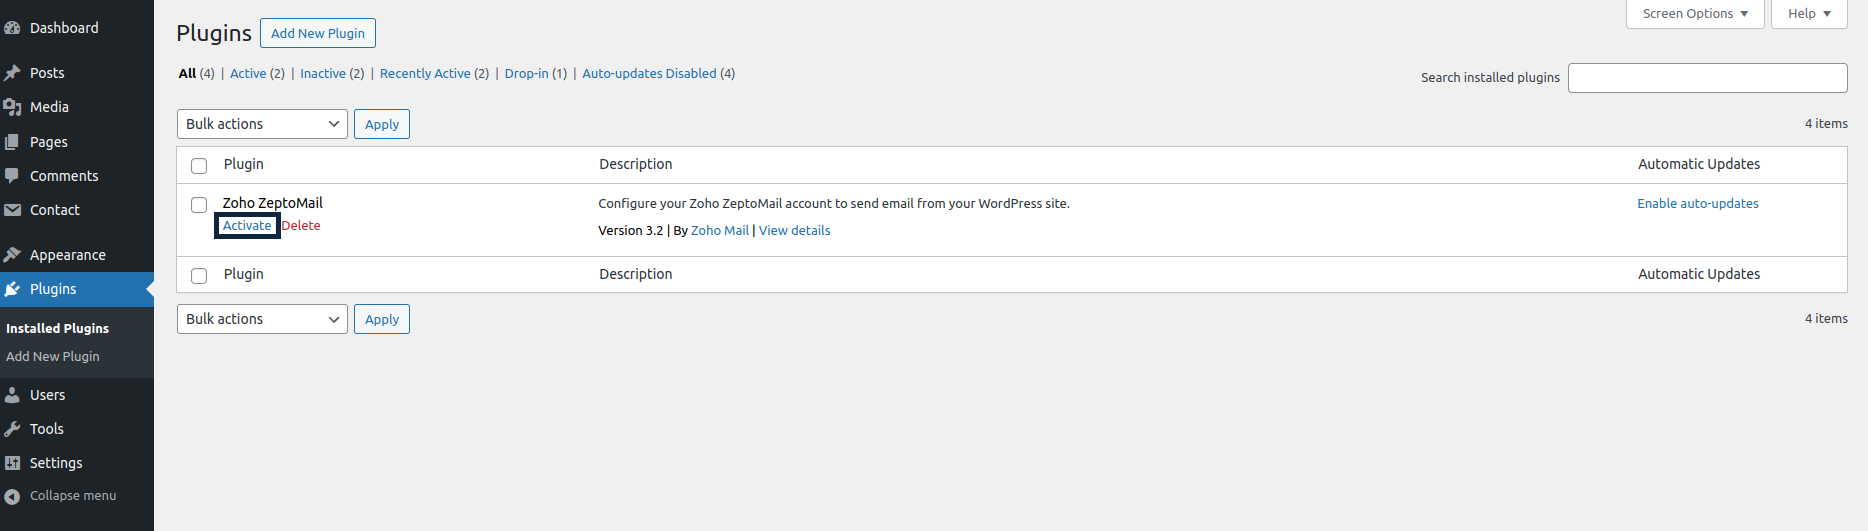
- Click the Activate button near the Zoho CPaaS Plugin.
- The Zoho CPaaS plugin will be activated in your WordPress account.
Configuration Parameters - Zoho CPaaS WordPress Plugin
| Parameter | Description |
| Hosted region | The region in which your Zoho Account Data resides. (One of the valid domains hosted with Zoho) |
| Send API key | Send API key generated in the Zoho CPaaS Agent you wish to configure in WordPress. |
| Email Format | Emails from the plugin will be sent in the chosen format by default. |
| From Email Address | The email address that will be used while sending all emails. |
| From Name | The name that will be shown as the Display Name while sending all emails from WordPress. |
Configuring Zoho CPaaS Plugin
Once the plugin is installed, you need to configure your Zoho CPaaS account in WordPress to send transactional emails via Zoho CPaaS API.
- After installing the plugin, the Zoho CPaaS plugin tab will appear on the left menu. Navigate to the Zoho CPaaS Account configuration page under this tab.
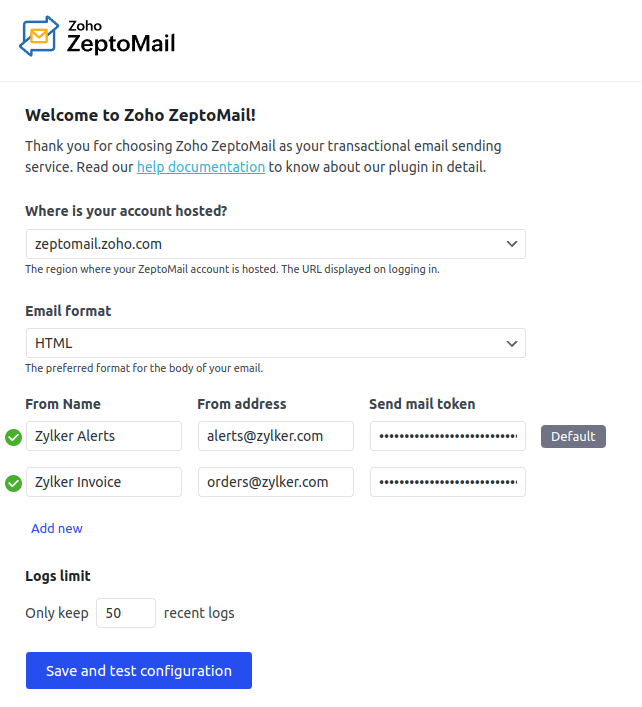
- Choose the region where your Zoho CPaaS account is hosted.
- Next, select the format in which your emails will be sent - HTML or Plain text.
- Enter the From name, From addresses and Send API key you wish to use to send out emails for you. A total of three From addresses and Send API keys can be used. The from address and Send API key values can be from a single Agent or multiple Agents.
- Of the three email addresses, one can be set as a default address. This will be used, if an incorrect email address or an email address apart from the ones mentioned is used to send out emails.
- Next, choose the number of email logs you wish to see in the Email logs section.
- Click save and test configuration to save changes. The configuration will be checked and validated. In case of discrepancies, the data should be changed to send out emails.
The Send API key you use to send out emails should be generated from your Zoho CPaaS account.
Steps to generate Send API key
- Login to your Zoho CPaaS Account and access the relevant Agent you wish to configure in WordPress.
- Copy your existing Send API key or generate a new one from the SMTP/API section of that Agent.
- Go to the Zoho CPaaS Account configuration page in the WordPress Dashboard to complete the process.
Once the configuration is correctly saved, you will be able to send transactional emails using the plugin.
Test email from the plugin
Once the Zoho CPaaS plugin is configured in your WordPress account, you can check the functionality of the plugin by sending a Test Email.
- In your WordPress Dashboard left menu, go to Zoho CPaaS > Test Mail.
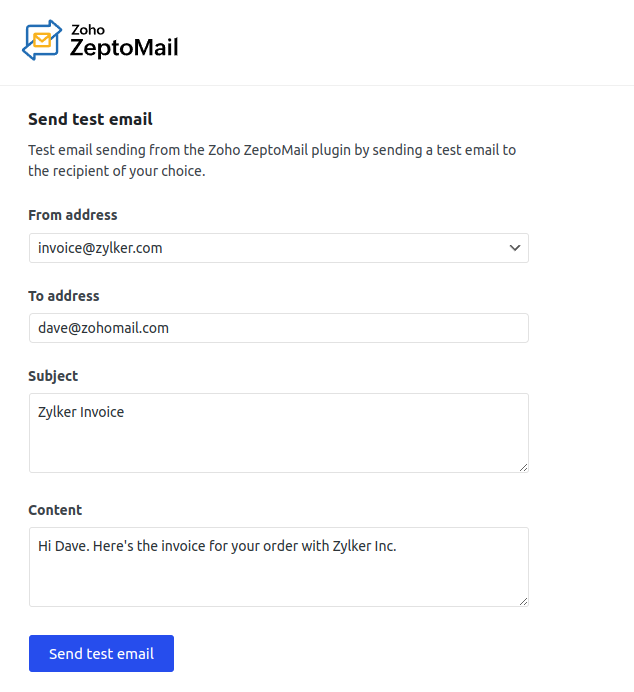
- Enter the following details:
- From : Validated sender address from the list
- To: Email Address of the recipient
- Subject: Subject of the email
- Content: The message or body of the email
- Click Send Mail.
A test mail will be sent. By default, the email will be sent using the 'From address' of the account.
Email logs
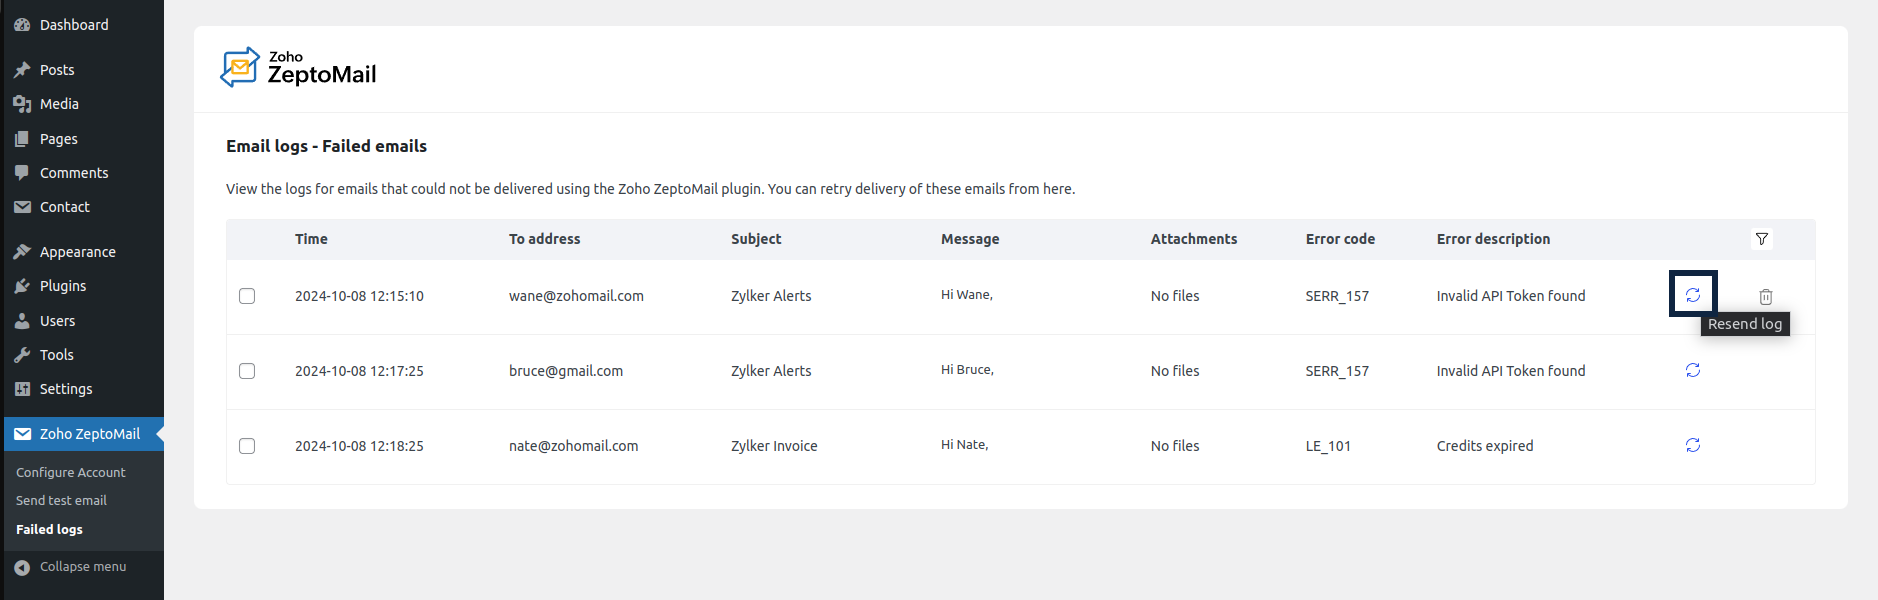
- You can view the list of emails that haven't reached the recipients due to various reasons from the Email logs section. You can attempt to resend these emails again using the Resend log button.
Further, you can filter the contents based on commonly encountered errors using the filter option.
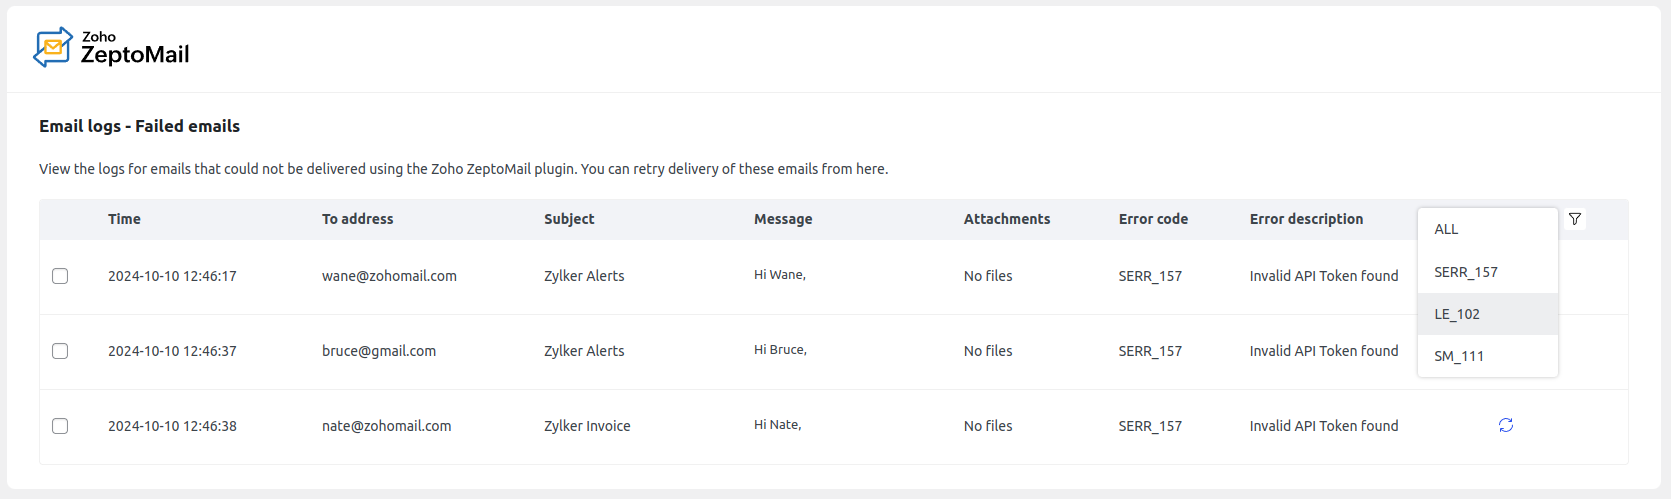
The error codes listed are :
Code Reason Solution SERR_157 Invalid Send API key Obtain the correct Send API key from the Setup info section of the Agent. SM_111 Unverified from address domain Verify the domain or use an email address with a verified domain LE_102 Credit exhausted Purchase new credits You can refer this document for information on other types of errors you encounter.
Troubleshooting
Using Zoho CPaaS with other SMTP plugins (e.g., WP Mail SMTP)
You can use Zoho CPaaS with other SMTP plugins but only one plugin should handle your outgoing mail at a time. Running two mail plugins at once can cause conflicts where one plugin may silently block the other, and emails might not send at all.
- If you want Zoho CPaaS to send all your emails: Disable the other mail plugin, or ensure they are not configured to override WordPress email sending.
- If the other plugin needs to handle specific emails (such as contact form submissions): Set that plugin to use its own built-in mailer, and make sure it is not set to override WordPress mail globally.
Email sending function overridden by another plugin
Another plugin on your site may have taken over the WordPress mail function. This means Zoho CPaaS plugin never receives the request to send email in the first place. You can temporarily disable other mail plugins one by one and send a test email after each. If email starts working after you disable a specific plugin, that plugin is the cause of the conflict.
SMTP connection errors
An SMTP connection error usually means WordPress cannot reach the mail server. This can happen due to wrong settings, a firewall, or your hosting provider blocking outbound connections.
Steps to try:
- Double-check your SMTP host, port number, encryption type (SSL or TLS), and your login credentials.
- Try using port 465 (SSL) or port 587 (TLS) if your current port is not working.
- Contact your hosting provider and ask if outbound SMTP connections are blocked on your server.
“From Name” validation error
The From Name field allows only specific characters. If you use an emoji, HTML code, or an unsupported symbol, the plugin will show a validation error and the email will not send. Make sure to remove any emojis, HTML tags, or special characters from the From Name and save the changes.
Allowed characters:
- Letters, numbers, spaces
- Symbols: . , _ - + & ’ ( ) :
Emails not sending
If no emails are going out, follow these steps :
- Go to the plugin settings and send a test email to confirm the basic setup is working.
- Temporarily disable any other mail or SMTP plugins and test again.
- Enable debug logging in the plugin settings and check the error log for any specific error messages.
If all the above-given troubleshooting methods do not resolve the issue, reach out to our Customer support (support@zohocpaas.com) with the screenshot of the configuration settings page for a solution.
Note:
Sending emails through Zoho CPaaS is subjective to our Usage Policy restrictions. Please refer to our Usage Policy page for details.