Creation of Items & Item Groups
Here is an overview of managing Items
- Creating a New Item Group with multiple items
- Removing items from a group
- Cloning an item from a group
- Moving items to another group
Creating a New Item Group with multiple items
You can create a new item group using different methods.
- Method 1: By clicking on the quick create + button near the Item Groups tab in the left side bar.
- Method 2: By opening the Item Groups page and clicking on the + New button on the top-right corner.
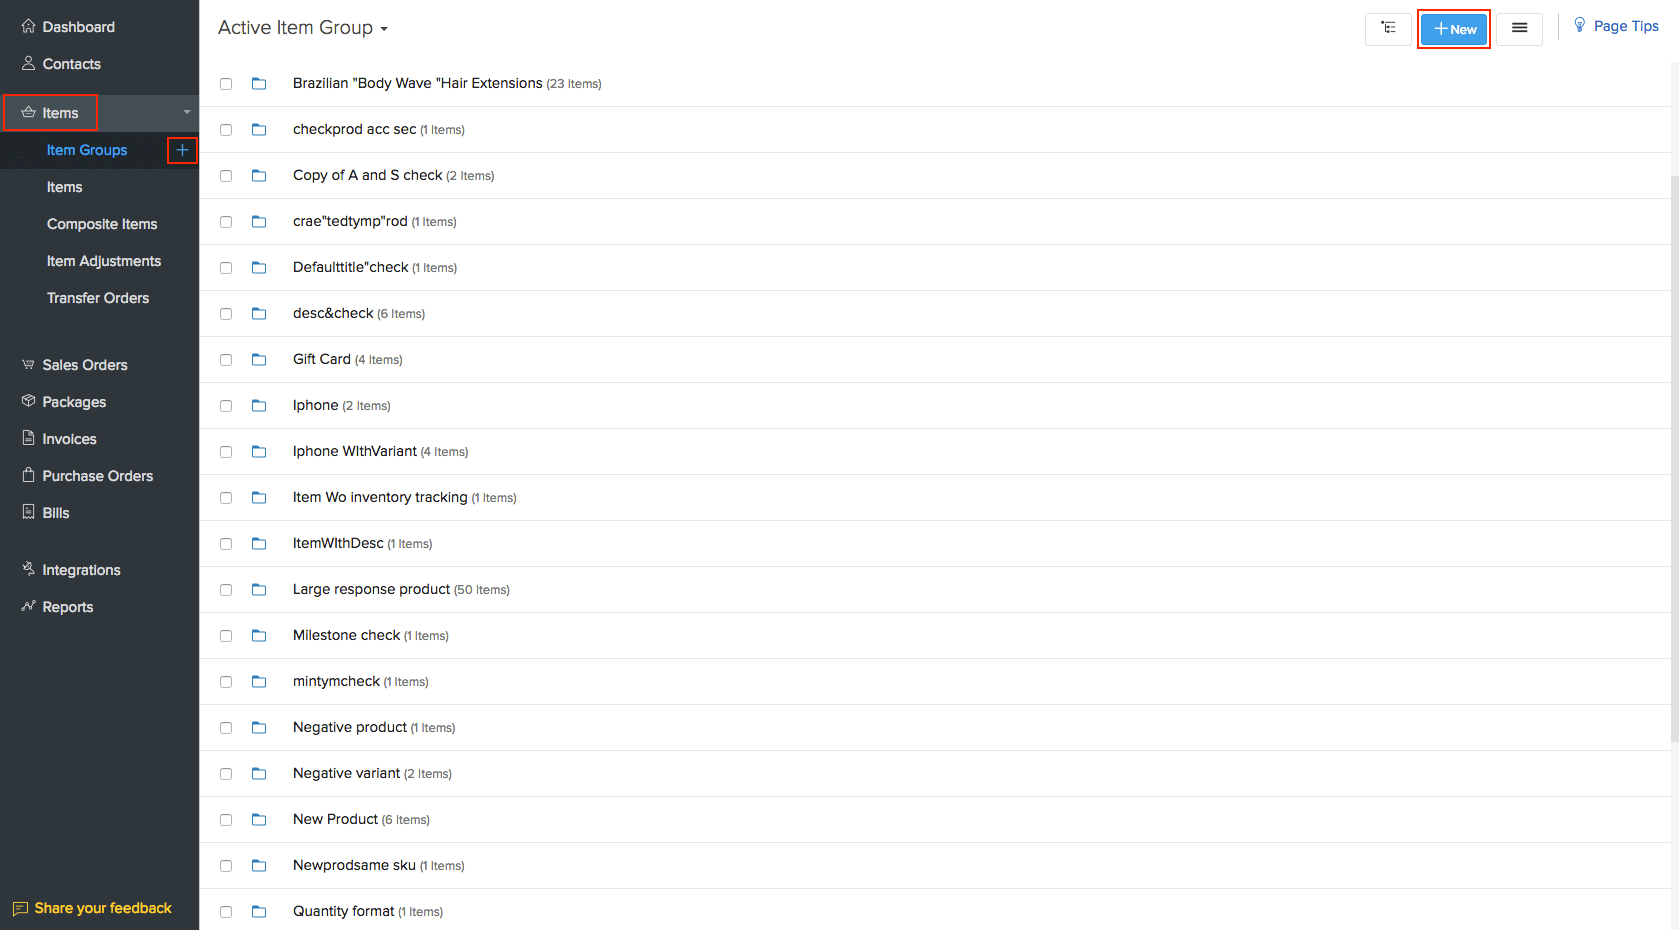
On using any one of the above mentioned methods, a new item group page opens up.
Adopt these steps to create an Item Group with multiple items.
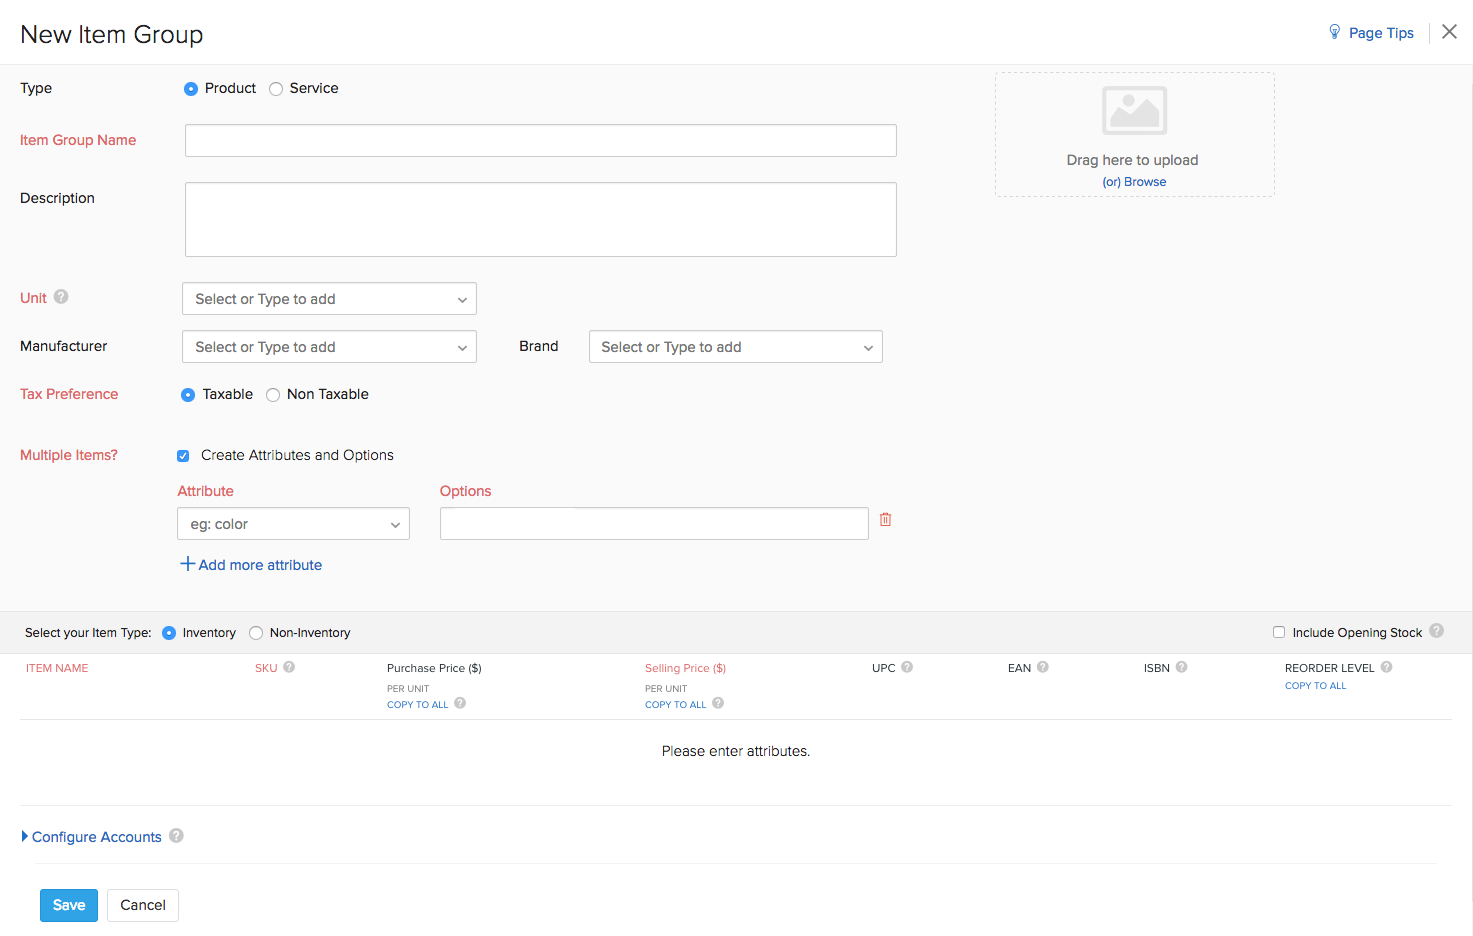
Recording primary information
- Fill up the name of the Item group.
- You can add a new item category or choose an already existing category from the drop-down. Learn more about item categories. The category assigned to the group will be applied to its constituent items too. Similarly, assigning a category to an item of a group will subsequently be reflected across the group and its constituents.
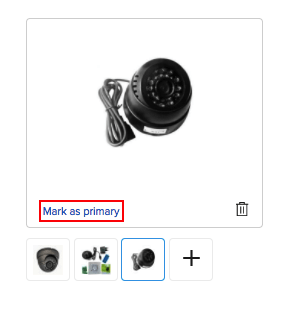
- Upload an image for your item. You can upload up to fifteen images for an item.(File format: .gif, .png, ,jpeg, .jpg, .bmp; Max File Size: 5 MB each.) Make one of them as the primary image that will represent all the variants in the item group.
- Choose the UOM(Unit of Measurement) for your product from standard ones like Kgs, meters, lbs etc. or add your own units of measurement.
- Record any Tax associated with the item.
- Add a Description of your item.
- Select your product type: Inventory or Non-Inventory.
- If your product type is Non-Inventory, select whether the product is a Sales Only product, a Purchase Only product or Both.
Adding attributes & options
- By default, the box near the Multiple Items field that says, Create Attributes and Options will be checked.
- On unchecking this option, a pop-up with two choices will appear before you. Using the choices on the pop-up, you can either choose to create a stand-alone item or an item group with multiple items.
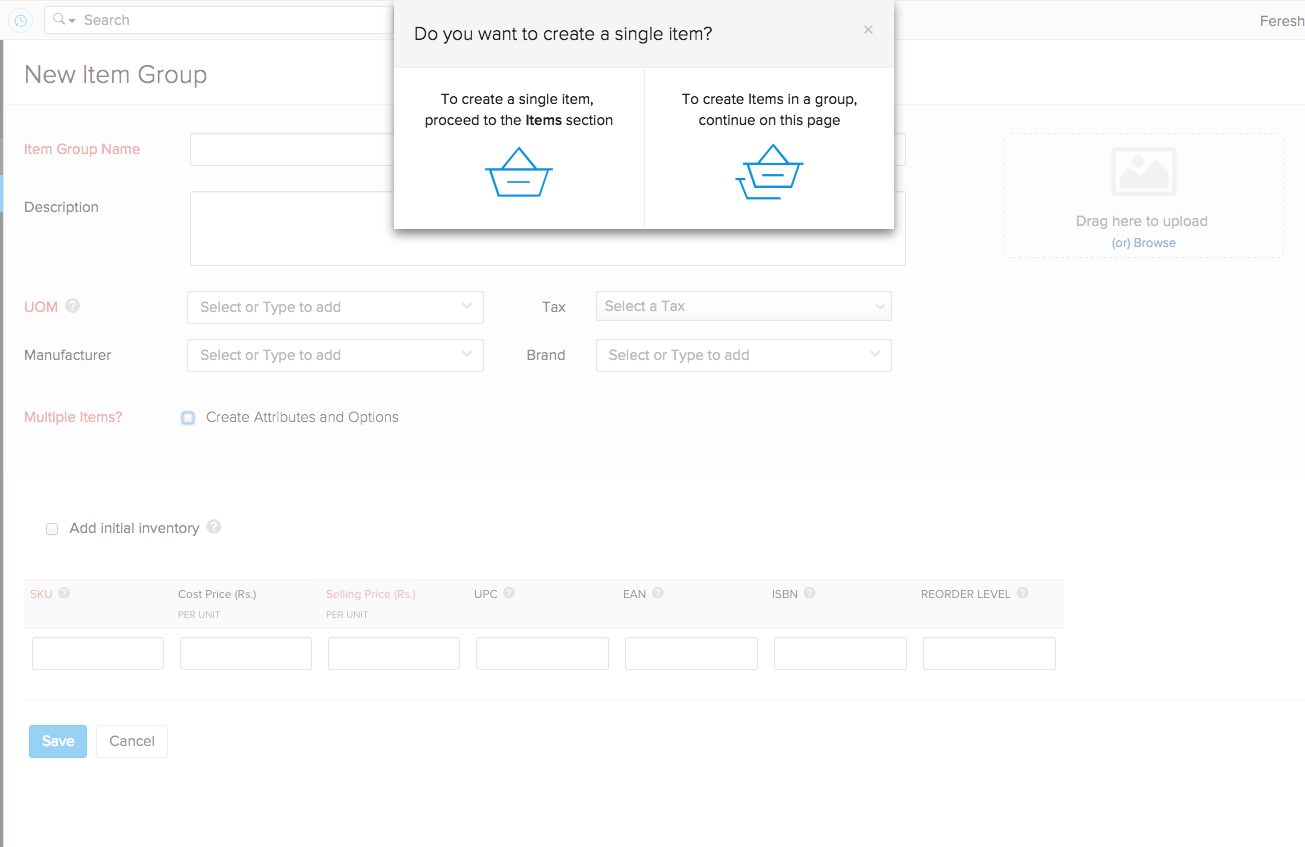
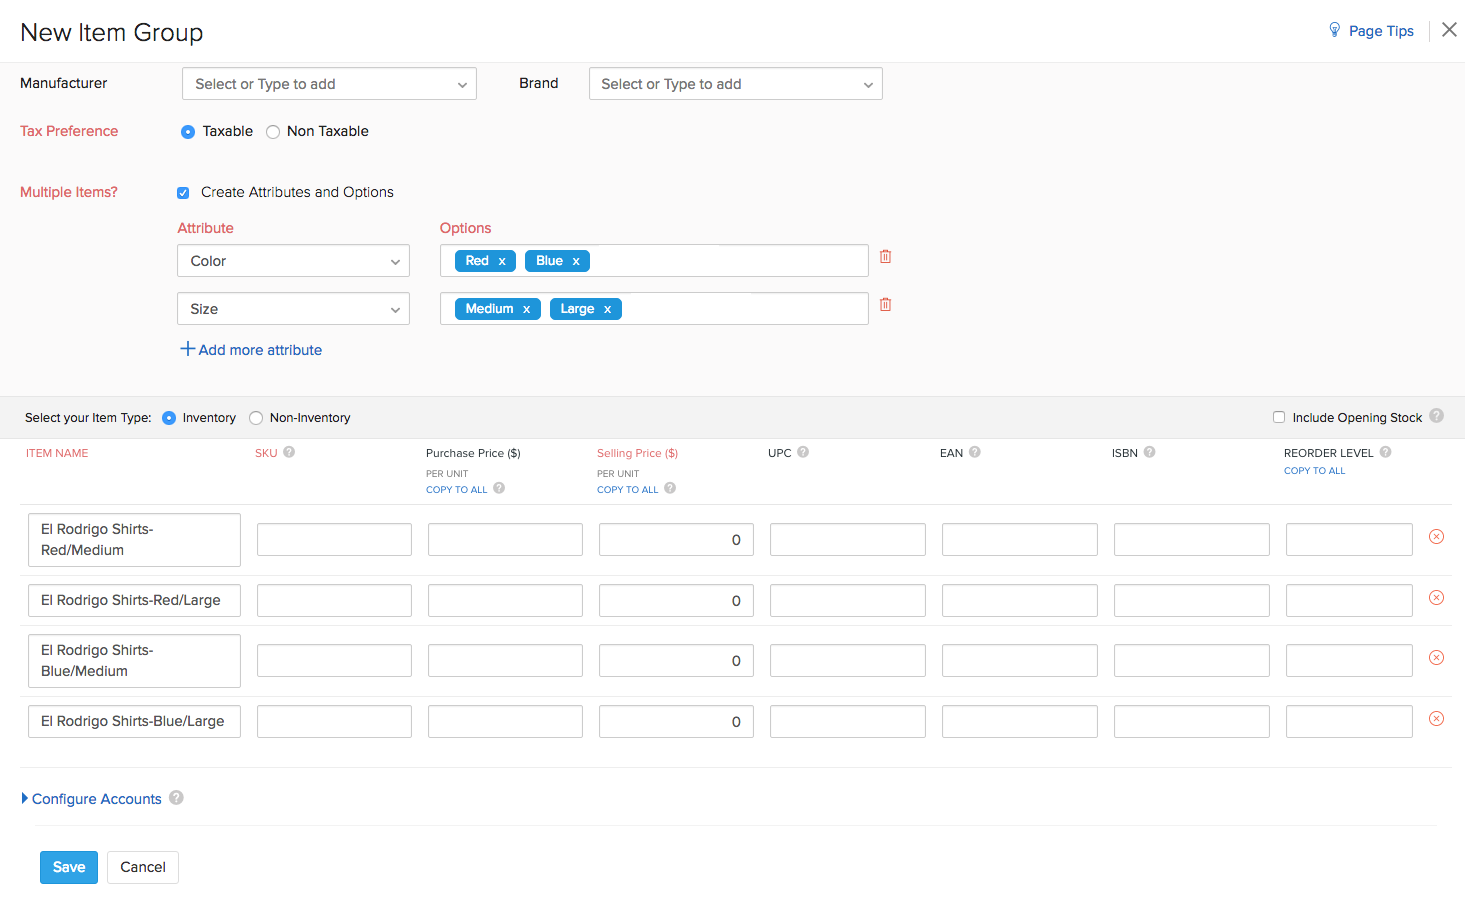
- Below the checkbox field, we have fields to enter attributes and options.
- You can add attributes like color, size etc. and provide the options (each option must be separated by comma) for that attribute.
- For e.g.: If the attribute is ‘color’, then the options for this attribute can be red, blue, green, etc.
- You can add more attributes if you wish, by clicking on the +Add more attribute option.
Important Note: You can add up to 3 attributes to classify your items in an item group.
- On adding attributes and specifying options for those attributes, items will be generated based the combination of the item group name and the options.
Configuring items of the group
- Item Name is auto generated by the system. However, you can also manually change the item names as you wish.
- The SKU(Stock Keeping Unit) field is a mandatory identifier for your items. Hence you will not be able to skip this field. Storing your barcode information on this field will enable you to use a barcode scanner to add items to your orders, invoices and bills.
- HSN code also can be recorded for the item for GST compliance.
Note: Click the Search icon next to the HSN field to search and find the HSN code for the respective item.
- Record your item’s average purchase price in the Purchase Price field.
- Record your item’s average sales price in the Selling Price field.
- Check the box near Include Opening Stock option to record the Opening Stock and the Opening Stock Value of the item.
Note: The opening stock of an item refers to the stock you have on hand at the moment of creating that item. The opening stock value refers to the average purchase price of your opening stock. This will be used for FIFO Cost Lot Tracking.
- If you wish to add product codes like UPC(Universal Product Code), EAN(International Article Number) and ISBN(International Standard Book Number), you can fill the details in their respective fields for the Item.
- Note: The UPC and EAN fields are numeric fields. The MPN and ISBN are alphanumeric fields that support alphabets, numbers, spaces and even hyphens.
- You can also set Reorder Levels for your items so that when their current stock on hand becomes less than the reorder point, then these items will be considered as low stock items.
Configuring the accounts associated with item groups
- You can configure the accounts associated with the items of this group by clicking on the Configure Accounts option below the item table(below all your items under the group).

Doing this will open up fields for associating a Sales Account, a Purchase Account and an Inventory Account of your choice.
By default an item group will be associated with the following accounts - Sales, Cost of Goods Sold and Inventory Asset accounts.
When you are ready, hit the Save button to create an item group with multiple inventory tracked items.
Cloning an Item from a Group
Cloning helps you create an item quickly without having to enter all the details from scratch. This feature comes in handy when you want to:
- deactivate an item and create a new one in its place.
- create a new item with properties that are similar to the existing one.
An item group as a whole cannot be cloned, but you can clone the variants in the group.
To clone an item from a group:
- Go to the Item Groups module on the sidebar.
- Open an item group.
- Click on an item you want to clone under Item Details.
- Click on More and select Clone.
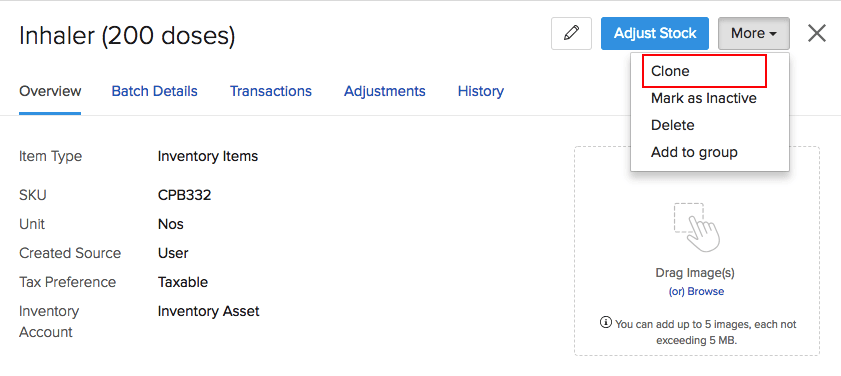
- The item details will be pre-filled. Make the necessary changes.
- Scroll down and click Save to create the item.
Note: When you clone an item from a group, it’ll be created as an individual item and not as part of the group. Learn how you can move an existing item into a group.
Removing items from the group
You can remove items from Item Groups. To do so,
- Navigate to Items -> Item Groups in the sidebar of Zoho Inventory.
- Select the item group of your choice.
- In the details page on the right, click on the item that you wish to remove from the group.
- Now, the item details will be displayed.
- In this page, click on More -> Remove from Item Group. Confirm your action to remove the item from the Item group.
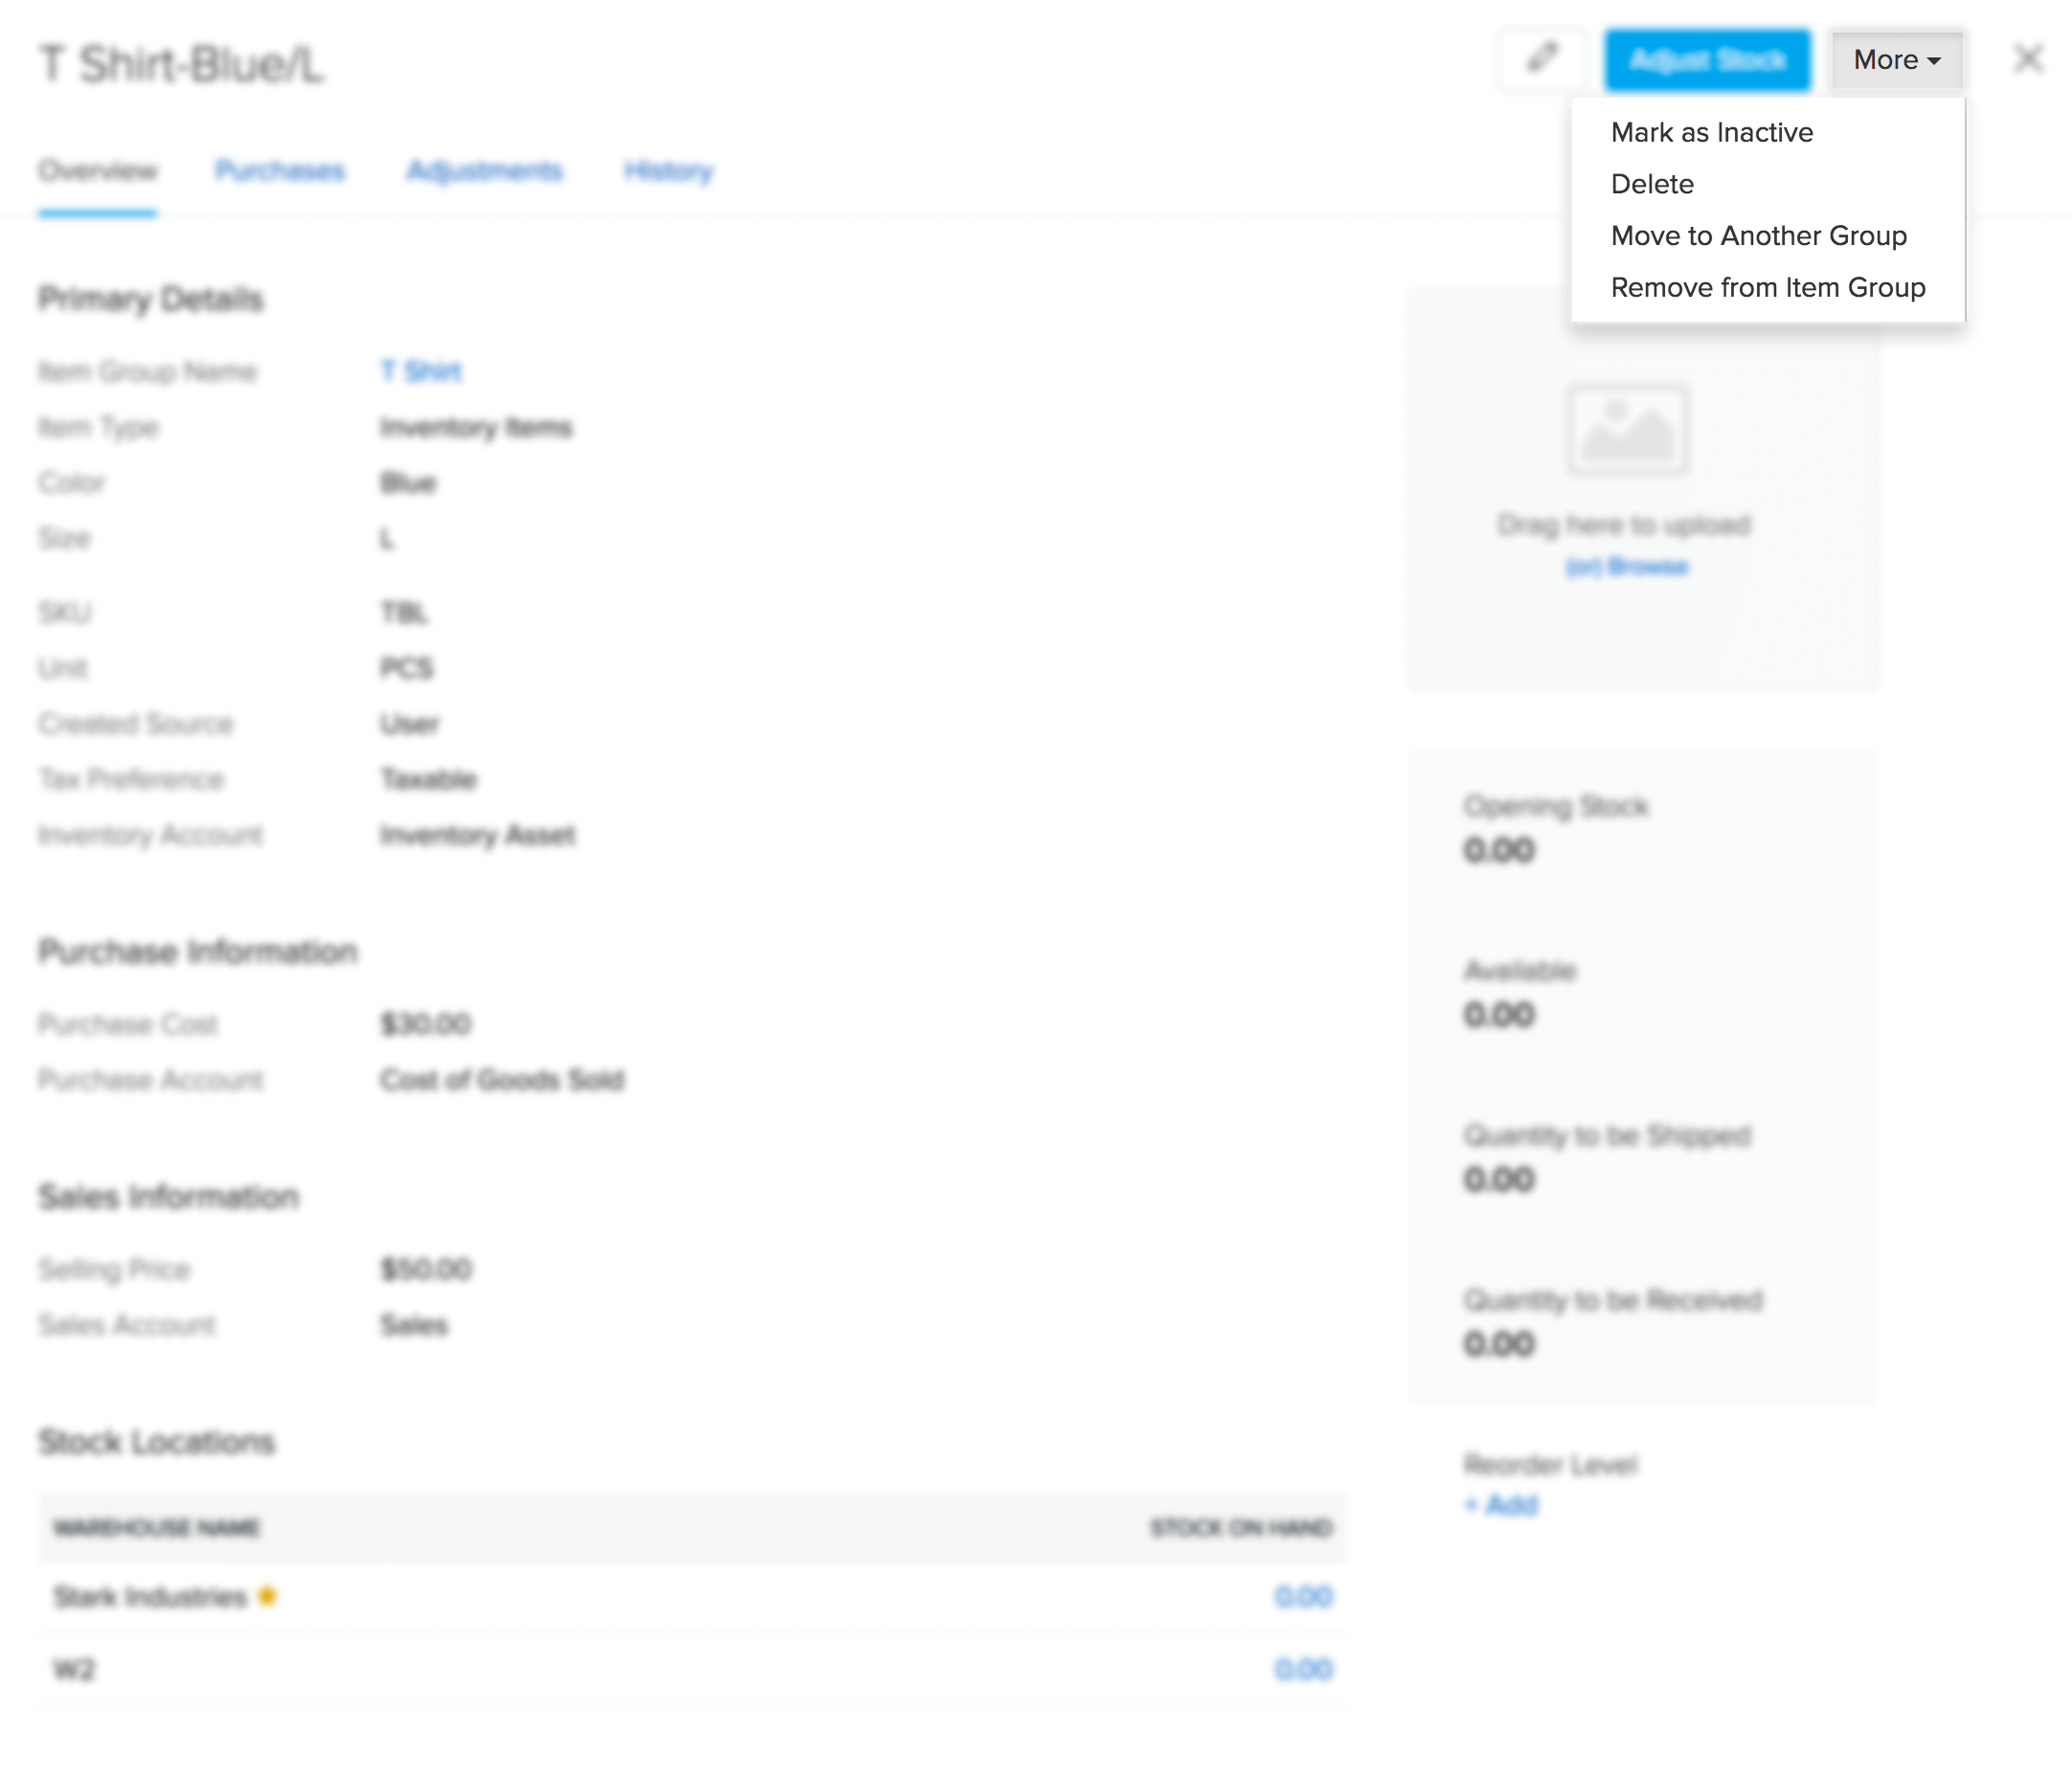
Note: You can also do the operation by selecting the item from your items list.
Moving items to another group
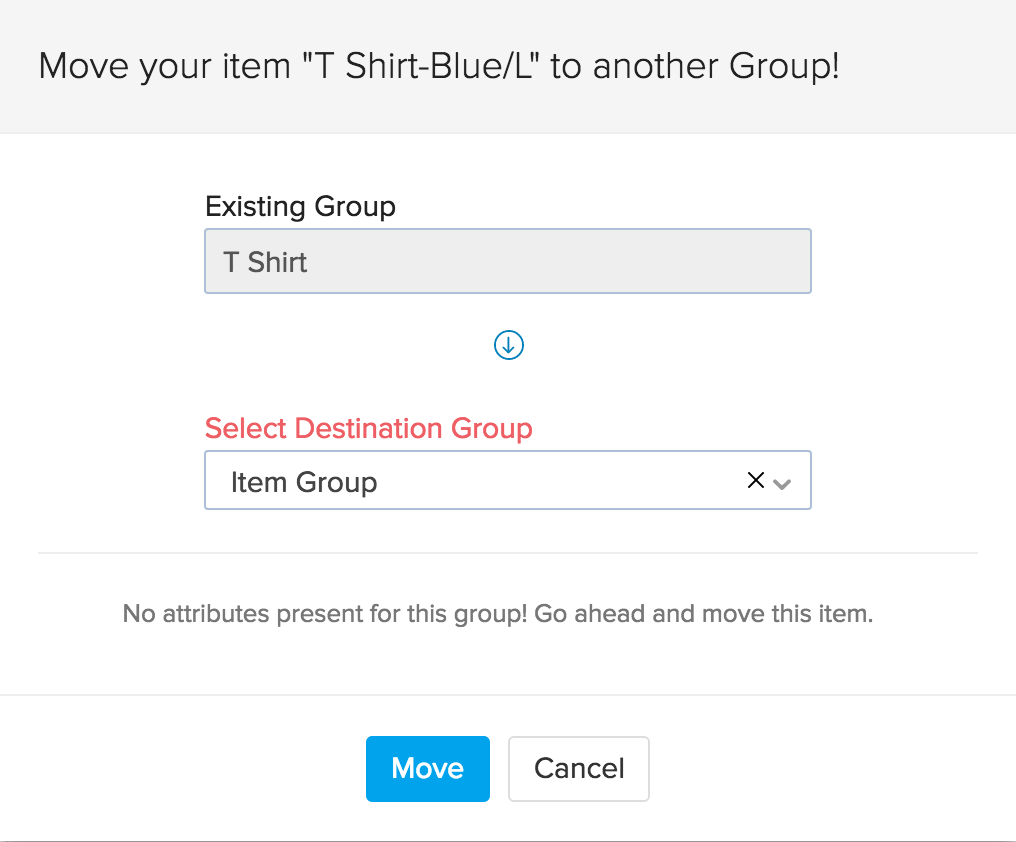
To move an item to another group,
- Navigate to Items -> Item Groups in the sidebar of Zoho Inventory.
- Select the item group of your choice.
- In the details page on the right, click on the item that you wish to remove from the group.
- Now, the item details will be displayed.
- In this page, click on More -> Move to another Group.

- Select the destination group, and fill in the attribute information for that group, if any. Click on the Move button to move the item to the other group.
Importing Item Groups
To import item groups into your Zoho Inventory account:
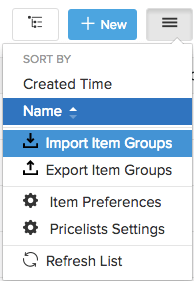
- Navigate to the Item Groups module.
- Click on the Hamburger icon(Top-right corner).
- Select Import Item Groups option in the drop down.
Import phase-1 : Uploading the file
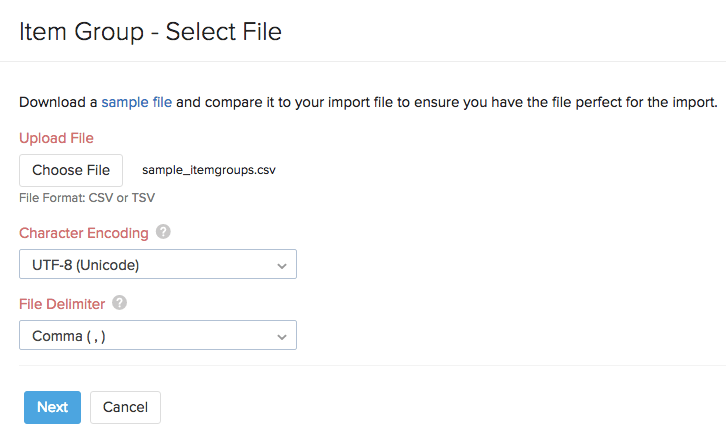
- You will be navigated to a new window.
- Here you can choose the CSV or TSV file to be uploaded.
- Choose the File Delimiter(comma or semicolon). By default it will be comma for a CSV.
- Click on Next to proceed to mapping fields window.
Import phase-2 : Mapping import fields
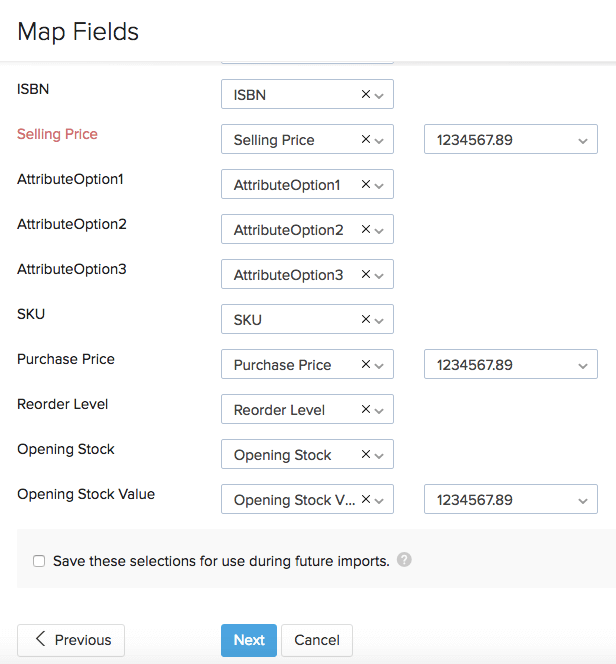
- Zoho Inventory will automatically map similar fields and match them together.
- You can manually match the unmapped ones or alter mapped ones.
- Check the box near the option Save these selections for use during future imports to automate mapping for future item imports.
- Click on the Next button to proceed to the Preview window.
Note: The variant names in the item group will be formed as a combination of the Product Name and Attribute Options. For example, as given in the sample downloadable file, if your product name is iPhone and its variants are 6S and 6S Plus, then the variants will be created as iPhone-6S and iPhone-6S Plus.
Import phase-3 : Preview & Import
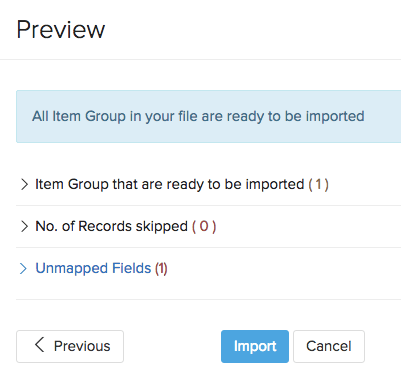
- Here a synopsis of the no.of variants ready for import, no. of skipped records and unmapped fields will be shown.
- You can make any changes to the operation by clicking Previous button.
- If everything is ready, click on Next button to successfully import.
Please Note: You can find the sample downloadable file in the import page which can be used as a reference to create the files you need to import.
Creating a New Item
In Zoho Inventory, you will be able to create a new item using different methods. Let’s see how…
Creating a non-inventory item
To create a new non-inventory item in Zoho Inventory,
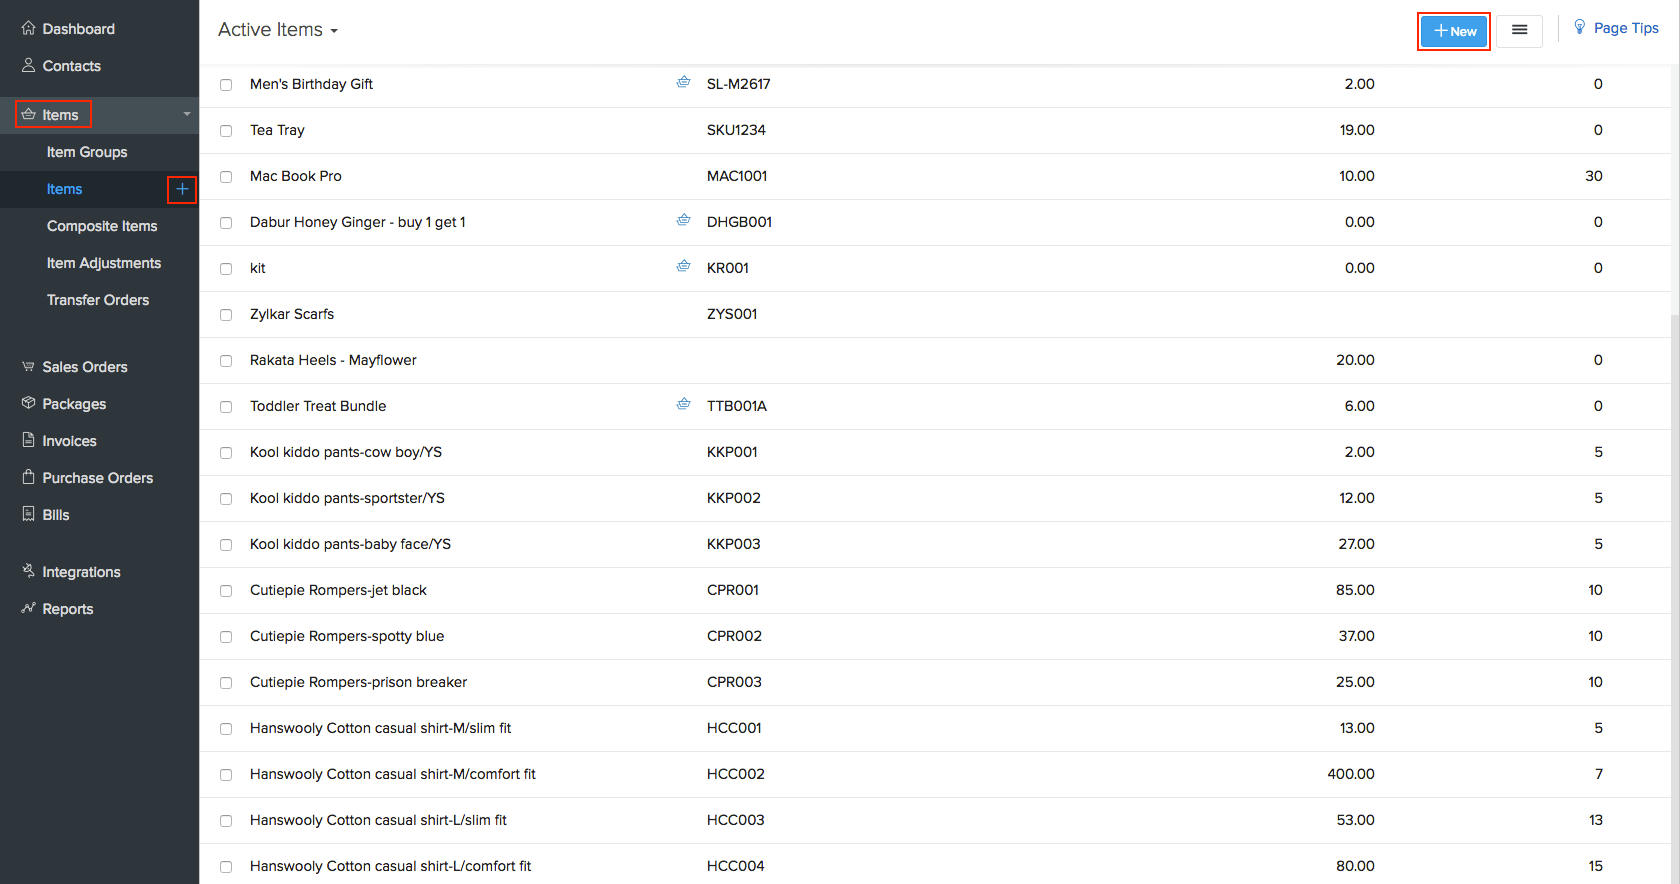
- Navigate to the Items module.
- You can start the creation process by either clicking on the quick create button (+ button near items on the LHS) or the + New button on the right top corner.
- Doing this, will direct you to a new item page.
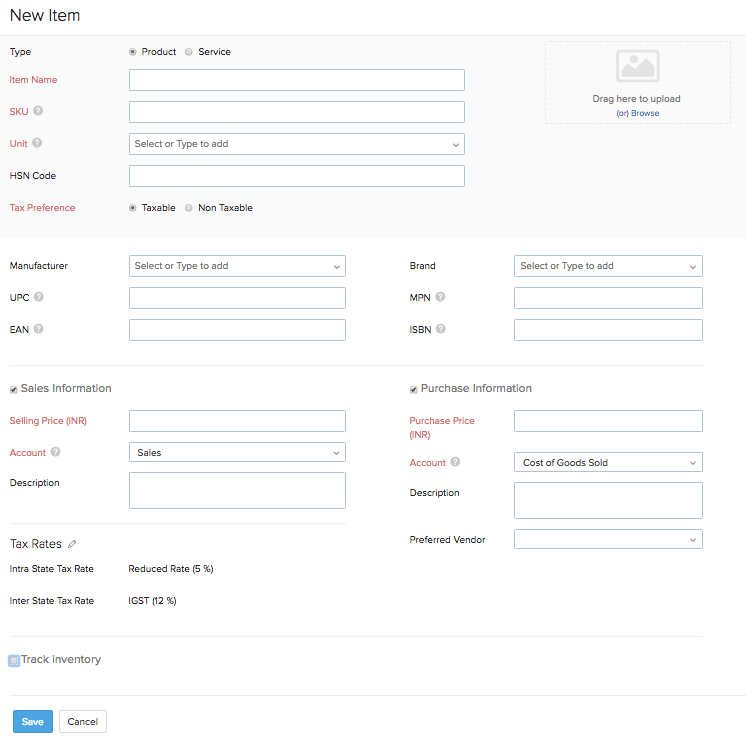
Primary Information
- Select the Type as Product.
- Enter the Name of the item.
- Specify a unit of measurement(for e.g. Kgs, pieces etc) for the item in the Unit field. You can also choose one of your previous UOMs if any from the drop-down.
- Record the SKU(Stock Keeping Unit) code for the item. This will serve as one of the unique identifiers for this item.
- You can add a new item category or choose an already existing category from the drop-down. Learn more about item categories.
- HSN code also can be recorded for the item for GST compliance.
Note: Click the Search icon next to the HSN field to search and find the HSN code for the respective item.
- Upload an image for your item. You can upload up to fifteen images for an item.(File format: .gif, .png, ,jpeg, .jpg, .bmp; Max File Size: 5 MB each.) Make one of them as the primary image.

Product Codes
- If applicable, you can record other product codes or standard barcodes associated with the item using the UPC, EAN, MPN and ISBN fields.
- Note: The UPC and EAN fields are numeric fields. The MPN and ISBN are alphanumeric fields that support alphabets, numbers, spaces and even hyphens.
Selecting the item type
- In Zoho Inventory by default, the Sales Information, the Purchase Information and the Track inventory for this item options are enabled. You can enable or disable any of these options. > To create a non-inventory item disable the Track inventory for this item option by unchecking the box adjacent to it.
- Note: A non-inventory item can also be created with only sales information or purchase information.
Sales Information
Under Sales Information,
- Record the Selling Price, associate the concerned Account(By default, the account associated will be Sales) and Tax(if applicable).
- Tax Rates section contains fields for Interstate and Intrastate tax rates. By default, the value given during the GST configuration process will be applied here. This can be changed by clicking on the pencil icon and selecting the appropriate tax rates applicable for your item.
- You can also add a sales description of up to 6000 characters in the Description field below Sales Information. This will be reflected on all your sales orders and invoices when you add the item to them.
Purchase Information
Under Purchase Information,
- Record the Purchase Price and associate the concerned Account(By default, the account associated will be Cost of Goods Sold). You can also create a +New Account of cost of goods sold type from the Account drop-down and associate it to the item for keeping track of its purchases.
- You can also add a purchase description of up to 2000 characters in the Description field below Purchase Information. This will be reflected on all your purchase orders when you add the item to them.
Finalizing item creation
- After filling in all the necessary details, click the Save button.
- Henceforth, you will be able to access the item from the Items module at any point of time.
Creating an inventory tracked standalone item
To create a new inventory tracked item in Zoho Inventory,

- Navigate to the Items module.
- You can start the creation process by either clicking on the quick create button (+ button near items on the LHS) or the + New button on the right top corner.
- Doing this, will direct you to a new item page.
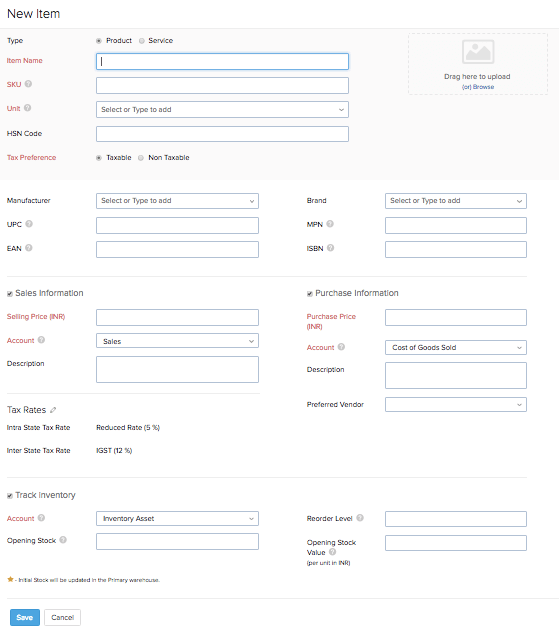
Primary Information
- Select the Type as Product.
- Enter the Name of the item.
- Specify a unit of measurement(for e.g. Kgs, pieces etc) for the item in the UOM field. You can also choose one of your previous UOMs if any from the drop-down.
- Record the SKU(Stock Keeping Unit) code for the item. This will serve as one of the unique identifiers for this item.
- You can add a new item category or choose an already existing category from the drop-down. Learn more about item categories.
- HSN code also can be recorded for the item for GST compliance.
Note: Click the Search icon next to the HSN or SAC field to find the HSN or SAC code for the respective item.
- Upload an image for your item. You can upload up to fifteen images for an item.(File format: .gif, .png, ,jpeg, .jpg, .bmp; Max File Size: 5 MB each.) Make one of them as the primary image.

Product Codes
- If applicable, you can record other product codes or standard barcodes associated with the item using the UPC, EAN, MPN and ISBN fields.
- * Note: The UPC and EAN fields are numeric fields. The MPN and ISBN are alphanumeric fields that support alphabets, numbers, spaces and even hyphens.
Selecting the item type
- In Zoho Inventory by default, the Sales Information, the Purchase Information and the Track inventory for this item options are enabled. > To create an inventory item - all the above mentioned options(Sales Information, Purchase Information, and Track inventory for this item) must be enabled.
- Note: A non-inventory item can also be created with only sales information or purchase information.
Sales Information
Under Sales Information,
- Record the Selling Price, associate the concerned Account(By default, the account associated will be Sales) and Tax(if applicable).
- Tax Rates section contains fields for Interstate and Intrastate tax rates. By default, the value given during the GST configuration process will be applied here. This can be changed by clicking on the pencil icon and selecting the appropriate tax rates applicable for your item.
- You can also add a sales description of up to 6000 characters in the Description field below Sales Information. This will be reflected on all your sales orders and invoices when you add the item to them.
Purchase Information
Under Purchase Information,
- Record the Purchase Price and associate the concerned Account(By default, the account associated will be Cost of Goods Sold). You can also create a +New Account of cost of goods sold type from the Account drop-down and associate it to the item for keeping track of its purchases.
- You can also add a purchase description of up to 2000 characters in the Description field below Purchase Information. This will be reflected on all your purchase orders when you add the item to them.

Inventory Tracking Information
Under the Track inventory for this item option,
- By default, the item will be associated to Inventory Asset under the Account field.
- Record the Opening Stock(if any).
Opening Stock refers to the quantity of the item on hand before you start tracking inventory for the item in Zoho inventory.
- If you have enabled warehouses in Zoho Inventory, then select a warehouse and enter the opening stock to be added to that warehouse.
- Click + Add Warehouse to enter an opening stock in another warehouse.
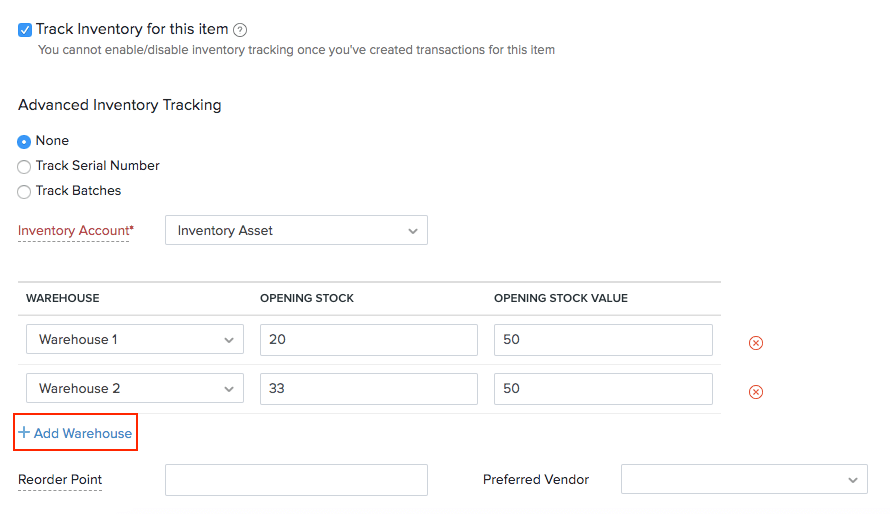
- Record the average purchase price as the Opening Stock Value.
- You can also record the Reorder Level and add a Preferred Vendor of your choice for this item.
Finalizing item creation
- After filling in all the necessary details, click the Save button.
- Henceforth, you will be able to access the item from the Items module at any point of time.
Bonus
- Additionally inventory tracked items can also be added to an item group or associated with a composite item.
- To know more about grouping of ungrouped/standalone items, click [here]().
- To know more about composite items, click [here]()
Creating a Service Item
You can also create Service Items or Service Goods in Zoho Inventory. To do so:

- Navigate to the Items module.
- You can start the creation process by either clicking on the quick create button (+ button near items on the LHS) or the + New button on the right top corner.
- Doing this, will direct you to a new item page.
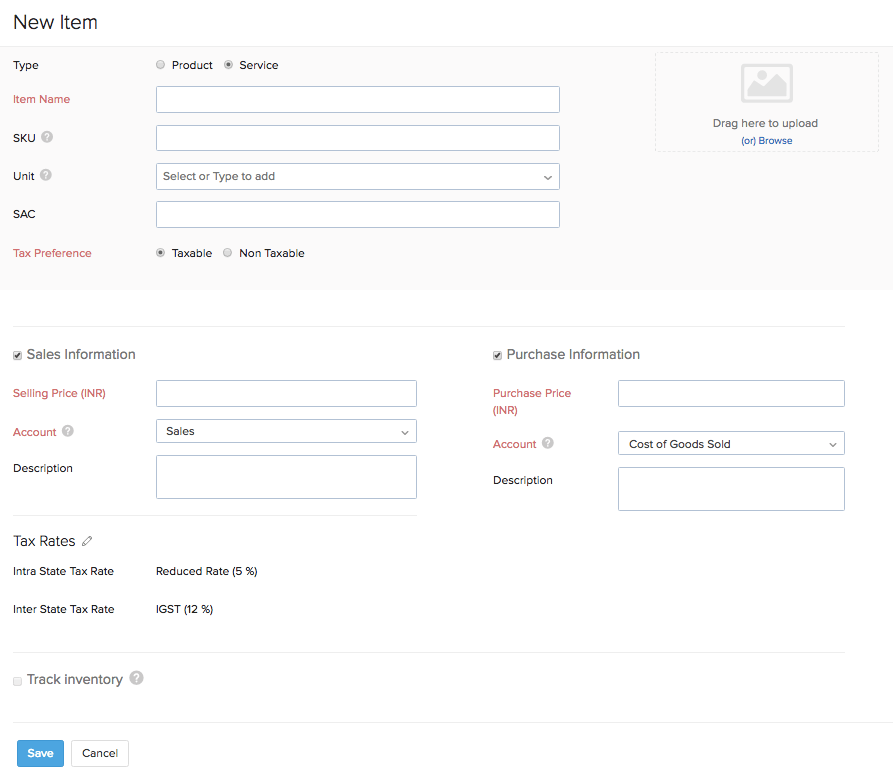
- Select the Type as Service.
- You can add a new item category or choose an already existing category from the drop-down. Learn more about item categories.
- Upload an image for your item. You can upload up to fifteen images for an item.(File format: .gif, .png, ,jpeg, .jpg, .bmp; Max File Size: 5 MB each.) Make one of them as the primary image.
- Fill in the necessary information and click on Save
Note:
- Service items can be used for adding your labor costs and other services. These items will not be displayed in Packages and Shipments.
- Click the Search icon next to the SAC field to find the SAC code for the respective service item.
Creating an item with serial numbers
You can also create new items with serial numbers in Zoho Inventory. To do so:

- Navigate to the Items module.
- You can start the creation process by either clicking on the quick create button (+ button near items on the LHS) or the + New button on the right top corner.
- Fill up the item details, and select Track serial number option under Advanced Inventory Tracking. If you’ve entered an opening stock, you’ll be able to add serial numbers for them.
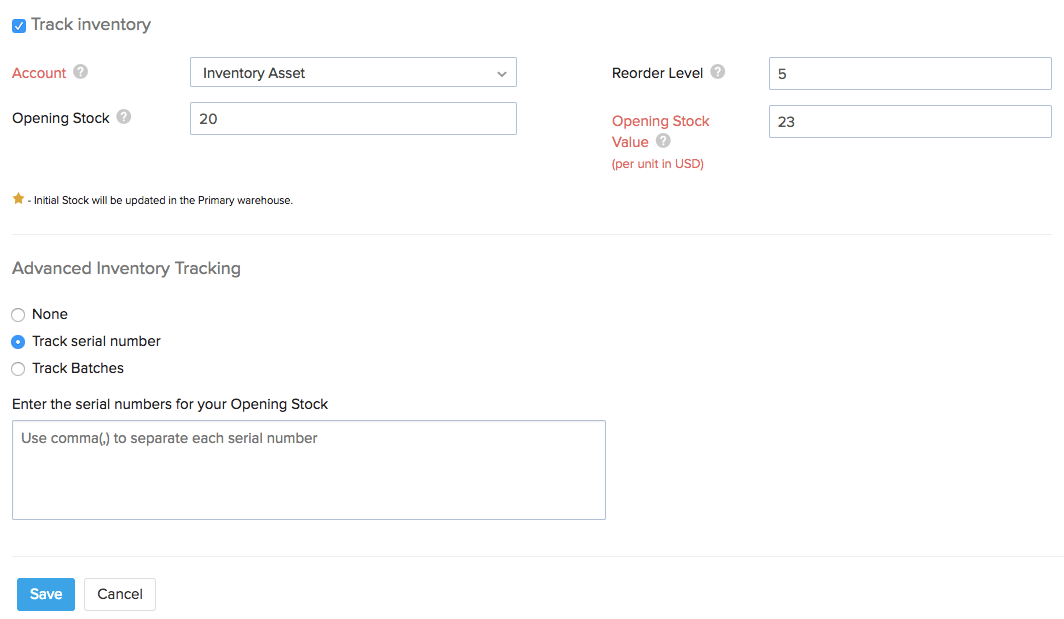
- If you have enabled warehouses in Zoho Inventory, then select a warehouse and enter the opening stock to be added to that warehouse.
- Click the (…) icon at the end of the row and click Add Serial Number to enter serial numbers for the opening stock of the particular warehouse.
- Click + Add Warehouse to enter an opening stock for another warehouse and repeat the previous step to enter serial numbers for those units.
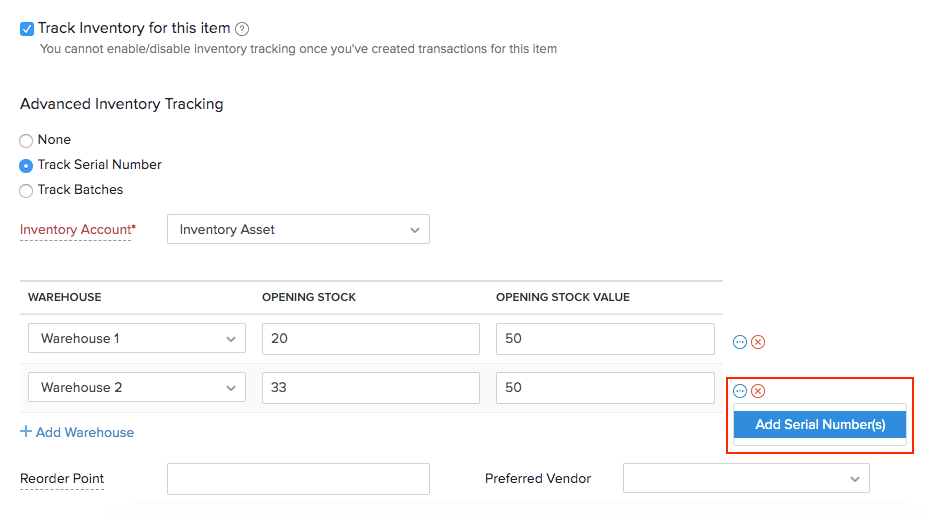
Note: You can enter upto 200 serial numbers for an opening stock.
- You can either manually enter the serial number or scan it using a barcode scanner for all the units, and click Save. The serial numbers will now be available for your transactions.
Note:
- Serial number tracking is available only for items that have inventory tracking enabled.
- You can also create composite items with serial numbers. Learn how.
Creating a batch tracked item
- Navigate to the Items module.
- Click the quick create button (+ button near items on the LHS) or the + New button on the top-right corner.
- Fill up the essential details and enable Inventory Tracking.
- Choose Track Batches under Advanced Inventory Tracking.
- If you’ve entered an opening stock for the item, you’ll be able to enter the batch numbers for those units in the same page.
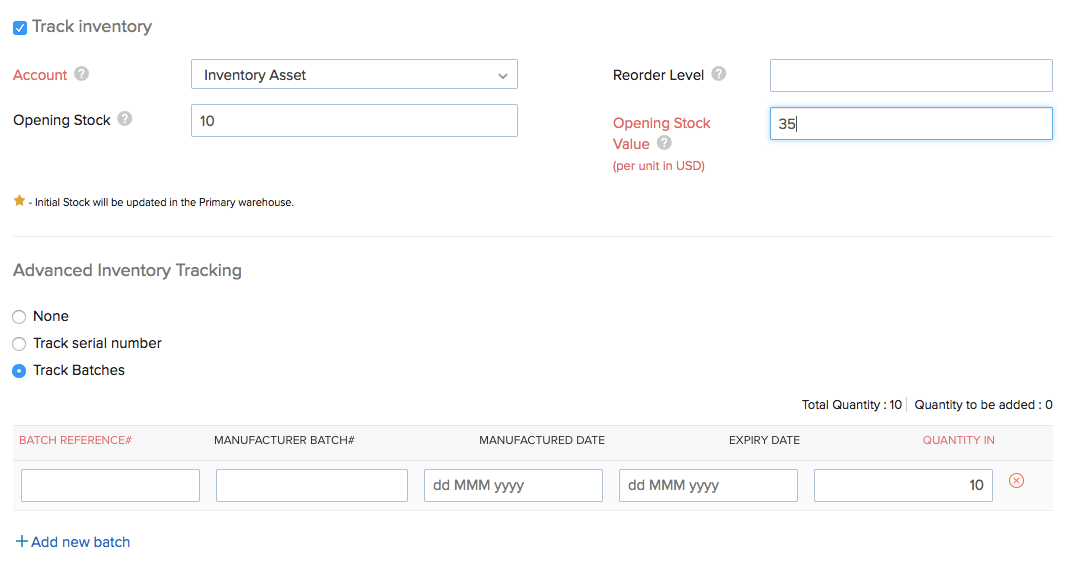
- If you have enabled warehouses in Zoho Inventory, then select a warehouse and enter the opening stock to be added to that warehouse.
- Click the (…) icon at the end of the row and click Add Batches to enter batch numbers for the opening stock of the particular warehouse.
- Click + Add Warehouse to enter an opening stock for another warehouse and repeat the previous step to enter batch numbers for those units.
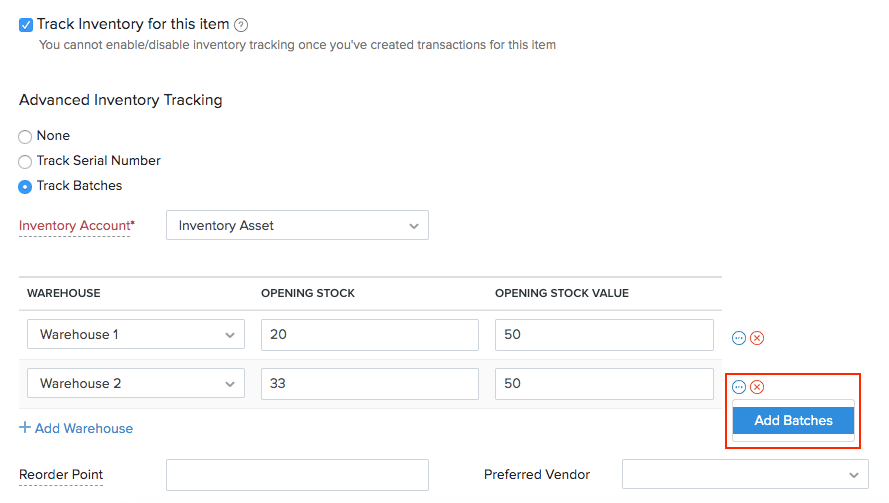
Note: You can enter upto 100 batch numbers for an opening stock.
| Field Name | Description |
|---|---|
| Batch Reference# | A unique number which will serve as a reference for you to save and track your batches in Zoho Inventory. This is not the manufacturer batch number. |
| Manufacturer Batch# | Batch number provided by your manufacturer. |
| Manufactured Date | The date on which the item was manufactured. |
| Expiry Date | The date until which the item is consumable. |
| Quantity in | Quantity of the item that you wish to add in each batch. |
Insight: You can enter decimal quantity (up to 6 decimal places) for batches. For instance, a certain quantity of milk has to be divided into batches. In Zoho Inventory, you will be able to add 1.91L in batch 1 and 3.560L in batch 2 and so on.
- You’ll also be able to enter batches for the items while recording a new purchase bill.
Creating an item from transactions
You can also create a new item while creating an order or an invoice. To do so:
- Create a new transaction.
- Click on the item selection field.
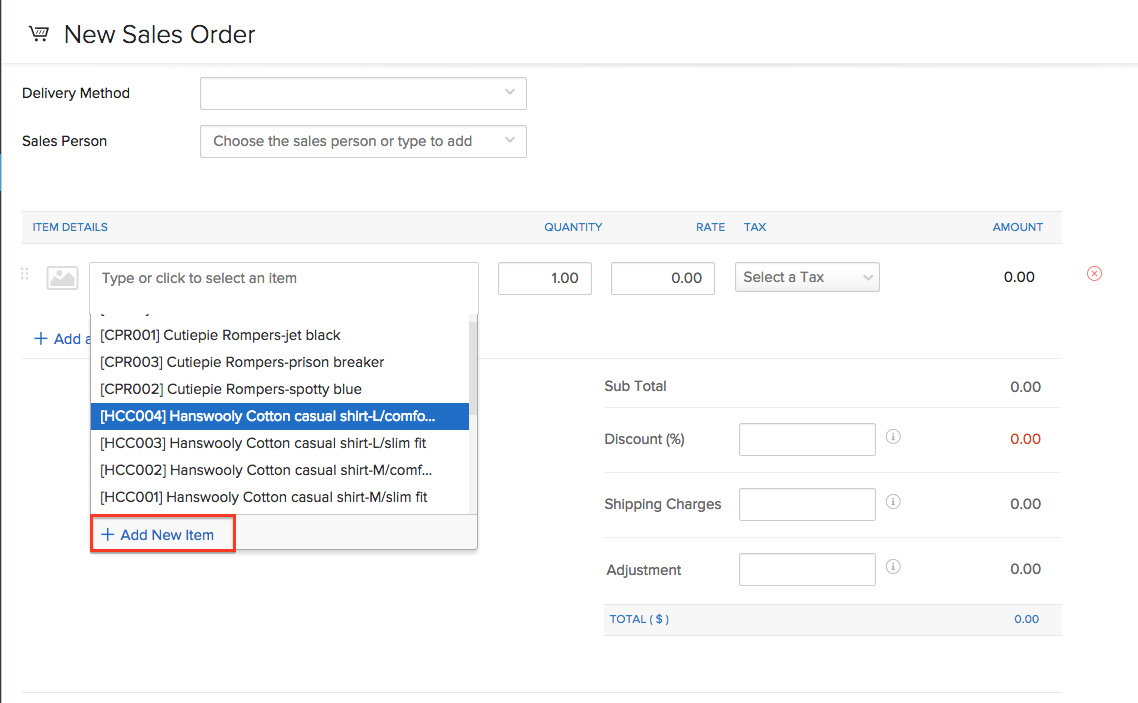
- Select the + Add New Item option.
- A new item creation pop-up will materialize before you.
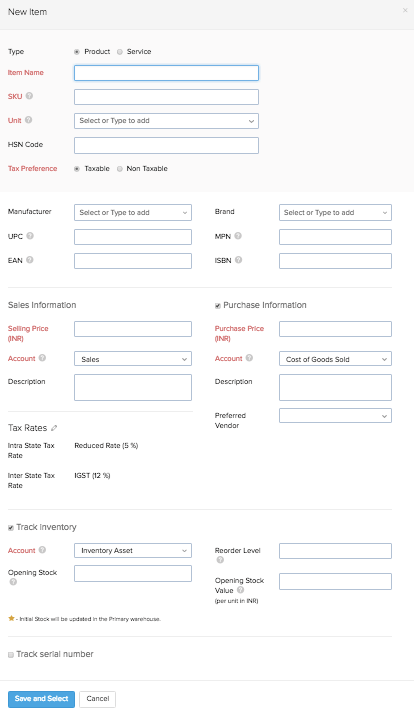
- Fill in the necessary information.
- Click on the Save and Select button to create the item and add it to the transaction.
Cloning an Item
Cloning helps you create an item quickly without having to enter all the details from scratch. This feature comes in handy when you want to:
- deactivate an item and create a new one in its place.
- create a new item with properties that are similar to the existing one.
To clone an item:
- Go to the Items module on the sidebar.
- Open an item that you want to clone.
- Click on More and select Clone.
- The item details will be pre-filled. Make the necessary changes.
- Scroll down and click Save to create the item.

Adding items to an existing item group
You can add more variants later by following these steps:
- Go to the Item Groups page
- Click on the item for which, you wish to add new variants.
- The page with the details of that Item opens up.
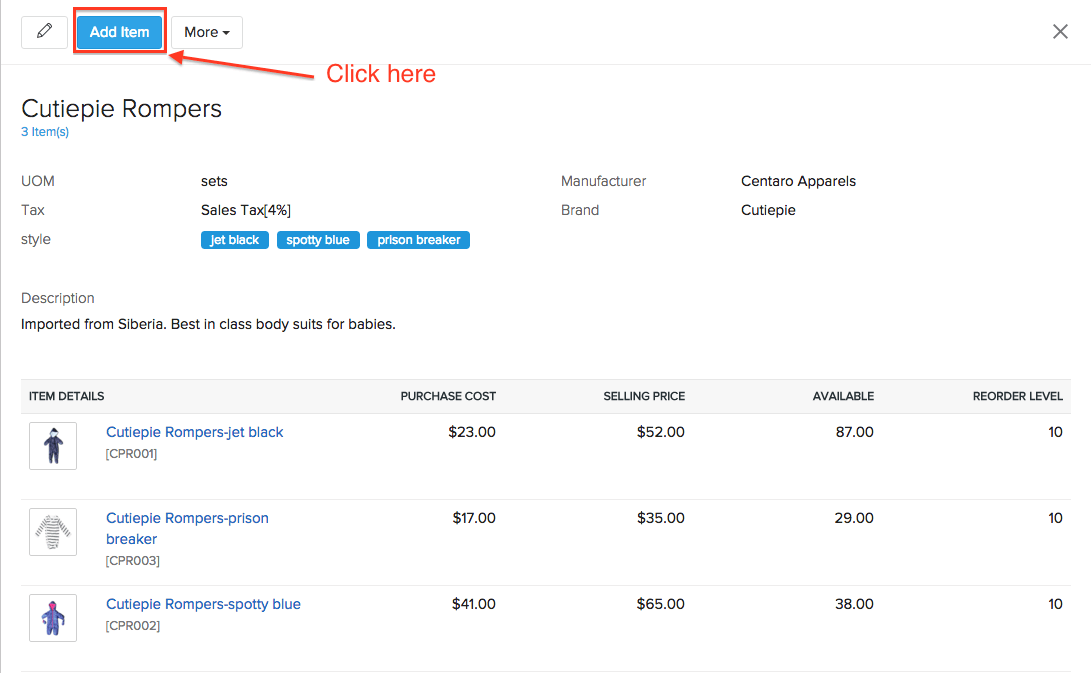
- Click on the Add item button on top of that page.
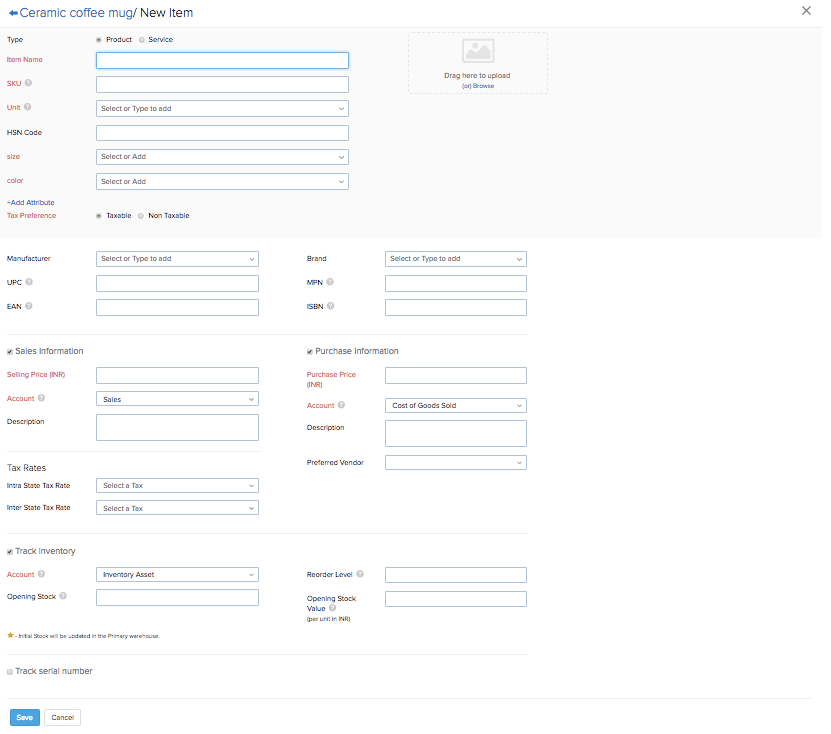
- A new page opens up. Here you can add all the details pertaining to that variant.
- Click on the Save button below to successfully add the variant.
Importing items
To import items into your Zoho Inventory account:
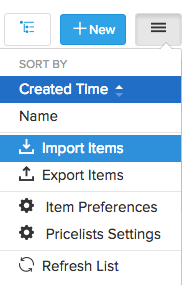
- Navigate to the Items module.
- Click on the Menu icon(Top-right corner).
- Select Import Items option in the drop down.
Import phase-1 : Uploading the file
- You will be navigated to a new window.
- Here you can choose the CSV or TSV file to be uploaded.
- Choose the File Delimiter(comma or semicolon). By default it ll be comma for a CSV.
- Click on Next to proceed to mapping fields window.
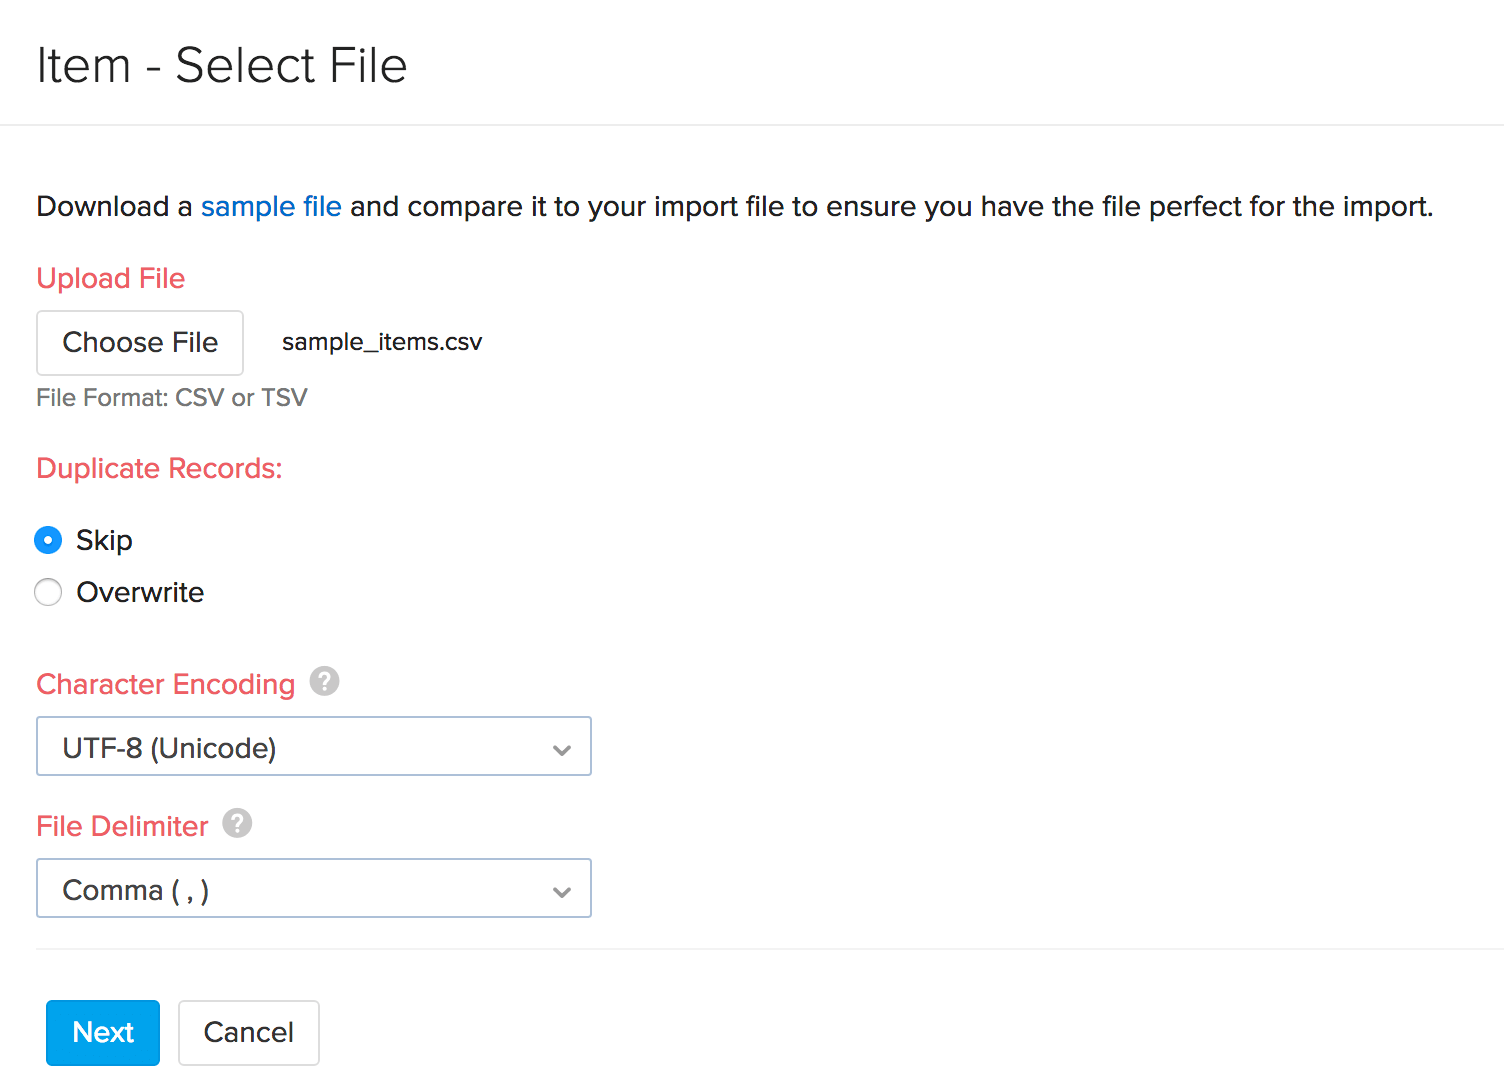
To update the details of all your items at one go, you can choose the overwrite option while importing. Learn how.
To overwrite duplicate records, you must choose a unique field (Item Name, Item ID or SKU) which will be mapped with the equivalent field from the import file. If the values match, then its corresponding records will be overwritten with the data in the import file. For example, if you want to update item names, you can choose Item ID or SKU as the unique field. If the SKU/Item ID that you’re trying to import exists, then its corresponding item name and other details will get updated.
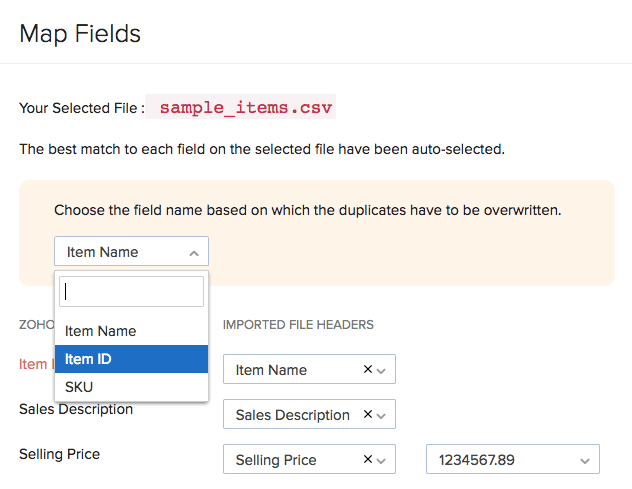
Import phase-2 : Mapping import fields
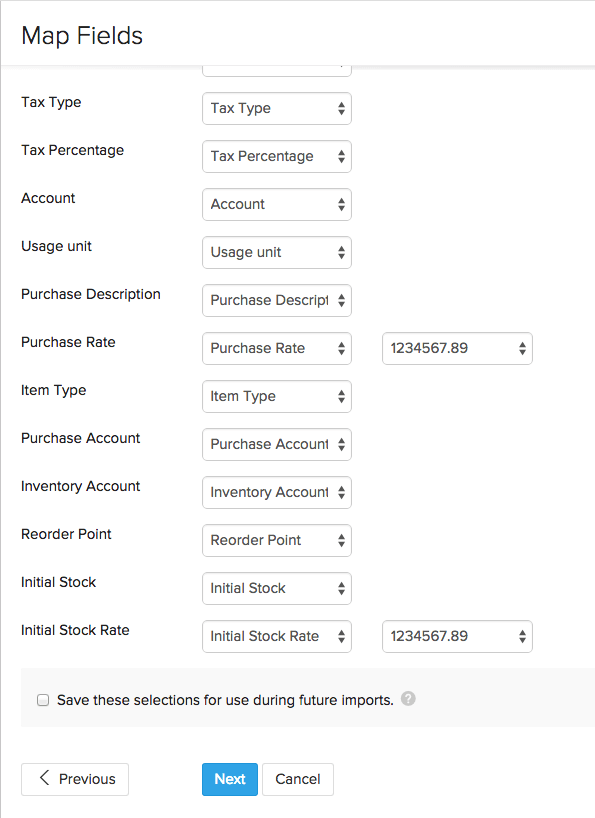
- Zoho Inventory will automatically map similar fields and match them together.
- You can manually match the unmapped ones or alter mapped ones.
- Check the box near the option Save these selections for use during future imports to automate mapping for future item imports.
- Click on the Next button to proceed to the Preview window.
Import phase-3 : Preview & Import
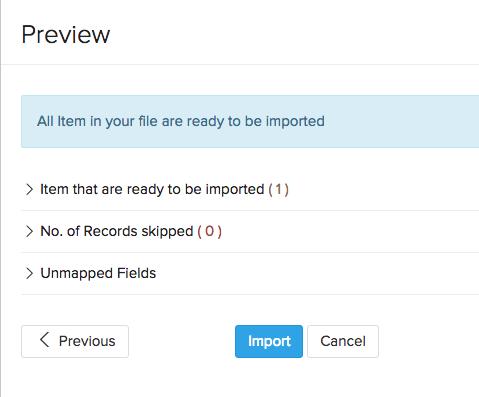
- Here a synopsis of the no.of variants ready for import, no. of skipped records and unmapped fields will be shown.
- You can make any changes to the operation by clicking Previous button.
- If everything is ready, click on Next button to successfully import.
Please Note: You can download the sample file in the import page, to get an idea on how to create the files you need to import.
Adding your items from Zoho Books to Zoho Inventory
Through the seamless integration between Zoho Books and Zoho Inventory, all your items are automatically reflected in both the apps.
In this section, we are going to understand the prerequisites and the preparation needed to make it a success.
Prerequisites
- Your Zoho Books organization must be joined to Zoho Inventory. It can also be the other way around. Know how by clicking here.
Enabling inventory tracking for your untracked items
In order to enable inventory for your untracked items in Zoho Inventory, please make sure that all these items have both sales and purchase information inside Zoho Books.
Enabling Inventory for items without transactions
- Navigate to the Items module in Zoho Inventory.
- Apply the appropriate filter by clicking on the filter tab on the top-left corner.
- Select & open the item.
- Ensure it has both sales and purchase information, if not fill in the information.
- After following the above steps, click on the checkbox called Track inventory for this item.
- Fill in the necessary details.
- Click Save.
Henceforth inventory will be tracked for this item.
Enabling Inventory for items that have transactions
- Navigate to the Integrations module.
- Select the Accounting tab.
- Click on the Access Now button to open your integrated Zoho Books organization.
- Navigate to the Items module in Zoho Books.
- Select & open the item.
- Ensure it has both sales and purchase information, if not fill in the information.
- Copy and paste this URL - https://books.zoho.com/app#/items/trackinventory
- This will take you to a page which has all untracked items which have both sales and purchase information.
- Choose the necessary items and click on the Enable Inventory button.
- You can select and enable inventory for up to 25 items at a time.
Henceforth inventory will be tracked for all these items and this change will also be reflected inside Zoho Inventory.
Ease of access
All your items from Zoho Books can be accessed from the Items module of Zoho Inventory. You can also apply the ungrouped items filter and create item groups inside Zoho Inventory for your inventory tracked items from Zoho Books.
Adding your products in Zoho CRM to Zoho Inventory
Upon integrating with Zoho CRM, you have the option of obtaining your items by syncing the Products from Zoho CRM. To learn more about Zoho CRM Integration, click here.
To learn how to configure your product sync, click here.
To learn how to perform an instant sync between Zoho Inventory and Zoho CRM, click here
Important Note: The items brought in from Zoho CRM will contain only sales information. To enable inventory tracking for these items inside Zoho Inventory, kindly edit the them here.
Grouping of ungrouped Items
Why grouping?
In Zoho Inventory, we normally have all our items neatly classified under different item groups. But in some cases, we also have deal with items that are not a part of any item group.
The most common case of ungrouped items is because of the integration between Zoho Books and Zoho Inventory where, the items(Zoho Books does not support Item groups) created in Zoho Books are reflected in Zoho Inventory.
This may add clutter to your inventory. Hence to resolve this case, we have introduced a feature that allows you to group all the ungrouped items in your inventory by defining new item groups or adding them to the existing ones.
Creating a new item group for your ungrouped items
Before we begin please note that only your inventory tracked items can be grouped together.
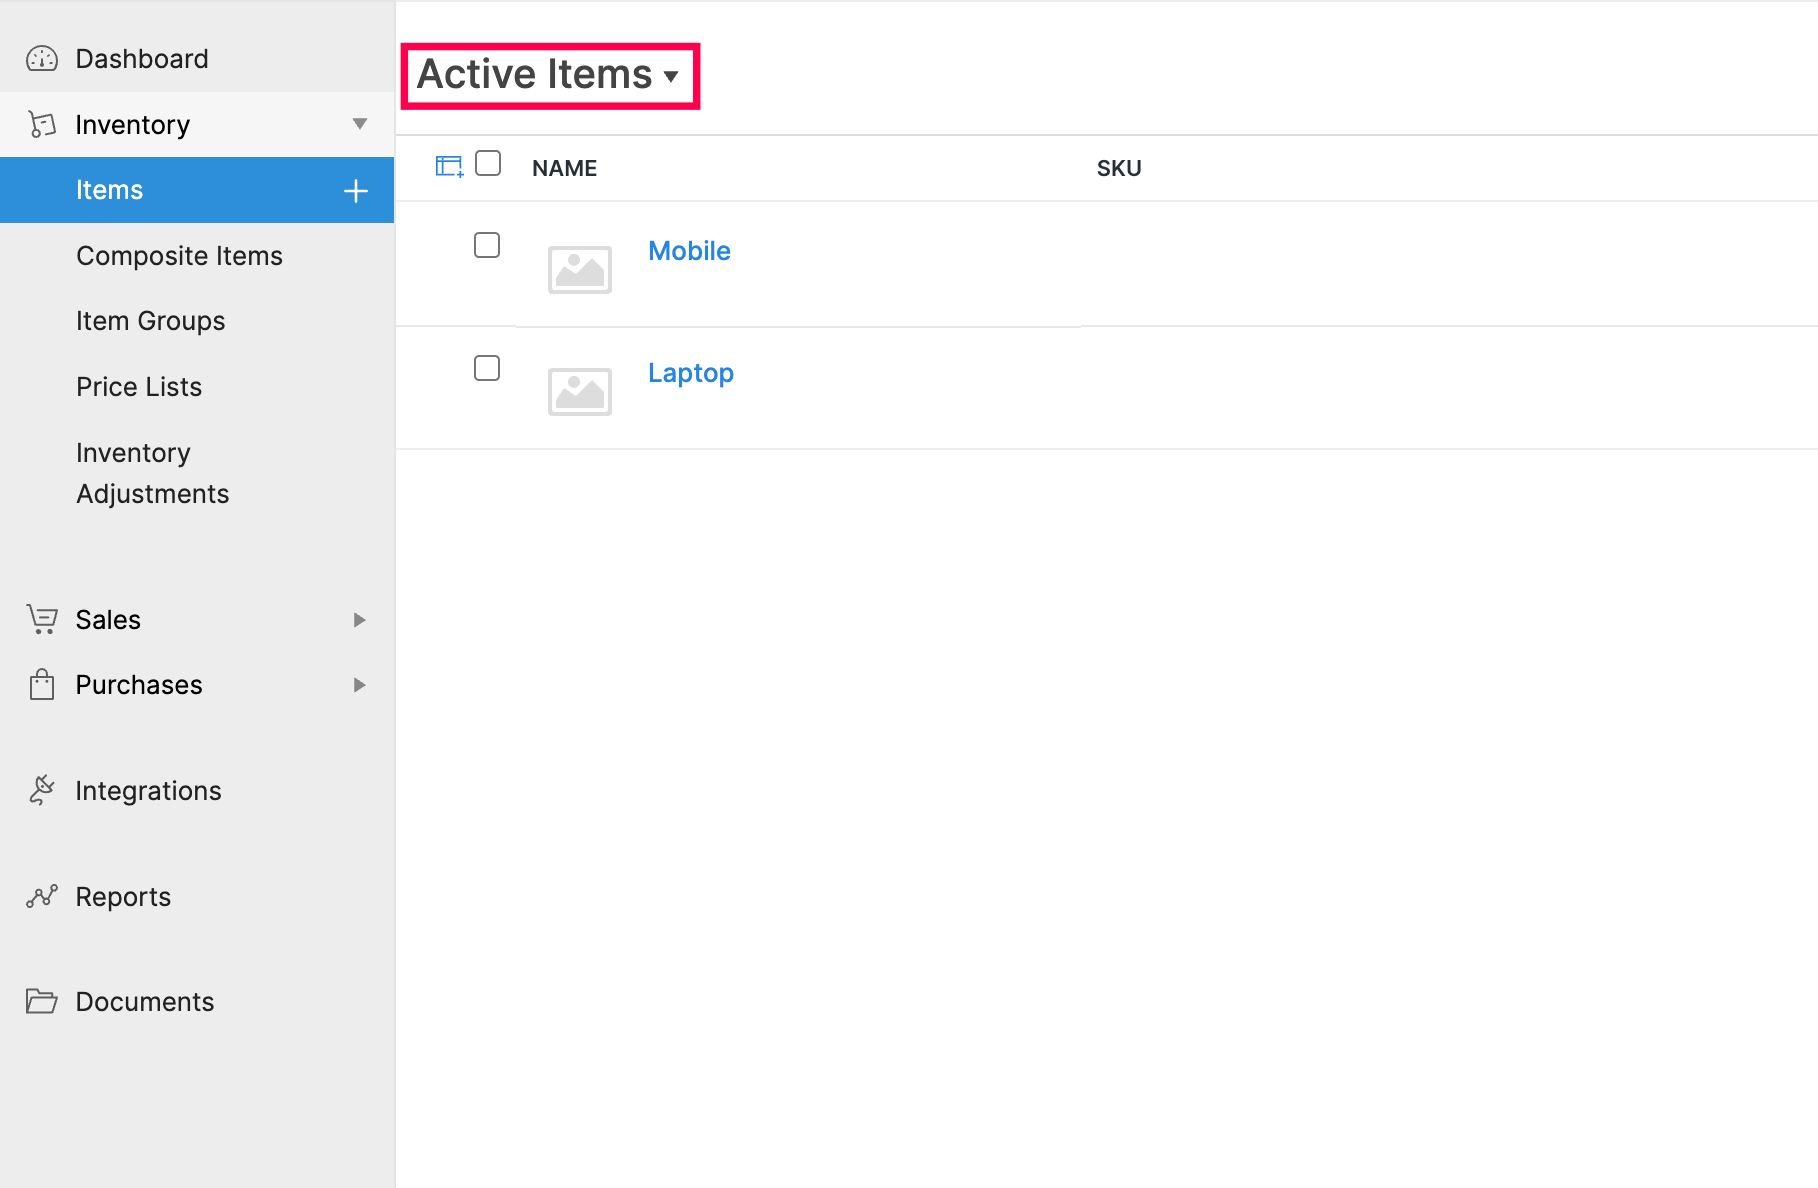
- Navigate to the items module by selecting Items from the left hand sidebar.
- Click on the filter tab on top-left corner.(By default, the Active Items filter will be displayed).
- Select the Ungrouped Items filter from the drop-down.
- All the ungrouped items that you have inside Zoho Inventory will be displayed.
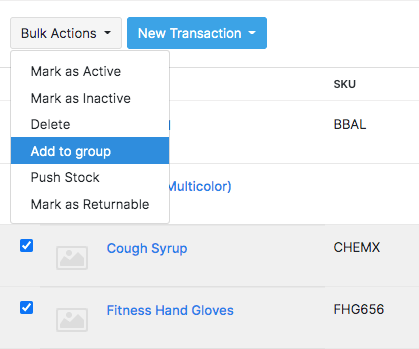
- Select the items that you wish to group by checking the box near their names.
- On doing so, a couple of buttons materialize on the top of the page.(Group Items and More buttons)
- Click on the Add to Group button.
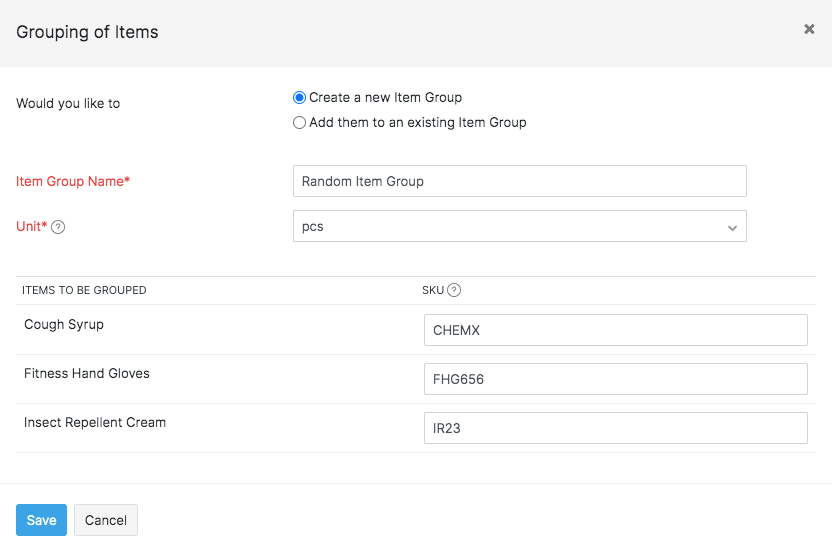
- A pop-up equipped with all the tools that allow you to group items together appears.
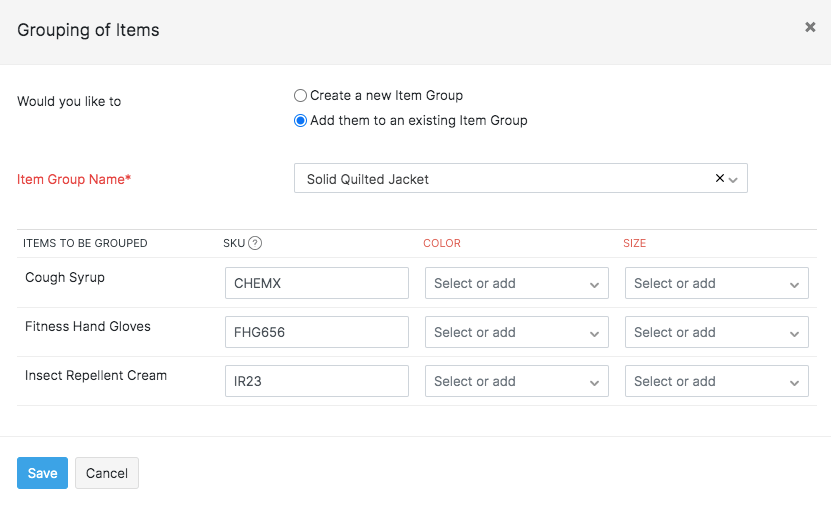
- Now you have two options:
- Option 1 - Create a new item group for the selected item(s).
- Option 2 - Associate the selected item(s) to an existing item group.
- Select option 1.
- Fill up the necessary fields: Item Group Name, UOM, and SKUs for the items.
- Click on the Save button.
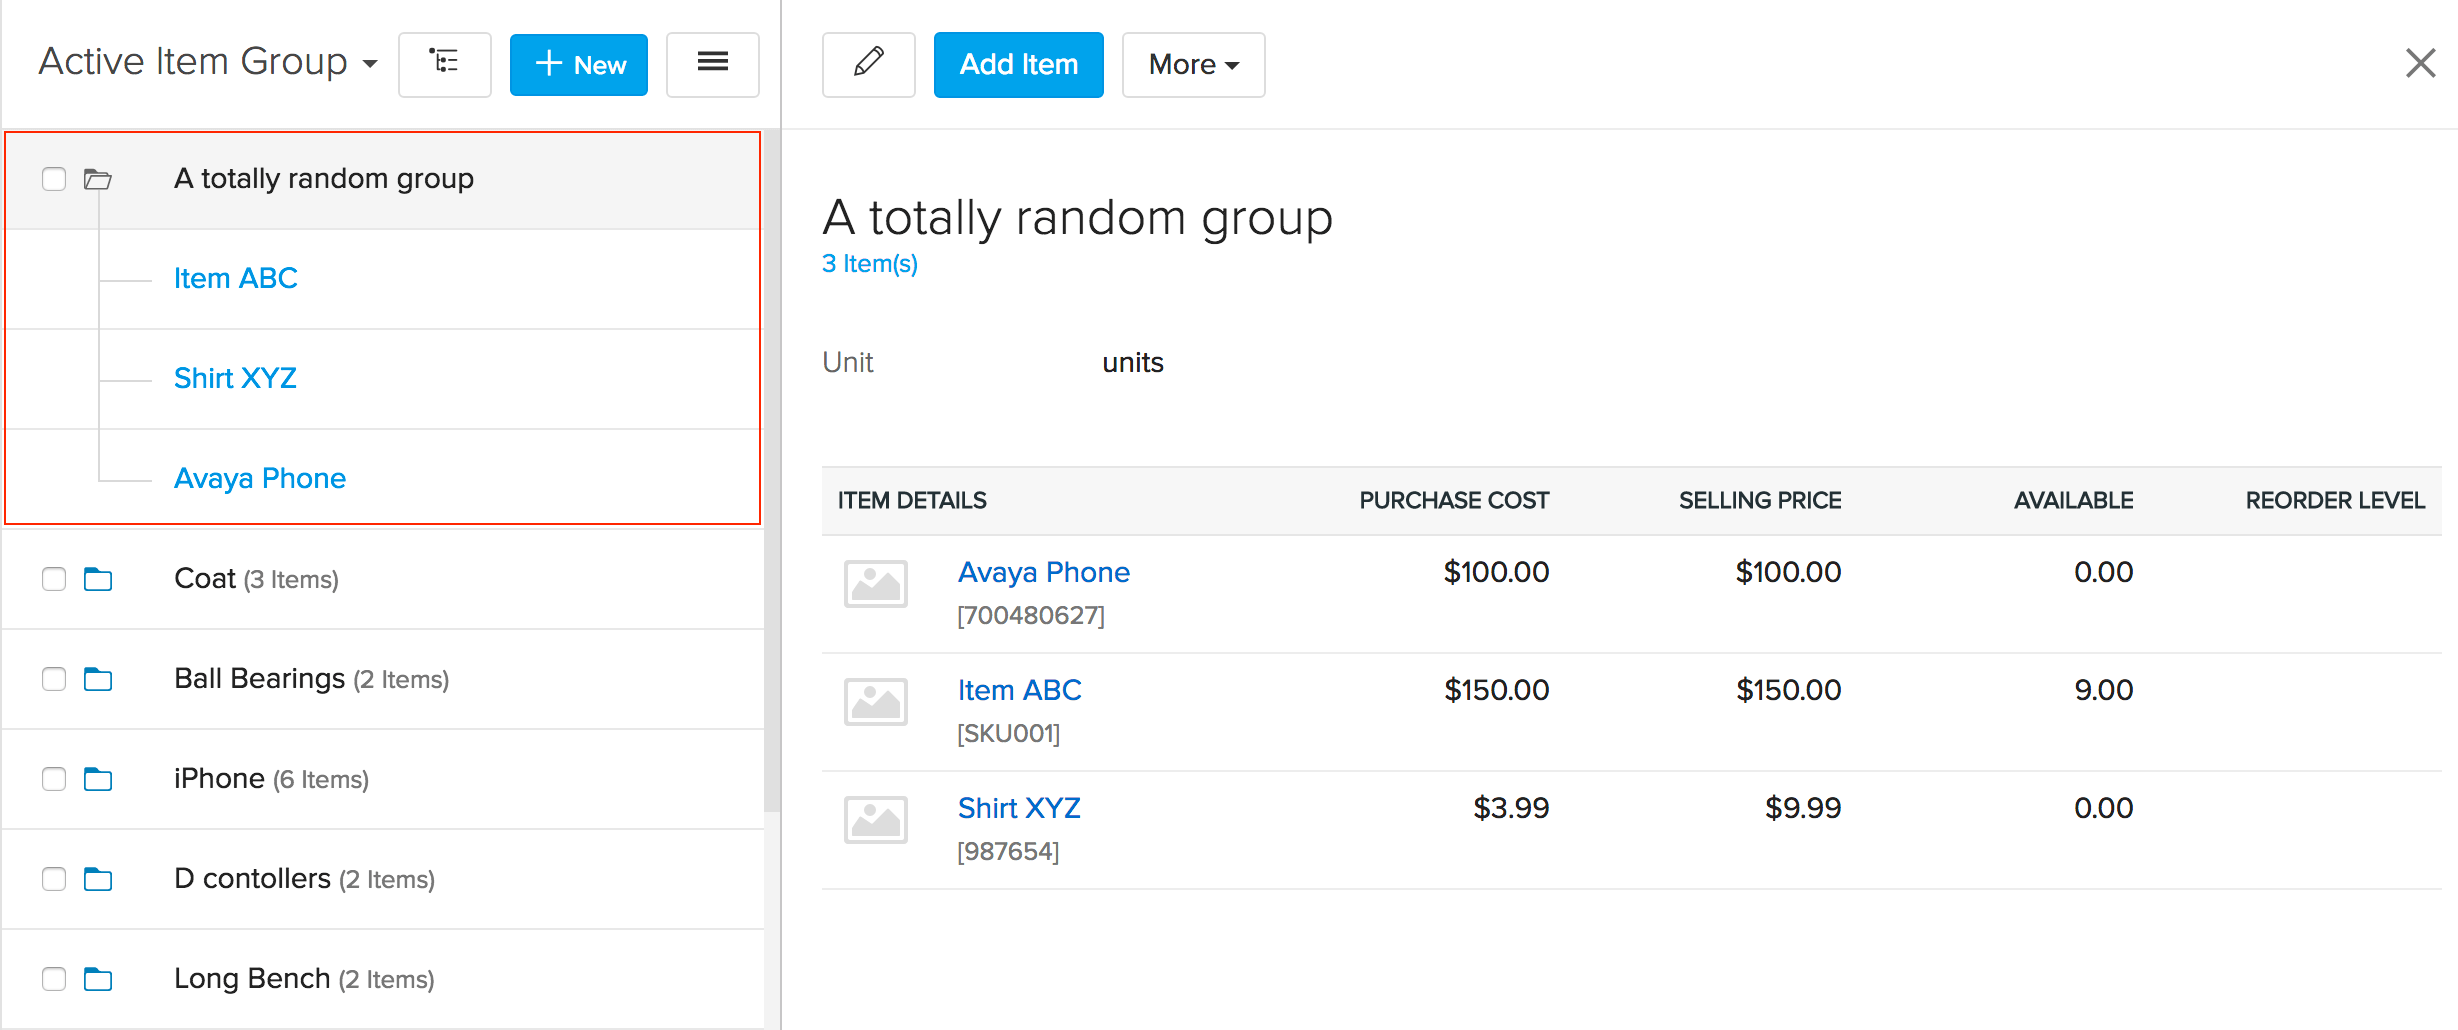
- The item will be successfully grouped and classified under an item group.
Adding ungrouped items to an existing group

- Navigate to the items module by selecting Items from the left hand sidebar.
- Click on the filter tab on top-left corner.(By default, the Active Items filter will be displayed).
- Select the Ungrouped Items filter from the drop-down.

- All the ungrouped items that you have inside Zoho Inventory will be displayed.
- Select the items that you wish to group by checking the box near their names.
- On doing so, a couple of buttons materialize on the top of the page.(Group Items and More buttons)

- Click on the Group Items button.
- A pop-up equipped with all the tools that allow you to group items together appears.

Now you have two options:
- Option 1 - Create a new item group for the selected item(s).
- Option 2 - Associate the selected item(s) to an existing item group.
Select option 2.
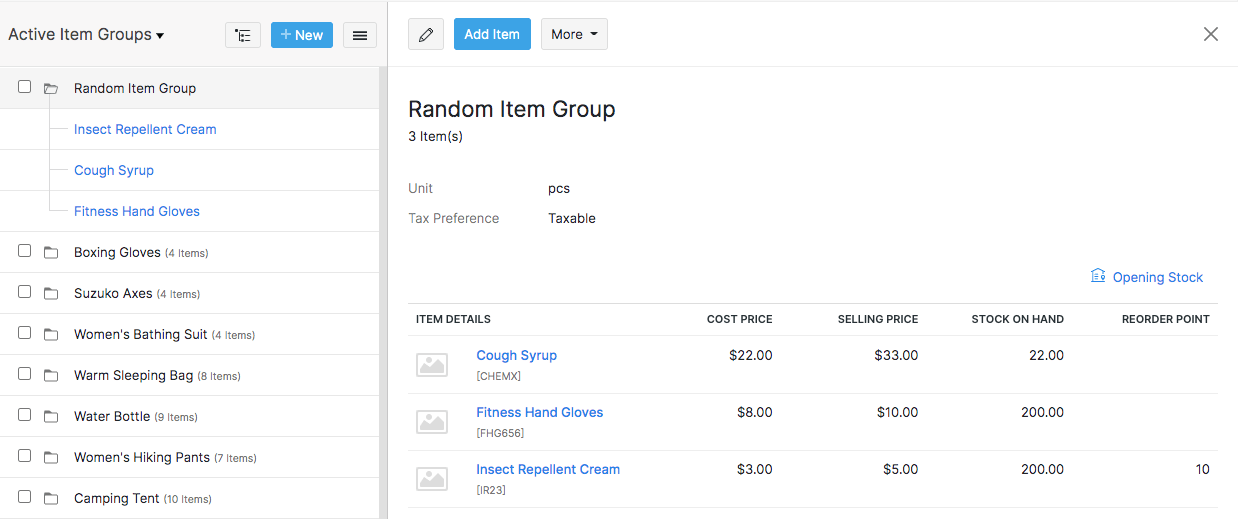
- Fill up the necessary fields: Select the Item Group Name from the drop-down and SKUs for the items.
- Click on the Save button.
- The item will be successfully grouped and classified under an item group.
Multiwarehouse Operations related to items
If you’ve enabled multiple warehouse management for your organization, you’ll have additional capabilities related to Items in Zoho Inventory. To know more, click here.


