Shipments
Our powerful shipping integration feature can integrate your organization with a host of shipping service providers, enabling you to get shipping rates, ship your packed goods to your customer, track your shipments and manage your deliveries from Zoho Inventory.
Overview
- Prerequisites
- Creating Shipments
- Ease of Access
- Managing your shipments
- Import Shipments
- Export Shipments
Prerequisites
For manual shipments, all you need is to be a Zoho Inventory user.
For Shipments using a carrier:
- You need a valid shipping account with the shipping service provider before you set up your integration with Zoho Inventory.
- You are required to have your shipping account credentials given by your shipper before you record a shipment in Zoho Inventory.
- You have to establish an integration between at least one carrier supported by us. To know more about Shipping Integrations, click Here
Creating Shipments
To create a shipment:
Method 1: For an existing package.
- Create a package from the sales order.
- Click on the Create button on top of the Sales orders page.
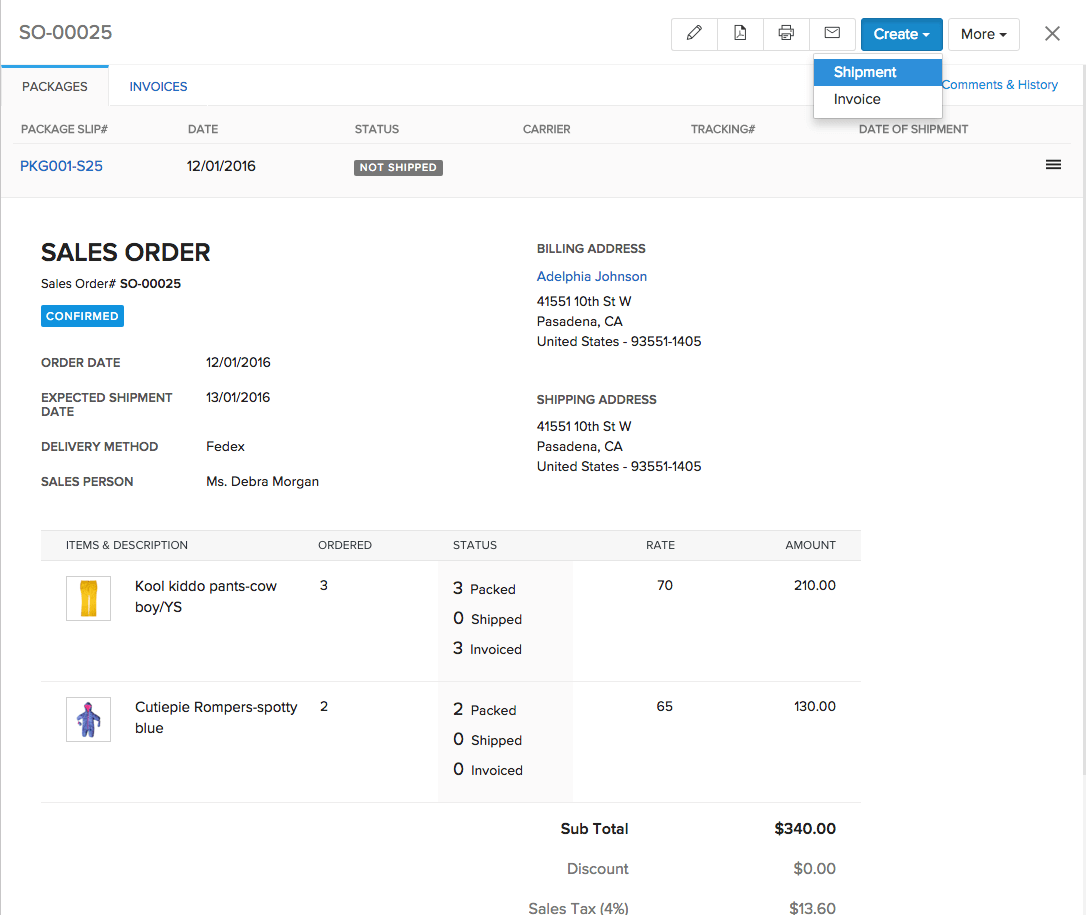
- A pop up showing the different shipment methods - Ship Manually and Ship via Carrier appears.
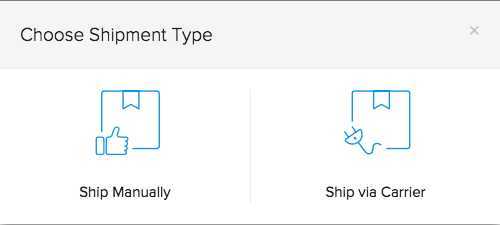
- Choose the method you prefer to proceed.
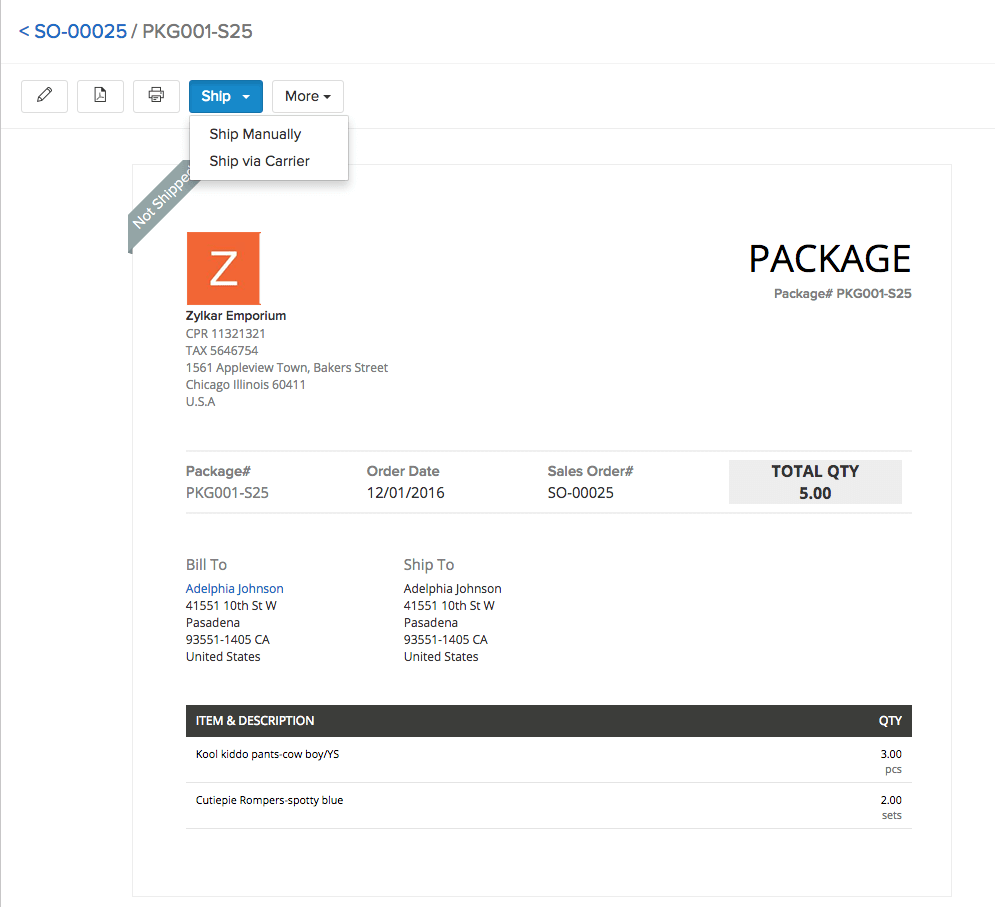
- Note: You can also create a shipment order from within a package slip. To do so:
- Open the package slip.
- Click on the Ship button.
- Choose the shipment method in the drop down to proceed.
Method 2: Without having a package beforehand.
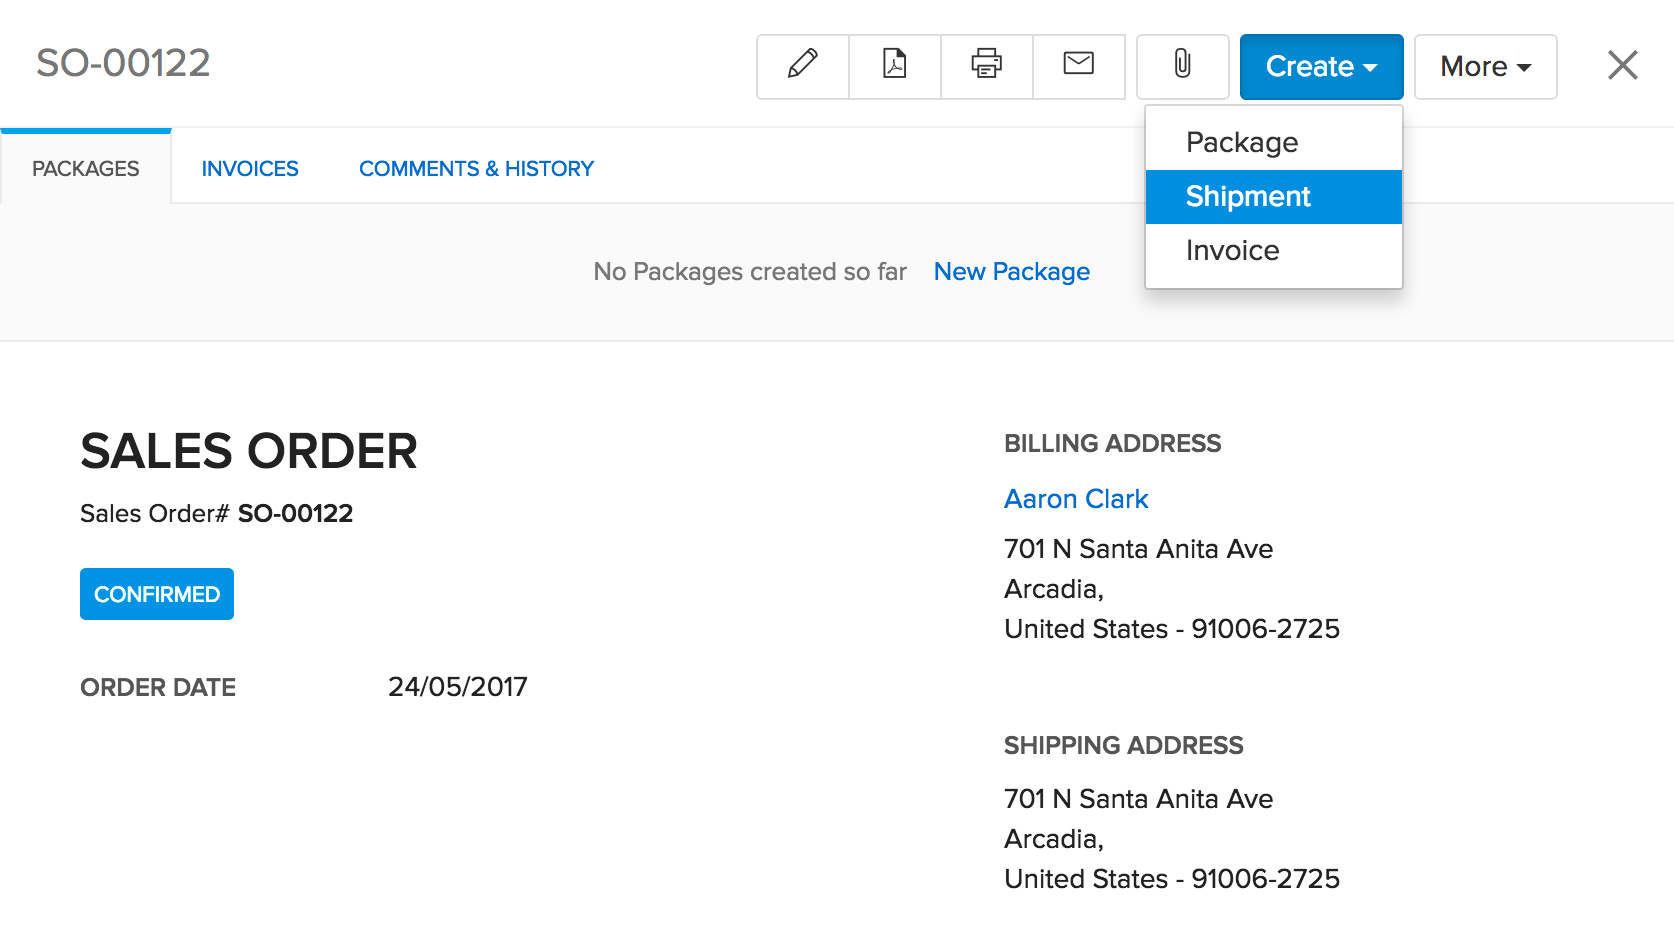
- Click the Create button on top of your sales order.
- Select Shipment option.
- A pop up for creating packages appears.
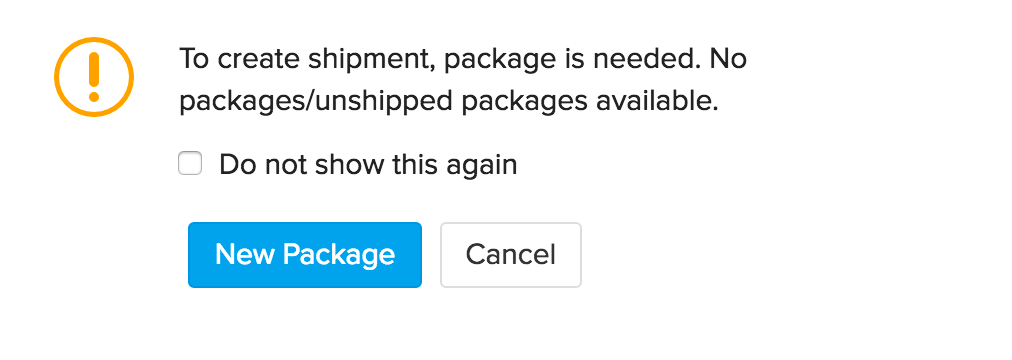
- Click on the New Package option.
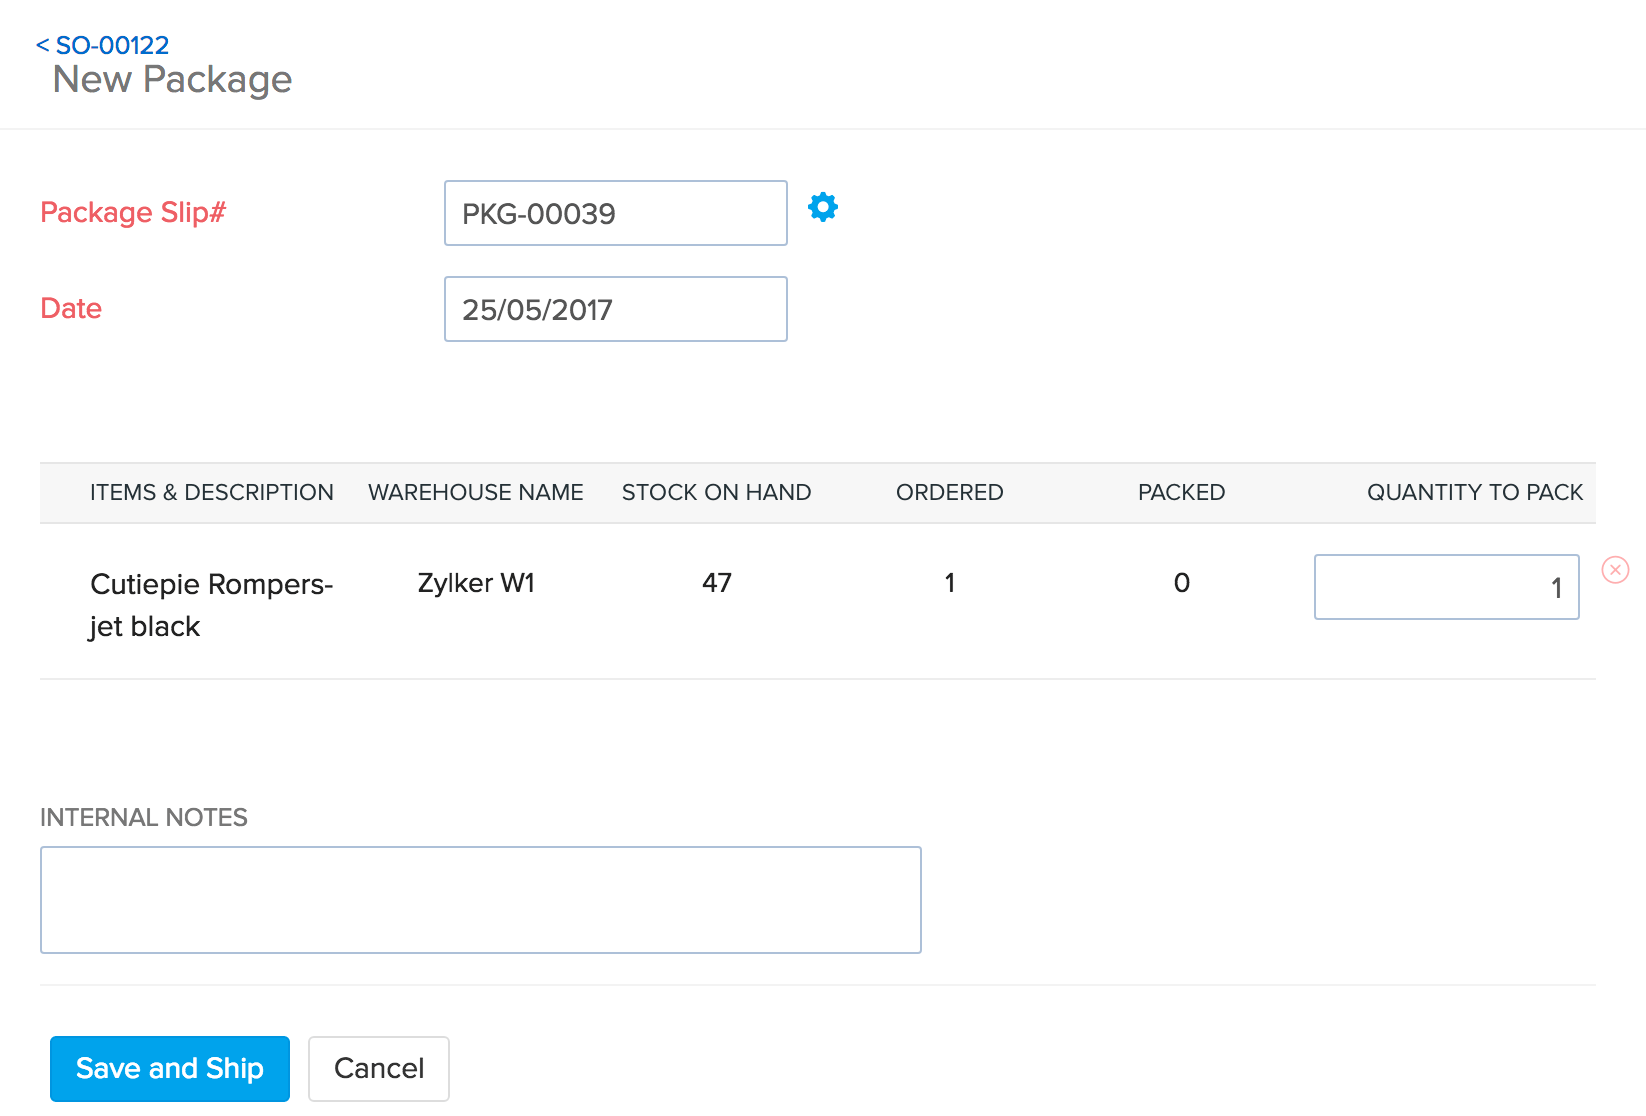
- The package creation page appears.
- Fill up the package details.
- Click the Save and Ship option.
Ship Manually
1) Creating a manual shipment
When you choose Ship Manually as your mode of shipment, a New Shipment page opens up with all the fields as shown below.
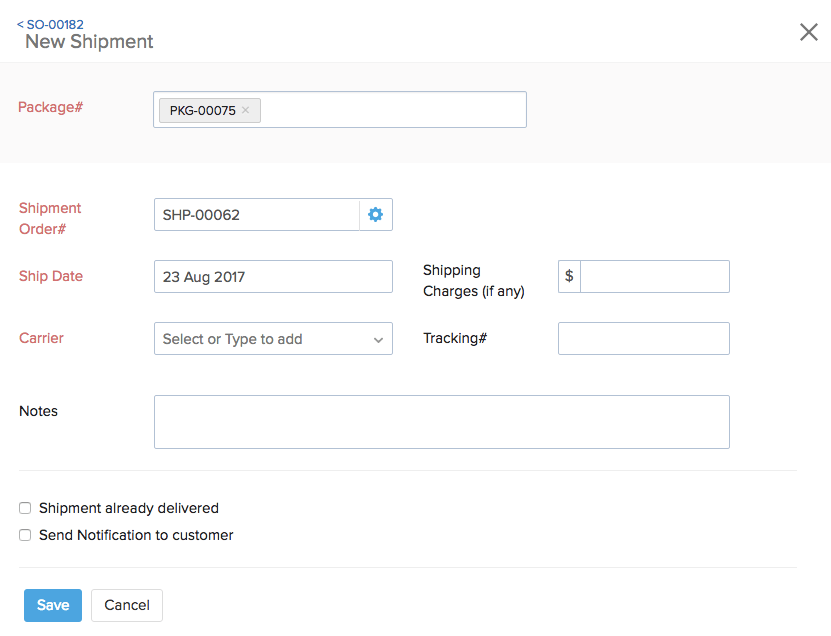
- Fill up the Shipment Order#, Carrier and other fields.
- If the shipment is already delivered, then check the option Shipment already Delivered.
- If you wish to notify the customer about the shipment, click on Send Notification to Customer.
- Click Save to successfully save a shipment.
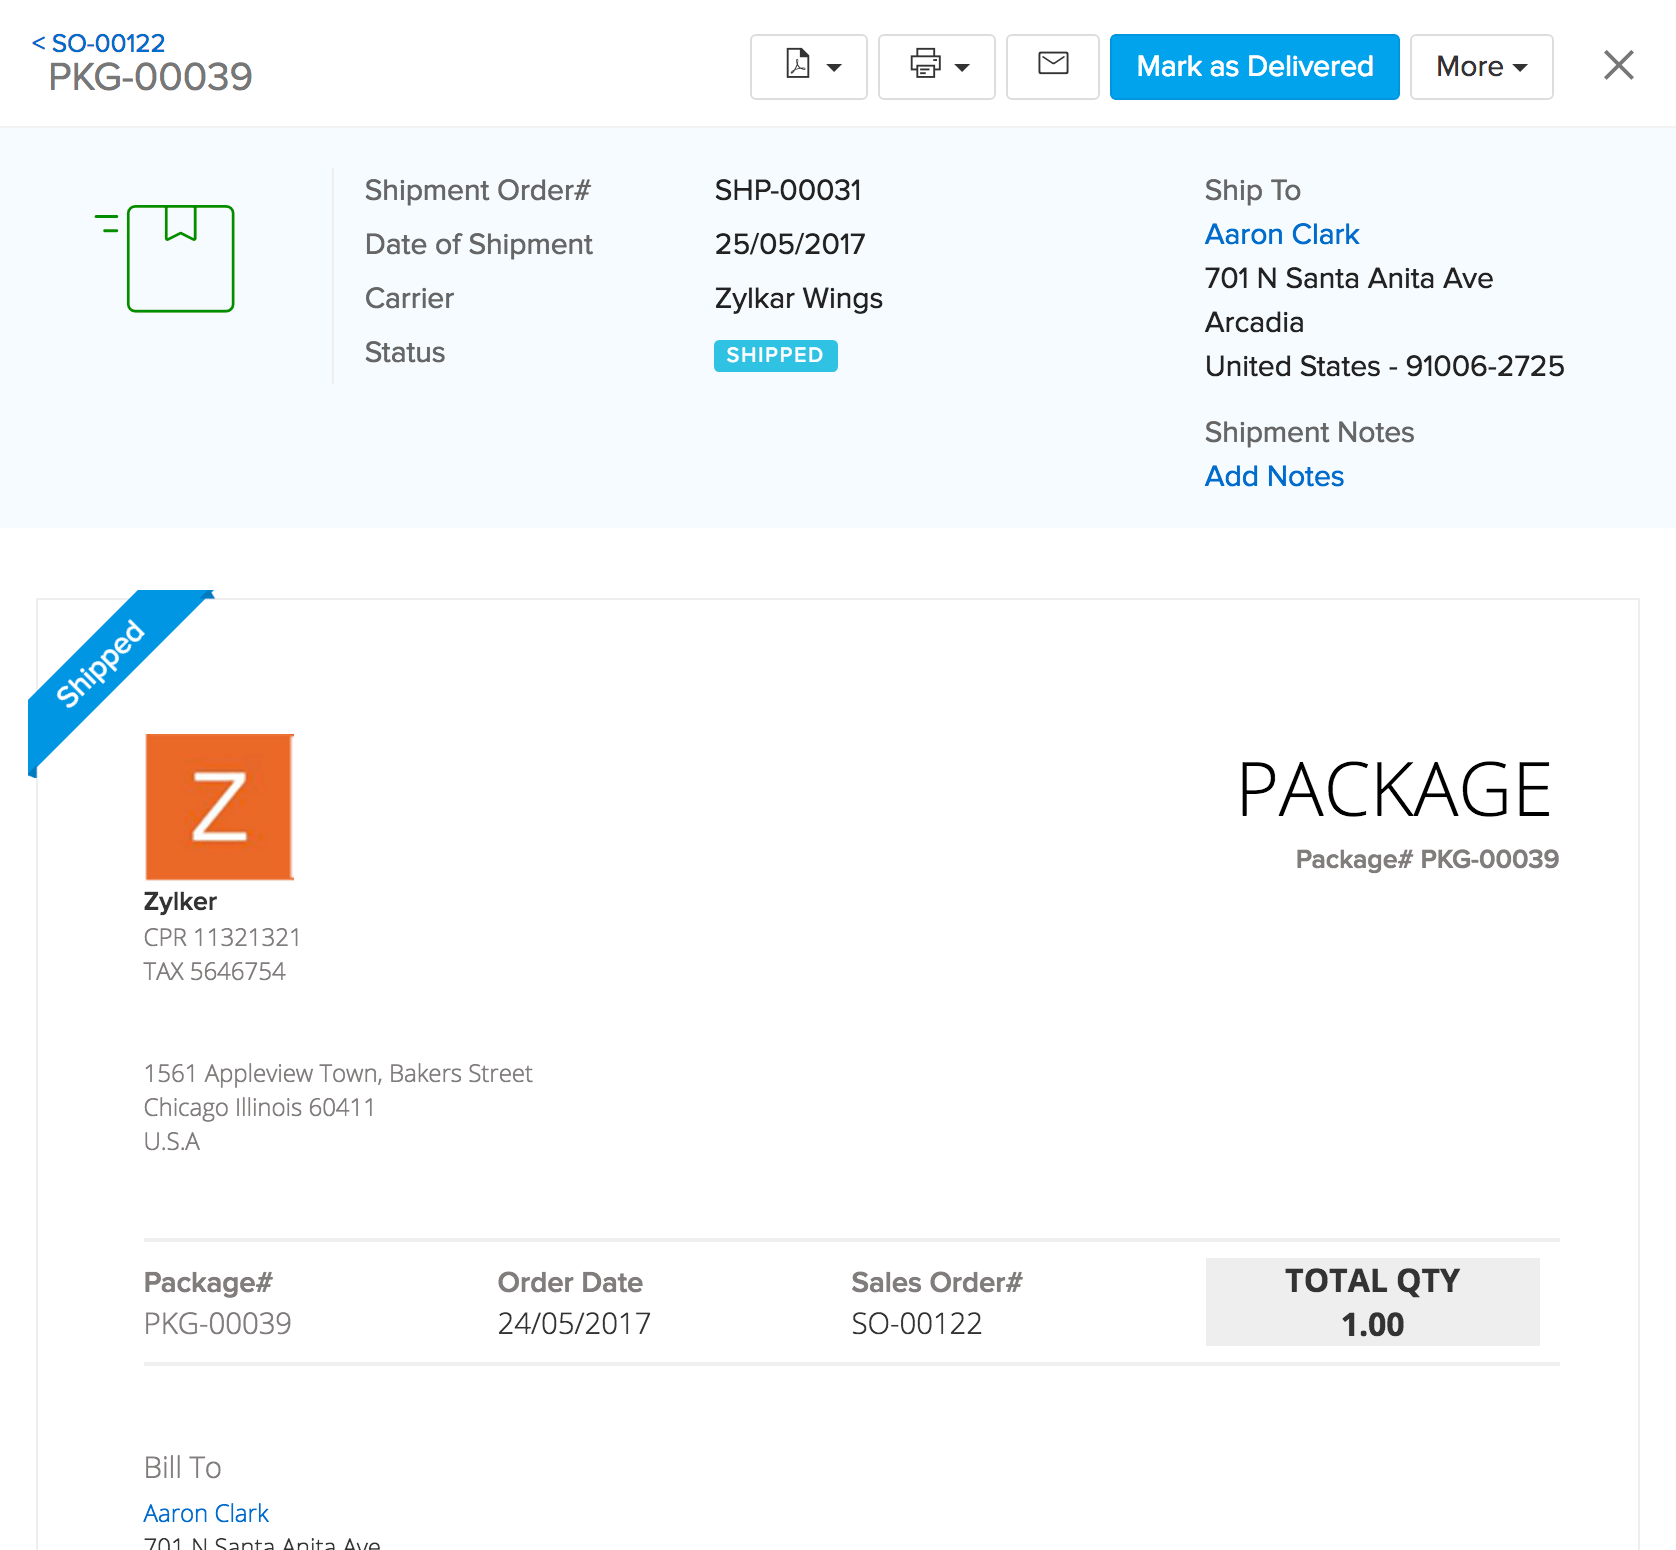
- A package slip with the tracking ID and shipment details is created.
2) Creating a shipment for multiple packages
You can also include several packages in the same shipment. Here’s how:
Important Note:
- Only those packages that are associated with the same sales order can be included in a shipment.
- The following procedure is applicable only for manual shipping method.
- Open a sales order with multiple packages.
- Click on Create button and choose Shipment option.
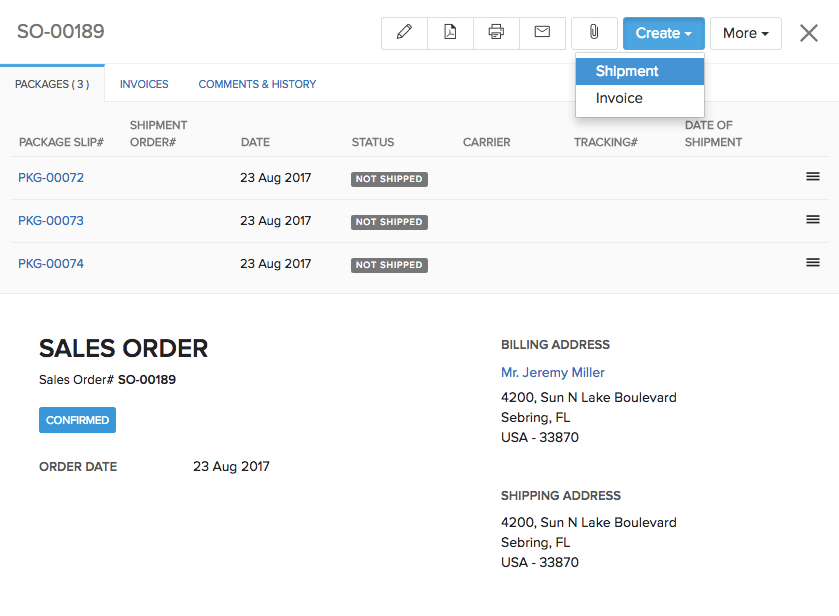
- When you select Ship Manually as your mode of shipment, a New Shipment page opens.
- Select all the packages that you would like to include from the dropdown.
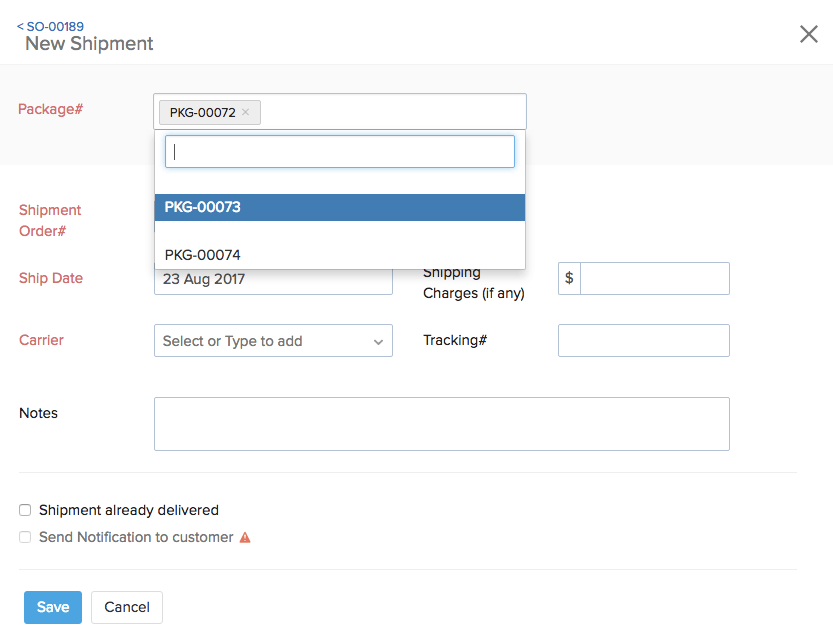

- Fill up the Shipment Order#, Carrier and other fields.
- If the shipment is already delivered, then check the option Shipment already Delivered.
- If you wish to notify the customer about the shipment, click on Send Notification to Customer.
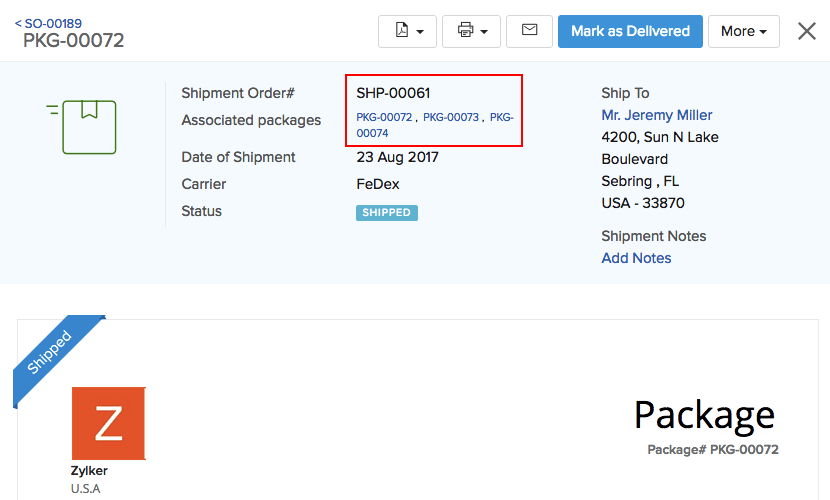
- Click Save to successfully save a shipment.
- A package slip with the tracking ID and shipment details is created.
Ship via Carrier
When you choose Ship via Carrier as your mode of shipment, a New Shipment page opens up with all the fields as shown below.
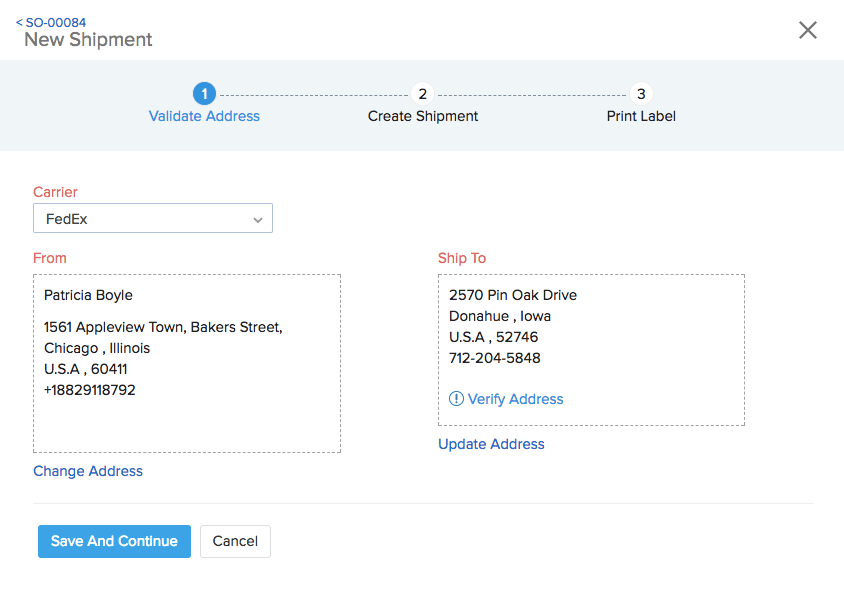
- Choose the Carrier of your choice.
- By default the From address will be the address of your organization and the To address will be the shipping address of the customer that you have stored in contacts.
- You can verify address and you can also Change address if the need arises by clicking on the options below the address field. (Note: Only US addresses can be verified)
- Click on Save and Continue. You will now be taken to the Shipment details page.
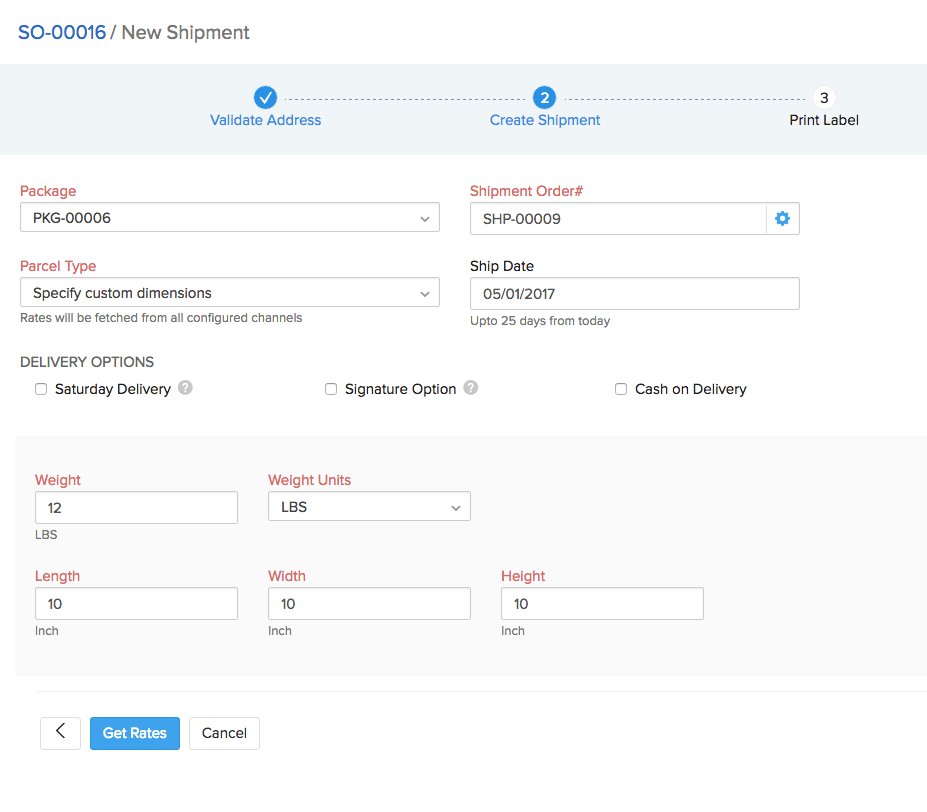
- The Package number is automatically updated.
- The Shipment Order# can be either set to be generated automatically, or entered manually.
- Enter the shipment date either the one for your reference or the ones provided by your shipper in the Ship Date tab.
- Choose a standard parcel type or add a custom one.
- On choosing a custom package, you have to provide the package dimensions in the respective fields.
- Enter the weight of the product.
- Choose other options like Saturday delivery, signature option and Cash on delivery if applicable
- Click on the Get Rates button to get current shipment rates for the package.
- The rates from shipping services will be displayed.
- You can also choose to recalculate rates, if you wish to make any changes by clicking on the Recalculate Charges button.
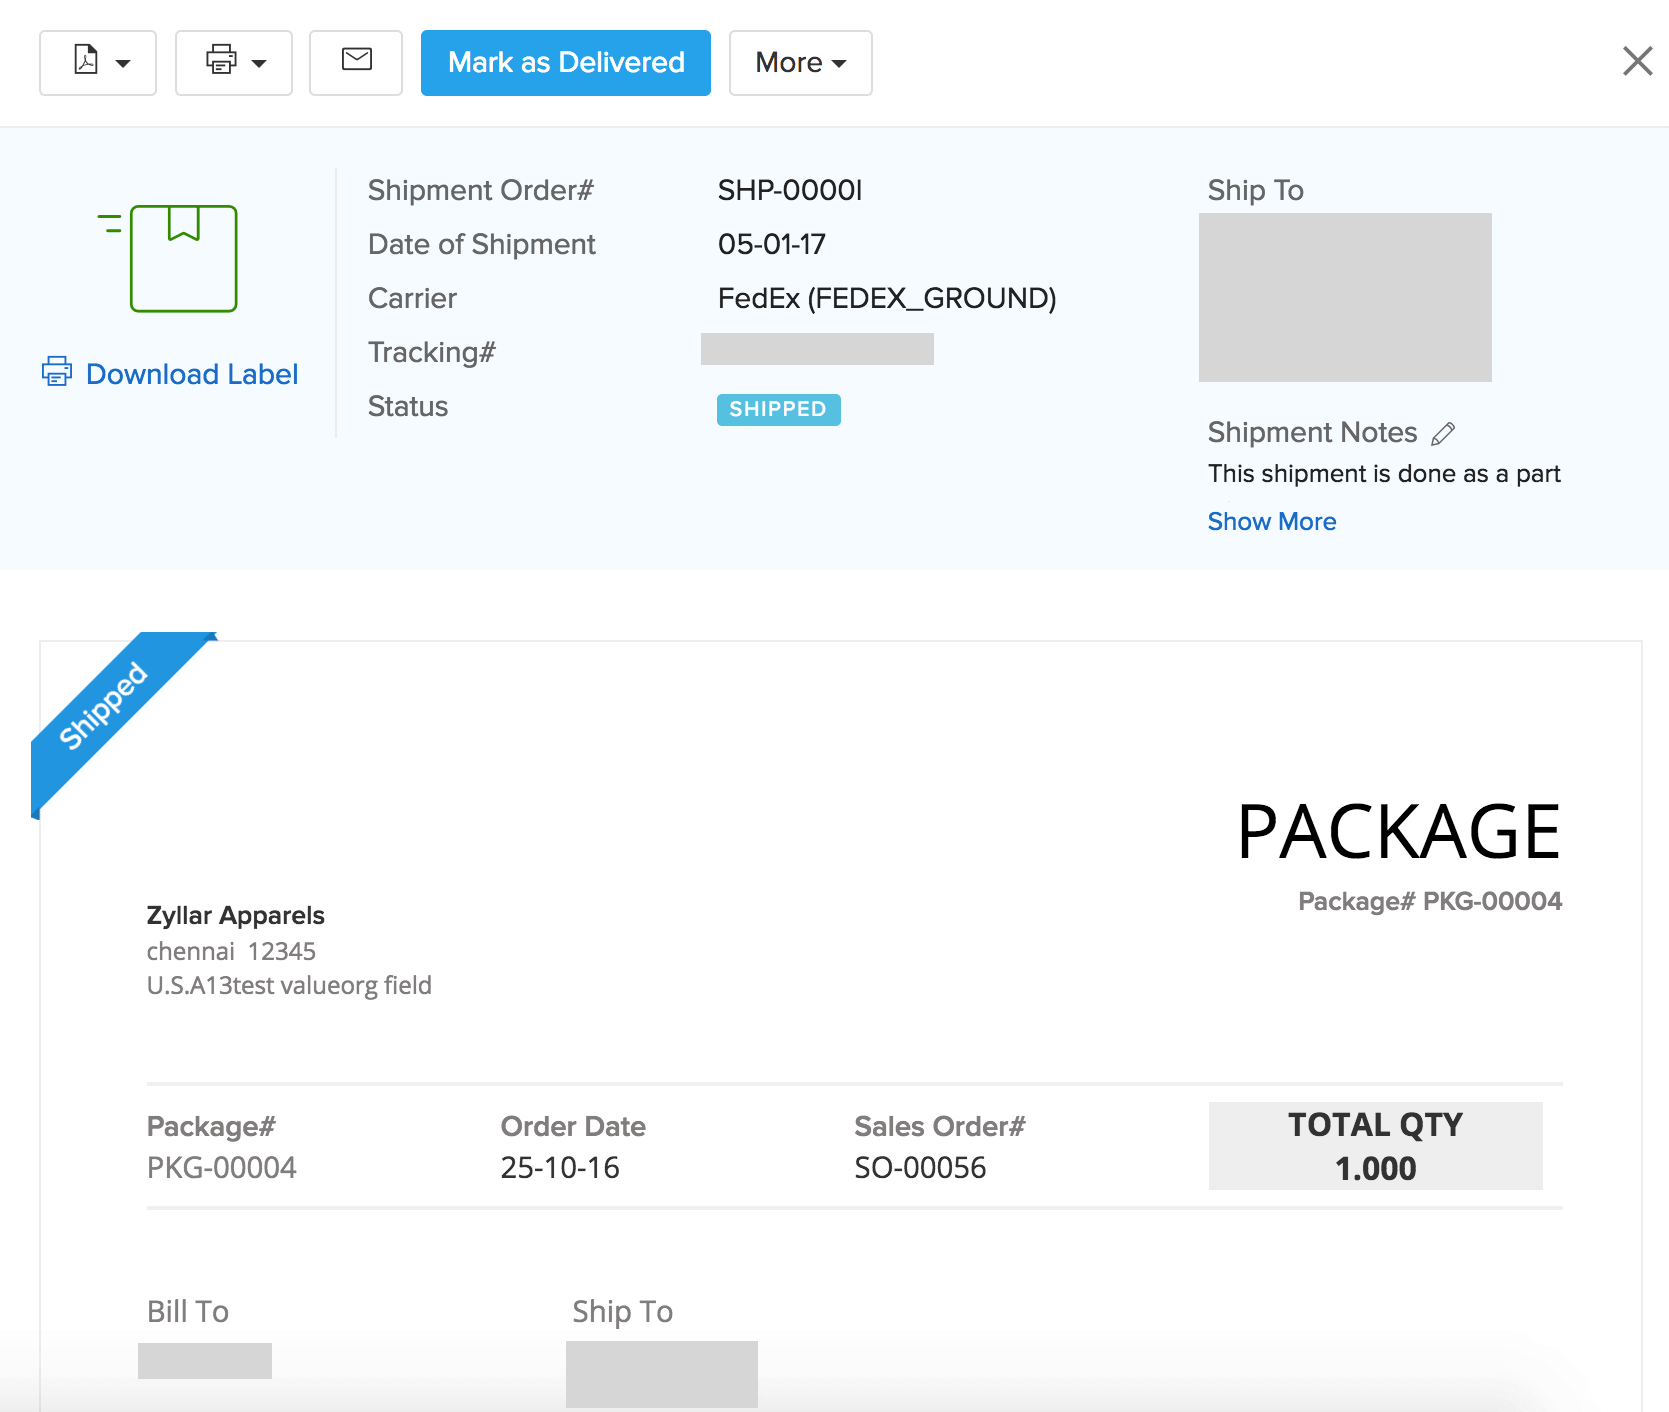
- After making your choices, click on the Save button to successfully create a shipment order and a shipping label.
Ease of Access
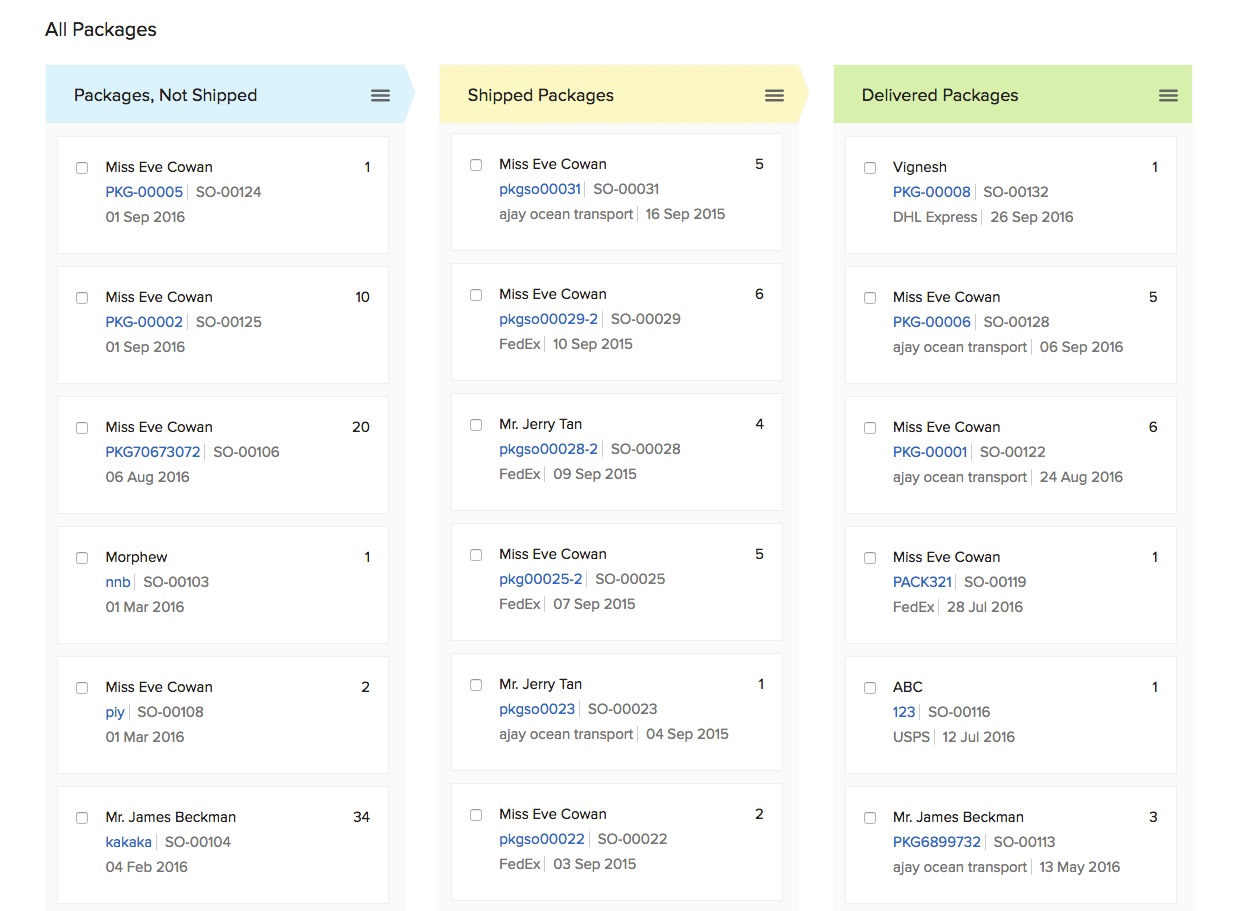
The status and details of your shipments and packages can be accessed by clicking on the Packages tab on the sidebar.
Managing your shipments
Marking a Delivery:
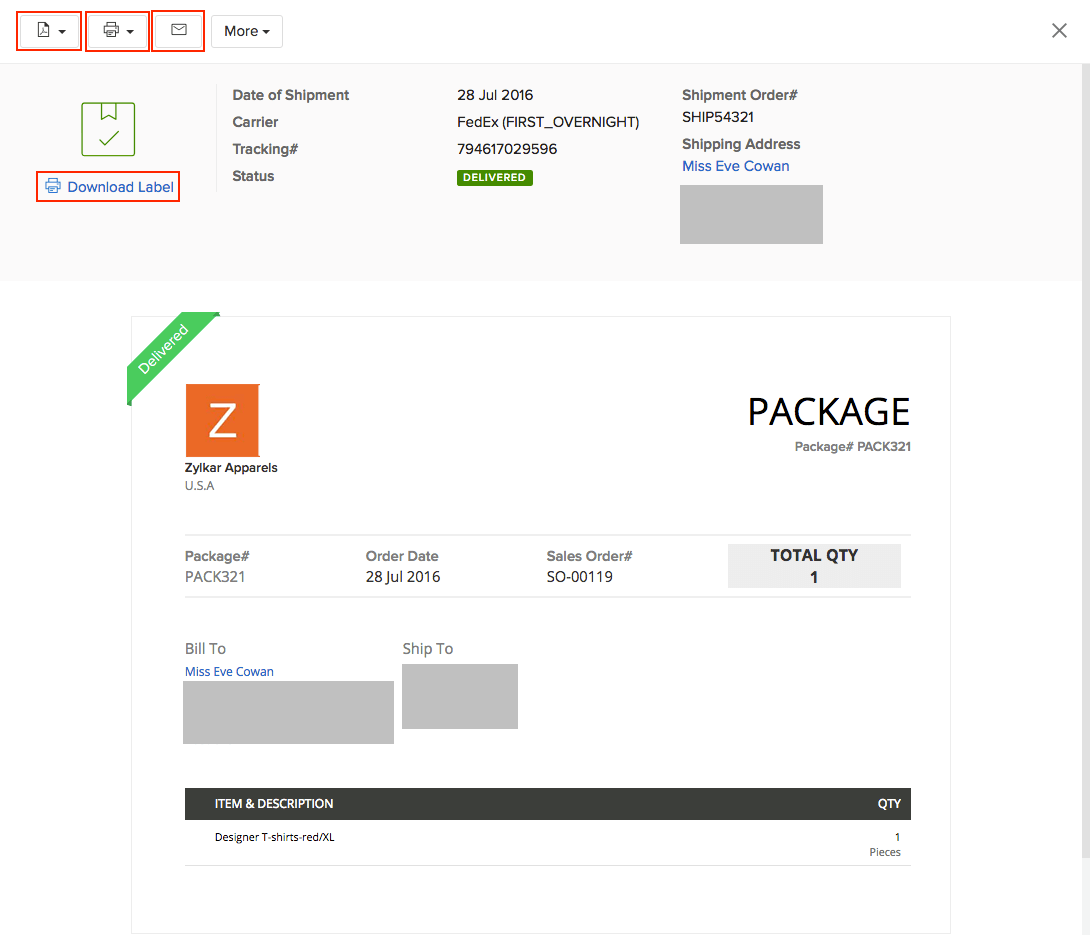
- You can mark the packages that have been shipped as delivered by clicking on Mark As Delivered button on top of your Package slip.
- On doing so, your shipment status changes from shipped to delivered.
- This is useful in case of manual shipments.
Export/Save package slips and shipment orders as PDF:
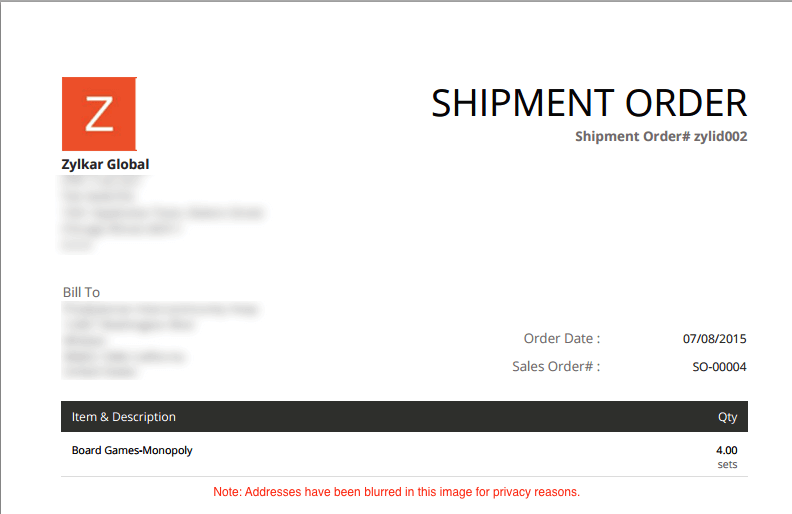
You can save a PDF copy of the package slip or the shipment order to your hard drive by clicking the PDF icon on the top of your package page.
Notifying your customers about shipments and delivery:
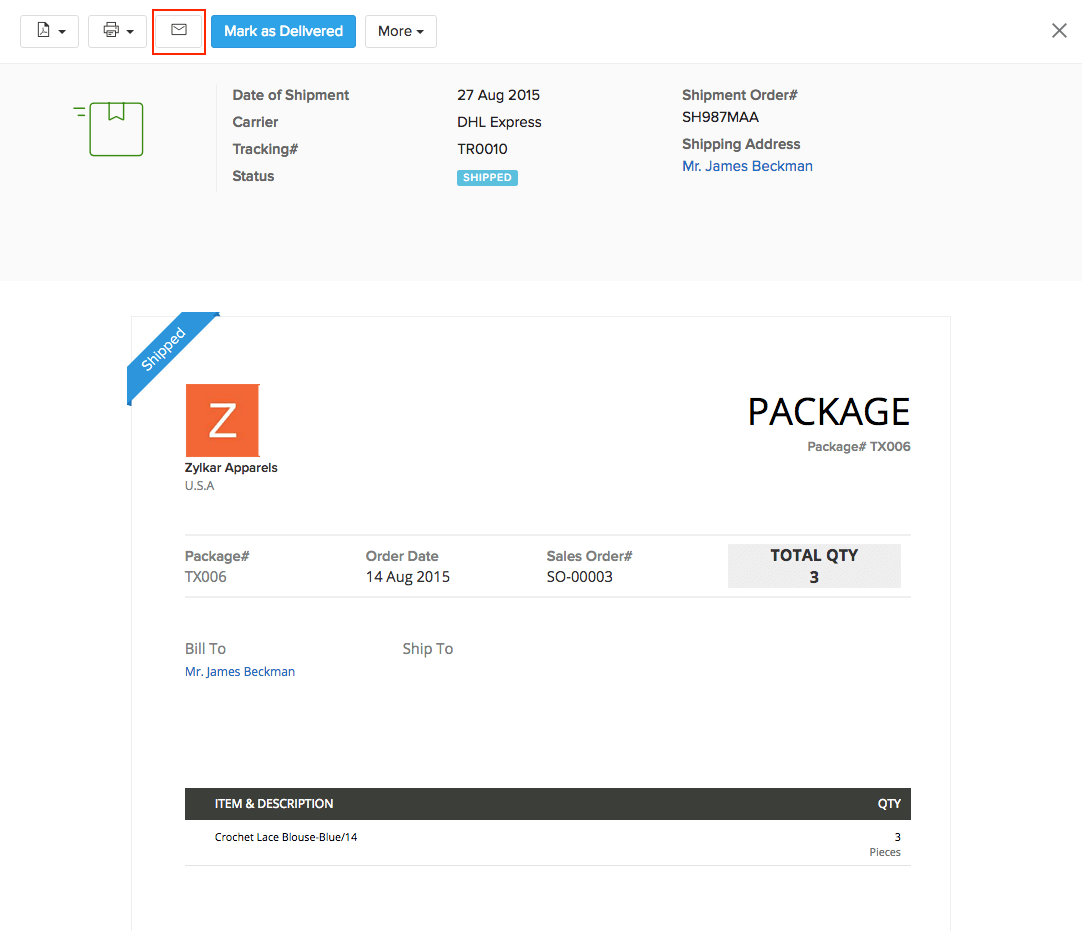
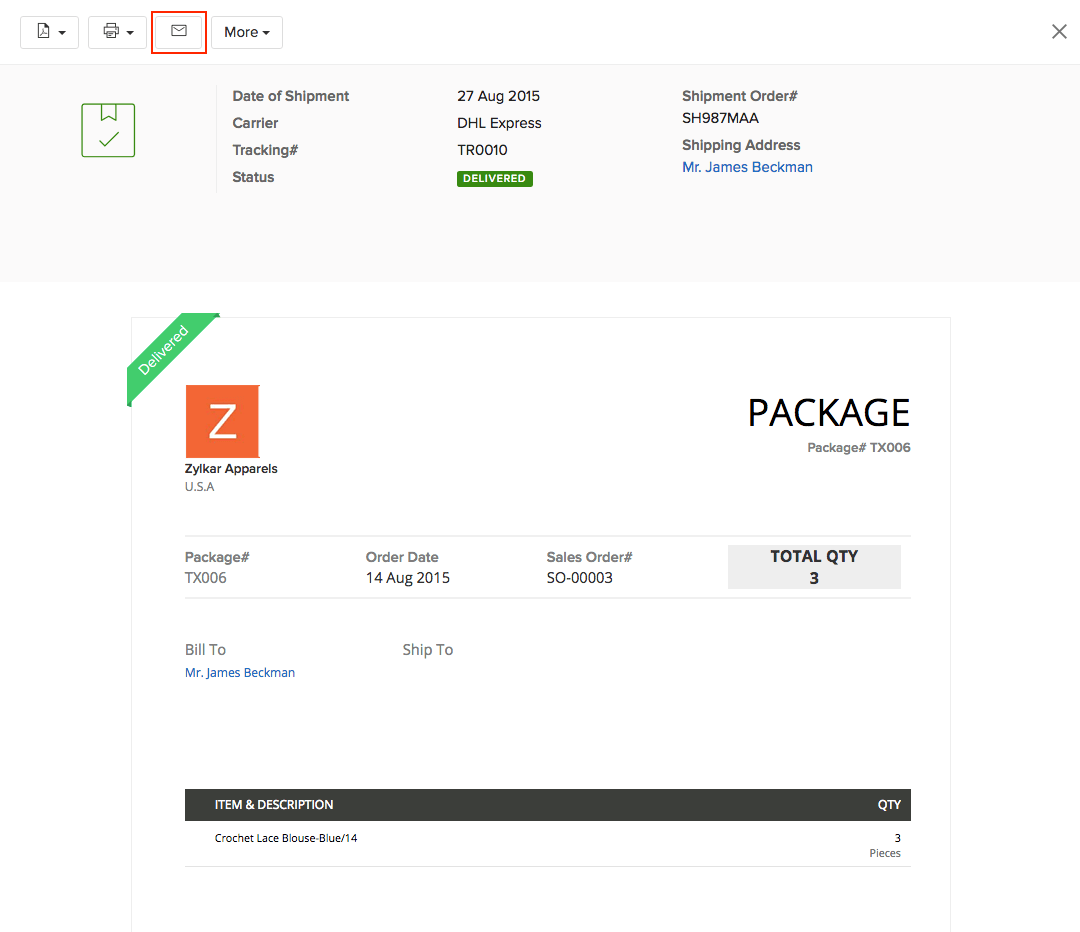
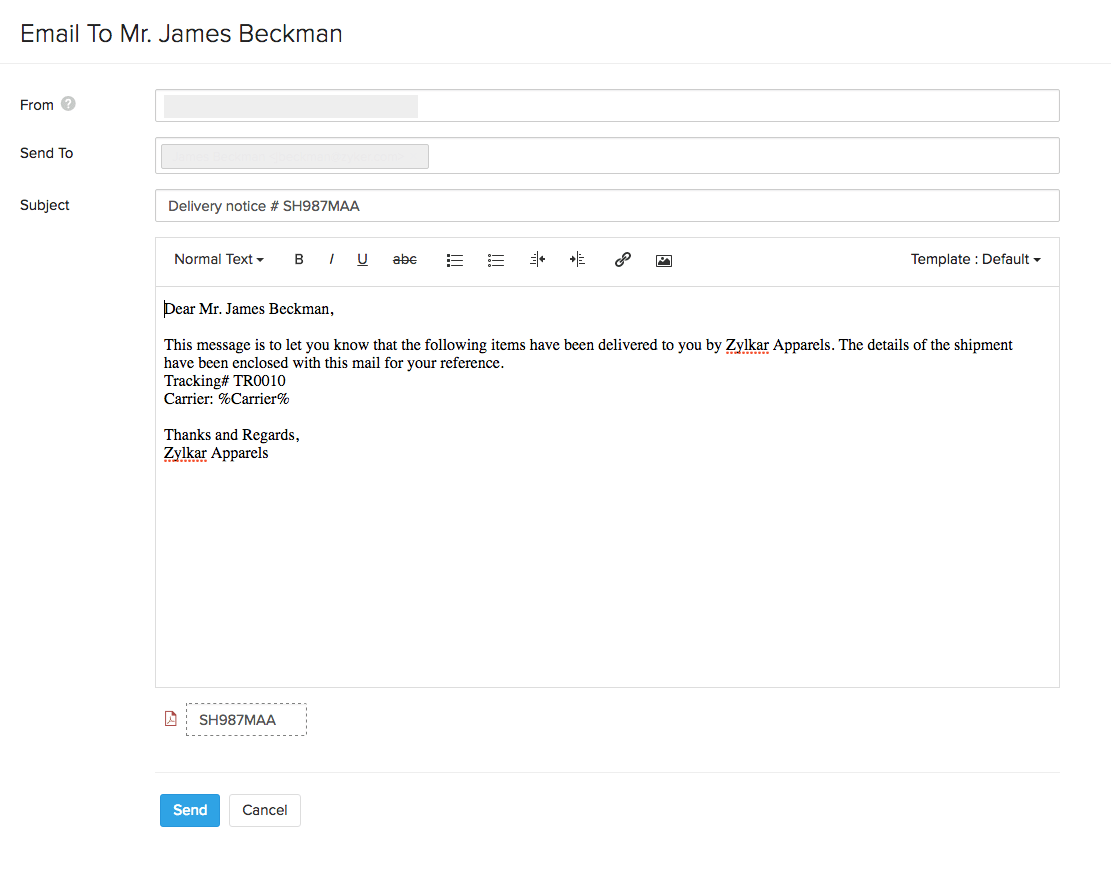
You can send email notifications to your customers when their packages have been shipped or delivered. To do so,
- Open the desired shipped/delivered package from the Packages module.
- Click on the mail icon to send an email to the customer.
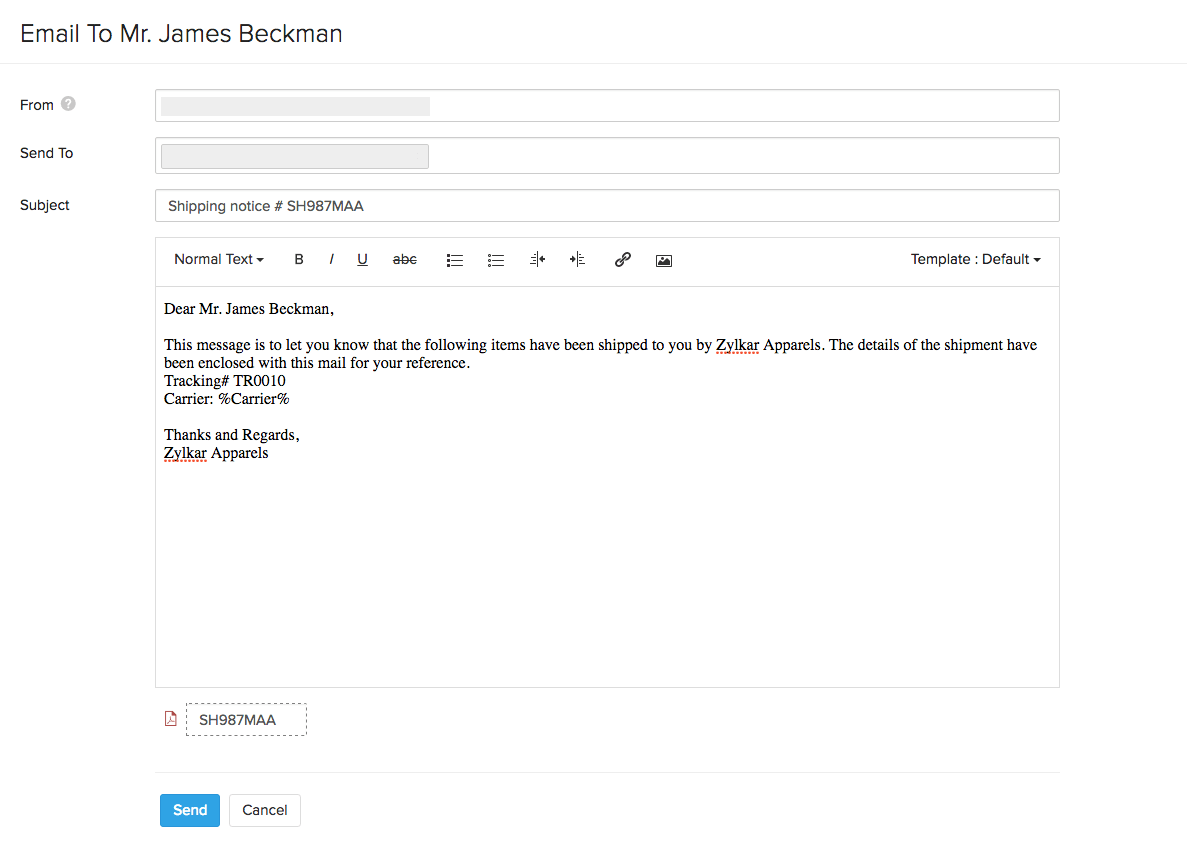
- Clicking on the mail icon will take you to the e-mail interface from where you can send the mail to your customers. You can edit the content here, or you can go make the changes to the template under the Email Template options in the Settings menu.
Printing package slips & shipment orders:
You can print you package slips and shipment orders by clicking on the Print icon on the top.
Delete a shipment:
You can delete a shipment by clicking on the More button and clicking on the delete shipment option.
Mark as Undelivered:
(applies only to delivered packages - handy for manual shipments when redirected)
In the case when an error has been made in recording a delivery especially during manual shipments, you can mark a delivered package as undelivered.
- To do so, click on the Mark as Undelivered button on top of the package that has been prematurely or wrongly marked as delivered.
- Its status will be reverted from Delivered to Shipped.
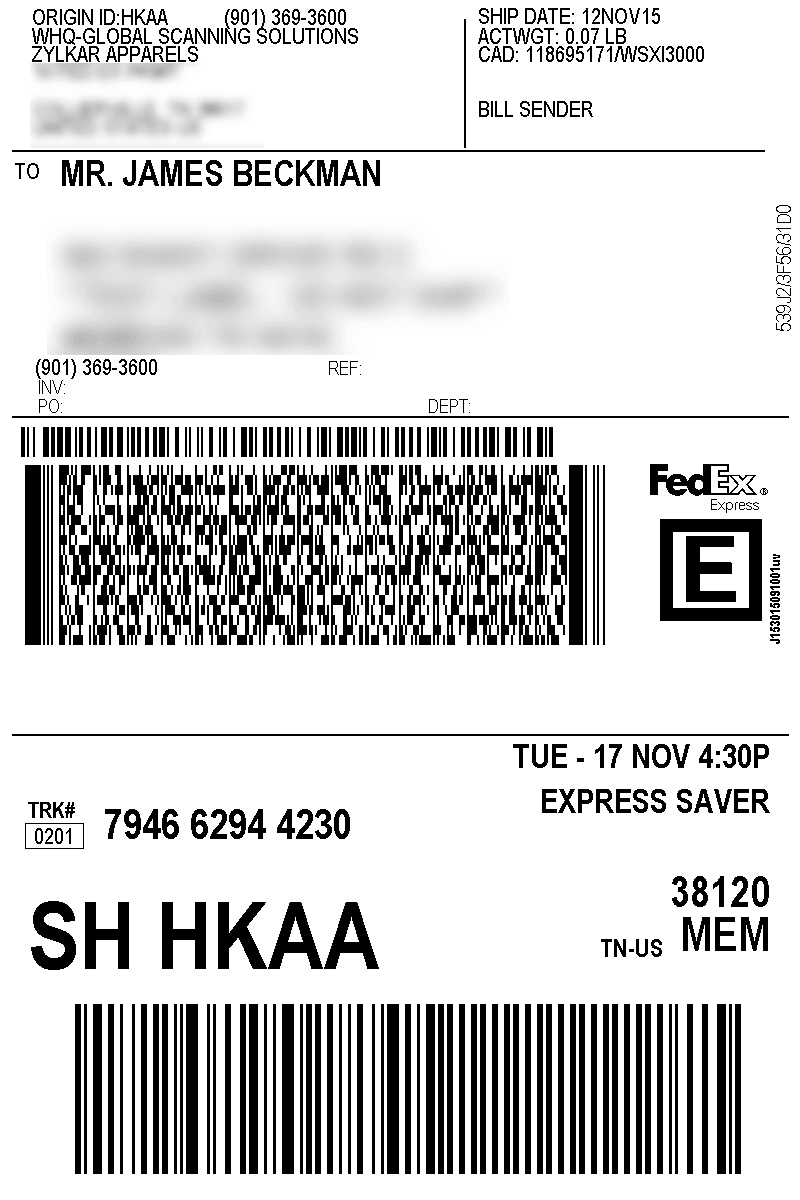
Downloading a Shipping Label
You can download the shipping label for a shipment made using an integrated carrier. To do so:
- Navigate to the Packages module.
- Select the preferred package that has been shipped(via carrier method).
- Click on the Download Label option on the package slip.
- Your shipment label will be downloaded and saved inside your default downloads folder.
Shipment Templates
To add new shipment templates:
- Click the Gear icon(Settings) on the top right corner and go to Templates.
- Go to the Shipment module.
- Click the + New button.
- Hover over your preferred template and click Use This.
- Provide a name for the template and make any necessary changes to the template properties.
- Preview the changes and click Save.
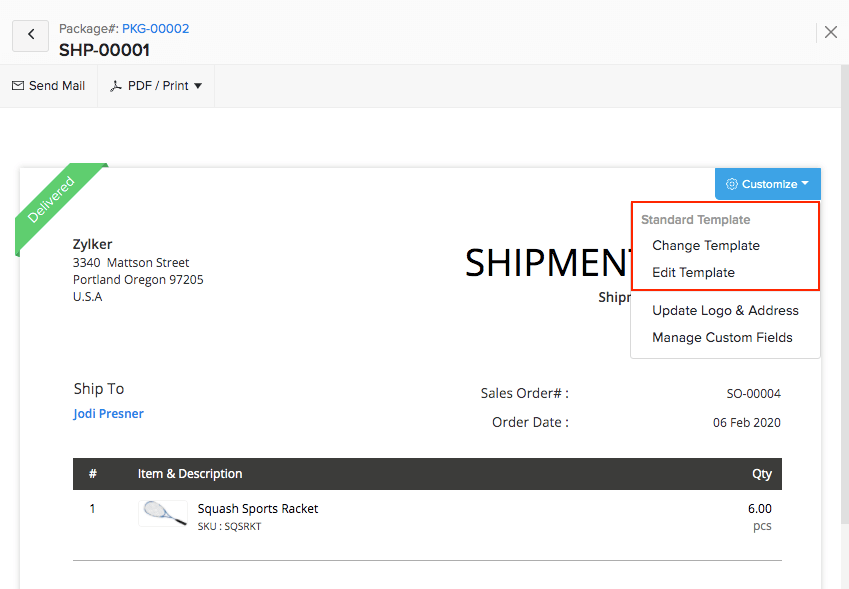
To change your shipment template:
Go to the Packages module in the left navigation pane.
Click on a package which has been shipped.
Click the Shipment Order Number on top of the package details page.
Click the Customize button at the top right corner of the shipment PDF.
Choose the action you want to perform on the template from the dropdown.
Import Shipments
To import shipments into Zoho Inventory:
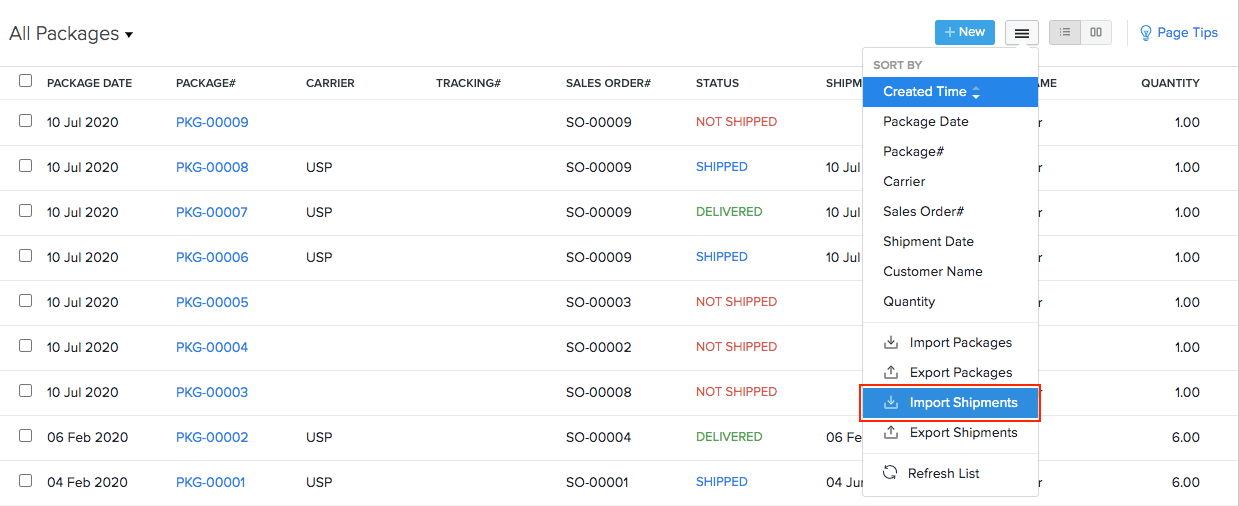
Go to the Packages modules on the left sidebar.
Click the More icon on the top right corner.
Choose Import Shipments option from the dropdown.
Click Choose File and select the import file from your system. You can also download the sample file from this page as a reference to prepare your import file.
Keep UTF-8 as your Character Encoding and select the File Delimiter.
Choose whether you want to autogenerate your shipment numbers in Zoho Inventory.
Click Next to proceed to the next step.
For every Zoho Inventory field, select the appropriate field from the dropdown.
Choose whether you want to use the same selection for your future imports.
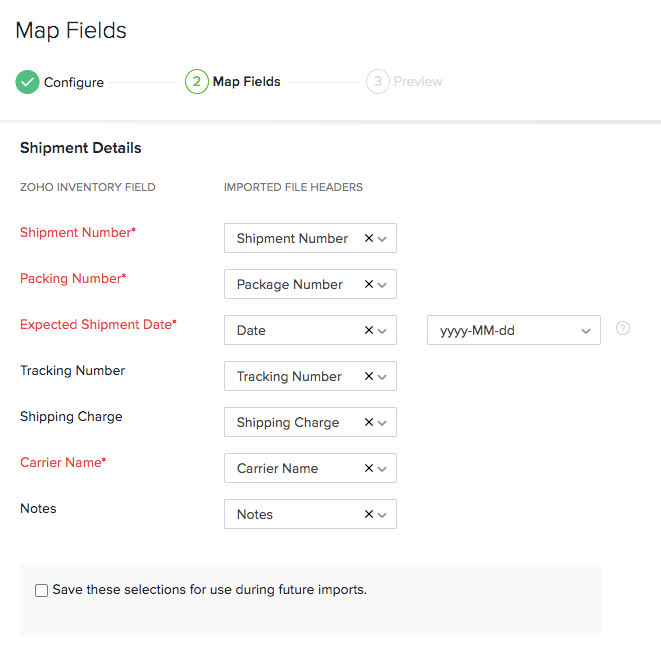
Click Next to preview the records that are ready to be imported.
If you need to make changes, click Previous, otherwise, click Import.
Export Shipments
Go to the Packages module from the left navigation pane.
Click More icon(three horizontal lines) on the top.
Select Export Shipments.
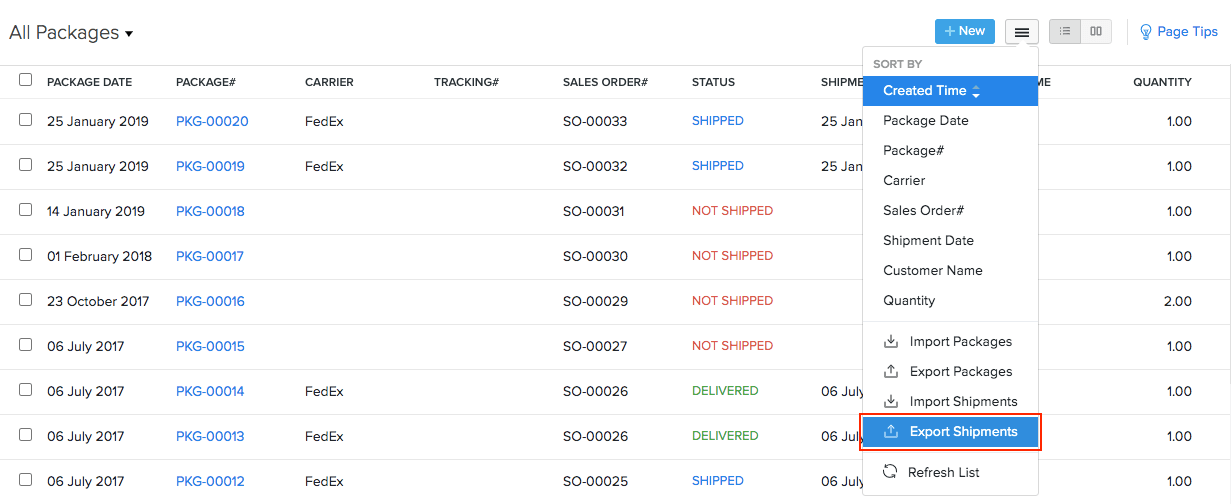
Choose whether you want to export all shipments or shipments created within a specific period.
Choose the format in which you want to save your export file.
Enter a password to secure your file. (Optional)
Click Export.
Fulfill orders quickly and easily with the efficient order fulfilment software


