VAT in Germany
In Germany, Value Added Tax (VAT) is levied by the government on the goods or services provided by registered businesses. It is mandatory for all resident and non-resident businesses in Germany to register for VAT.
VAT Settings
Configure VAT in Zoho Books
If your business is registered for VAT, you can enter your VAT information and configure VAT settings within Zoho Books.
Note: You can find the necessary details in the VAT Certificate issued by your German jurisdictional tax office.
To configure VAT in Zoho Books:
- Click Settings on the top right corner of the page.
- Click Taxes under Taxes & Compliance.
- In the Taxes pane, click VAT Settings.
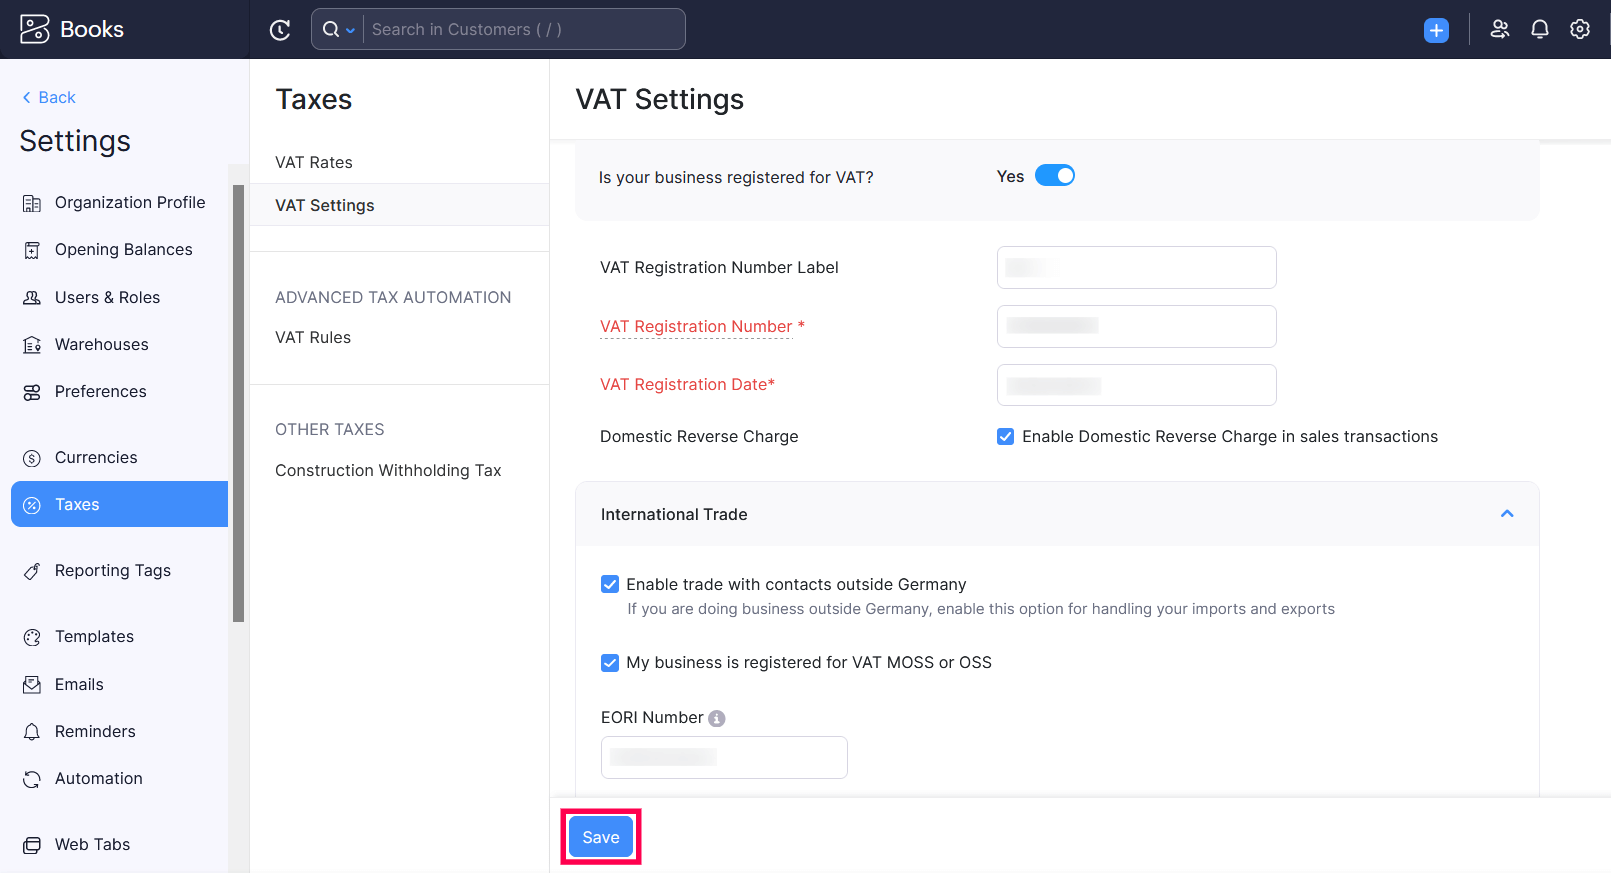
- Select Yes if you are a registered business under Is your business registered for VAT?
- Enter the 9-digit VAT Registration Number.
- Enter the VAT Registration Date.
Note: You cannot apply VAT on transactions created before this date in Zoho Books.
- Check the Enable Domestic Reverse Charge in sales transactions option to apply domestic reverse charge on services in your sales transactions.
Insight: Domestic Reverse Charge (DRC) is a legal measure introduced to stop fraudsters from avoiding paying their VAT dues to the government, which they had collected from their German customers.
In the International Trade section, check the Enable trade with contacts outside Germany if you supply or import goods from other countries. Enabling this option lets you apply Reverse Charge and Acquisition VAT on your items in your sales and purchase transactions.
Check the My business is registered for VAT MOSS or OSS option to track VAT according to the One Stop Shop scheme and enable VAT Rules for your organization.
Insight: The OSS (One Stop Shop) scheme was introduced to simplify the taxation process for businesses in Germany that import goods from EU member states.
If you sell services valued over EUR 10,000 to EU customers outside Germany, you should apply VAT based on their location. Once you start tracking OSS scheme in Zoho Books, you will be able to create VAT rules and apply VAT rates on items based on the customer’s location automatically.
You will also be able to generate dedicated reports that details the transaction type and the taxable amount.
Enter your EORI Number. (Economic Operators Registrations and Identification) which is an identification number for vendors involved in trade with EU’s customs territory.
Click Save.
Manage VAT Rates
Once you’ve configured VAT in the VAT Settings page, you can start you can start applying the default VAT rates to your transactions. These include the Standard Rate [19%], Reduced Rate [7%], and Zero Rate.
Note: The default VAT rates cannot be edited or deleted.
Create VAT Rate
To create a VAT rate:
- Click Settings.
- Select Taxes under Taxes & Compliance.
- In the Taxes pane, click VAT Rates.
- Click + New VAT and in the pop-up that appears:
- Enter the VAT Name and Rate(%).
- Mark the option This tax is a compound tax, if this is a tax that is calculated on top of a primary tax.
- Select the Account to Track Sales and the Account to Track Purchases under Tracking Preference.
- Click Save.
The VAT rate will be created, and you’ll be able to apply this to transactions.
Edit VAT Rate
To edit an existing VAT rate:
- Click Settings on the top right corner of the page.
- Click Taxes under Taxes & Compliance.
- In the Taxes pane, click VAT Rates.
- Hover over an existing VAT rate and click Edit.
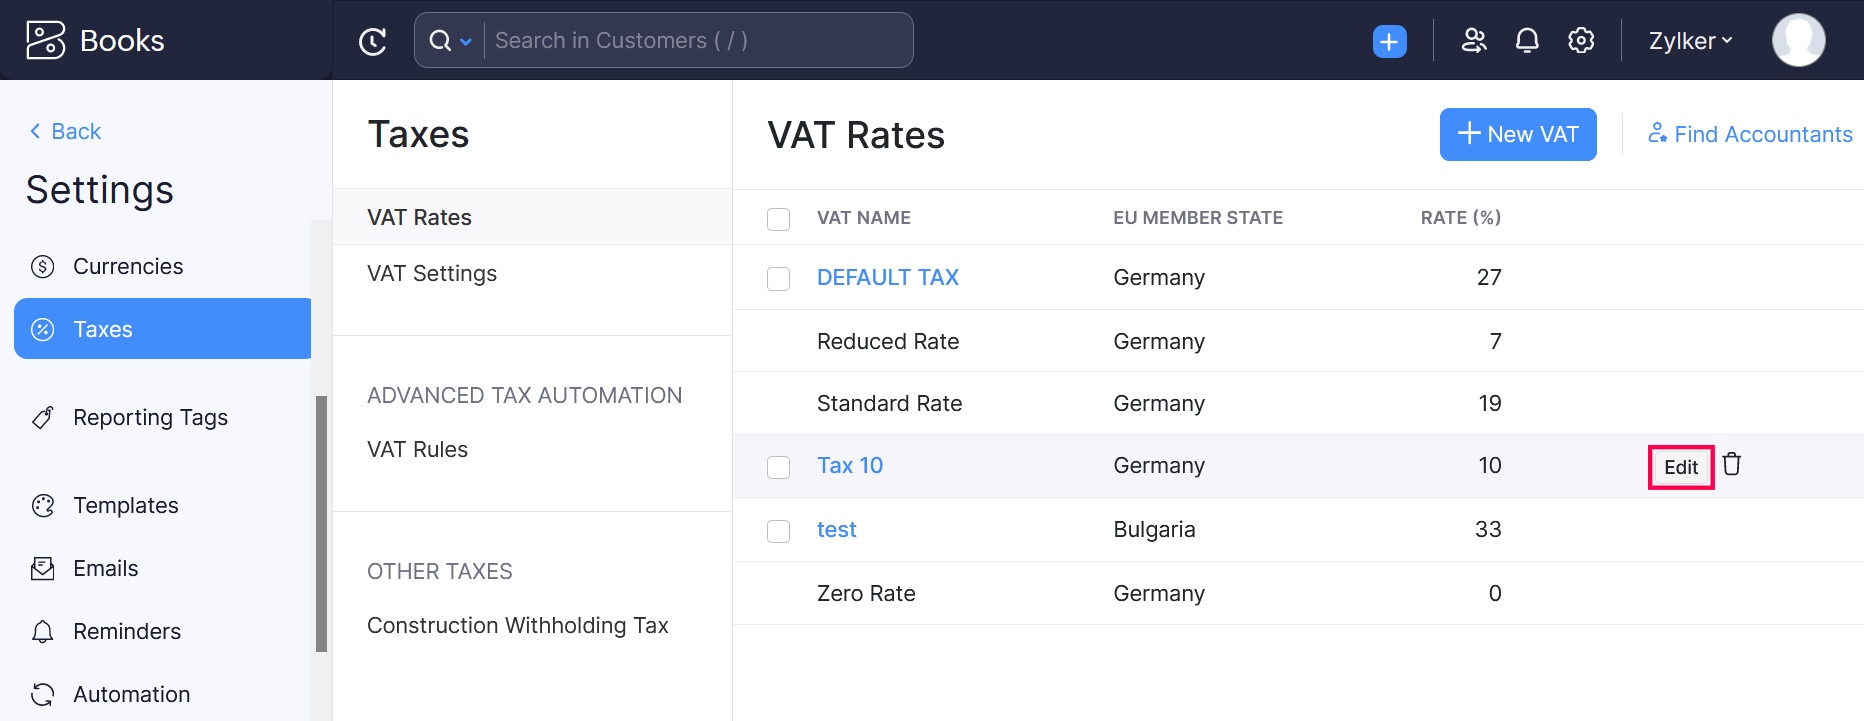
- Edit the fields as per your preference.
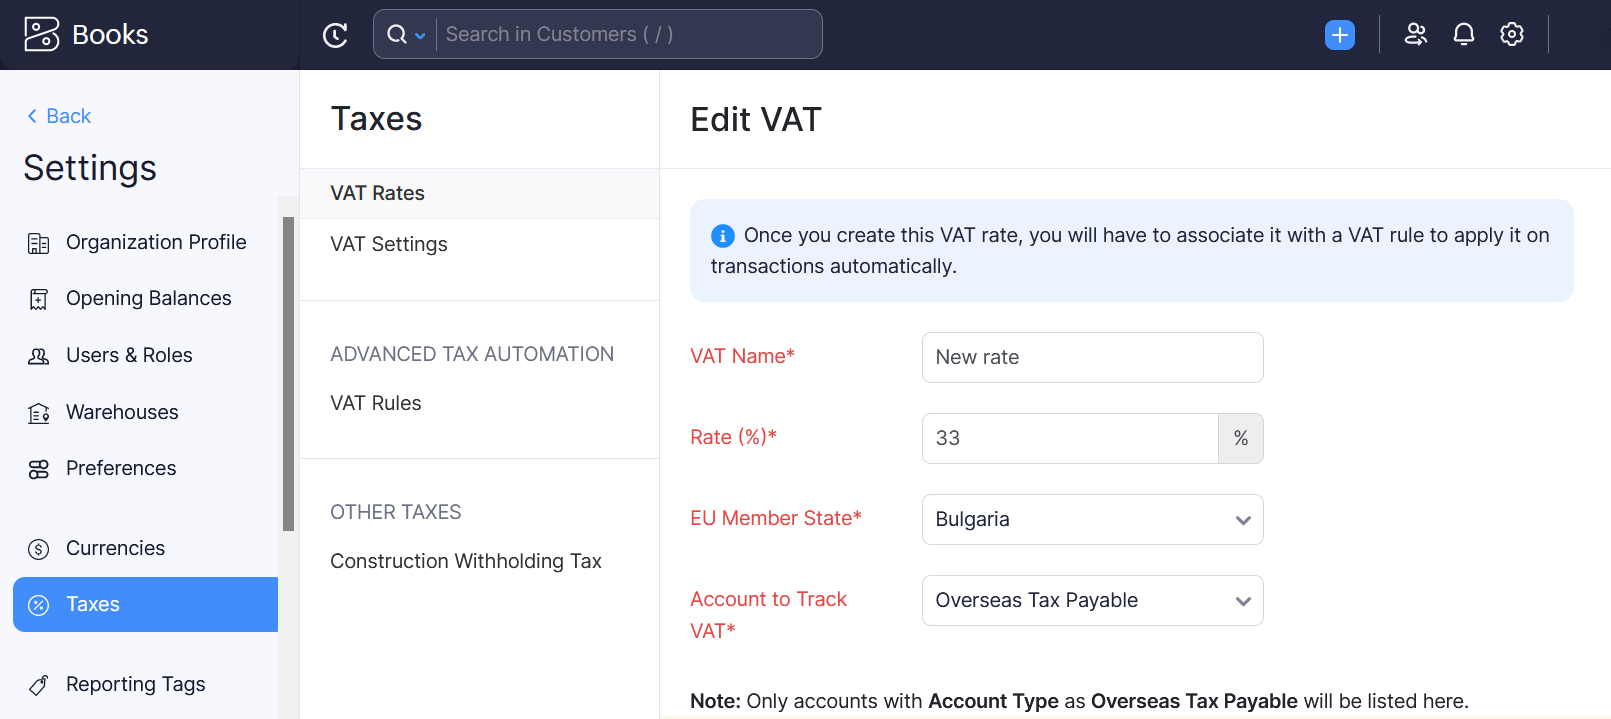
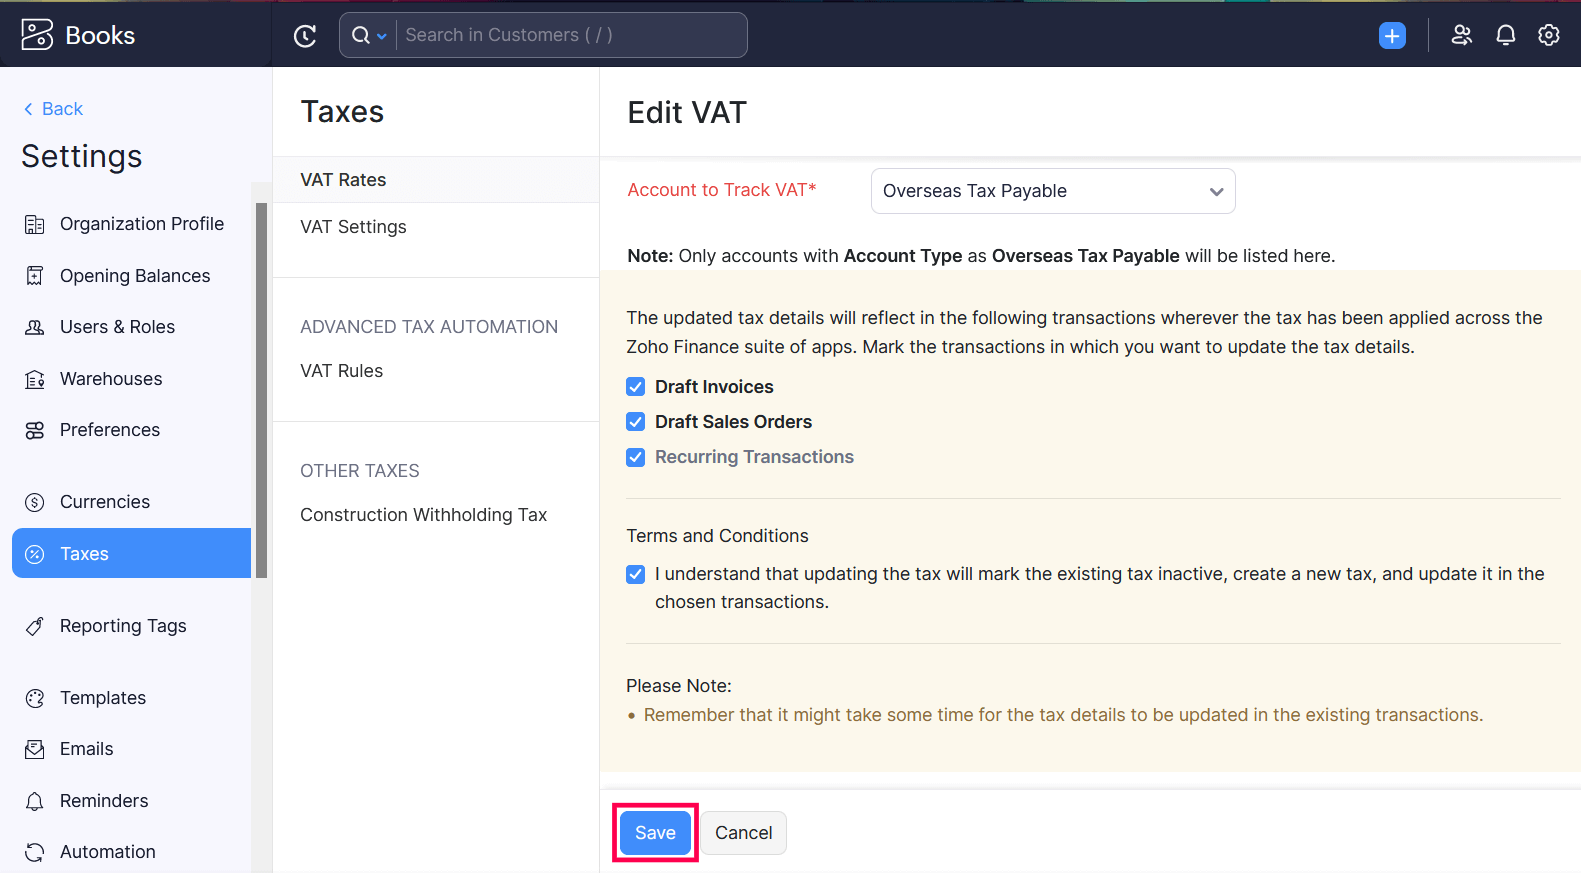
- Select the draft transactions in which you want to update the edited VAT rate.
- Click Save.
Delete VAT Rate
To delete an existing VAT rate:
- Click Settings on the top right corner of the page.
- Click Taxes under Taxes & Compliance.
- In the Taxes pane, click VAT Rates.
- Hover over an existing VAT rate and click the Delete icon.
- Confirm the action by clicking OK in the screen that follows.
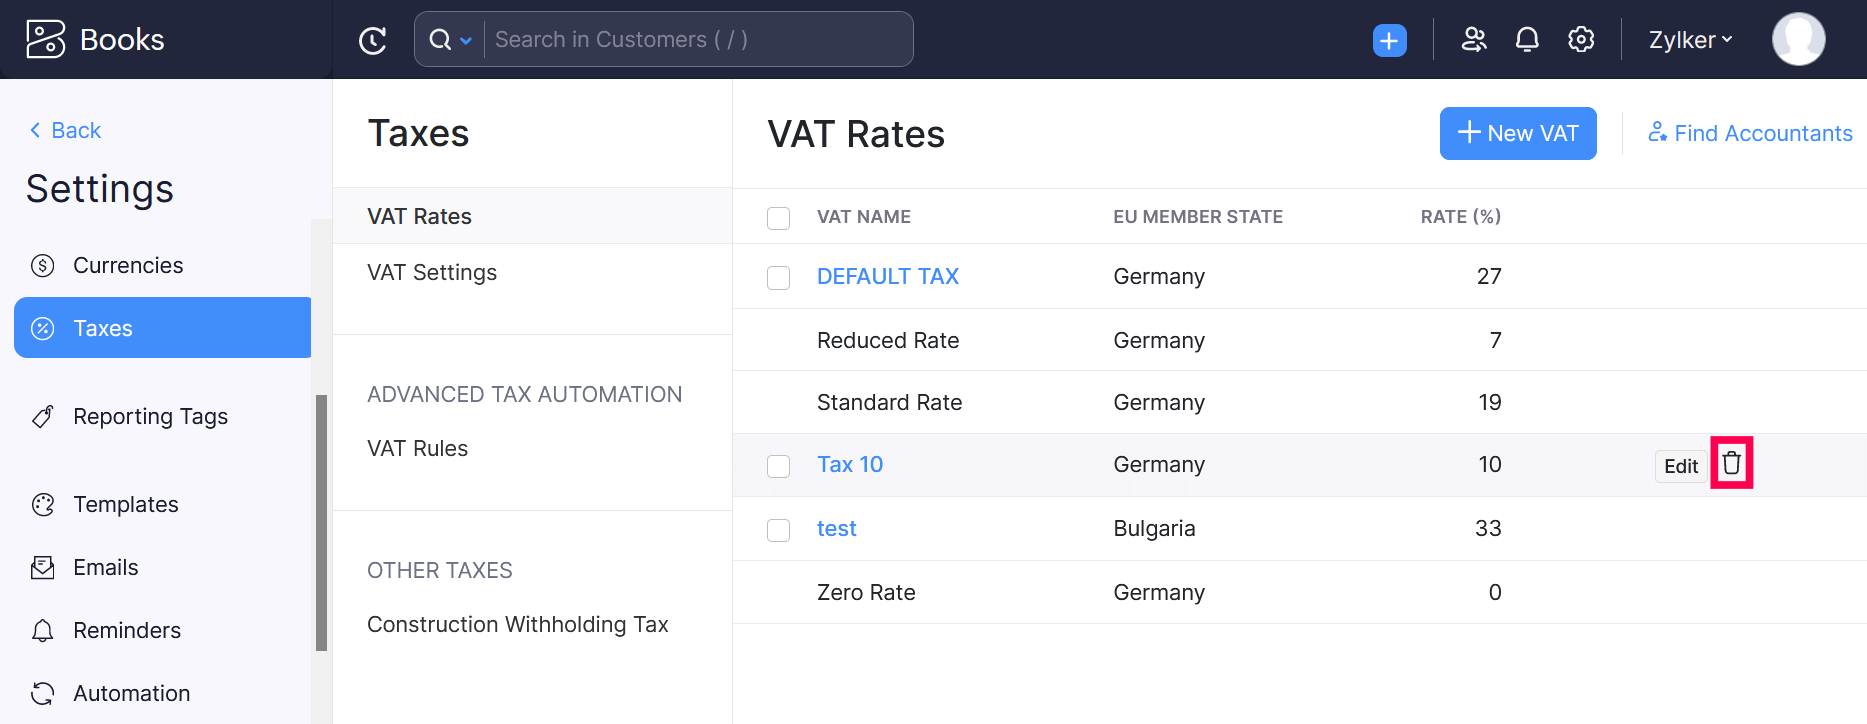
The VAT rate will be deleted.
Track OSS Scheme
The OSS (One Stop Shop) scheme was introduced on 1 July 2021 to ease the taxation process for businesses that import goods from overseas into the European Union member states.
In Zoho Books, you can choose to associate customers to the OSS scheme. Thereby, when you record an invoice or credit note for these customers, you can track the tax applied on transactions as per the OSS scheme.
Note: Tracking the tax as per OSS is optional in Zoho Books.
Once you start tracking OSS scheme, you will also be able to generate dedicated reports that details the transaction type and the taxable amount.
Enable Tracking of OSS Scheme
You have to enable tracking of OSS scheme to track tax as per the OSS scheme in Zoho Books. To enable tracking of OSS scheme:
- Go to Settings in the top right corner of the page.
- Select Taxes under Taxes & Compliance.
- In the Taxes pane, select VAT Settings.
- Check the My business is registered for VAT OSS option.
- Enter your EORI Number(Economic Operators Registrations and Identifications).
- Click Save.
Insight: Your EORI number is used in all custom procedures when exchanging information with customs administrations and will be displayed on the invoices you send to your customers.
You will now be able to associate customers to the OSS scheme and track tax as per OSS scheme while recording an invoice or credit note.
Add OSS Tax Rates
You have to add the tax rates as per OSS schemes in Zoho Books to apply the OSS tax rates on your invoices and credit notes.
To add OSS tax rates:
- Go to Settings in the top right corner of the page.
- Select Taxes under Taxes & Compliance.
- In the Taxes pane, select VAT Rates.
- Click + New VAT.
- Enter the VAT Name and Rate.
- Check the Track the tax collected using this tax rate country-wise when it is applied on transactions where VAT OSS scheme is applicable. option.
- Select the EU Member State.
- Select the Account to Track VAT.
- Click Save.
You will now be able to apply these tax rates as per OSS schemes on your invoices and credit notes.
Construction Withholding Tax Settings
In Germany, the Construction Withholding Tax refers to a tax regulation applied on construction services where the contractor (customer) is required to withhold 15% of the subcontractor’s (vendor) invoice amount and pay it directly to the German tax authorities.
If you want to enable CWT tracking for your transactions:
- Go to Settings and navigate to Taxes.
- Select Construction Withholding Tax from the sidebar.
- Select Yes if you want to track CWT under Do you want to track CWT on transactions?
- Select if you are a contractor, subcontractor or both in the CWT Role dropdown.
- If you are a subcontractor, select the CWT Deduction Rate from the dropdown.
- Click Save.
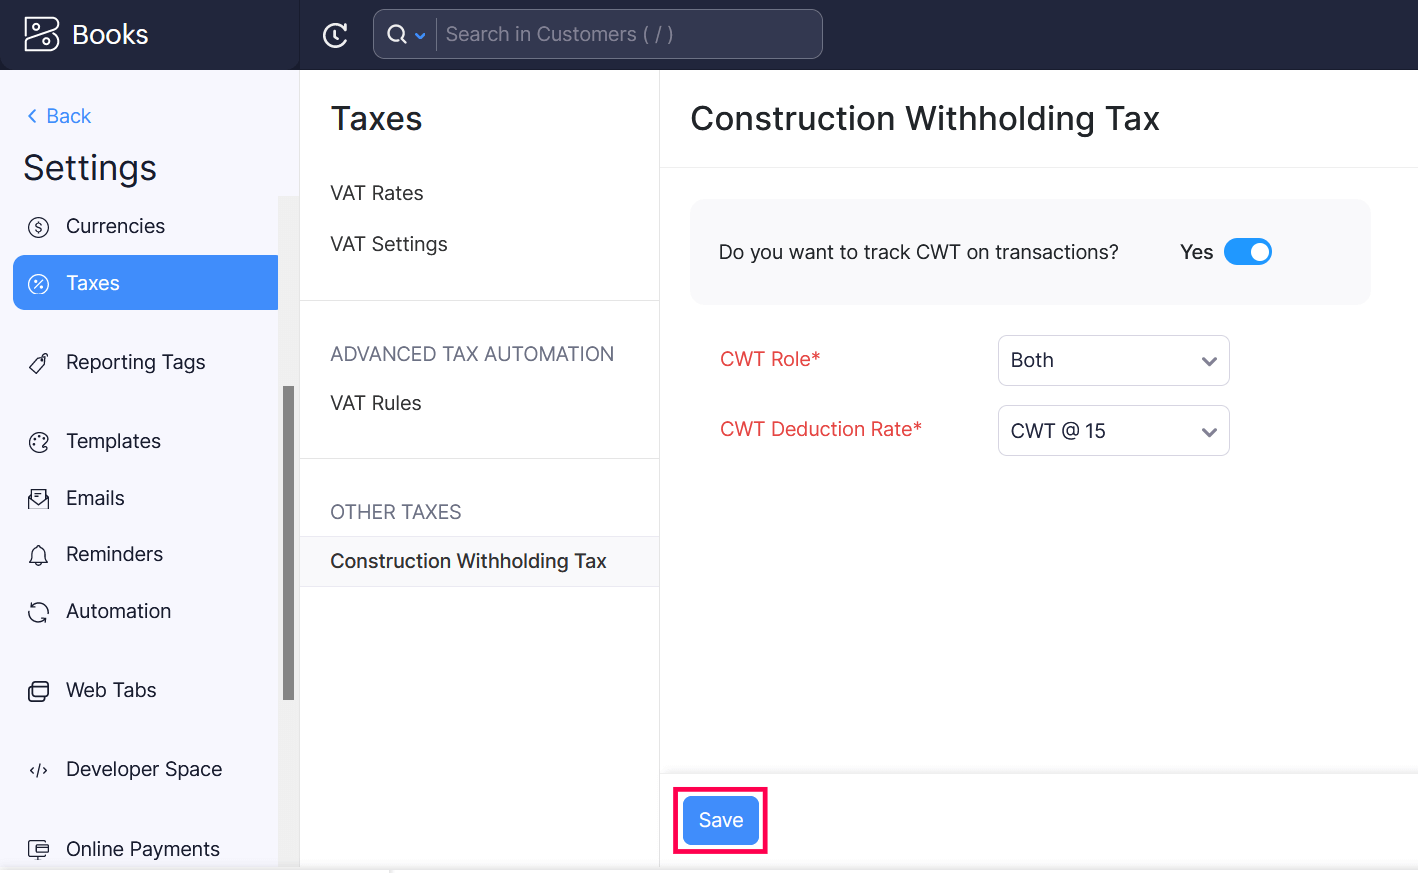
You will now be able to track CWT deductions in your transactions using the CWT Deduction and CWT Suffered reports.
Advanced Tax Automation with VAT Rules
Note: This feature is available only for certain plans of Zoho Books. Visit the pricing page to check if it’s available in your current plan.
Advanced Tax Automation in Zoho Books lets you use VAT rules to automatically select the appropriate VAT rates for your items when you create a transaction. VAT Rules are a set of VAT rates that you can configure to be automatically applied in a transaction.
When you associate a VAT rule with a contact, the VAT rate specified in that VAT rule will be applied to all transactions that you create for that contact. If you associate a VAT rule to an item, the VAT rate specified in that VAT rule will be automatically applied to that item when you add it to a transaction.
Enable Advanced Tax Automation
To enable Advanced Tax Automation:
- Click Settings on the top right corner of the page.
- Click Taxes under Taxes & Compliance.
- In the Taxes pane, click VAT Settings.
- Check the My business is registered for VAT MOSS or OSS box to manage VAT rules and automate the location-specific VAT applied on transactions.
- Click Save.
Once you enable this, you’ll be able to see the Advanced Tax Automation section under Taxes.
Create VAT Rules for Items
VAT rules that are assigned to specific items are categorised as Item based VAT Rules.You can assign these VAT rules to items and automatically apply VAT rates in your sales transactions, based on your customer’s place of supply.
Scenario: Oscar runs a SaaS company in Germany and sells his products worldwide. While creating transactions, he’ll have to assign VAT rates to each customer outside Germany manually. He then enables VAT rules, so now he can create a single VAT rule with different VAT rates for different countries and assign it to an item. Now, whenever he creates a customer transaction and adds that item to it, Zoho Books automatically applies the VAT rate according to the customer’s country.
To create a new VAT rule:
- Click Settings on the top right corner of the page.
- Click Taxes under Taxes & Compliance.
- In the Taxes pane, click VAT Rules.
- Click + New VAT Rule in the top-right corner and a VAT rule creation page will be displayed.
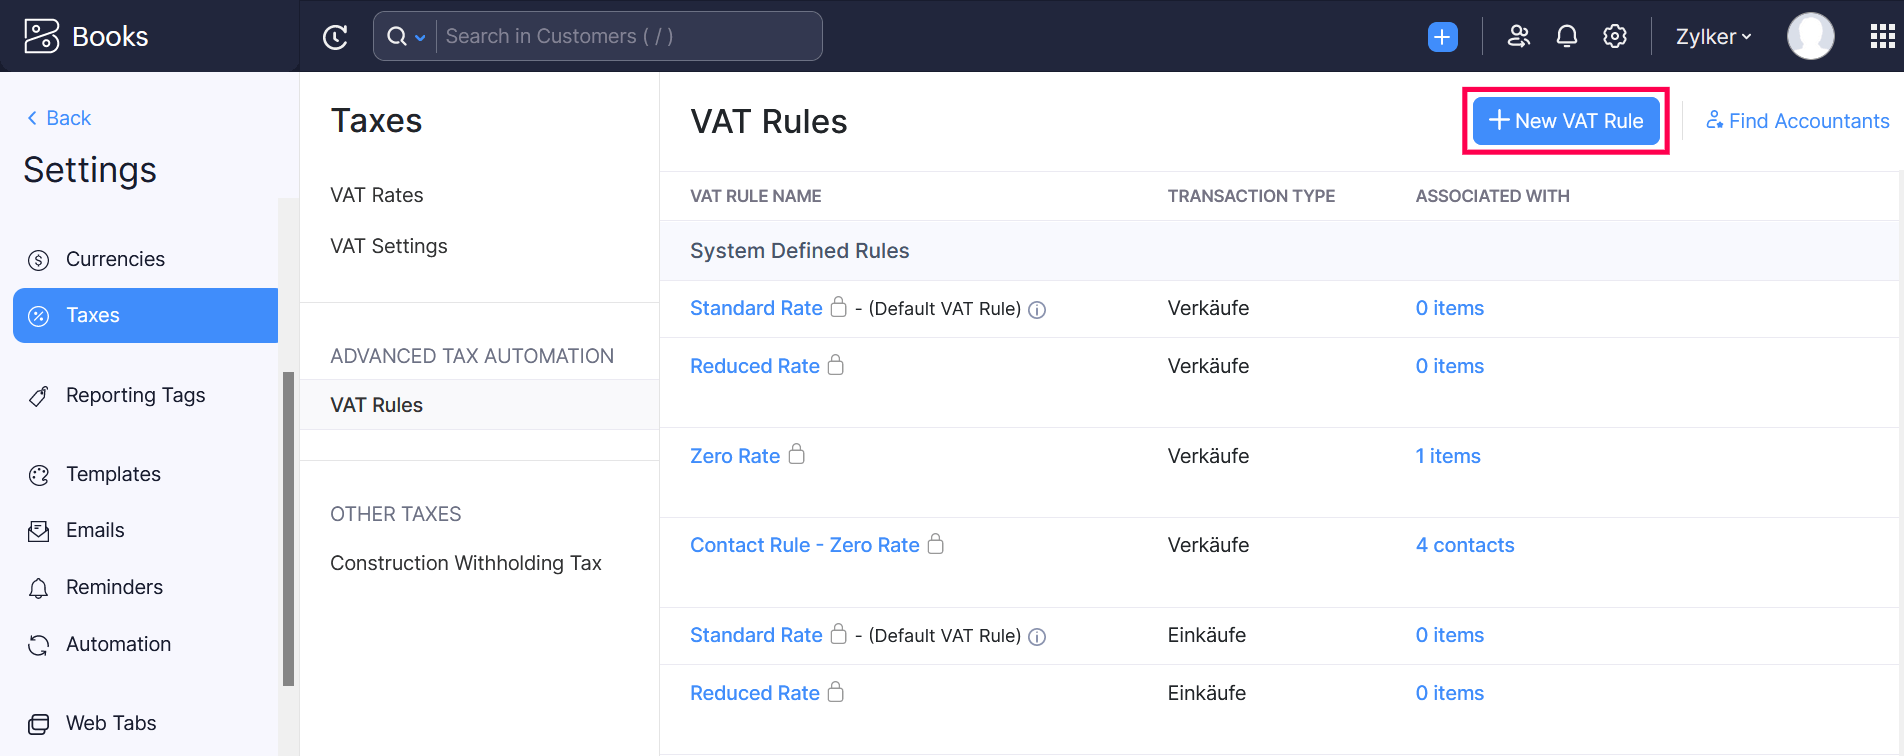
- Enter the VAT Rule Name.
- The Association Type will be set as Item Based, since new VAT rules can only be associated with items.
- The Transaction Type will be set as Sales since new VAT rules can only be associated with sales transactions.
- Click +Add New Country and select a country and assign the VAT rates.
- Click Save.
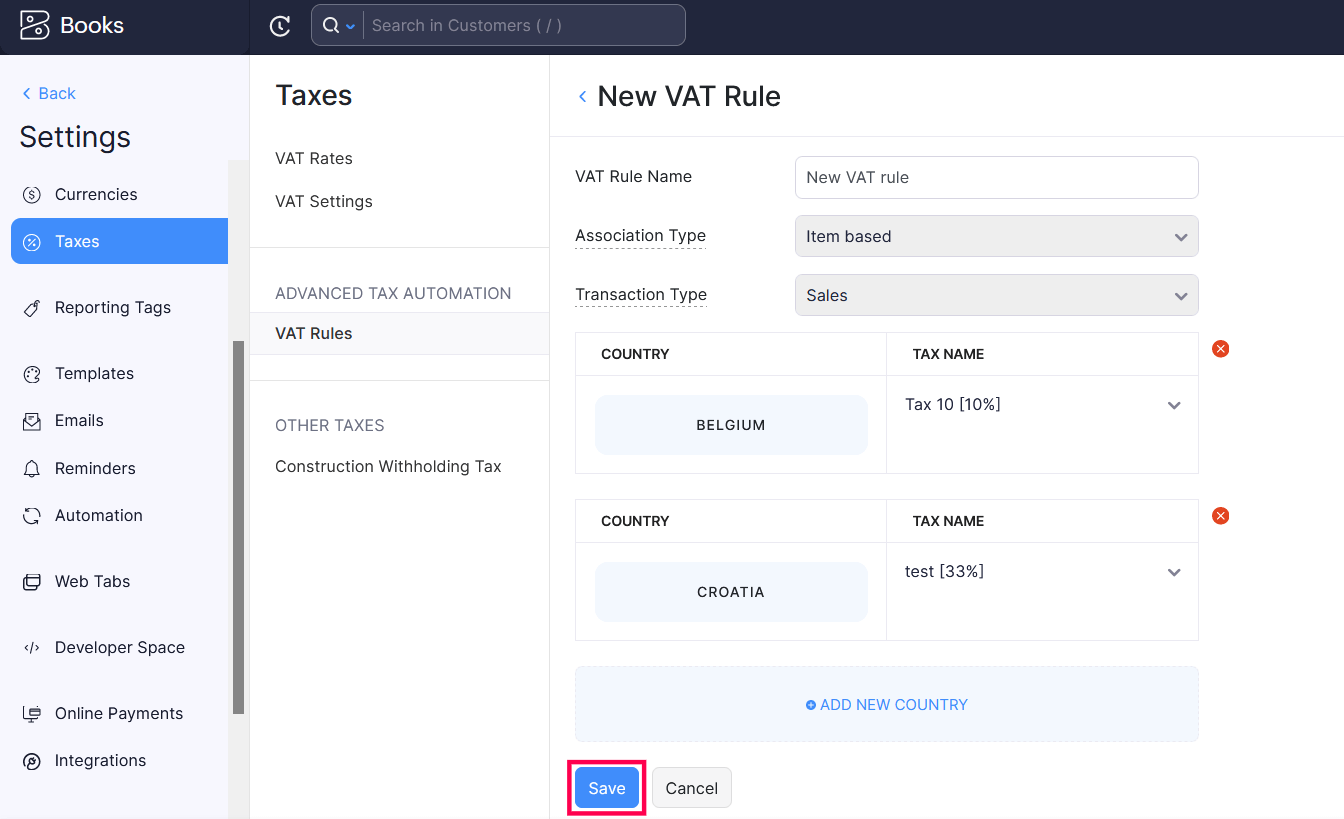
If your customer’s place of supply matches the country specified in a VAT rule that is assigned to an item in a sales transaction, the country - specific VAT rate in that rule will be applied automatically to the item.
Assign VAT Rules to Items
You can assign VAT rules to new or existing items. Here’s how:
- Go to the Items module on the left sidebar.
- Create or edit an item.
- Select the Sales VAT Rule under Sales Information and Purchase VAT Rule under Purchase Information.
- Click Save.
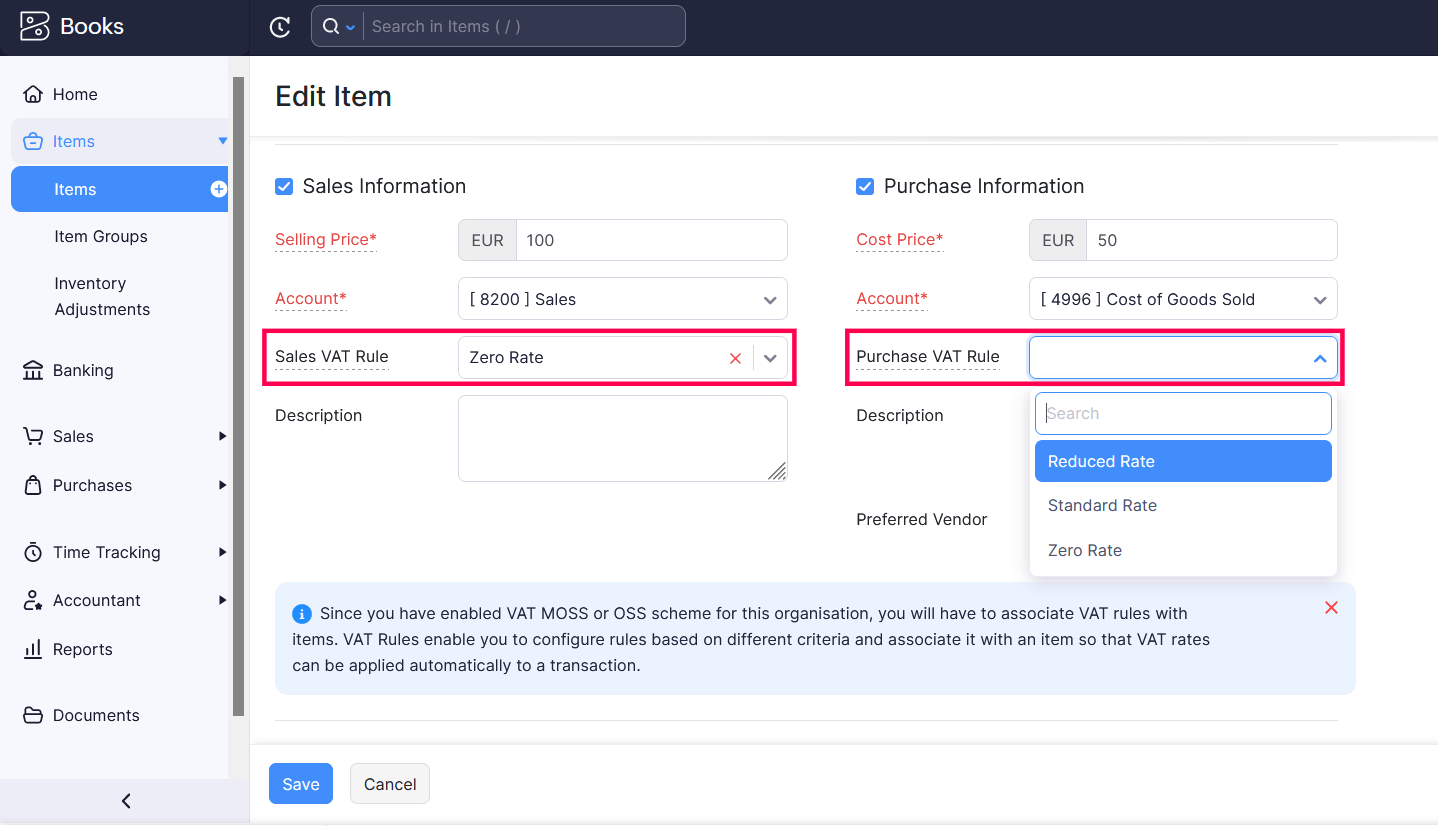
All the transactions to which you add these items will have the VAT rate based on the rule assigned to them.
Note: While creating a transaction, if you have associated VAT rules to the contact and the items, the VAT rule associated with the contact will override the VAT rules associated with items.
Edit VAT Rule
Note: The system - defined VAT rules cannot be edited.
To edit an existing VAT rule:
- Click Settings on the top right corner of the page.
- Click Taxes under Taxes & Compliance.
- In the Taxes pane, click VAT Rules.
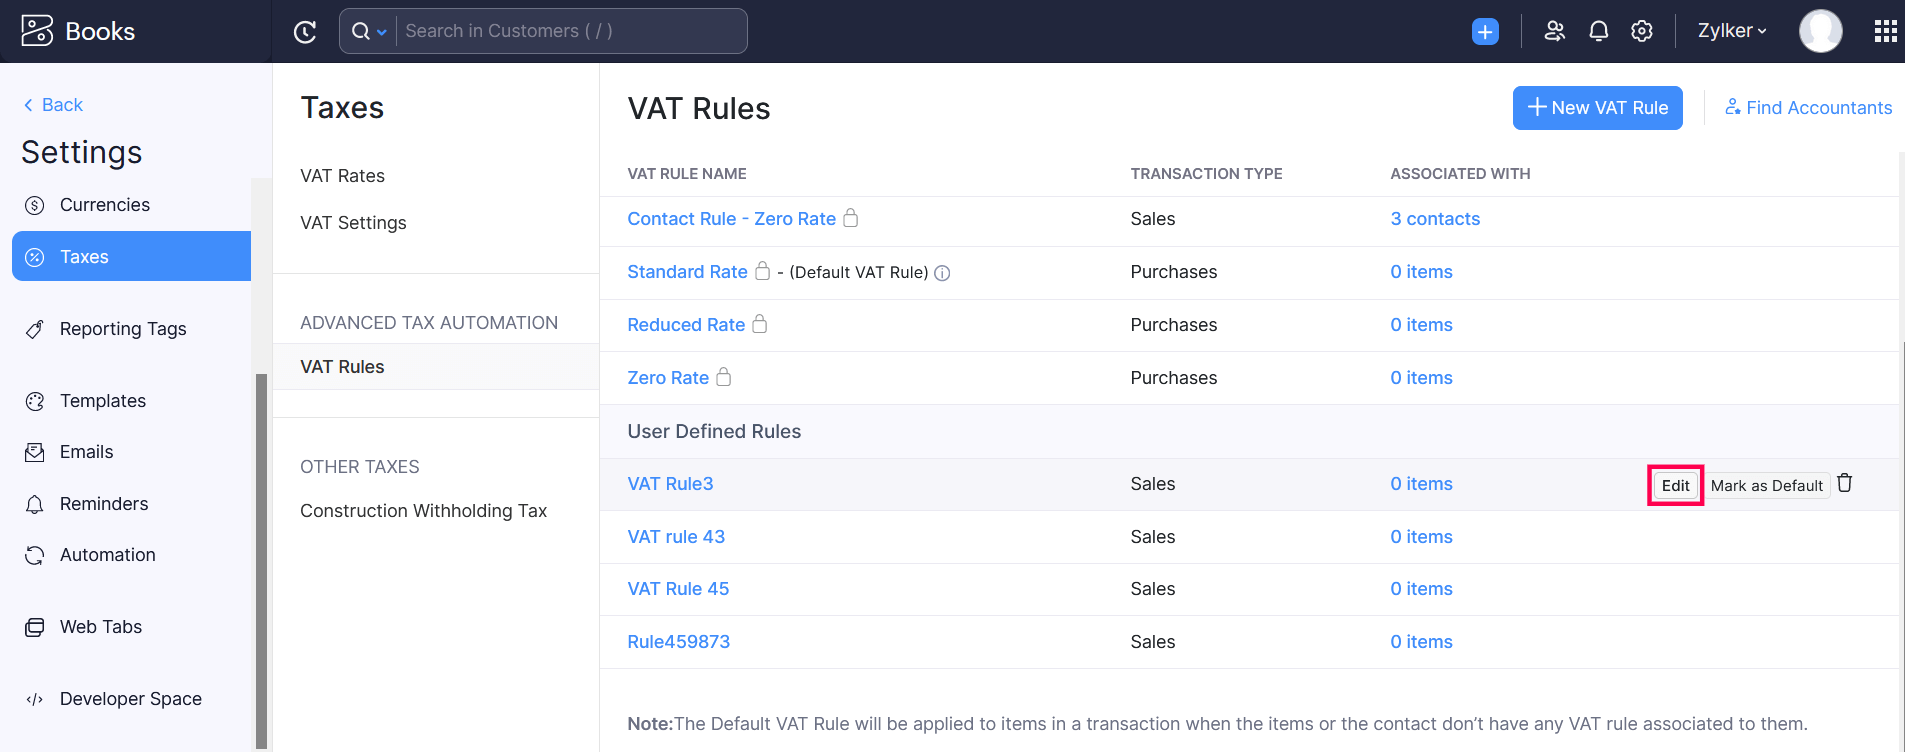
- Hover over the VAT rule and click Edit.
- Make the necessary changes and click Save.
Delete VAT Rule
Note: The system - defined VAT rules cannot be deleted.
To delete a VAT rule:
- Click Settings on the top right corner of the page.
- Click Taxes under Taxes & Compliance.
- In the Taxes pane, click VAT Rules.
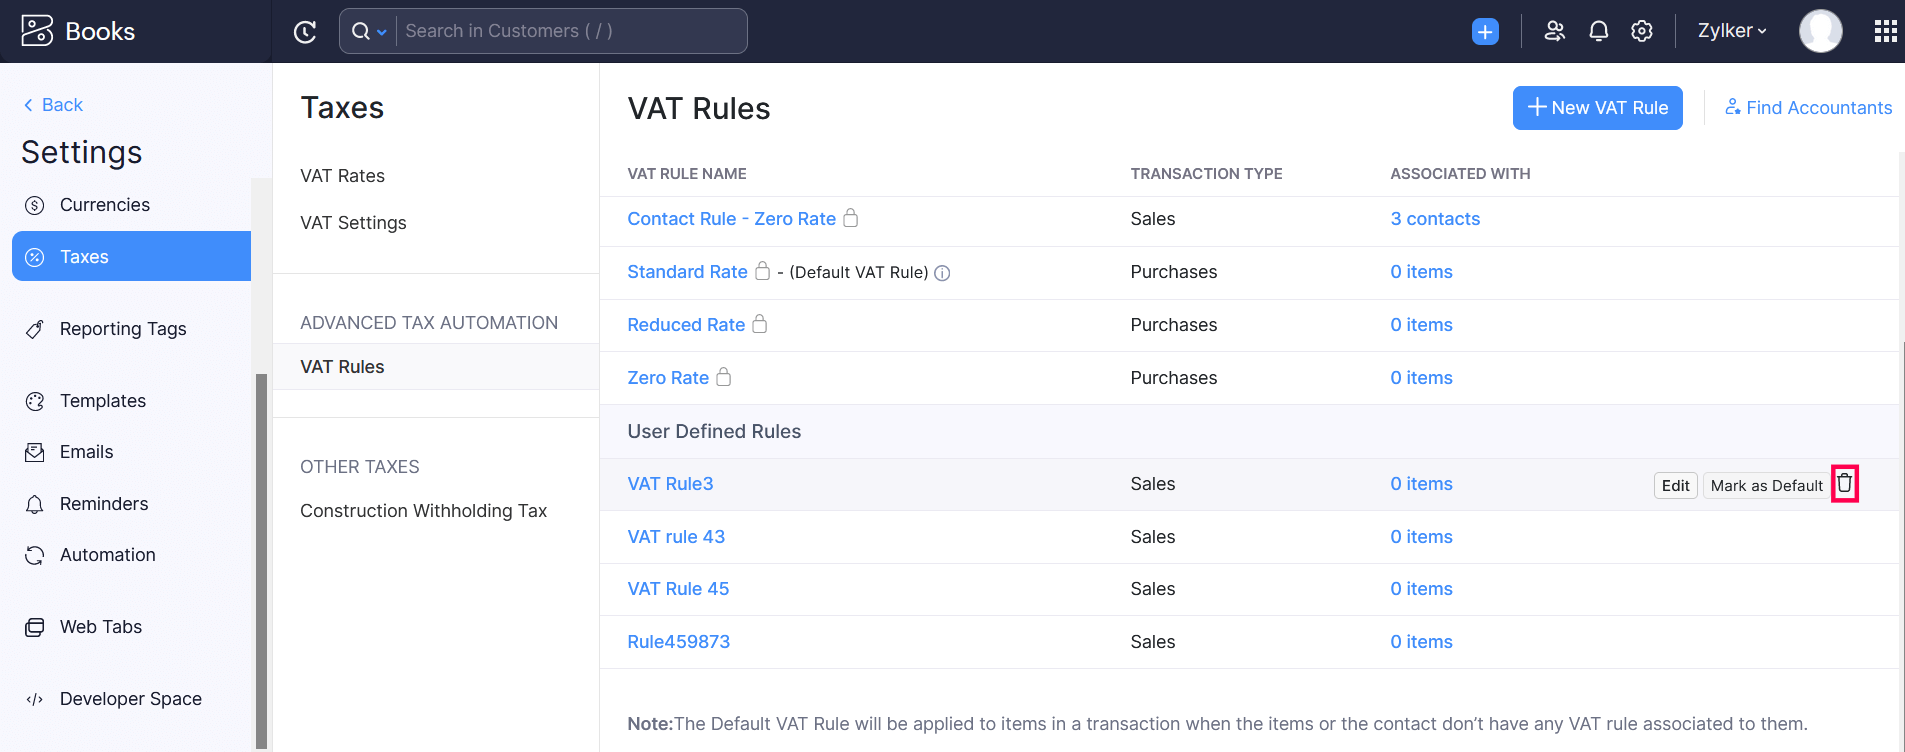
- Hover over the VAT rule and click theTrash icon.
- Click OK to confirm.
The VAT rule will be deleted from your organization.


 Yes
Yes