
Cheque Payments for Vendor Bills and Advances
If you have a business that pays your vendors through cheques, then this feature simplifies your payment process efficiently. You can pay your vendors by writing and printing out a cheque directly from Zoho Books. Whenever you make a payment via cheque, your bill payment details will instantly be auto-fetched and printed on your cheque leaf.
Note: Cheque payments are different from the Cheque option available under the mode of payment dropdown while creating transactions. The Pay via Cheque option is exclusive to cheques that you create from Zoho Books.
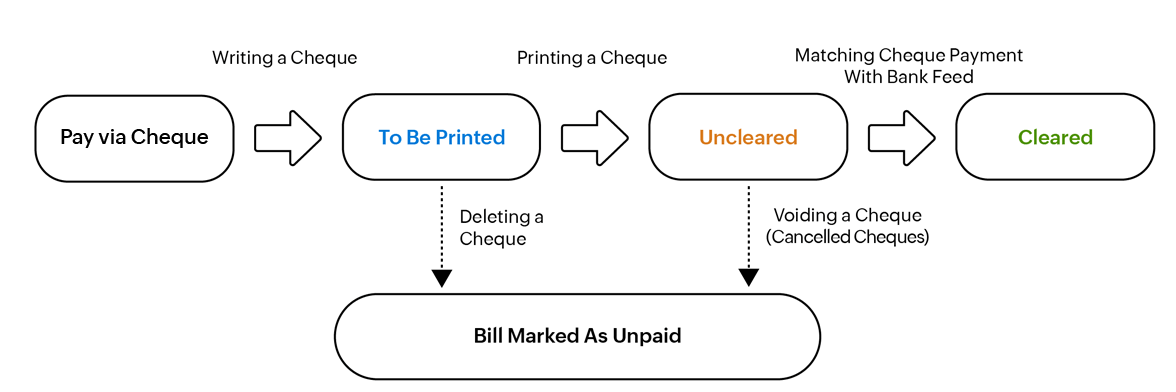
Payment Statuses of a Cheque Payment
Depending on whether you’ve enabled approvals for payments or not, a cheque payment goes through the following statuses:
| Payment Status | Description | Applicable When | |
|---|---|---|---|
| Draft | The cheque is created but not processed further. | Approvals is enabled or disabled | |
| Pending Approval | The cheque is waiting for approval. | Approvals is enabled | |
| Approved | The cheque is approved and ready for further action. | Approvals is enabled | |
| Approval Rejected | The cheque’s approval has been rejected. | Approvals is enabled | |
| To Be Printed | The cheque is ready to be printed. | Approvals is enabled or disabled | |
| Uncleared | The cheque is printed but not yet cleared by the bank. | Approvals is enabled or disabled | |
| Cleared | The cheque is matched with a bank feed. | Approvals is enabled or disabled | |
| Void | The cheque is marked as void and will not be processed. | Approvals is enabled or disabled |
Write and Print a Cheque
You can print the bill details in your cheque instantly. Here’s how:
- Go to Purchases on the left sidebar and select Bills.
- Select a bill for which you want to make a payment via cheque.
- Click the Record Payment dropdown and select Pay via Cheque.
- Review your payment details and click Save and Print Now or Save and Print Later based on your preference.
The status of the bill will now be changed to Paid.
- If you select Save and Print Now, your payment details get printed on your cheque once you click Print in the preview popup that appears.
- If you select Save and Print Later, your cheque’s status will be changed To be printed, and you can print it anytime as required by navigating to Payments Made and clicking the Print icon from the dropdown next to PDF on the cheque you would like to print.
- Once this is done, in the pop-up that appears, choose - Not yet printed, keep cheque in to-be printed list, if your cheque is not printed correctly.
- If the cheque is printed correctly, choose - Yes, cheque printed correctly and review the Cheque Number. Zoho Books will auto-generate this number sequentially to help you track your cheque payments; you can also modify them based on your requirement. The status of your cheque will be changed to Uncleared.
Warning: You can use your cheque number only once. You cannot reuse the cheque numbers that are allotted to void cheques.
Pay a Vendor’s Bills Using a Single Cheque
If you’ve incurred multiple expenses from the same vendor, you can pay all the bills through a single cheque instead of making payments individually through multiple cheques. To pay a vendor’s bills in a single cheque:
- Go to Purchases on the left sidebar and select Vendors.
- Select the vendor for whom you want to make a cheque payment.
- Click the New Transaction dropdown and select Pay Bill via Cheque.
- On the page that opens, enter the following information:
| Fields | Description |
|---|---|
| Payment Made | Enter the amount that you plan to pay via cheque to the vendor. |
| Payment Date | Select the date on which you make the payment |
| Bank account | Select the bank or checking account from which you are paying the vendor. |
- After entering these details, enter the amount you’ve paid for each bill.
- Click Save and Print Now or Save and Print Later based on your preference. The bill’s status will now be changed to Paid.
- If you click Save and Print Later, your cheque’s status will be changed to To Be Printed, and you can print it anytime as required by navigating to Payments Made and clicking the Print icon from the dropdown next to PDF on the cheque you would like to print.
- Once this is done, in the pop-up that appears, choose - Not yet printed, keep cheque in to-be printed list, if your cheque is not printed correctly.
- If the cheque is printed correctly, choose - Yes, cheque printed correctly and review the Cheque Number. Zoho Books will auto-generate this number sequentially to help you track your cheque payments; you can also modify them based on your requirement. The status of your cheque will be changed to Uncleared.
Print Cheques in Bulk
Let’s say your business recently made a significant purchase comprising over 50 items, and you need to pay the bills by issuing cheques all on the same day. Printing cheques for all these bills will cause a significant delay.
With bulk printing, you can print multiple cheques for various vendors and banks. The printed cheques will not appear in the list of To Be Printed Cheques again. You can print a maximum of 100 cheques at a time. However, you can reprint these cheques individually.
To print cheques in bulk:
Go to the Purchases on the left sidebar and select Payments Made.
Click the filter dropdown on the top left corner of the page and select To Be Printed Cheques.
Select the payments for which you want to print the cheques and click the Print icon in the top left.
You can preview the cheques that you have selected for printing in the Preview pop-up that appears. After reviewing the preview, click Print.
Once the cheques are printed, a pop-up will appear showing the list of cheques and their numbers. Select the cheques printed without errors (such as alignment errors, value errors, etc.) and review their Cheque Numbers. These numbers are generated automatically. However, you can also enter a Cheque Number of your choice.
Click OK.
The status of the selected cheques will be changed from To Be Printed to Uncleared. The unselected cheques will be in the To Be Printed status.
Clear a Cheque
You can update the status of your cheque payment to Cleared when you match the payment with the respective bank feed. To do this:
Go to Banking on the left sidebar and select the account using which you’ve made cheque payments.
Select a bank feed you’d like to match under the Uncategorised transactions tab, and Zoho Books will list out the best matches for that bank feed.
Click Select next to the payment that you want to match.
Click Match in the lower right corner of the page.
Zoho Books will match the payment and change the payment status to Cleared.
Insight: If you’ve not integrated with a bank account in Zoho Books, you can manually add a bank account and reconcile it to clear the cheques.
Void a Cheque
When a cheque bounces or gets damaged, you can cancel it by voiding the cheque.
Prerequisite: You can mark only the Uncleared cheques as void.
To void a cheque:
- Go to Purchases on the left sidebar and select Payments Made.
- Click the filter dropdown on the top left of the page and select Uncleared Cheques to view all the uncleared cheques.
- Select a cheque that you want to mark as void.
- Click the More icon on the top of the page and select Void from the dropdown.
- Click OK in the pop-up that appears on the screen.
The cheque payment will be unassociated from the bill and it’s status will be changed to Void.
Insight: To view the void cheques, navigate to Purchases. Click the filter dropdown at the top left corner of the page and select Void Cheques.
View and Filter Cheques
To view the cheques that you have written based on their statuses:
- Go to Purchases on the left sidebar and select Payments made.
- Click the filter drop-down on the top left corner of the page and select a filter to view the cheques based on their status.
The following are the statuses of your cheque payments:
| Status | Description |
|---|---|
| To Be Printed Cheques | A cheque that you’ve saved but haven’t printed. |
| Uncleared Cheques | Cheques that you’ve printed but are yet to be matched with the respective bank feed will be under this status. |
| Cleared Cheques | Cheque payments that you’ve matched with their respective bank feeds will be under this status. |
| Void Cheques | Cancelled or bounced cheques that you’ve marked as Void. |
| Paid via Cheque | You can view all the To Be Printed, Uncleared, and the Cleared Cheques by selecting this filter. |
Customise Cheque
You can adjust the alignment of your cheque template according to the printer you use. To do this:
- Go to Purchases on the left sidebar and select Bills.
- Select a bill for which you want to make a payment using a cheque.
- Click the dropdown next to Record Payment and select Pay via Cheque.
- Click Customise Cheque at the bottom right corner of the page.
- Hover over the cheque and click Edit.
- Edit the position values for the fields that require a change in placement.
- Click Preview to view the changes you’ve applied.
- Select the Tamper proof option for the required fields. If you choose this option, the values that are printed in the fields of the cheque cannot be overwritten or changed.
- Click Save.
Pro tip: You can customise a cheque by navigating to Settings, selecting PDF Templates under Customization, and then choosing Cheques under the Templates section.
Export Cheque as PDF
You can export a cheque as a PDF file. To do this:
- Go to Purchases on the left sidebar and click Payments Made.
- Select the cheque that you want to export.
- Click PDF/Print at the top of the page.
- Select PDF from the dropdown.
- The cheque will be downloaded as a PDF.
Warning: Cheques cannot be exported as PDF in bulk.