
Configure Bharat Connect in Zoho Books
Bharat Connect is a platform for businesses to manage bills and payments securely and efficiently. It works seamlessly with Zoho Books to provide an interoperable solution that streamlines the payment process and simplifies reconciliations in real time. It enables businesses to send and receive purchase orders, invoices, bills, and credit and debit notes.
Watch this video to learn how the integration works.
Note: This solution is available only for users in the India edition of Zoho Books created under the zoho.in domain.
Insight: Zoho Books works with Zoho Payments to offer this solution. As a payment aggregator registered with Bharat Connect, Zoho Payments helps onboard buyers and sellers to the Bharat Connect network for B2B transactions. Since Zoho Payments works seamlessly with Zoho Books, you can easily transact with your buyers and sellers through the Bharat Connect network. Learn more about the Zoho Payments – Bharat Connect solution.
Benefits of the Zoho Books – Bharat Connect Solution
- Automatically sync transactions with your vendors and customers in real time.
- Make and receive payments effortlessly using Bharat Connect, connected banking, UPI, or cards.
- Reconcile payments automatically, saving time and reducing errors.
- Vendors can request financial assistance via Bharat Connect to manage cash flow.
Get Started with Bharat Connect in Zoho Books
To get started, you will have to set up Bharat Connect in Zoho Books. Once that is done, you can create a B2B ID, add the B2B ID of your customers and vendors, and add users to access the solution. You can then start initiating transactions from Zoho Books via the Bharat Connect platform.
Prerequisites:
- Ensure you are either the business owner or an authorised person to share business details and set up Bharat Connect in Zoho Books.
- Keep your business details and documents handy to get started.
Set Up Bharat Connect
To get started with Bharat Connect in Zoho Books, initiate the setup and complete three quick steps to onboard your business. To initiate setup:
- Go to Settings and then Integrations and Marketplace.
- Click Set Up Now next to Bharat Connect.
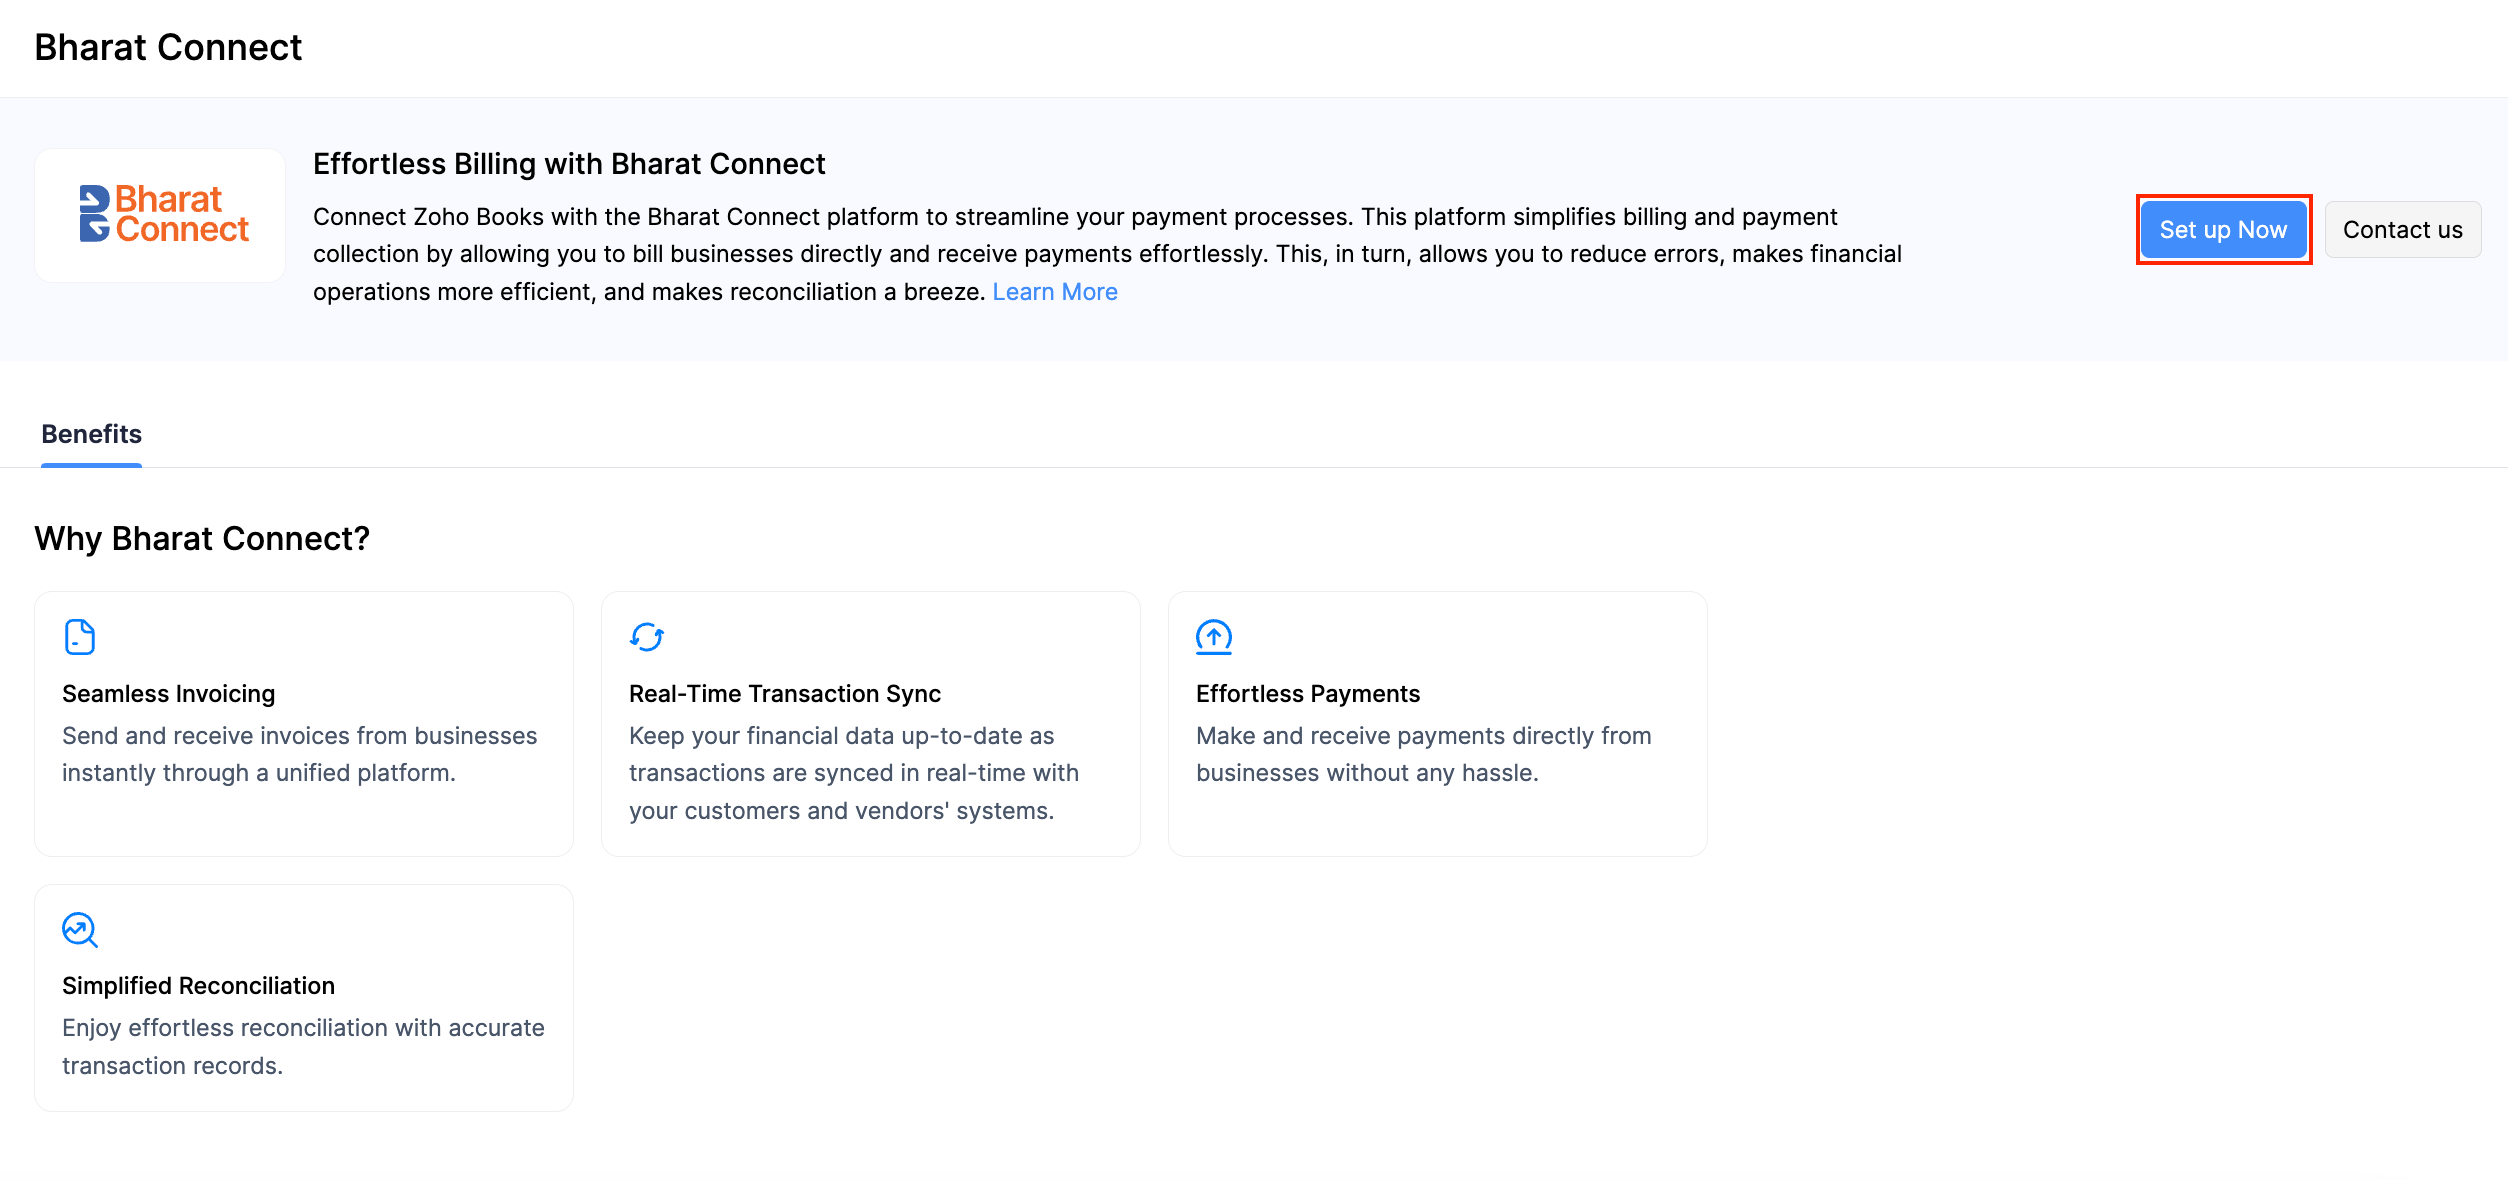
- Check the box to confirm you’re authorised to set up Bharat Connect for your organisation.
- Click Proceed.
Once you’ve initiated the setup, follow these three simple steps in the pop-up to get started.
1. Verify your GSTIN:
GSTIN is a 15-digit unique identifier assigned to GST-registered businesses. This step verifies your GSTIN connects your account to the GST portal and confirms your business details for secure transactions.
Insight: If you have multiple GSTINs, select the one you’ll use for Bharat Connect B2B transactions.
- In the pop-up, select your GSTIN from the drop-down.
Note: To connect Zoho Books with the GSTN portal securely, you need to enable API access from your account on the GSTN portal. This allows us to verify your details securely. Learn how to enable API access for GSTN portal.
Enter your Legal Business Name and GSTN Username.
Select your Business Type.
Click Get OTP and enter the 6-digit OTP received on your GSTN-registered mobile number or email address.
Click Verify OTP to confirm your GSTIN details.
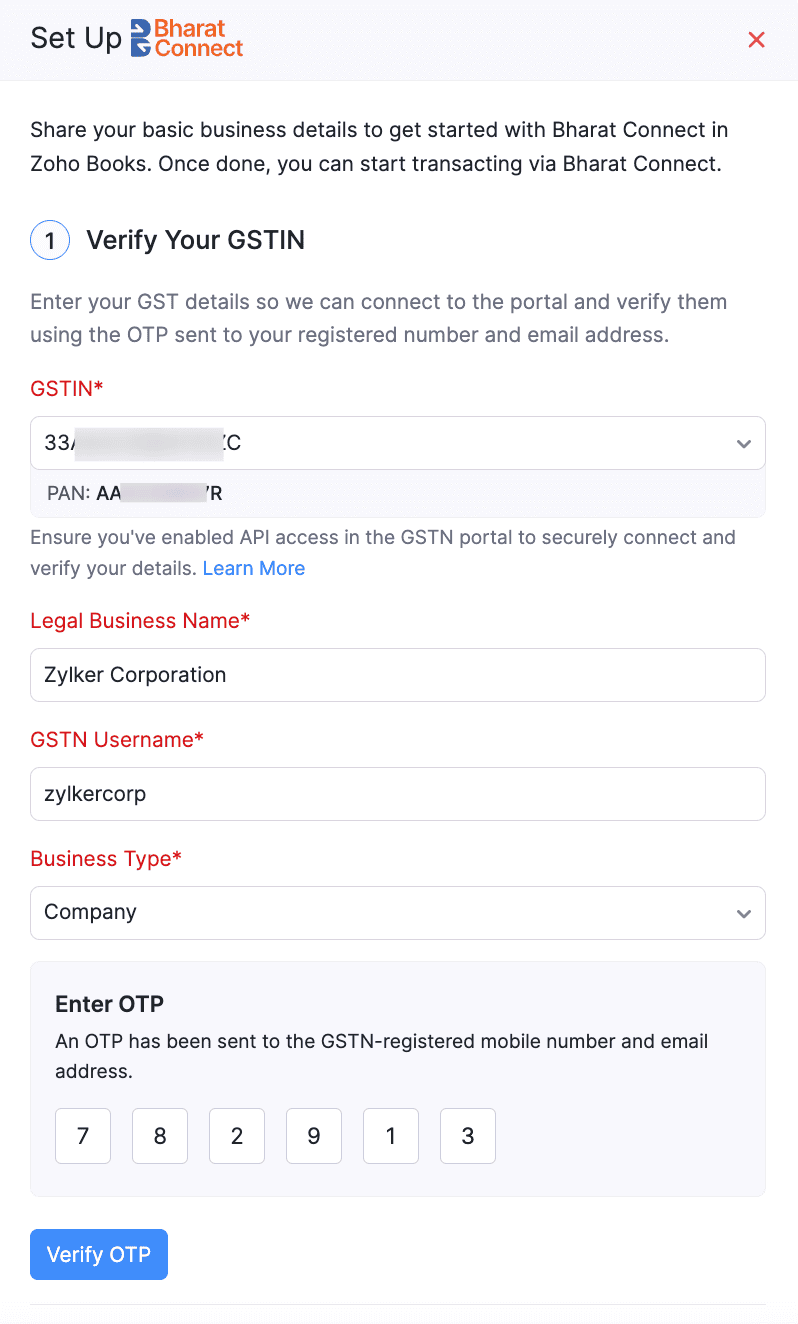
Once your GSTIN is verified, proceed to confirm your mobile number.
2. Confirm Your Mobile Number
Enter the mobile number you want to register with Bharat Connect. To do this:
Enter your mobile number.
Click Get OTP and enter the OTP received.
Click Verify OTP to confirm your mobile number.
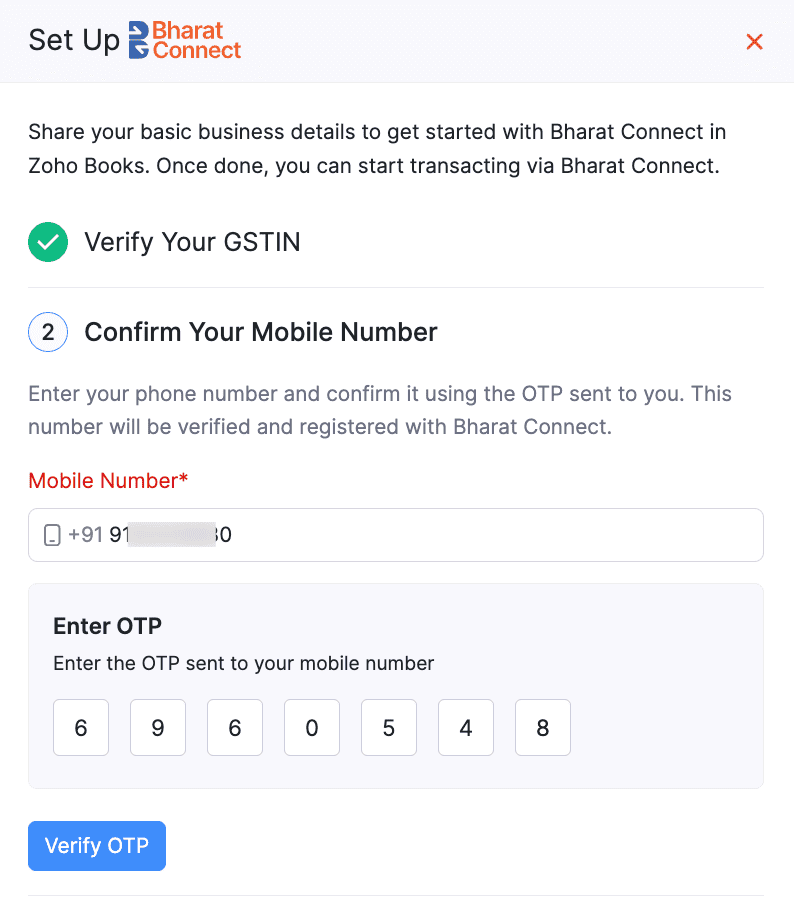
Once your mobile number is verified, you can create your B2B ID.
3. Create B2B ID
A B2B ID (Business-to-Business ID) is a unique identifier created by businesses within the Bharat Connect network. It allows businesses to communicate seamlessly through the network.
Guidelines to create your B2B ID:
- The B2B ID should reflect your brand or organisation.
- It should be based on your registered business name or an acronym using the first letters of the business name. Avoid using aliases and generic names.
- You can include numbers or valid area, city, or state names in combination with your business name or acronym.
- Ensure the B2B ID does not include any language considered discriminatory, vulgar, or harmful.
Warning: Once your B2B ID is created, it cannot be modified. If you wish to delete it, please contact support.india@zohobooks.com.
To create your B2B ID:
Select one of the suggested options, or create a B2B entry by referring to the guidelines.
Check the box to agree to the Terms and Conditions.
Click Save and Submit.
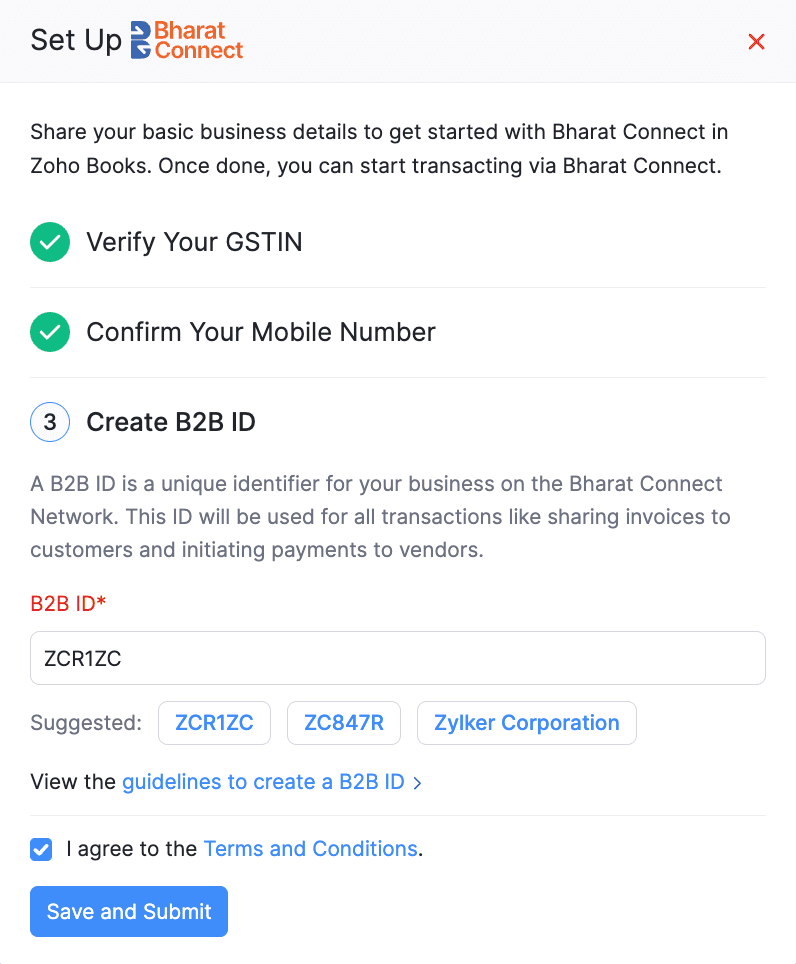
Your details will be forwarded to the Bharat Connect network. Once they are verified and approved, your business will be registered on the network, and you can start using the Zoho Books – Bharat Connect solution.
Complete your Setup
To securely pay bills and collect payments from customers, click Continue Setup and fill in the required business details. This allows us to complete your KYC verification and get you fully onboard.
You will be required to provide the following details:
| Section | Content |
|---|---|
| Business Profile | Enter your basic business details. Provide the other required business-related details and documents based on your Business Type. |
| Business Representative | Share the details of the individual engaged in the direction and control of the business. Enter their details and submit the requested documents for verification. |
| Business Owners | Provide the details and documents of all the business owners with significant ownership (10% or more) in your business. |
| Bank Account | Share the details of the bank account from which the payments should be initiated. |
Once your KYC is completed, you can directly initiate and collect payments from the platform.
Associate B2B ID with Customers and Vendors
After your B2B ID is created and the integration is active, you can fetch and associate B2B IDs with your vendors and customers using their GSTIN. You can fetch them individually for each contact or in bulk if you have multiple vendors and customers.
Associate a B2B ID for Contacts Individually
You can associate B2B IDs with your customers and vendors by fetching their GSTINs. To do this:
- Navigate to the Customers or Vendors module.
- Go to the customer or vendor whose details you’d like to update and click Edit.
- In the Other Details section and click Fetch from GSTIN click next to B2B ID.
- Click Save.
The B2B ID of the contact will be updated.

Associate B2B IDs in Bulk
B2B IDs can be fetched in bulk for your customers and vendors using their GSTIN, and can be associated with them easily. To do this:
- Go to Settings and then under Integrations, select Bharat Connect.
- Click More and select Search Contacts in Bharat Connect. This will initiate a search for B2B IDs using your contacts’ GSTINs.
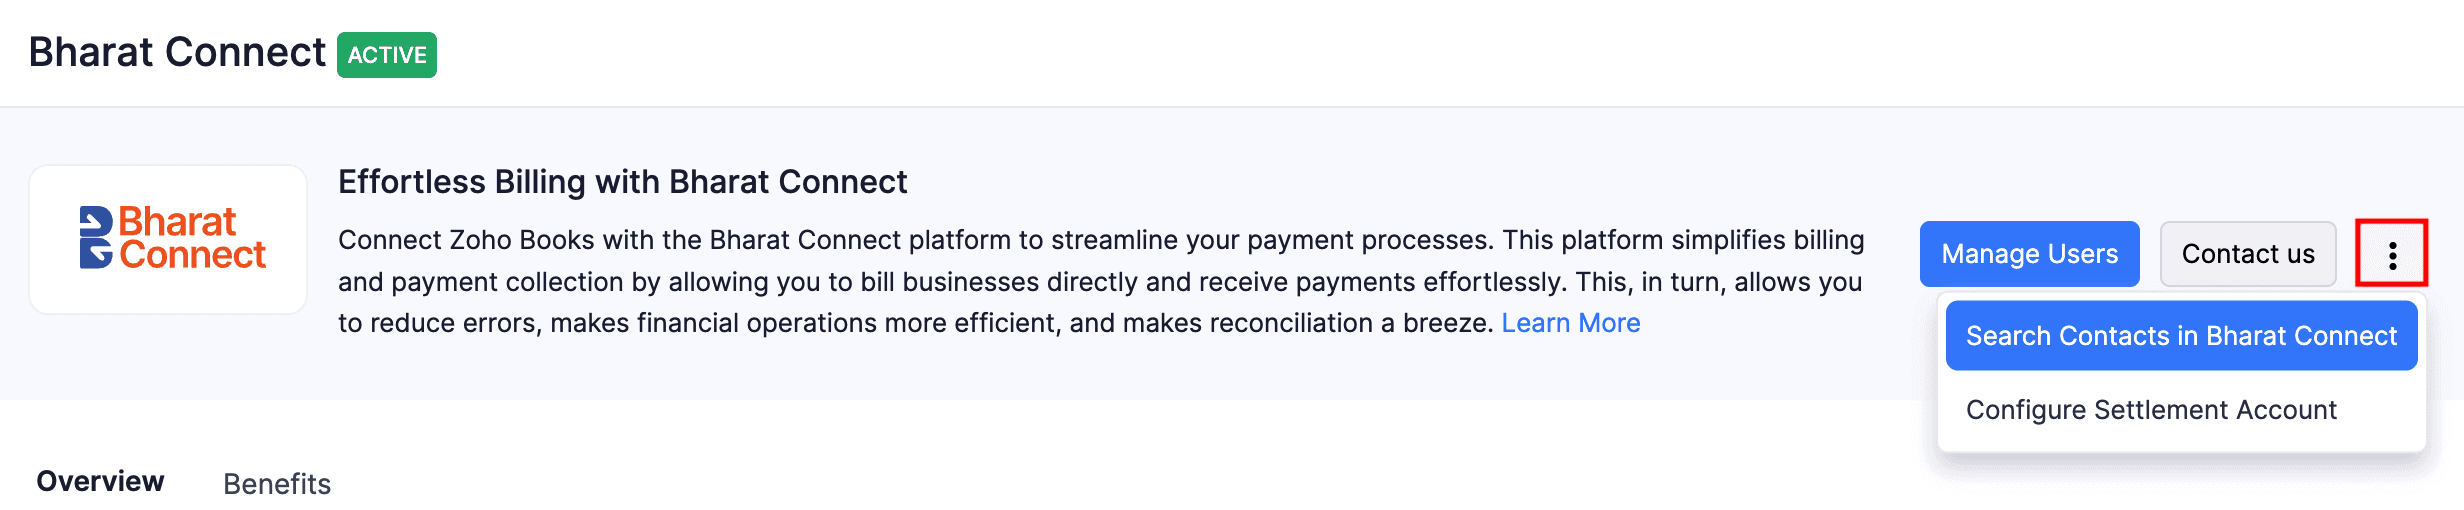
- Click Link Now after the B2B IDs of your contacts are fetched.
Note: Some contacts will have multiple B2B IDs associated with their GSTIN. Ensure to select the right B2B ID before associating them.
- Select the contacts and click Link Now.
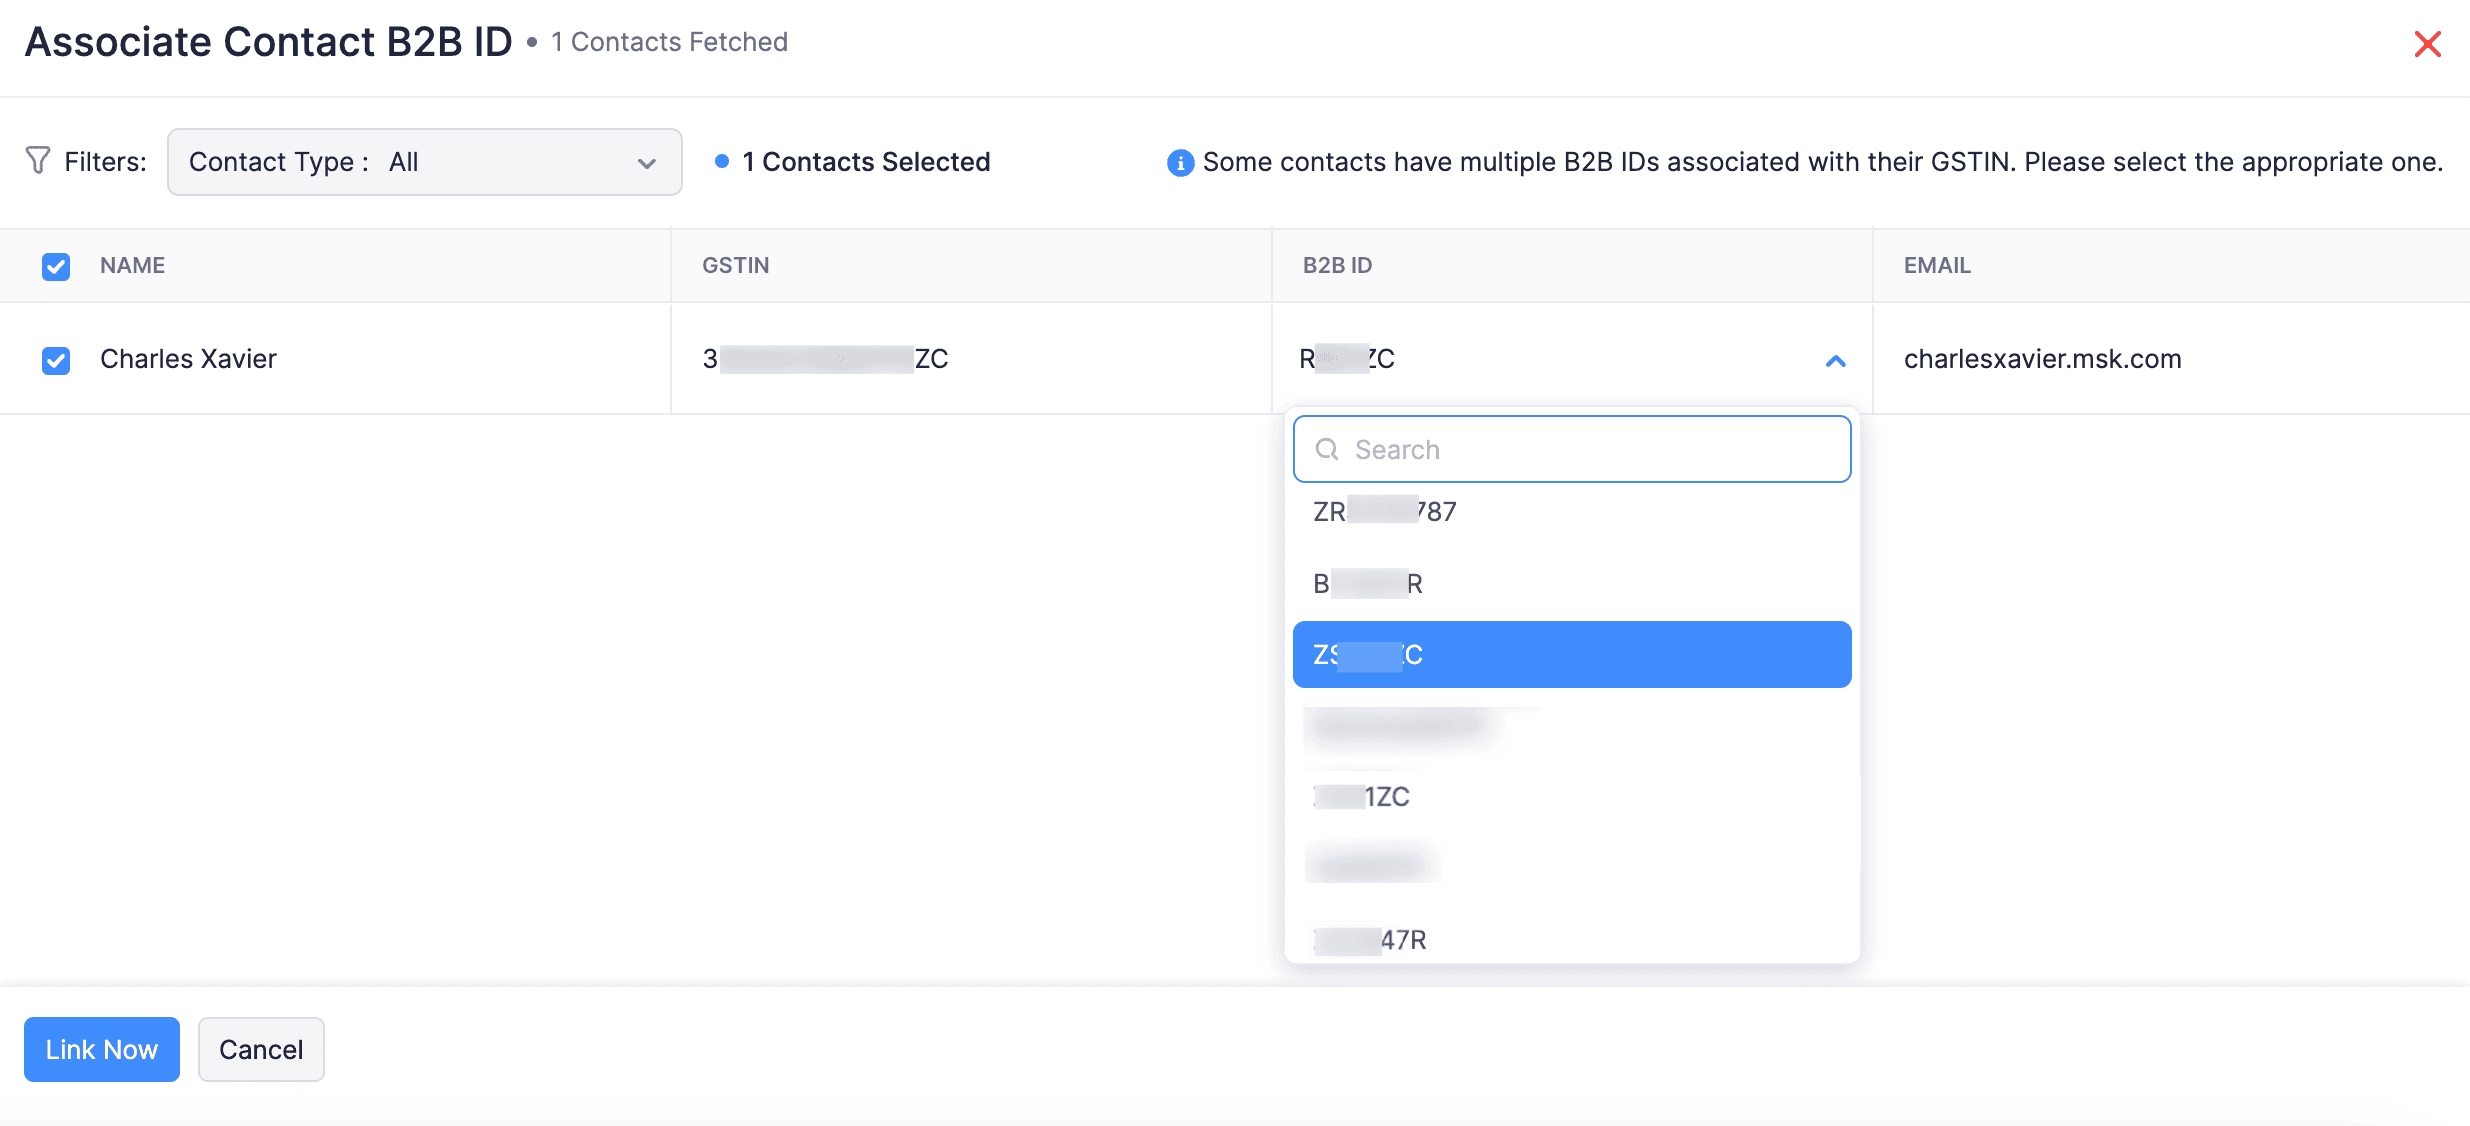
The B2B IDs of the selected contacts will be updated.
Create Roles with Permissions
You can control user access to Bharat Connect by creating a custom role with the required permissions. To do this:
- Go to Settings and select Users & Roles.
- Navigate to the Roles tab and click New Role.
- Provide a Name and Description for the role.
- Scroll down to the Bharat Connect section and enable the following permissions based on your requirements:
- Send Transactions via Bharat Connect: Push invoices, purchase orders, credit notes, debit notes, and payment records to buyers and suppliers through Bharat Connect, both individually and in bulk.
- Accept Transactions from Bharat Connect: View the bills from the Bharat Connect tab in the Bills module, accept or reject bills and sales orders received through Bharat Connect, and use the bulk Accept and Reject actions from the list view.
- Manage Bharat Connect Integration: Initiate the Bharat Connect setup, complete KYC (GSTIN verification, mobile number confirmation, B2B ID creation), and associate GSTINs with B2B IDs on the Bharat Connect integration page. Only integration owners can perform these actions.
Note: To enable the Manage Bharat Connect Integration permission, ensure that Manage Integrations is also enabled under Settings for the same role.
- Click Proceed.
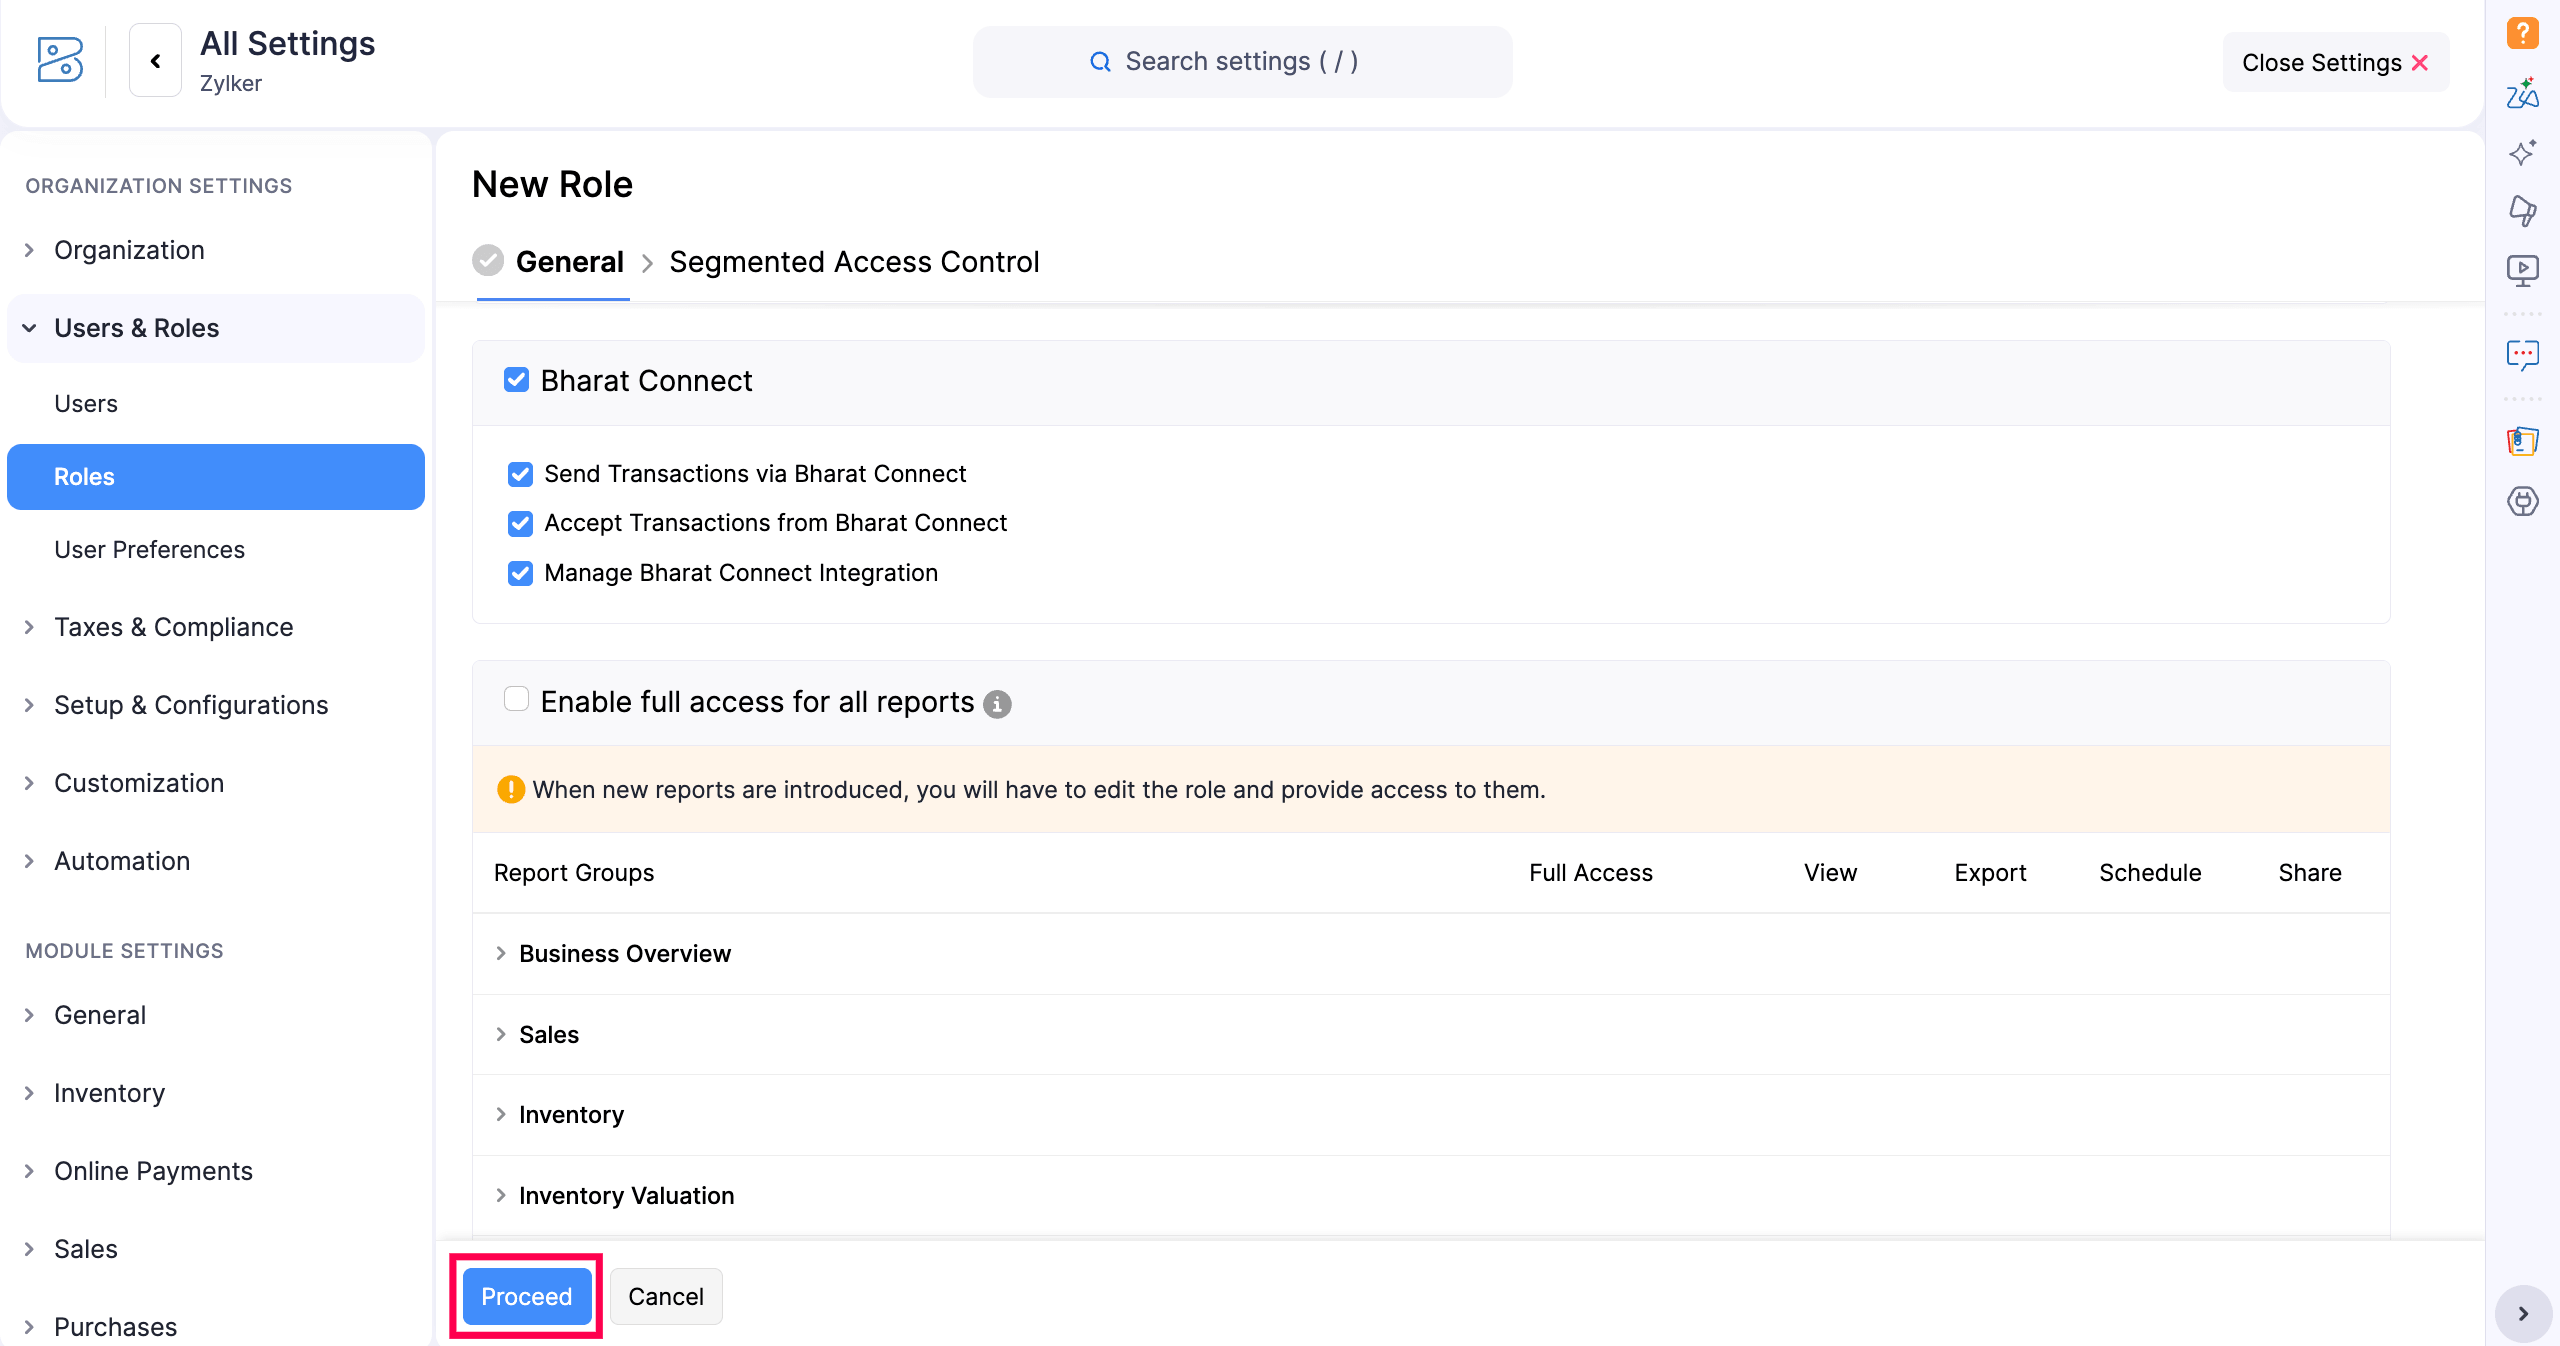
- Enable Location and Bank Accounts in the Segmented Access Control if required.
- Click Save.
Once the role is created, assign it to the relevant users so they can initiate and manage transactions via Bharat Connect.
Initiate Transactions via Bharat Connect
Once you’ve set up Bharat Connect and assigned B2B IDs to your customers and vendors, you can start creating transactions. This includes creating and pushing invoices and purchase orders, credit and debit notes, accepting sales orders and bills, pushing payment records, and recording payments received.
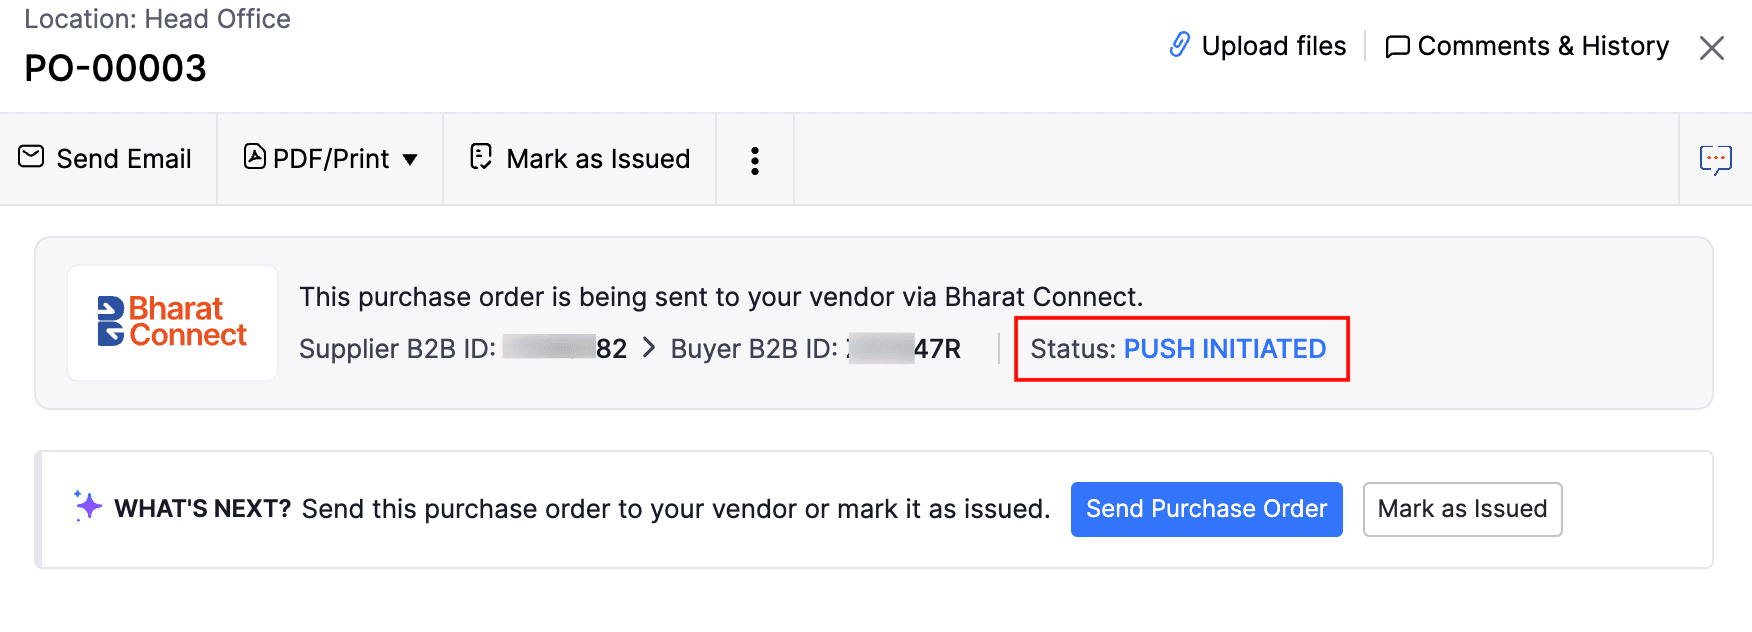
Create and Push Purchase Orders
You can create purchase orders and push them to your vendors via Bharat Connect. To do this:
- Go to the Purchases module.
- Select a Purchase Order.
- Click the + New button to create a new order for a Bharat Connect-registered vendor.
- Enter the required details and click Save and Send via Bharat Connect.
The order will be pushed to the vendor’s ERP through Bharat Connect. They can then view, accept, or reject the purchase order, and the status will be updated accordingly.
Pro Tip: You can also select sales or purchase orders from the list view and click Push via Bharat Connect to push them in bulk.
View and Accept Sales Orders
When your vendor creates a purchase order for your organization and pushes it via Bharat Connect, you will receive it as a sales order. You can then view the details and accept it.
- Go to the Sales Order module.
- Select a sales order that has been received via Bharat Connect.
- Click Accept or Reject.
Note: Once a sales order is rejected, it will be permanently deleted, and no records will be associated with it.
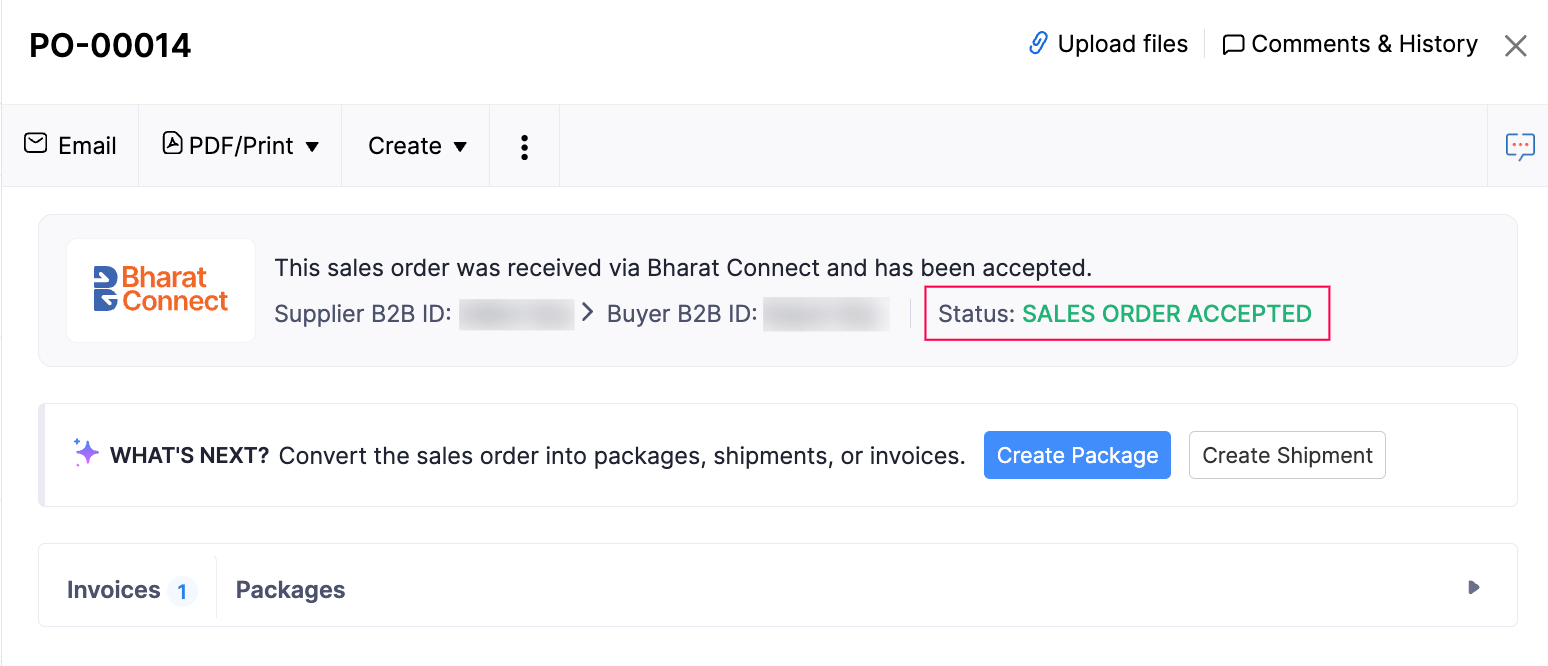
Once accepted, the sales order will be confirmed, and you can proceed to create an invoice for it.
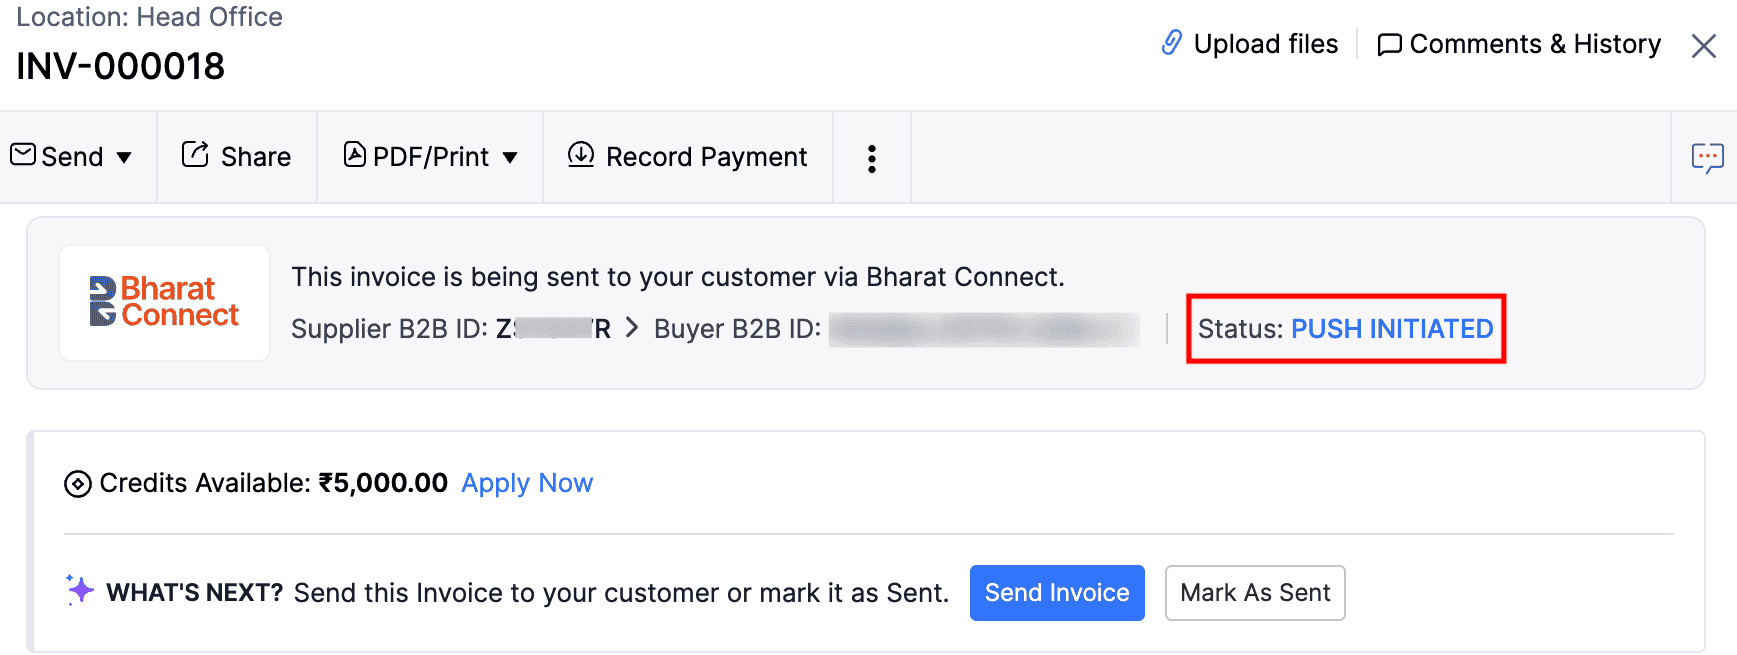
Create and Push Invoices
You can create an invoice from the accepted sales order and push it to your customer via Bharat Connect. To do this:
- Go to the Invoices module under Sales on the left sidebar.
- Create a new invoice for a Bharat Connect-registered customer.
- Enter the required details and click Save and Send via Bharat Connect.
The invoice will be pushed to the customer’s ERP through Bharat Connect. They can then view, accept, or reject the invoice, and the status will be updated accordingly.
Pro Tip: You can also select multiple invoices from the list view and click Push via Bharat Connect to push them in bulk.
Refer to the table below to understand the different statuses of transactions pushed via Bharat Connect.
| Status | Description |
|---|---|
| Push Initiated | The transaction has been pushed via Bharat Connect. |
| Push Failed | The attempt to push the transaction was unsuccessful. |
| Awaiting Response | The recipient is yet to provide a response for the transaction. |
| Invoice/Purchase Order Accepted | The recipient has accepted the transaction. |
| Invoice/Purchase Order Rejected | The recipient has rejected the transaction. |
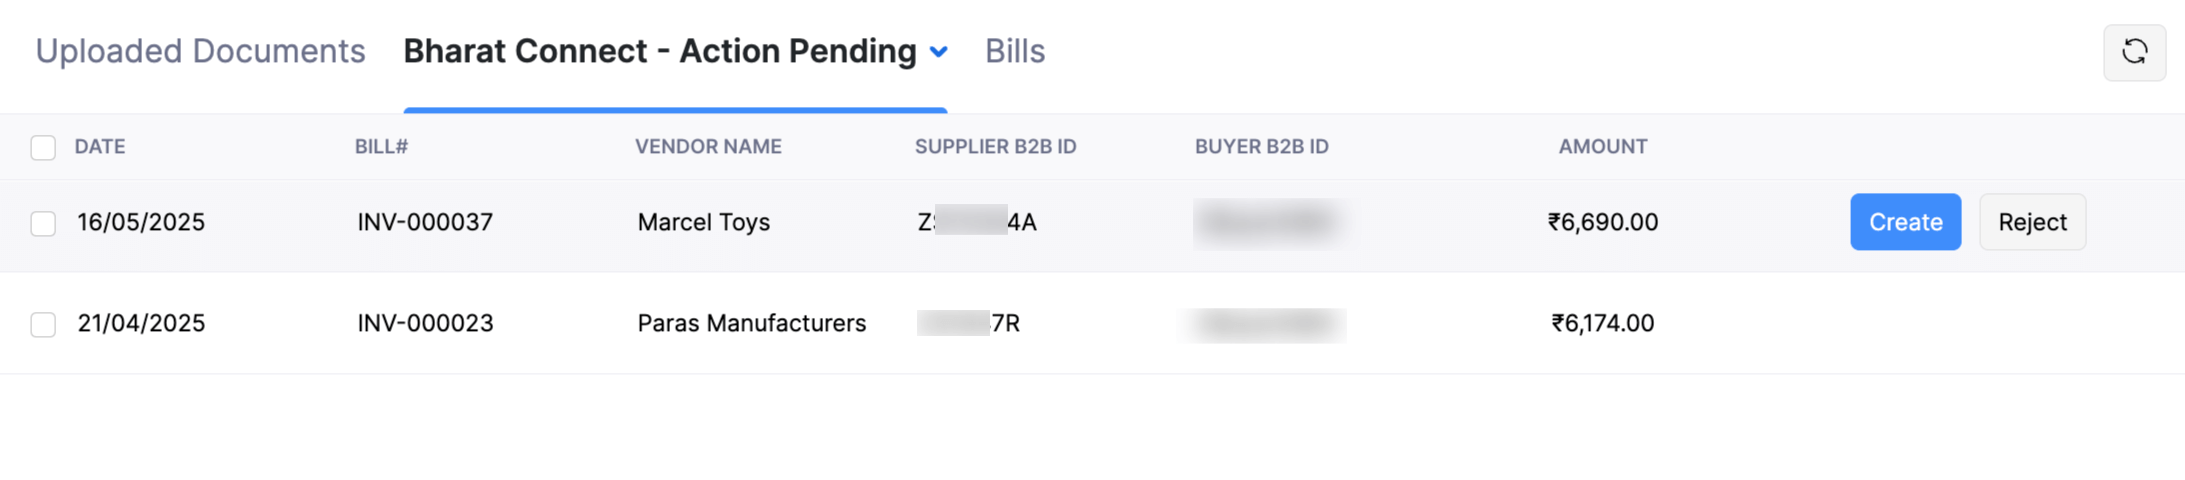
View and Accept Bills
When your vendor creates an invoice for your organisation and pushes it via Bharat Connect, you can view the details and accept them. To do this:
- Go to the Bills module under Purchases on the left sidebar.
- Switch to the Bills From Bharat Connect tab.
- Click Create to add it as a new bill or Reject.
Note: Once a bill is rejected, it will be permanently deleted, and no records will be associated with it.
- Verify the details of the new bill and click Save and Accept.
Note: If you have enabled an approval flow in your organisation, the bill will be processed based on it. The seller will be notified of the outcome, and the status will be updated accordingly.
Refer to the table below to understand the different statuses of transactions received via Bharat Connect
| Status | Description |
|---|---|
| Acceptance In Progress | The sales order or bill has been accepted, and the acceptance is being pushed via Bharat Connect. |
| Sales Order/Bill Accepted | The sales order or bill has been accepted. |
| Sales Order/Bill Rejected | The sales order or bill has been rejected. |
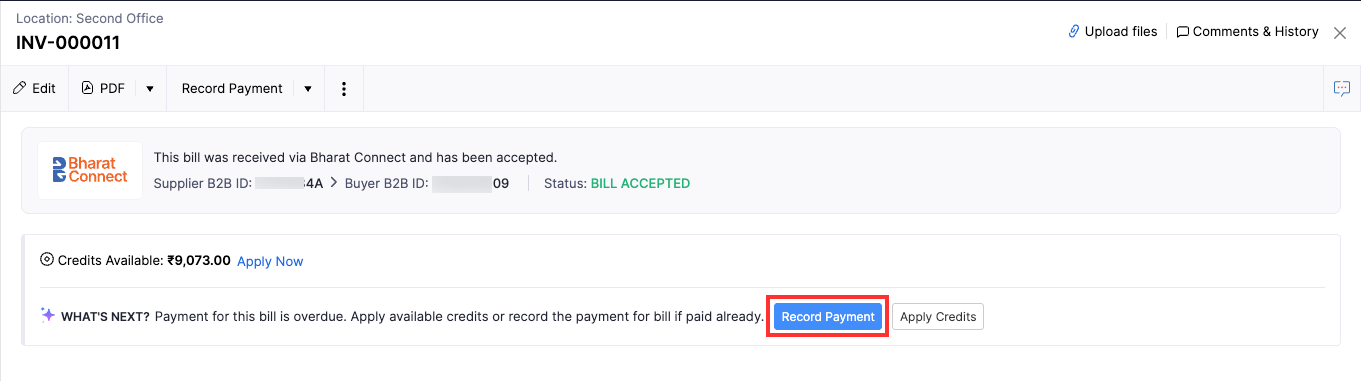
Once the bill has been accepted and converted to open, you can initiate payment directly from Zoho Books. If the payment is made offline, you can also manually record it by clicking Record Payment.
Create and Push Credit and Debit Notes
You can create credit and debit notes in Zoho Books to adjust invoice amounts due to returns or billing corrections. Once created, you can push them to your customers or vendors through Bharat Connect. To do this:
- Go to Sales for a credit note or Purchases for a debit note.
- Click the + New button in the top-right corner.
- Select a Bharat Connect-registered Customer or Vendor for whom you want to create the note.
- Enter the necessary details and click Save and Send via Bharat Connect.
The credit or debit note will be pushed through Bharat Connect. The status will be updated to Credit/Debit Note Received, and once you accept or reject it, the status will update to Accepted or Rejected accordingly.
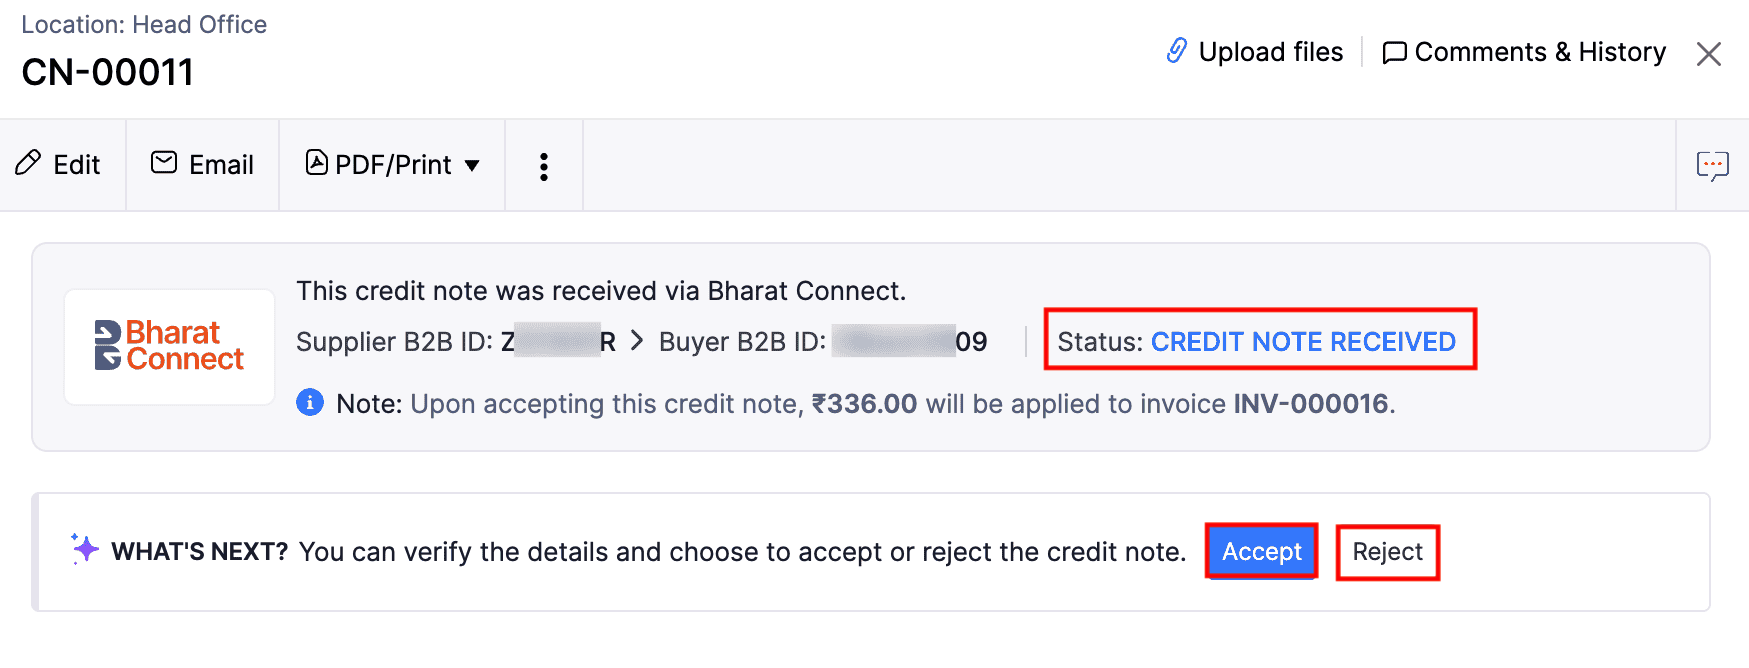
Note:
Credit and debit notes can be created and pushed via Bharat Connect. For notes associated with a bill or invoice, ensure that the related transaction has also been pushed via Bharat Connect. You can also accept or reject these notes upon receiving them.
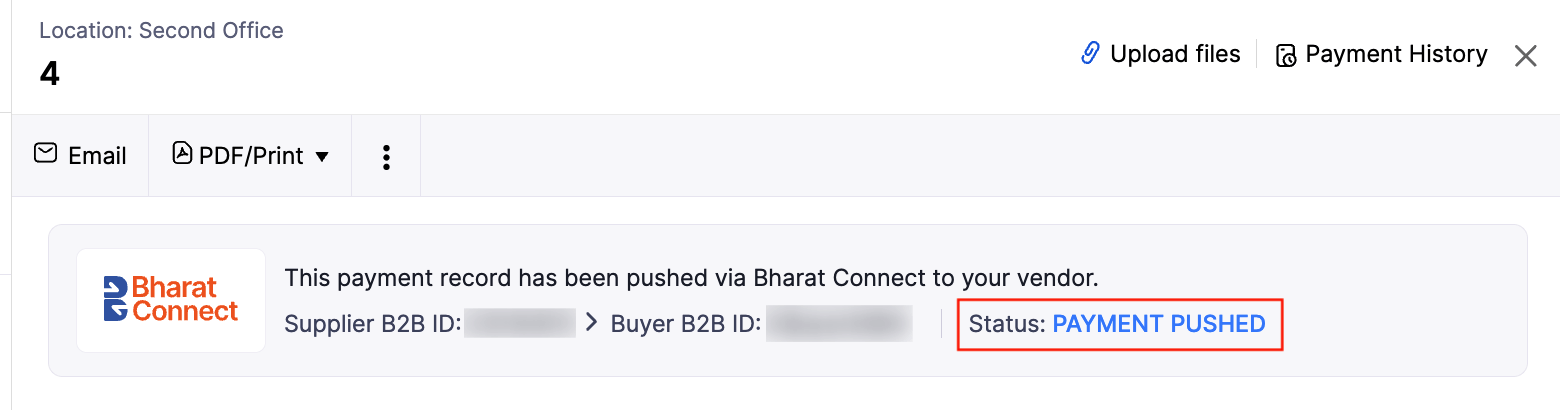
Push Payment Records
Once you’ve recorded an offline payment for a bill, you can send the payment record through Bharat Connect. To do this:
- Go to the Payments Made module under Purchases on the left sidebar.
- Select a payment record you want to push via Bharat Connect.
- Click the Push to Bharat Connect button on the top bar.
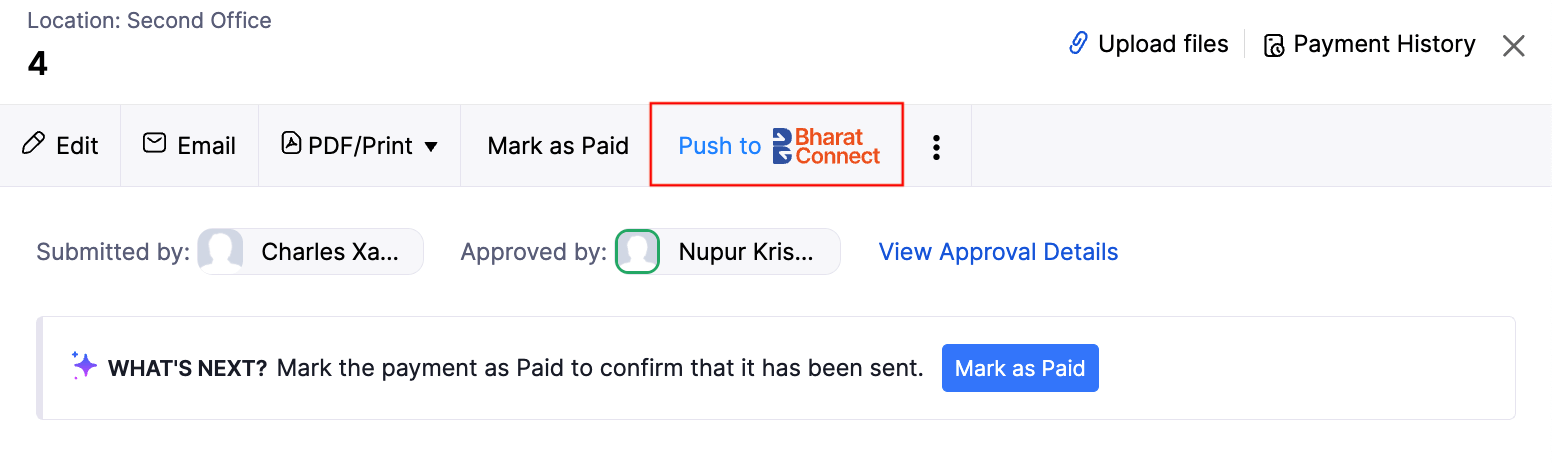
- Click Yes, Push in the confirmation pop-up.
The payment record will be pushed, and the status will be updated accordingly.
View or Record Payments Received
Once a customer has paid online, the invoice’s status will be automatically marked as paid.
If the customer has made a payment offline, you must verify the payment’s status on your bank statement and mark the payment as received or not received. To do this:
- Go to the Payments Received module and select the recent payment record.
- Verify the payment status offline and select Payment Received or Payment Not Received.
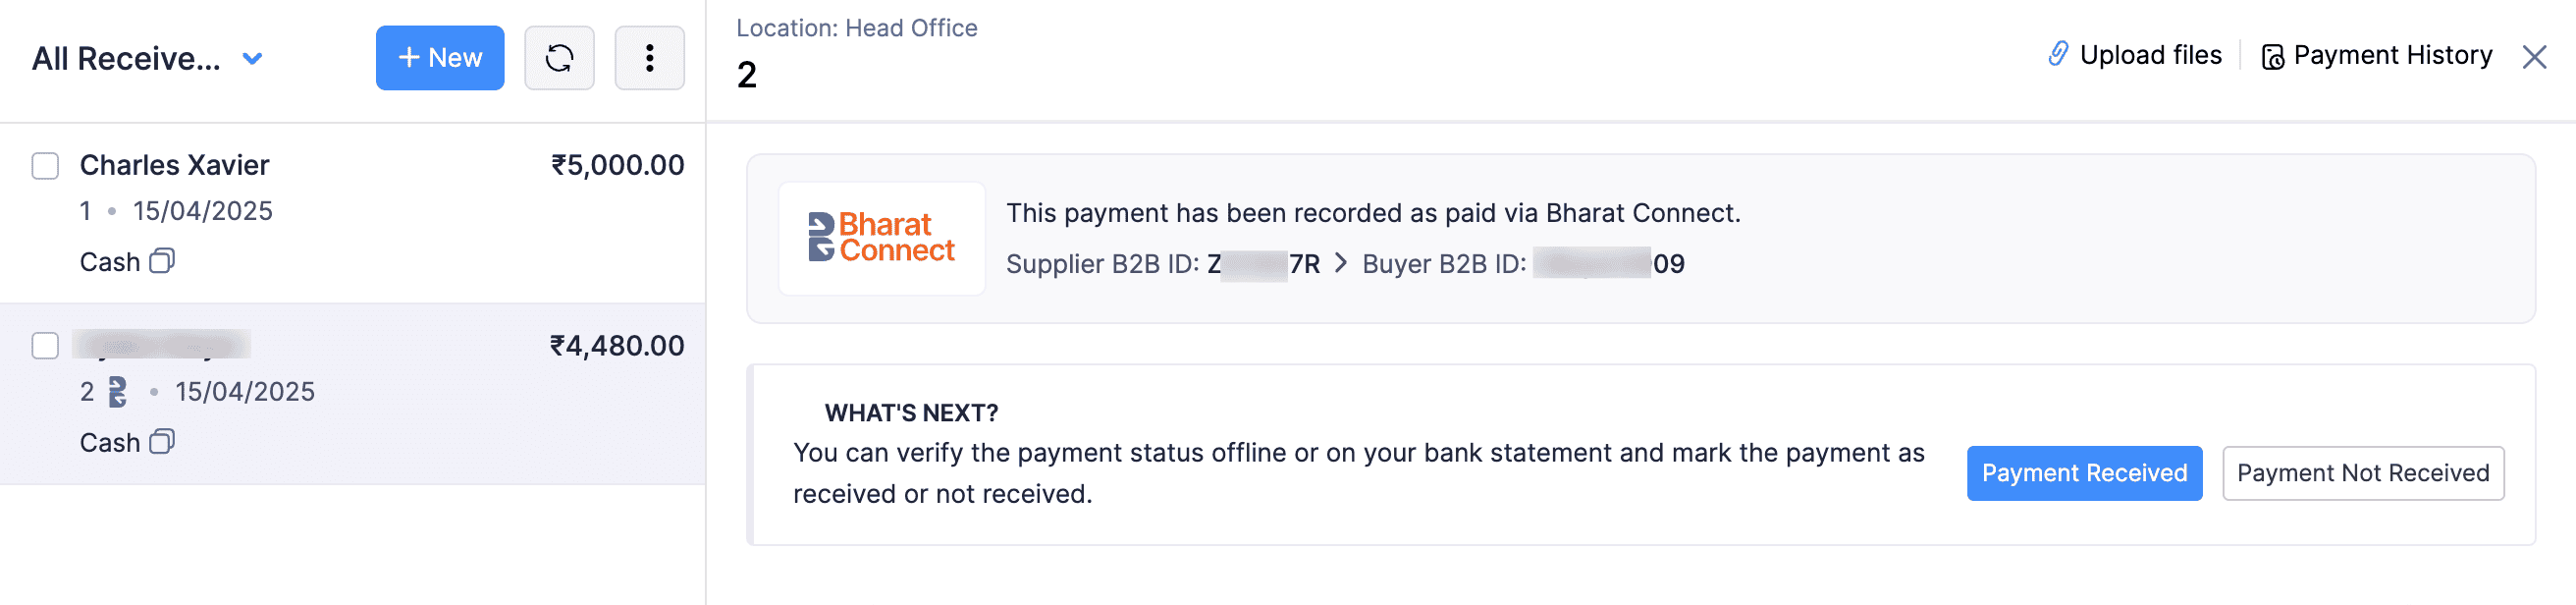
Once you mark the payment as received, the payment will be recorded in Zoho Books. If you’ve confirmed that the amount has not been received, the payment record will be deleted from Zoho Books. You can request the customer to initiate the payment again.
 Yes
No
Yes
No
Thank you for your feedback!