Filing GSTR-1
GSTR-1 is a monthly return that contains the details of outward supplies of goods or services made by a regular taxpayer registered under the GST.
When is the last date to file GSTR-1?
The last date to file your GSTR-1 is based on your filing period and turnover.
The filing dates of quarterly return for registered persons with aggregate turnover up to 1.5 crore rupees:
- Jul-Sep 2017, Oct-Dec 2017, Jan-Mar 2018, Apr-Jun 2018, Jul-Sep 2018: 31 Oct, 2018
The filing dates of monthly return for registered persons with aggregate turnover of more than 1.5 crore rupees:
- Jul 2017 to Sep 2018: 31 Oct, 2018
Note: The filing date has been fixed as October 31, 2018 for all the monthly and quarterly returns that have to be filed. You can file your return for a previous period, if you had not filed them.
How do I file a GSTR-1 return?
You can either file your GSTR-1 return from Zoho Books or from the GST portal.
Filing GSTR-1 From Zoho Books
- Prerequisites for Filing Returns Through Zoho Books
- Push Transactions to the GST Portal
- File GSTR-1 Through Zoho Books
Prerequisites for Filing Returns Through Zoho Books
To file your GSTR-1 return through Zoho Books, ensure that you have enabled API Access for Zoho Books in the GST Portal. If you haven’t enabled it, follow the steps below to enable the API Access:
- Log in to the GST Portal.
- Click My Profile in the top right corner.
- Click Manage API Access from the Quick Links tab.
- Check the Yes option under the Enable API Request option.
- Select the Duration and Confirm.
Here is a step by step guide to file your GSTR-1 return using Zoho:
Push Transactions to the GST Portal
To push your transactions to the GST portal:
Navigate to the GST Filing module in the left side bar of your Zoho Books organisation.

Select the Unpushed Transactions under GSTR-1 and you will be able to view the Transaction Summary, HSN, NIL, B2CS and the Documents Issued.
Tabs Description Transaction summary All the transactions in the current filing period which are ready to be pushed to GST. HSN The HSN summary of the transactions for the specified month. Nil The summary of nil-rated outward supplies. B2CS The transactions corresponding to the Table 7 of GSTR-1. Documents Issued The details of the documents you are about to upload to the GST. Supplies Through ECO Supplies made via E-Commerce Operators (ECOs) for which they are liable to pay tax under section 9(5).

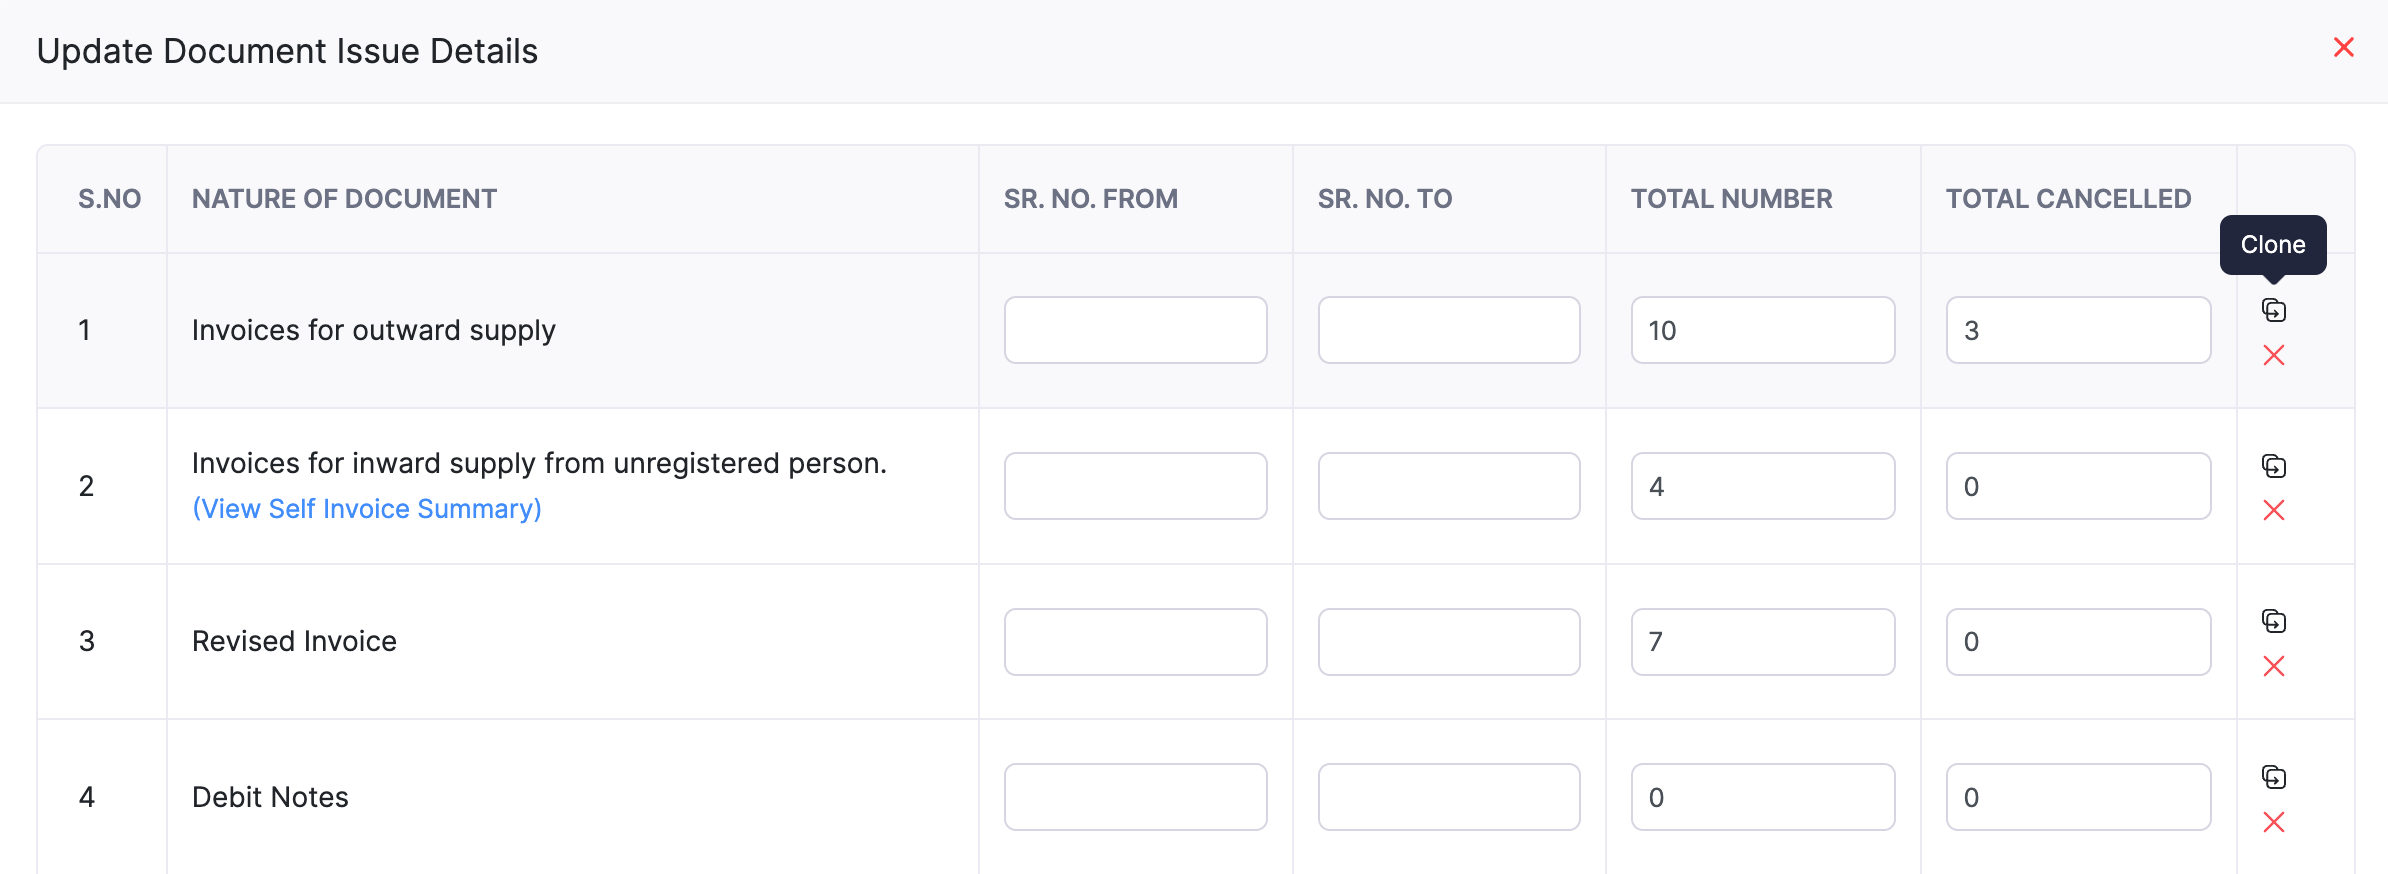
Enter the details of the documents issued before you push it to the GST. To do so:
- Go to the Documents Issued tab and click the Edit button.
- Enter the details of the documents to be uploaded and click Save. You can also click the Clone option to enter the details of transactions in another sequence.
- Click the Push to GSTN button to push your transactions.
- Enter your Aggregate Turnover in the preceding Financial Year and Aggregate Turnover - April to June, 2017 in the pop-up that appears.
- Click Push to GSTN and an OTP will be sent to your GST registered mobile number or email address if your session has expired.
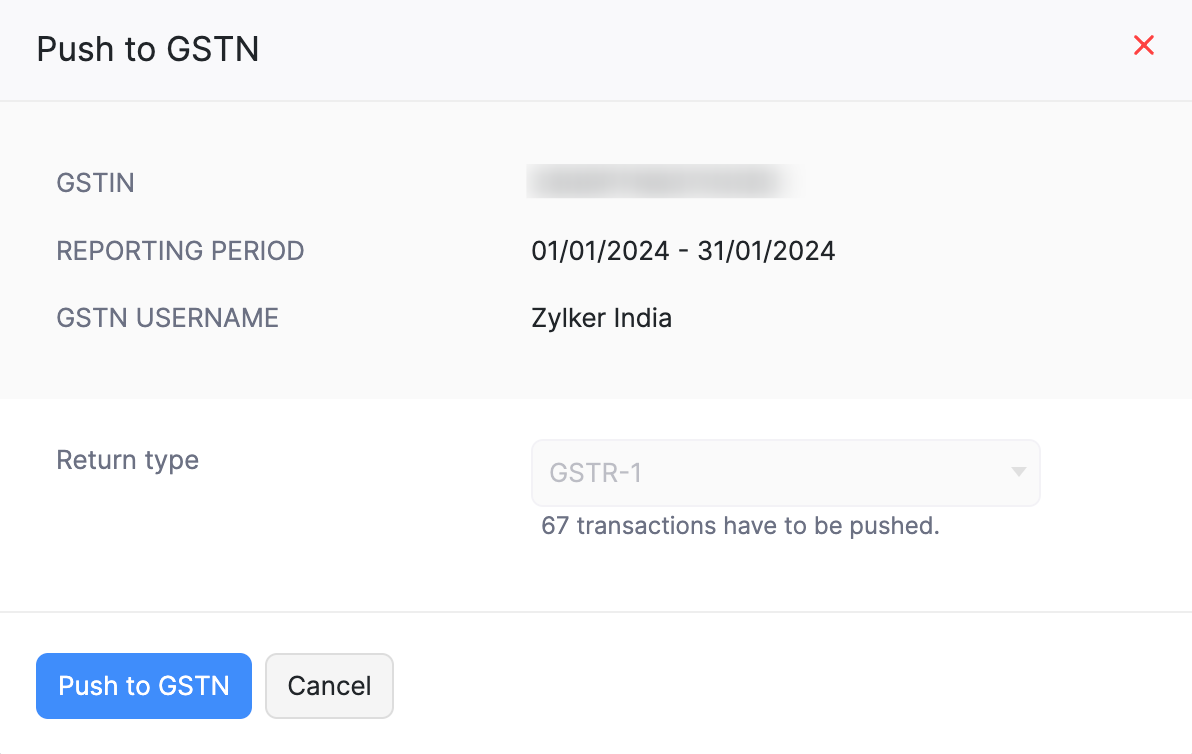
- Enter your OTP and click Verify OTP to push your return.
- Cliking the Check Status button to check the status of your push.
Once the transactions have been successfully pushed and uploaded in the GST portal, you will receive a confirmation email and a notification in Zoho Books.
Note: If there are any errors, you can navigate to the Failed Transactions tab in the Push To GSTN section. You can edit the corresponding transactions and push them again.
File GSTR-1 Through Zoho Books
To file your return through Zoho Books:
Navigate to GST Filing > GSTR-1.
Click the File Now option and click File Online.

Enter your PAN in the pop-up that appears and click Generate OTP.
Enter the OTP received on your registered mobile number and click File Now.
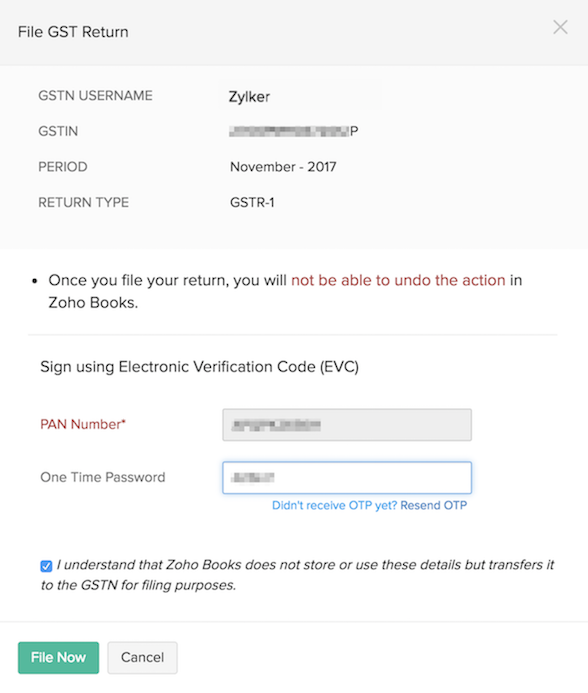
Click the Mark as Filed option to mark your return as filed from the returns page.
Note: Zoho Books does not save your PAN details. It only transfers it to the GST securely for filing purposes.
Filing GSTR-1 Through the GST Portal
File GSTR-1 Through the GST Portal
To file your GSTR-1 return from the GST portal:
Log in to https://www.gst.gov.in/ and head to Dashboard > Return Dashboard.
Select the Financial Year, and the Return filing period and click Search.
Click Prepare Online corresponding to Details of Outward supplies of Goods or services (GSTR1).
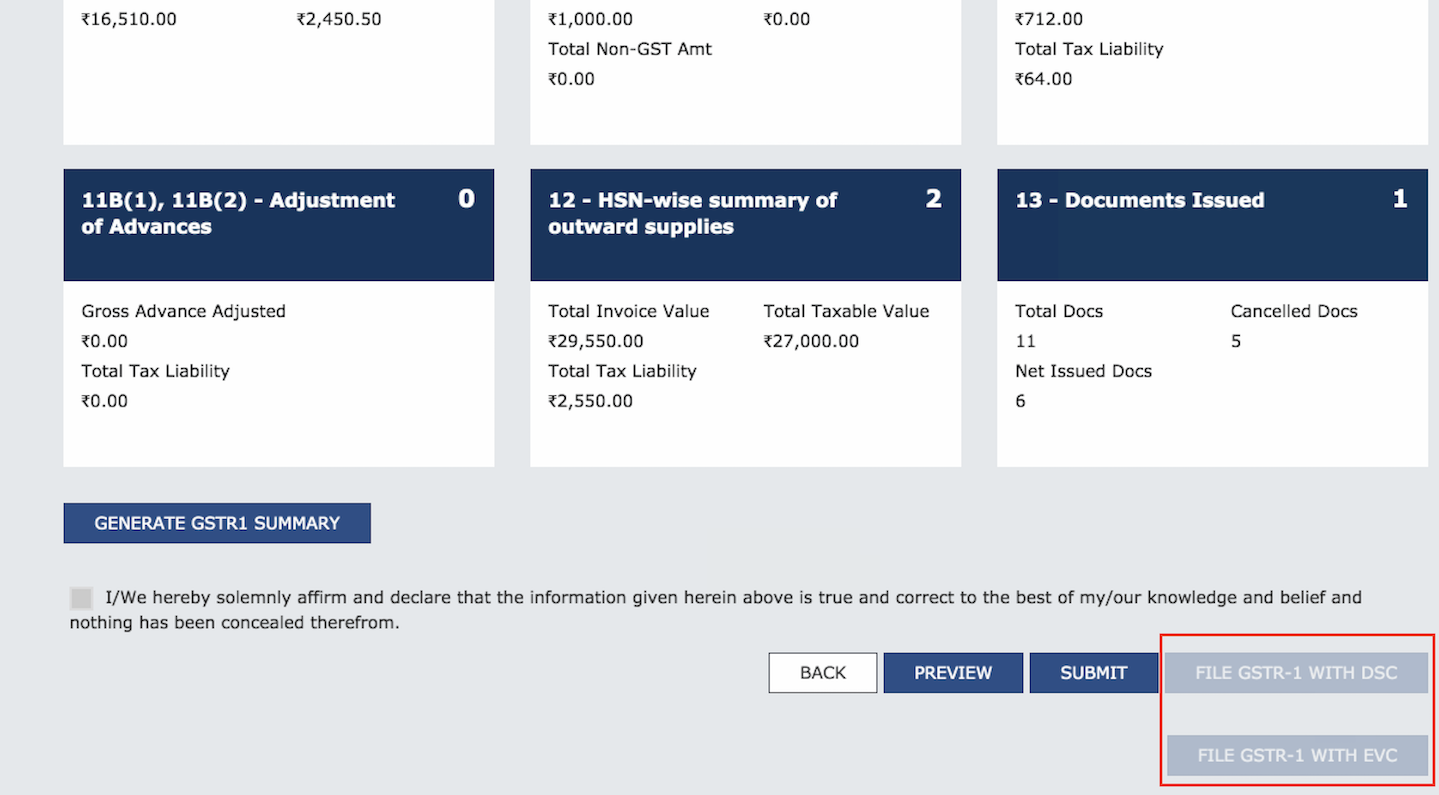
Click the File GSTR-1 with DSC option to file the return using digital signature or click File GSTR-1 with EVC and file your return through an OTP sent to your Aadhar linked mobile number.
Mark Return as Filed in Zoho Books
Log into Zoho Books after filing your return in the GST.
Go to the GST Filing module in the left navigation pane.
Navigate to the File your Return tab and click Mark as Filed.
Enter your Date of Filing in the pop-up that appears.
Confim that you’ve filed your return by checking the box near the option I confirm that the transaction amount in Zoho Books and the GSTN are the same and I’ve filed the return in GSTN.
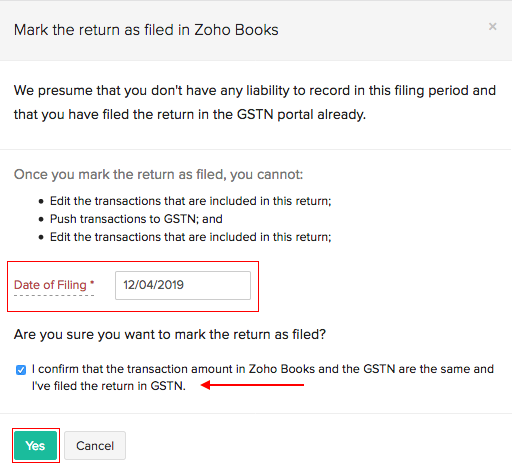
Click Yes to mark your return as filed in Zoho Books.
Unfile GSTR-1
You will be able to unfile your return in Zoho Books if you’ve:
- Filed your return in GST and marked it as filed in Zoho Books.
- Marked your return as filed accidentally.
- Filed your return directly through Zoho books.
You can use the Mark as Unfiled option to unfile your return in Zoho Books. There are three cases where this is applicable and here’s what you should do.
Case 1: You’ve already filed your GSTR-1 in the GST portal
If you had not included certain transactions in your GSTR-1 but you had filed your returns, you can mark the return as ‘Unfiled’. In this case, you will have to include the transactions manually in the next return that you are filing.
(or)
If there’s any update in the transaction, you will have to amend them manually under section 9A/9C of GSTR-1 in the GST Portal for the next return that you file.
Case 2: You’ve not filed your GSTR-1 in GST portal
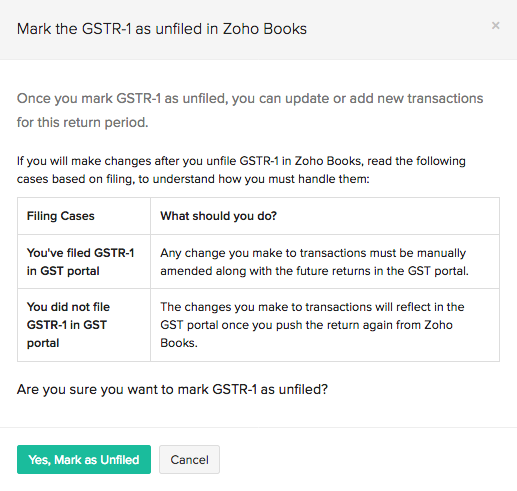
In case you had accidentally marked your return as filed without filing your return in the GST portal, you have the option to unfile it. In this case, once you mark it as unfiled, you can update your transactions and push the transactions again. The changes you’ve made will reflect in the GST Portal and you can file your returns.
Here’s how you can unfile your returns:
Go to GST Filing in Zoho Books from the left navigation page.
Select GSTR-1 and go to the File your Return tab.
Click the Mark as Unfiled button in the right side of the page.

Read the cases where this is applicable and how you need to handle them in the pop-up that appears.
Confirm your action by clicking Yes, Mark as Unfiled.
Case 3: You’ve filed your GSTR-1 directly through Zoho Books
In case you need to edit a transaction that you’ve included in your GSTR-1 filing that has been filed directly through Zoho Books, you can unfile your GSTR-1 return.
If you need to unfile a return that is not the recent GSTR-1 filing, you need to unfile all GSTR-1 returns from the most recent filing in reverse sequential order until you reach the return you want to unfile.
Note: Unfiling the GSTR-1 return that has been filed directly through Zoho Books will not unfile the return in the GST Portal.
Note: Any changes you make to transactions after unfiling your GSTR-1 return should be manually amended when you file your future returns.

